Installing the Internal Hard Drive
The idea of having a hard drive permanently attached to your media player is nothing new. The Seagate FreeAgent Theater HD did it, but it got you to dock a regular FreeAgent Go external drive. With the O! Play HD2, you can take just about any off-the-shelf 3.5-incher and have at ‘er.
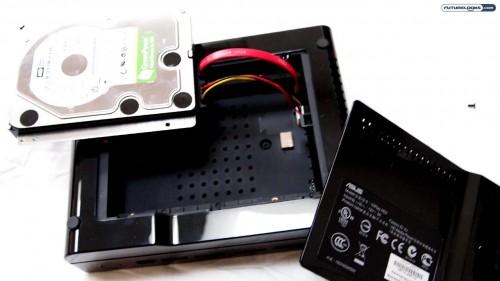
The installation process is described on a single sheet of paper, but if you’re reasonably familiar with this kind of stuff, you don’t really need the instructions. The bare 3.5-inch drive gets mounted in the provided holder with a set of screws in the side. Then, you remove the plastic cover in the bottom of the media player to reveal the hard drive dock.
Plug in the cables, stuff the drive in its spot, and put the plastic cover back on. When you first turn the O! Play HD2 on with the hard drive inside, the on screen interface will ask you to format the drive. For this reason, you don’t want to “preload” the drive with any of your content. The formatting process takes just a minute which is pretty quick.
Inputs and Output Options
If there’s one thing you have to hand to Asus for this device, it’s that they didn’t skimp out on the input and output options. In the front of the device, you get CF card slot, SD/MMC card slot, MS/MS Duo slot, eSATA/USB port, and a USB port. I don’t think too many people are going to use the CF or MemoryStick slots, but I guess it’s a nice added bonus. It’s also good that these are in the front this time around, rather than on the side. Much more accessible.

Swinging around to the back, you’ll find just about everything that you need to connect the media player to your home theatre too. You can use the included composite A/V cables for some standard definition action, I suppose, but that’s really a last resort.
Beyond the composite video, you get component video and HDMI. On the audio front, you are offered coaxial, optical, and RCA stereo options. Rounding out the ports are a LAN port for network connectivity, another USB port, and a USB 3.0 PC link port. It’s really too bad that the USB 3.0 is only for PC linkage and not for external drives.
It should also be noted that, like so many of these media players, the HD2 lacks in the Wi-Fi department. I wouldn’t think that including a Wi-Fi module would be terribly expensive or complicated, but it seems that no one is doing it. So, you’re left relying on a hardwired connection. It’s a shame seeing as ASUS also has a box called the O!Play Air which cuts the cables well.
A Carousel-Style User Interface
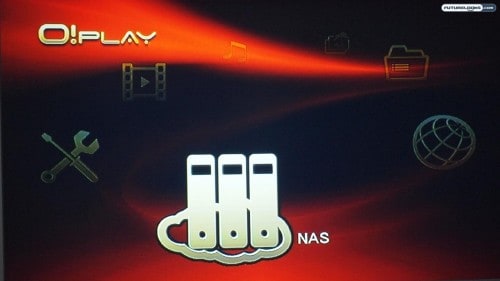
The on-screen user interface on this will feel familiar to anyone who has used previous Asus media players. Your various options are shown in a 3D-like carousel and you shift between them by pressing the left and right buttons on the screen.
Whereas previous versions had such options as movie and music, this one adds in the Internet and NAS features. The user interface isn’t exactly the fastest thing in the world, but it does get the job done. The menus can be multi-tiered in many areas too, which can get frustrating at times.
For example, let’s say that you have your videos organized in a hierarchical folder structure on a USB flash drive. You’d have to go into the movie mode, select external storage, pick the appropriate drive, and then dig through your folders until you finally get to the file. There appears to be a “search” function, but it doesn’t work terribly well.
Watching Regular Old Video Files
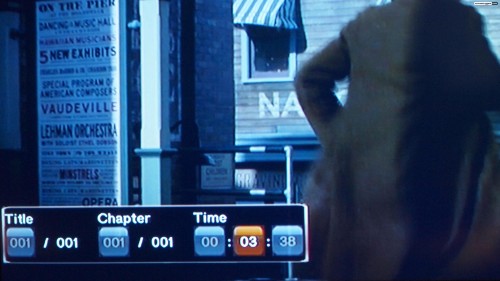
One of the complaints about early media players was that file format support was lacking. That’s not the case anymore. Whether you go with Western Digital, Seagate, Asus, or any number of other competitors, there’s a good chance that most devices will play most formats. With the HD2, you’ll run the gamut from RMVB to MKV, ISO to AVI, MP4 to FLV, VOB to M4V.
The available options while playing a video are pretty handy too. You can adjust the aspect ratio on the fly, activate and deactivate subtitles, zoom in and out, adjust the volume and so forth. As shown above, one of the newer features is called “GOTO” and it doesn’t exactly what you think it does. Instead of doing the old-fashioned “fast forward,” you can skip to a precise title, chapter, and time in your video file.
I tested a series of high-def videos that I had and they all played smoothly and without trouble. No complaints in that regard and there was nothing that I procured from the Interwebz that it couldn’t handle.