Test System Setup

I originally started testing with an engineering and retail sample Core i7-4770K but quickly learned that the retail chip operated a bit cooler and required less voltage when overclocking. It goes against the norm but maybe I just have a hot ES Haswell. Since each CPU scored the same in preliminary evaluations, I used the two between the three boards except when testing overclocking. Here’s the parts list.
- Processor: Intel Core i7-4770K (ES and Retail) Haswell
- Stock Test Memory: Kingston HyperX 2133MHz at 1600MHz (9-9-9-31)
- XMP Test Kits: Mushkin Redline 1600MHz, Patriot Memory Intel Masters 1866MHz, Kingston HyperX 2133MHz, ADATA Gamers V2.0 2400MHz, and Corsair Platinum Dominator 2666MHz
- XMP Large Test Kits: Patriot Memory Viper III 2133MHz 32GB and Kingston HyperX Beast 2133MHz 32GB.
- Motherboard 1: Intel DZ87KLT-75K Extreme (0344 UEFI BIOS)
- Motherboard 2: ASUS Z87 Deluxe (1205 UEFI BIOS)
- Motherboard 3: GIGABYTE GA-Z87X-UD5H (F6 UEFI BIOS)
- Motherboard 4: MSI Z87-GD65 Gaming (1.3 UEFI BIOS)
- Graphics: GIGABYTE GTX 770 OC
- Storage: Kingston HyperX 3K 240GB SSD
- Power 1: Rosewill Tachyon Platinum 1000
- Power 2: Corsair HX750 Professional
- Power 3 (EMI and EMF Tests): Rosewill SilentNight 500 Watt
- OS: Windows 7 Pro
- CPU Cooling 2: NZXT HAVIK 140
- CPU Cooling 2: Thermaltake Water 2.0 Extreme
Three power supplies were used interchangeably at the start simply to test that varying wattage PSU with different standards are supported given Haswell’s low power modes. No one wants to have to figure out if their PSU or board is dead only to figure out it’s simply not supported. Using various memory kits allowed me to confirm board compatibility and spot BIOS quality benefits.
UEFI BIOS – Pass or Fail. Go or No-Go.
UEFI BIOS have come a long way. While some companies needed more time to catch up, it seems that with INTEL leaving the motherboard market, all of its chipset partners have an opportunity to capture that business with a great user experience. This is great news for everyone because it’s going to push easier and more intuitive interfaces to surface from every maker.
The most important goal here was to evaluate each board’s UEFI BIOS in terms of configuration which is the logical layout of the BIOS, description and information provided for any settings, setup as to how easy it is to manage, and hardware to BIOS functionality ensuring what’s on the board reliably works with UEFI.
ASUS Z87 Deluxe – UEFI BIOS and Overclocking
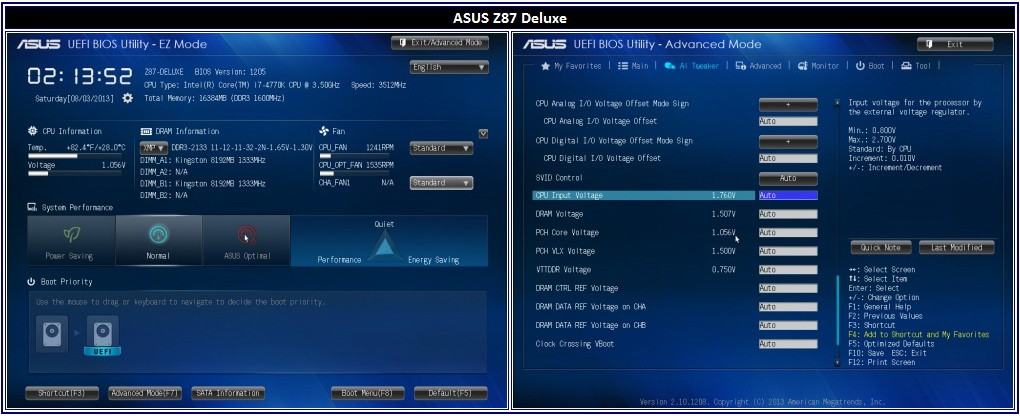
So what’s new in the ASUS UEFI BIOS? The very first page is the Easy Mode which now offers some new and more commonly used settings needed to set up the system. It includes temps, CPU voltage, XMP profile options (excellent), fan control, AHCI configured boot drive options slider, and three main system performance settings: Power Saving (EPU), Normal, and Optimal. Optimal automatically tunes your system to a locked VID of 1.275 volts. I saw a maximum of about 4.5GHz using the automated overclock. Keep in mind ASUS algorithms have been tuned to follow Haswell’s stricter thermal limitations. In other words, high end cooling will achieve the best results and the ASUS board knows how to take advantage.

Customizable tabs or favorites allow users to add short cuts to the most commonly used settings. If you’re a power admin swapping drives a lot, or an overclocker, you can set it up so storage or overclocking settings are more quickly available. Additionally, Quick Notes allows you to save and share notes such as your best overclock settings, or the optimal BIOS settings designed for RAID. You no longer have to commit settings locations to memory or write them down. You also no longer have to write them down or keep word documents. They are all in the BIOS.
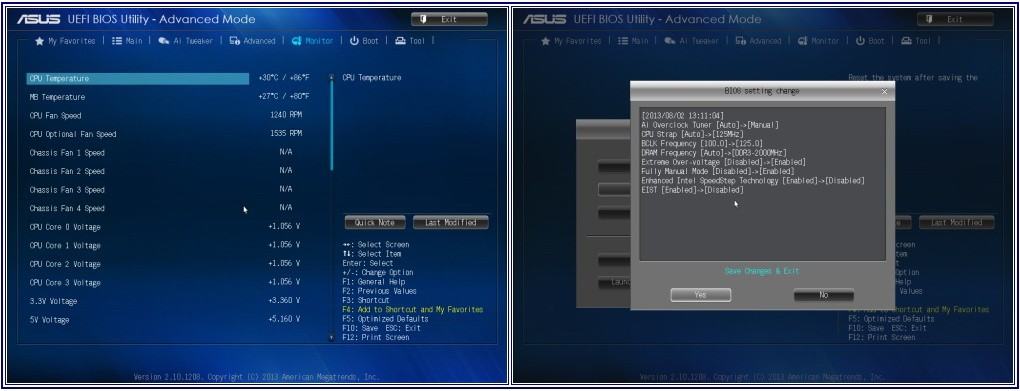
One of the newer UEFI power settings is Adaptive CPU voltage. While the former favorite CPU Offset voltage establishes a higher limit, Adaptive voltage settings allow the board to ramp down the overclocked processor’s voltage and frequency when not needed. The benefit is a cooler running system. After comparing manual, offset, and adaptive set voltages, I could get a stable 4.8GHz with 1.4 volts but I found 4.5GHz with adaptive voltage the optimal option for keeping Haswell’s hot blood under control.
When testing the Z87-Deluxe’s memory capabilities, I used the test kits to verify XMP support. Each of the kits were properly identified by the Deluxe. The Deluxe also loaded the memory timings to spec and in some cases located a lower, yet perfectly stable, CAS latency. MEMOK! does work if needed. Granted, some of the kits are probably tuned to run with slightly higher timings for longevity but it’s nice when the board does all the work for you.
Some suggestions for improving the BIOS here are minimal. The ASUS BIOS is quite intuitive. I would think it pretty handy to have a dual default and current CPU/memory frequency window.
Let’s see what GIGABYTE is up to next.