
Test System Configuration
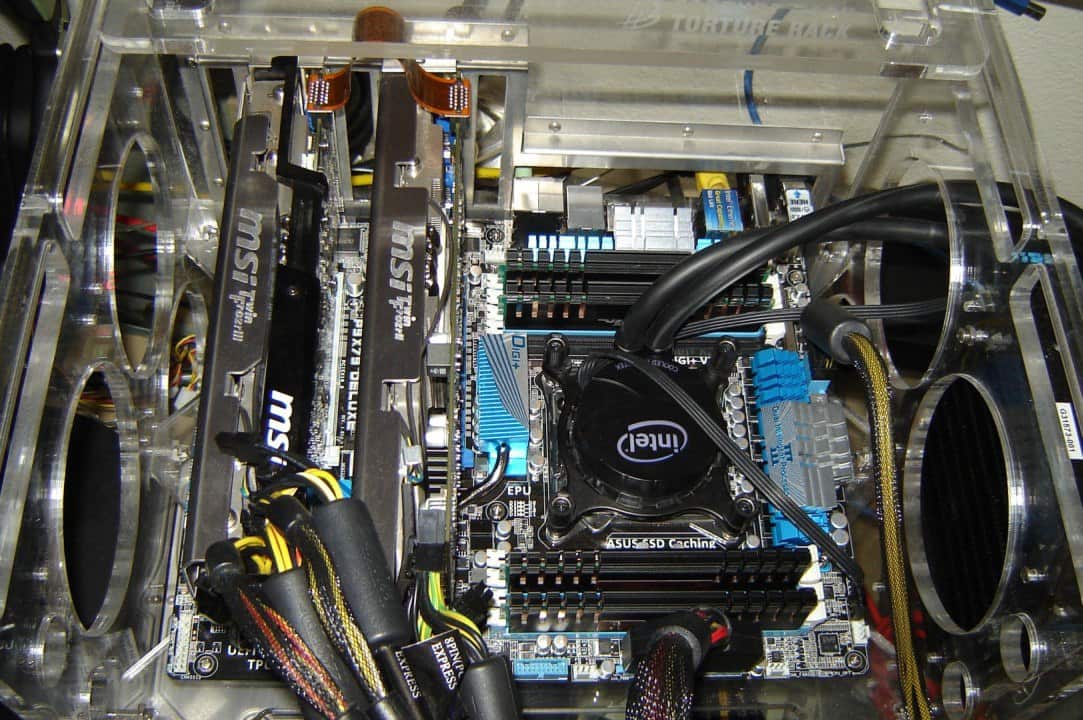
We’re going to keep the setup as similar as possible to the Intel X79 and Sandy Bridge-E configuration we worked with in our launch article. Our CPU cooling solution is still the Intel Asetek liquid cooler and Noctua NH-D14 and C14 coolers. For stock testing, the system used the Asetek cooler. Since the Asetek cooler isn’t meant for extreme overclocking, I switched over to the C14 monster which blows air down on to the system. Thank goodness for low profile HyperX Genesis memory modules. Anything with taller heat spreaders is a problem with the quad channel memory configuration.
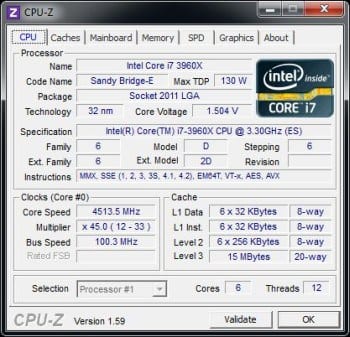
- Processor: Intel Core i7-3960X Sandy Bridge-E
- Motherboard 1: ASUS P9X79 Deluxe (as tested)
- Motherboard 2: Intel DX79SI Extreme
- Motherboard 3: GIGABYTE G1 Assassin 2
- Memory Stock: Kingston HyperX 1600MHz 16GB Quad Channel DDR3
- Memory OC: Kingston HyperX 2400MHz 8GB Quad Channel DDR3
- Graphics: MSI GTX 560 Ti TwinFrozrII SLI (NVIDIA 285.62 Drivers)
- Power Supply: Antec TPQ-1200 Quattro
- CPU Cooling 1: Intel Asetek LCS (stock tests)
- CPU Cooling 2: Noctua NH-C14 (overclocking tests)
- Storage 1: Kingston HyperX 120GB SSD (SATAIII)
- OS: Windows 7 Pro 64-bit
- Network: DLink DIR-615 LAN/Wi-Fi Router (25 feet away) and DLink DGS-2205 GIGABIT Switch.
- Monitor: LG W2600H @ 1920 x 1200
I didn’t use any regular platter based HDDs in testing other than to confirm they work fine. Why? Because platter drives are a system bottleneck whereas SSDs are quickly becoming the standard. Plus, there have been recent 20nm NAND advancements that basically ensure much larger capacities next year at a better price. The benchmarks also include SLI results only since these are platforms tuned specifically for high performance users.
Overclocking the ASUS P9X79 Deluxe Motherboard
There are two routes in which one can overclock their P9X79 Deluxe: ASUS software suite and BIOS. The software suite is very easy to setup which doesn’t take much time to figure out at all. You can choose your own settings or have it figure it all out and do the work for you. Our sample Deluxe was able to push any of the CPUs in my possession to 4.5GHz with very minimal fuss using only automated tuning and BIOS options.
The X79 ASUS BIOS is one of the smoothest to manage offering, offering both EZ and Advanced modes. EZ mode settings give you Power Saving for green operation, Normal for regular use and Optimal for aggressive performance. Advanced mode offers OC Tuner which automatically overclocks and tests the system’s stability for you. OC Tuner is slightly more conservative than manual tuning. Manual tuning gave me higher results achieving 4.75GHz by adding Offset Voltage to total 1.5 to 1.51 volts. Your CPU and cooling may vary your results.
Keep in mind that overclocking a Core i7-3930K or i7-3960X requires a very good CPU cooler. The Asetek cooler does its best work if the room temperature is always cool. Otherwise, you’ll see CPU temps climb with the ambient temps. A high performance Noctua, NZXT, Prolimatech or Thermalright CPU cooler will do better.
Benchmark Suite Notes
The software test suite includes PCMark7, CineBench R11.5, SANDRA Mathematical & Multimedia, 3DMark11, Unigine Heaven Demo 2.5, Metro 2033, Batman Arkham Asylum and City, RightMarkAudio, CrystalDiskMark, Network and Power Consumption. The final notes include motherboard quality where I look for things like crooked, scratched or low quality components. Your hard earned money should be rewarded with a quiet, stable, responsive product.
PCMark7
PCMark7 utilizes 7 different productivity benchmarks to get an overall system score. It breaks scores down in to individual categories which you can read up really quick on Futuremark’s PCMark7 page. Trial demos give you just an overall score, but it’s good enough for comparison. Keep in mind that we’re running the OS on an SSD which greatly improves the scores.

What you see here is that the Deluxe has an aggressive subsystem which improves system performance almost across all the categories. In other words, BIOS tuning gives the platform a strong set of wings making it very fast and efficient. If you’re a professional user, this means more can get done quicker.
3DMark11 – Performance Setting
I used performance settings so that you can give the trial download a run in case you wanted to compare your results. You’ll get an idea of where your system’s current graphics capabilities are on the food chain.
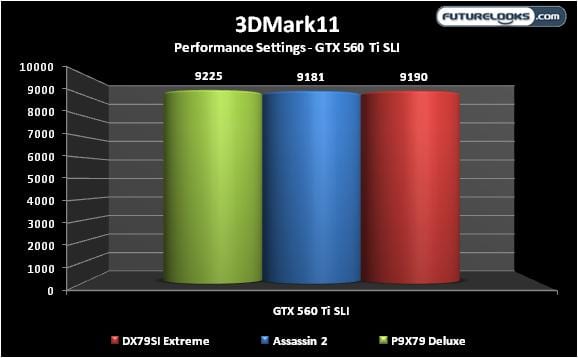
These scores aren’t miles apart but it’s clear which board likes the two GTX 560 Ti video cards. This time around the video drivers were left to default installation meaning application controlled. Keep an eye on the SLI setting as it sometimes magically disables itself in some circumstances.
Cinebench R11.5 – Multi & Single Core Tests
This benchmark renders a very large file picture using raw CPU power measuring single core and multi-core performance. Frequencies heavily influence the overall score. Naturally, the higher the score, the better.
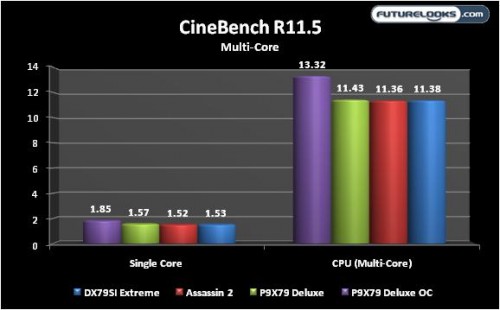
The Deluxe is again the clear winner. Since these are indicative of each motherboard’s optimal BIOS settings, it’s the Deluxe’s more aggressive CPU Turbo tuning that keeps it lean and mean. Factor in their cleaner transient response they’re known for and it continues to do very well even overclocked.
Let’s dive into a few more synthetic benchmarks and start hitting some games to see how it does.