
Liquid cooling is still the best, most aggressive cooling solution for today’s CPU and VGA components. While larger systems work the best, they also come with larger price tags and more involved installation work plus the need for regular maintenance. That’s why all-in-one liquid cooling systems are so popular these days. Most importantly, the latest coolers have been doing a surprisingly good job.
Today we’re going to be continuing to look at these all-in-one coolers with the arrival of the big brother of the previously reviewed Corsair H50: The Hydro Series H70 High Performance CPU Cooler.
Features and Specifications

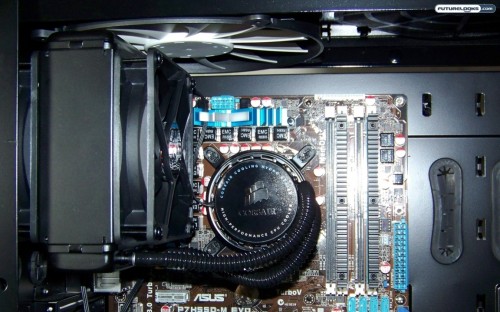
The Hydro Series H70 looks very similar to it’s little brother, the H50. The H70’s two biggest upgrades are the new 55mm thick 120mm radiator and more efficient, low-profile pump and copper cold plate unit which provide for greater heat dissipation. Improvements to the plate help carry away more heat to the double thick radiator. Copper still remains the number one material for transferring heat the quickest. It’s why we find them on nearly every high quality CPU and VGA cooler on the market.
That double thick radiator is cooled by two 120mm fans rated to about 50-61 CFM (cubic fee of air per minute) emitting roughly 26-31 dBA of fan noise each. The dual 120mm cooling fans cool the radiator in a “push-pull” configuration. This is the method for making sure the entire radiator gets hit with cool air at all times.
Like all good CPU coolers on the market, the H70 is compatible with AMD’s AM2 and AM3 sockets and of course, Intel’s LGA775, LGA1156, and LGA1366 sockets.
Pricing of the CORSAIR Hydro H70 cooler is around $109.99 US as of the writing of this review. However lower prices may be found in our shopping price engine.
What’s In The Box?

UPDATE: Check out our unboxing video on YouTube. We didn’t have time to complete our usual video unboxing and feature overview, so for now we’ll have to just tell you what you get with the CORSAIR H70.
Inside the box you’ll get two matched fans, the pre-plumbed radiator and heat exchanger as well as the mounting hardware that is for the previously mentioned CPU sockets. Hardware was black anodized and matched the other components well giving it a nice finished look. Of course, a manual is part of the deal and it is well presented with diagrams to help you with your installation from A-Z.
For those of you that want to see a full unboxing, we should have that video posted to our YouTube Channel in the next few days so stay tuned.
Test System
We wanted to give you a full spread comparison of the H70’s performance. So, we’ve included the CoolIT Vantage A.L.C. and Noctua NH-D14 which are both extremely capable CPU coolers. The DH-14 is arguably the pinnacle of available air coolers on the market both in size and price. The idea is to cover all the best performance possibilities.
- Processor: Intel Core i7-870 Lynnfield (LGA1156)
- Motherboard: ASUS P7H55M-EVO
- Memory: Corsair Dominator 4GB 1600MHz DDR3 Dual Channel
- Graphics: ZOTAC NVidia Geforce GTX 280 1GB AMP
- Storage: Kingston 128GB SSDNow V+
- Power Supply: Antec CP-850 Watt
- Computer enclosure: NZXT Phantom Crafted Series
- Test CPU Cooler 1: Corsair Hydro Series H70 (liquid)
- Test CPU Cooler 2: CoolIT Systems Vantage A.L.C. (liquid)
- Test CPU Cooler 3: Noctua NH-D14 (air cooled)
This is the same system used to test the Vantage A.L.C. a few months back with the addition of the NZXT Phantom chassis. Don’t worry as we’ve retested all of the coolers listed today to make sure that our change of case does not skew the results you see today. Our operating system of choice is of course, Windows 7 64 bit Ultimate Edition.
Installation Notes
The best cases to pair with the H70 are those that have extra room around the rear cooling fan(s) like the NZXT Phantom. This includes cases with dual 120mm fans in the back. I’ve found cases with single fan ports located about 1.5 inch or more from the top of the chassis ideal. If your fan is mounted near the top, you’ll want to make sure you don’t have any rivets or chassis frame work stick out. Otherwise, simply remove your existing fan and mount the H70 in the same spot.
The directions are easy enough to follow by default. If you have to remove your motherboard, then mount the heat exchanger first orienting it so the logo will be horizontal, then mount the radiator. Folks with motherboard tray CPU cut-outs can save themselves some hassle by mounting the radiator to the chassis first before mounting the heat exchanger. It’ll take about 30 minutes or less based on your skill level to do it right.
As for the default intake configuration of the H70’s fans, this is the best set up unless your enclosure has poor air flow. A computer case should have equal intake and exhaust fans for the best chance of optimal air flow. If you have 3 intake fans and 1 exhaust fan, you’re most likely packing stagnant warm air in your case especially if you have a hot running video card. If you have heat issues, you should add at least one more exhaust fan to offset.