Gutting the V3 Black Edition

After removing four screws, each panel easily came off without touching. It was kind of funny and surprising since most panels have to be slid back before they can be removed. Since we gut all our products on a nice big work top, no side panels were harmed in the making of this article.
Looking around the inside of the chassis, it starts to sink in just how much you get for your hard earned money. This is truly a finely crafted black chassis, with lots of fan ports, more than enough optical and hard drive bays, and extra space for large video cards. It even has cut outs in the motherboard tray for installing a really large CPU cooler without pulling the board.
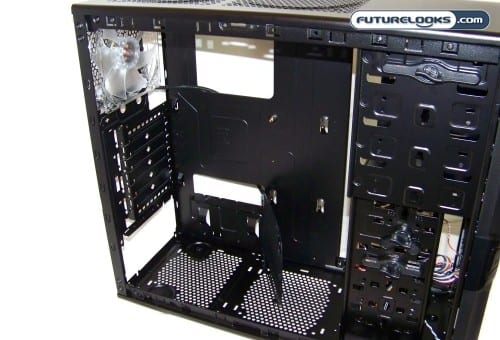
The case is already set up for your ATX sized motherboard which means that micro ATX boards will be no problem for this case if that’s your poison. You won’t have to install any motherboard standoffs unless you have a micro-ATX motherboard. You’ll find a couple extra standoffs in the screw package if you need them. Otherwise, any ATX motherboard will fit perfectly though the new GIGABYTE XL-ATX boards like the GA-890FXA-UD7 are a definite negative in this case.

And, finally, relying on a little patience and dexterity, we pulled off the front bezel to see what’s underneath. The front of the chassis is well fabricated and open which allows for a lot of air flow. This is also the only way you’ll be able to install an optional front 120mm cooling fan.
The 5.25 bay face plates are also held on by a couple screws so you don’t have to get all ghetto trying to remove them. Little things like what you see underneath really say a lot about the planning that went in to the design of this chassis.
Installation and Test Notes
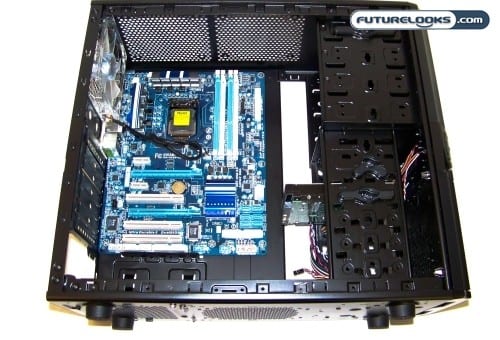
I didn’t run in to any issues when installing the test system. The ATX tray mounts matched the motherboard perfectly using the gold center guide post already attached to the tray. Even a Kingston SSD matched up nicely with the case holes. Overall, the system was ready in about 15 minutes. Time is money, right?
Since we only used one optical drive and one Western Digital 2TB hard drive, the two tooless clips were just right for a budget system. In fact, the clips worked like a charm and didn’t feel at all like they would break. If you need more, Thermaltake is currently looking at providing more online in the near future.
Test System:
- Intel Core i3 661 Clarkdale LGA1156 Processor
- GIGABYTE GA-P55A-UD3 ATX Motherboard
- Kingston HyperX 2x2GB 1600MHz DDR3 Memory
- Zotac Geforce 9800GTX AMP Edition Graphics Card
- Western Digital 2TB Caviar Black Edition Hard Drive
- Coolermaster GX Series 750W Power Supply
Something to keep in mind. Since this is a $700 budget built system, the components aren’t going to generate much heat. However, if you decided to add a performance level Nvidia GTX200 series or ATI 5800 series video card, heat will start to increase. In fact, running dual video cards will increase internal heat by more than ten degrees easily. Any system builder would advise installing at least two more case cooling fans to control temperatures.