System Setup
To test the CoolIT Domino A.L.C. CPU Cooler, we installed it into the following test system. These are the components relevant to the performance of a CPU cooler.
- Intel Core 2 Quad Q6600 2.4GHz Quad Core CPU
- GIGABYTE GA-EP45-DS5 Energy Saver Motherboard
- Corsair Dominator DDR2 4GB PC2-8500 RAM Kit
- ZOTAC GeForce GTX 260 AMP! Edition Video Card
- Thermaltake Toughpower 1000W Power Supply
- Lian Li PC-A7010 All Aluminum Full Tower ATX Case
All in all, it’s a pretty standard configuration for most moderate systems that will see benefit from a product like the Domino. Our operating system of choice was of course, Windows Vista 64.
Installation
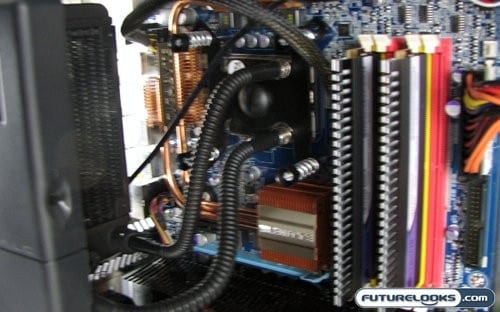
Installation of the CoolIT Domino was a fairly painless affair, thanks to the aforementioned user manual. In the simplest description, you basically install the appropriate hardware for your system platform, mount the CPU block, and then mount the radiator assembly. I didn’t encounter any issues with these steps. Thanks to the spring-mounted screws, mounting the CPU block was quite stress free. The way the springs are designed ensures that the block doesn’t place too much pressure on the CPU socket.

Now if you’re running a case that has a window installed, this is fairly similar to the view you will see. CoolIT designed the LCD, and the placement there of, with such a case in mind. It would have been nice to have a second LCD panel that could be mounted in a front drive by, so that those of use without case windows could see what’s going on.
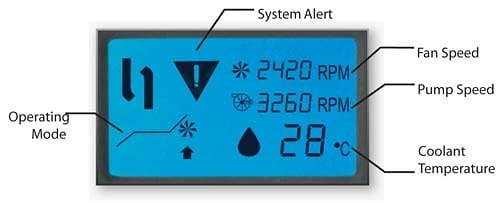
As for the information presented on the LCD, this is essentially what you get. This is more then just a simple LCD, as the PCB inside reports back all the things listed in real time. The operating mode will of course affect these numbers, and is changed by pressing the switch on the leading edge of the housing. This unfortunately requires the removal of your side panel, whether you have a window or not.
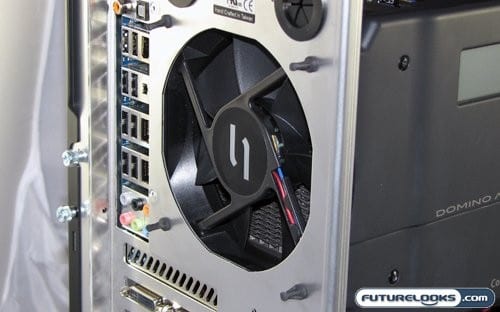
This is how the whole system is mounted. Rather than using screws, CoolIT went the quiet route and used vibration isolating plugs. These isolate the device from the case, reducing vibration transfer there by reducing noise. The only downside with this option is that if you have a high end case that uses proper chrome grills instead of pressed OEM metal grates, you end up with an unprotected fan. This is hardly the fault of CoolIT though, and it provides an easy way to test the fan stop alarm and make sure it’s working.