Installation Notes
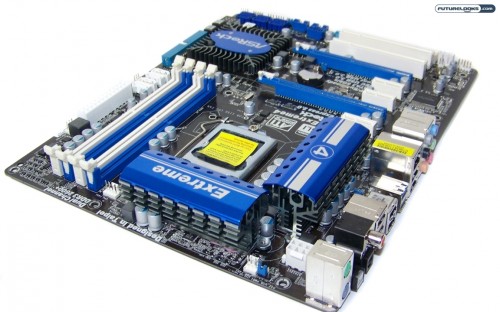
There are a couple of things I observed during installation. When picking up the board from the corner, you can see noticeable amount of bending in the PCB. While this may not be much of a concern to some users, it may be of concern for some that tend to run without a case or who changes enclosures often. Also, the placement of the white SATA 3 ports near the DIMM slots can clutter up the area with cabling. It would have been nice to see some 90-degree ports directed off the edge of the board.
Once up and running, when attempting to overclock the Patriot 2400MHz DDR3 memory, one of the settings didn’t take and the system didn’t easily reset when pushing the CMOS Clear button in the back. A few more presses still didn’t reset the system and resulted in constant restarting. Finally, a hard power off and 3 lengthy presses of the button did the trick and the system was up and running. This isn’t completely uncommon when it comes to these buttons. So, just make sure you give it a 2 to 3 decent 5 second press to reset.
Benchmark Software Setup
A rather extensive software suite was assembled to put the entire platform through its paces by testing CPU, 3D, input/output, audio, and power consumption. This includes: PCMark Vantage, 3DMark Vantage, SANDRA, CineBench R11.5, Heaven Demo v2.0, Gaming: Crysis Warhead and Bad Company 2, RightMark Audio, and CrystalDiskMark. While many users may never utilize these systems daily which includes overclocking, I’m looking to heavily burden the system in order to test all of the sub systems. While the beatings continued, I also looked for any odd instabilities or issues that users may encounter.
For the best results possible, I downloaded and installed the latest motherboard (Intel .INF) and audio drivers. The Extreme 4 had a recent 10/22/2010 1.50 BIOS update which worked well in both Instant Flash and Windows installation. The latest 260.99 NVidia drivers were used to make sure our GTX 280 is ready to go.
Overclocking
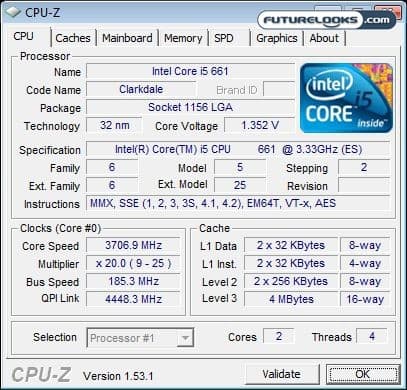
Using as little finesse as possible, I went looking for the easiest, most obtainable CPU and memory overclock without having to push voltages in to extremes. With the multiplier backed down to eliminate it as a barrier and using 1.35 volts to the CPU, the platform reached a 185 MHz CPU bus clock before hitting a wall. Anything higher was just a little too unstable with more aggressive VCore and PLL voltage applied. That’s a bit lower than the GA-P55A-UD3 which reached 200 MHz CPU bus clock with very similar voltage and effort.
After backing down the CPU bus clock again and using the right memory divider, the maximum achievable memory overclock using the Patriot ViperII Sector5 2400MHz DDR3 was about 2290MHz. This is par for the course with similarly priced motherboards out there. Getting to 2600MHz memory divider would require a much more aggressive CPU bus clock than the Extreme 4 is capable of reaching. While the P55A-UD3 was a little more aggressive holding up at almost 2400MHz, as far as I’m concerned, there’s nothing wrong with a solid 2200MHz DDR3 overclock.
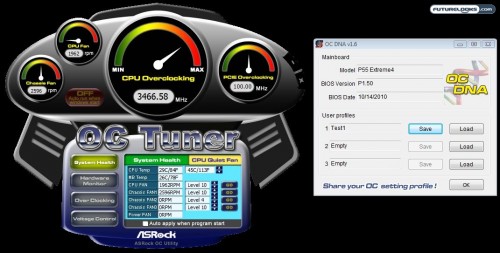
Using the ASRock OC Tuner, I wasn’t as fortunate to get anywhere close to the above results which were achieved through the BIOS. Regular users and beginners will easily get about a 4GHz using OC Tuner using higher multipliers and lower CPU Bus clocks. And, probably more importantly, the software and motherboard seemed eager to accommodate my overclocking fetish with some much needed stability. That’s really the more important thing.
3DMark Vantage
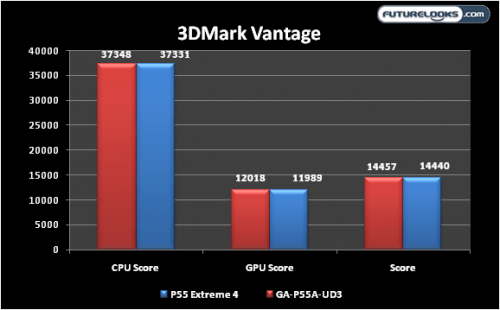
This is a good benchmark for what it does. It often gives us a hint of the scores expected throughout real world performance. In our case, it could mean a very close battle between the two chosen gladiators: The ASRock P55 Extreme4 and the GIGABYTE GA-P55A-UD3.