Checking Out the Board

The ASRock H55DE3’s design is very plain and simple for the most part. Compared to its more powerful sibling, the H55 Pro, you won’t find any fancy heat sinks or extra cooling which we don’t mind. At least here, they aren’t anodized gold aluminum. We like our heat sinks anything other than cheap silver, or even cheaper gold.
We’re not completely sure why, but a lot of the vendors have moved over to the coffee colored PCB as of late. This is also the color of choice for motherboards made by its big brother ASUS. Maybe it’s cheaper to make this color PCB than black. As long as the color is dark enough, it usually looks just fine. However, the traces on this board stand out a bit more than others.
The overall layout is pretty basic. The board offers no extras in terms of highly useful horizontal SATA ports on the front edge of the board, nor does it offer any eSATA ports on the back. They’re at least tucked in the corner well out of the way of large expansion cards, but definitely won’t clean up as well as horizontal ones. We’re also happy to see that they opted to embrace legacy free goodness by ditching the old IDE port. Attaching an IDE port to a Core i3, i5, or i7 is like putting donut tires on a racing car.
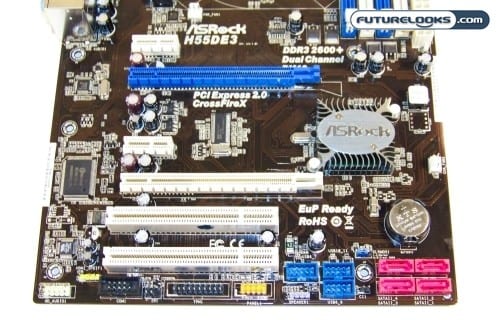
Speaking of expansion cards, the board offers dual PCI-E 2.0 slots. However, one is a full speed x16 (PCIE2) and the other one is a x4 (PCIE4) slot. What this means is that the PCI-E x4 slot is best suited for a graphics card that functions as a physics card. Ultimately, any dual GPU card in this slot will operate in a much slower capacity and nowhere near as close to the performance of an x8 by x8 dual card setup.
That’s pretty much as far as the visible checkover goes. It’s a rather uneventful board given its market placement as a low cost soluiton. Now, let’s get on with the testing.
Test System Setup and Installation Notes
Installing the drivers and updating the BIOS are typically easy to do. However, our driver CD was physically a bad disc and wouldn’t read. If this ever happens to you, don’t panic. Acquire at least a 1GB USB pen drive, borrow a computer, download the major drivers needed to connect to the internet, and copy them to a folder on your system. Then, simply install them from that folder.
Since the disc was bad, we also couldn’t determine if the “trial-ware” Sound Blaster X-Fi emulation software was any good or not. Again, we see it on the box and website specifications, but not available on the H55DE3’s support downloads page.
Here is the breakdown of the test system:
- Intel Core i5-661 Clarkdale LGA1156 Processor
- Cooled by Thermalright MUX 120 CPU Cooler
- ASRock H55DE3 (BIOS 2.10)
- MSI H55-GD65 (BIOS 1.2)
- Corsair Dominator 4GB 1600MHz @ 1333MHz Dual Channel DDR3
- Kingston SSDNow V+ 128GB Rev1.1
- Zotac Geforce GTX280 1GB Video Card
- Antec SG-850 Power Supply
- Benchmarks: PCMark Vantage, 3DMark Vantage, SANDRA Math and Multimedia, CineBench R11.5, Unigine Heaven Demo, Crysis, and RightMark Audio
Naturally, we updated to the latest BIOS available to ensure we present you with the motherboard’s best side. Without the motherboard manual, we were left to figuring out some of the special feature settings on our own. Intel Turbo Tech settings were left enabled where possible, except when overclocking to ensure maximum stability.
Overclocking
If you recall, one of the main features advertised on the very front of the box is ASRock’s highly touted Turbo 50 feature. This feature is visible in the BIOS, but can’t be accessed. To our disappointment, even after re-flashing the BIOS, it wouldn’t allow us to test the feature. This being the case, we tried using some of the preselected overclocked options and of course manual settings.
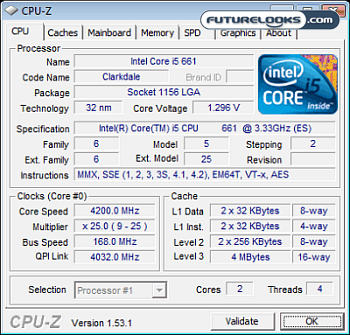
The two highest automatic options were 4.2GHz and 4.4GHz. Of the two, 4.2GHz proved to be the most stable passing all stability stress tests. Manual overclocking wasn’t nearly as forgiving and required more effort. We messed with more voltage settings than normal, even some that rarely ever have to be touched to attempt 4.3GHz with little success. Either way, an automated 4.2GHz is pretty darn good for a $90 motherboard.
So, we’re on the fence about the lack of the advertised Turbo 50 feature. Mainly because it was advertised, but never delivered. However, we were able to achieve a decent overclock without it that might very well be higher, or at least, more stable than what Turbo 50 might have achieved.