
Test System Setup
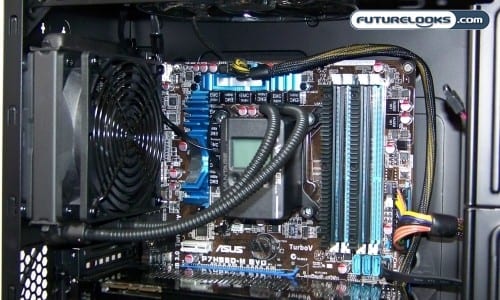
In order to test the Vantage A.L.C. we assembled a selection of parts that would provide both a real world example of standard parts to test the installation process and to test the ability of the system to perform. Even though I have no doubt that the Vantage can handle the beefiest processors available, it seems more feasible to test it on a mainstream processor. For that reason, the Vantage was installed on an Intel Core i7 800 series processor with an LGA1156 socket.
Here’s a quick breakdown of the other parts that were used to evaluate our experience with the Vantage…
- Processor: Intel Core i7-870 Lynnfield (LGA1156)
- Motherboard: ASUS P7H55M-EVO
- Memory: Corsair Dominator 4GB 1600MHz DDR3
- Graphics: ZOTAC NVidia Geforce GTX 280 1GB
- Storage: Kingston 128GB SSDNow V+
- Power Supply: Antec CP-850 Watt
Our operating system of choice was of course, Windows 7 64 bit pro. Since the the Vantage A.L.C. was designed to work within an enclosure, we ditched the test bench and installed the system right into a brand new Thermaltake A90 case that we’ll be posting a review of in short order. We felt that this chassis provides both a mix of performance, price and silence that is a very good match for the Vantage in a reasonable gaming setup.
Installation Experience
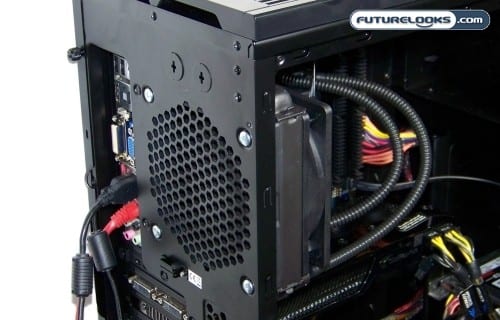
Overall, the installation is easy. First, the cooling unit’s adjustable Intel mounting clip standoffs were adjusted to LGA1156 (the middle setting). After double checking the positioning, the plastic base cover was removed and the base unit was centered over the back plate protruding through the motherboard. Then, a few twists were given to each standoff till the base unite was securely fastened. Then, the radiator was then orientated with the tubing to the bottom. The four included machine screws were used to fasten the radiator. Some care had to be taken as these screws are finely threaded and can easily strip the black spacer if tightened too much. Finally, the base unit 4-pin connector was plugged in to the motherboard and the 4-pin fan cable connected to the base unit.
For AMD fans, installation is even easier. All you have to do is unbolt and remove the plastic bracket from the motherboard while it is still mounted in the case, replace the INTEL bracket with the AMD bracket on the controller block, and mount it to the existing CPU back plate that is still mounted to the motherboard.That’s it! All done. However, we did have a few notes to pass along to you.
First, the installation manual has you install the radiator first. However, that puts a little twisting stress on the tubing and makes it hard to hold the control unit in place while tightening. Also, if you push too hard on the clip, it can slide to a different socket setting. For this reason, we found it much easier to install the base unit first and then the radiator to avoid the frustration. It also makes minor routing adjustments to the tubing much easier.
We also found that the black spacer that mounts to the back of the case is about 20mm deep instead of 25mm deep like the common case fan. If you can’t mount the radiator for whatever reason, you can use your case cooling fan as a spacer instead. As long as your case fan RPMs are higher than the Vantage and flows at least 60CFM this should work fine and provide a bit better performance.
Figuring Out Operations and Settings
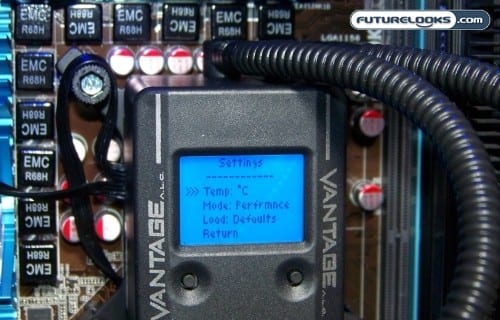
Everything about the Vantage is pretty darn simple to understand. The left button maneuvers you through the main menu and settings. The right button changes the setting. Your modes are Quiet, Performance, and Extreme:
- Quiet mode does just what it says. It manages the cooler and CPU temps with the least amount of speed and noise. Without the case fans powered on, the noise is somewhere in the area of 13dBA. Pretty darn quiet!
- Performance mode offers a little more fan RPM potential as long as the internal coolant tops 35C, or so. This is the ideal setting if you’re using a beefier quad processor and doing regular intense CPU work. It’ll help manage temps by ramping up the fan RPMs just a bit as the coolant temp rises.
- Extreme mode is for those doing some intense CPU work as well as some overclocking. As coolant temperatures rise, the Vantage gets more aggressive turning the fan up to 2400-2450 RPMs to help cool the radiator and coolant. You can expect more audible fan noise as the coolant temp approaches 40C.
There is also a “load defaults” menu option that allows you to return things to factory settings in case you don’t like what you did.
The important thing to keep in mind is that the internal coolant temp has to top 36C before the Performance and Extreme settings reveal their nature. Until then, the Vantage’s cooling fan will continue to spin at lower RPMs and remain pretty much utterly silent, being drowned out only by the case fans and other system components.
Now that we’ve gone through the very easy setup process, we’ll now assess the performance of the cooler and what it can do for your system in terms of thermal performance.