Setup and Installation
To some, the bag of assorted nuts and screws can look like a huge sadistic puzzle. Luckily, thanks to years of pointing and giggling by North American media about the “Engrish”, CoolerMaster has kept the wording simple and the pictures detailed. This combination makes the installation far easier than the mess of parts makes it out to be.

The assembly of the heatsink starts with the base. Two sets of mointing plates are provided for either AMD or INTEL installations. Since we’re installing on an AMD Phenom CPU, we’ve chosen the AMD CPU plates and have attached it with the included screws. Another set of mounting bolts (not shown) are then reverse threaded into the appropriate holes from the top down, to allow the heatsink to be bolted to the board. In the case of the AM2+ based processor, the four outside holes were used. Vibration damping donuts are then applied to the bolts to keep things quiet. Just a quibble, but the mounting screws for the plates didn’t have any loctite applied. You may want to apply a small amount to the screws to ensure that they don’t work loose at an inopportune time, like during a heated LAN party.
Whether you’re installing the CoolerMaster V8 on an INTEL or an AMD processor, the stock mounting mechanism will need to be shelved for a sturdier version. Since the heatsink weights nearly 1.91 lbs, this is not such a bad thing. I’ve used to bitch and moan about having to completely disassemble my system to install a heatsink, until one day, one of my older systems with a large heatsink, snapped off the clips from the stock plastic cradle. Since that day, I’ve believed that this is a necessary evil with heavier heatsinks.

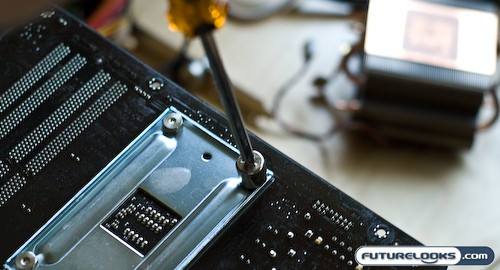
Once you’ve slathered on your favourite heatsink compound (Gelid Solutions GC1 was our choice), or used the included stuff, I found it easiest to flip the heatsink upside then, and then just plop the motherboard on top of the base, lining up the mounting bolts that we installed previously. This should get the heatsink base plate square to the CPU. You can then pop the mounting plate in place, and proceed to bolt it down using the included socket head. It’s actually not really a socket, since the backside is just a phillips head, but it works well nonetheless. The criss cross “put your tire on” tightening pattern is recommended to provide uniform pressure across the four corners. Don’t overtighten.
A couple of quick notes on this part of the assembly that may help, is to make sure that you center the bolts in the holes before throwing down the plate. Then that way, the heatsink will sit square to the CPU, rather than being twisted. Finger tighten first, then take the socket tool and tighten it down. One thing that is a bit of a typo, or rather, Photoshop-O is the orientation of the heatsink in the manual. It has the heatsink facing the wrong direction with the logos facing upside down. Doing this will have your fan yanking air from the back of the case, and expelling it back into your system. Obviously you don’t want this. Make sure you install with the logos facing up when looking at your case window. It will also look better when you’ve got it mounted inside a case with a plexi side window.

After everything was tightened down, we noticed no problems with the heatsink clearing any of the motherboard components. The mounting mechanism simply took over where the footprint of the old plastic cradle was. The other thing that was nice about the CoolerMaster V8 was the fact that the heatsink did not impede any of the RAM slots in our motherboard. We could easily use any combination of slots on our board easily, without finger gymnastics, thanks to the clearance provided. However, due to the concessions made to make the heatsink clear the RAM modules, the heatsink is quite tall as you can see. This may cause problems with folks using shallower cases.
Real-Time Price and Stock Check – Find More CoolerMaster Products
