
Thank mother nature in all her glory, the hot summer seems to have finally subsided up here in the Pacific Northwest. All of my poor test bench systems were wheezing on some of the hottest air ever recorded. Most of the retail coolers were just getting by whirring away at their fastest speed. However, it still hasn’t cooled off for many folks in year round hot weather. Our efforts continue in looking for ways to help you cool off your CPU.
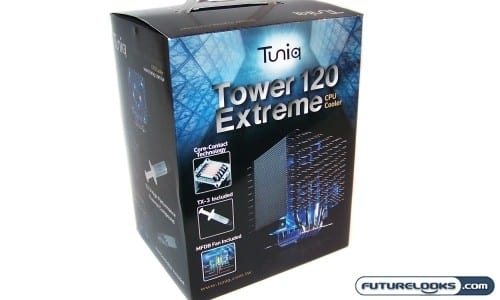
Tuniq, one of the trust names on the market, continues to design and create some artistic, yet contemporary CPU coolers. Their latest CPU cooling solution, the Tower 120 Extreme, can cool every processor available from both Intel and AMD. Let’s have a quick look at this new design to see whether if it’s all show and blow or just the best damn CPU cooler ever.
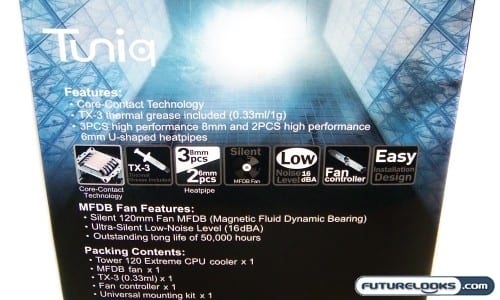
Features and Specifications

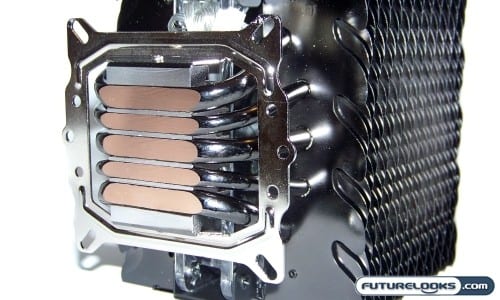
When heat pipes first arrived, it didn’t seem much more could be done to improve thermal transfer capacity. However, Core-Contact proved to be a simple solution where the heat pipes are positioned directly on top of the CPU. This dropped temperatures about another 5 C degrees in many tests of coolers using this design and the Tuniq Tower 120 Extreme takes advantage of this.
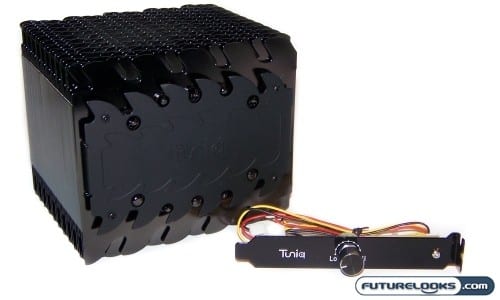
There are two different 120 Extreme versions: One comes with a stock unlit cooling fan and the other contains blue LEDs for that added extra modified look. In either model, a decent looking Fan Controller is included that slows the fan to drop noise to 16 dBA. At its max speed, the fan produces a whopping 90 CFM (cubic feet of air per minute) which can improve cooling capacity dramatically.
The 120 Extreme is currently compatible with all except for the new Intel LGA1156 platforms. However, I have it on good authority that brackets have been shipping and adapter kits are being provided. The pre-mounted base plate can easily swapped out by removing two screws. It’s easy as that.
Checking Inventory
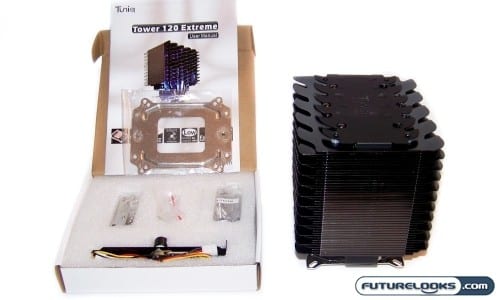
The bundle is quit simple and very well organized. You’ll find the CPU cooler in an easy to remove plastic packaging. (We hate blister packaging) Inside the white box are the polished black Fan Controller, mounting screws, AMD/Intel motherboard back plates, and individually marked baggies separating the AMD and Intel installation parts.
The manual is super easy to understand. I found the directions and illustrations perfect and well presented. Whether you have an AMD or Intel processor, any novice should be more than able to install this CPU cooler successfully. Just make sure you keep a soft cotton towel near by for wiping off finger prints as the shiny surfaces of the cooler do tend to pick them up.
CPU Cooler or Medieval Weapon?
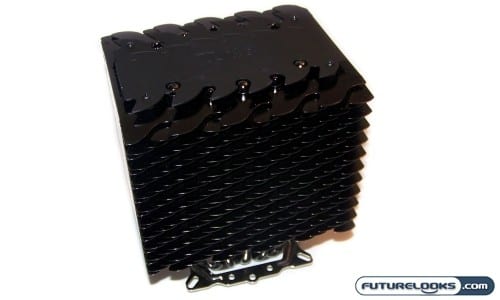
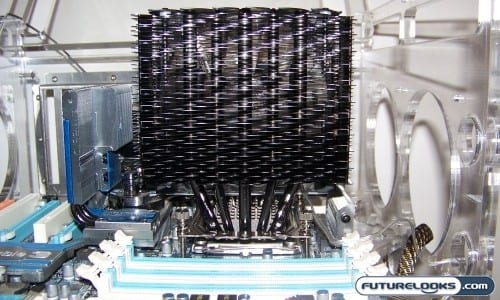
The Tuniq Tower 120 Extreme CPU Cooler is one of those heat sinks you can’t quite grasp by just looking at the picture on the box or on a web page. Once you have it in your hands you understand the design theme more and can appreciate its creativity.
The impression is that it looks like it’s meant to slice and dice your foes on some archaic battlefield. The Tuniq stamped matt black plate on top and all of the bladed looking fins that give the cooler that look. However, they are in fact quite dull and are very light weight with smooth buffed edges. Safety first.
Taking a Closer Look…
You’ll notice that the sides of the cooler are closed off. The fin edges are all flattened to help channel air through the depth of the cooler. This is actually an efficient approach ensuring that each fin and heat pipe stays as cool as possible rather than randomly blowing air through. It also just happens to make handling the cooler easier.
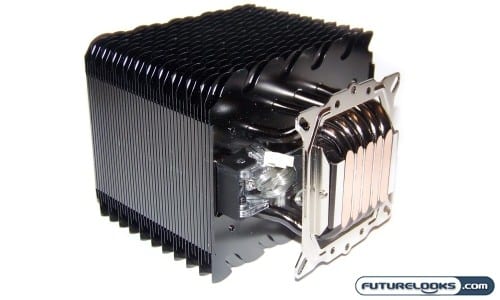
Flipping the cooler on its side, you can get a better look at the “Core Contact” heat pipe base. An aluminum block is used to help ensure the pipes are protected and stay in place since they are just made from copper. Without it, the pipes could easily flex over time.
If you look closely, you can see the seams between the CC and aluminum block base. It’s important to make sure these seams are as close as possible or some of the thermal transference breaks down. This is why it doesn’t hurt to apply paste directly to the base itself before attaching to the motherboard. More on that during installation.
The cooler’s main mounting bracket already comes attached. Due to its design, it’s a very sturdy bracket which is held in place by two screws. While it may look like it can spin or tilt in either direction, the bracket sits inside the base well enough that it can’t move.

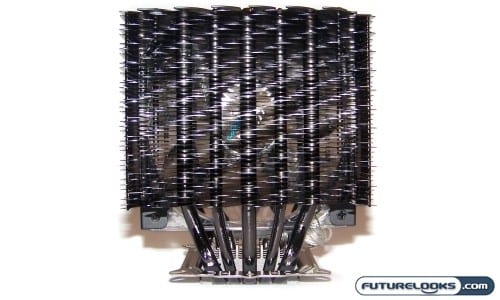
Cleaning the internal fan is quite easy due to a very clever design. Simply remove the four black screws in the black Tuniq marked plate. Then, pull up on the plate and the fan comes along. At that point, you can blow, clean, wash, and wipe down each piece to your heart’s content.
Since the fan comes with a controller, Tuniq opted for a standard 3-pin, rather than 4-pin, 120mm blue LED fan. It’s capable of moving about 90 CFM of air through the cooler at full speed. A 4-pin connection is useful if you’re plugging straight in to the motherboard which allows the BIOS to monitor and control said fan. Since we have a fan controller, it isn’t necessary here.
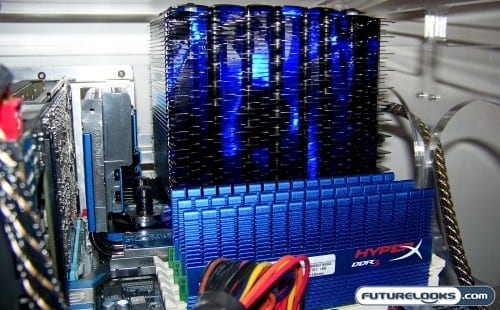
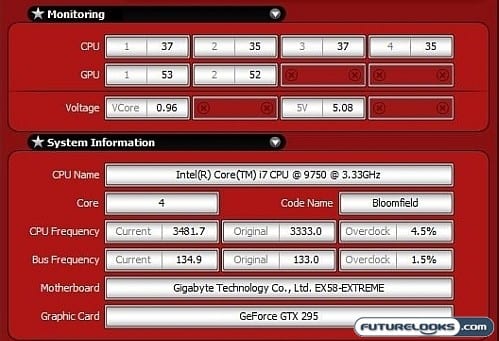
Test System
Our every powerful and towering Core i7 system provided by our illustrious partners was once again called to action.
- Intel Core i7 975 Bloomfield CPU (Test 1 @ 3.3 GHz, Test 2 @ 4 GHz)
- Cooler 1: Tuniq Tower 120 Extreme
- Cooler 2: Coolermaster Hyper N620
- Cooler 3: Retail Cooler
- GIGABYTE GA-X58-Extreme Motherboard
- Kingston HyperX 6GB 2000 MHz Triple Channel DDR3
- Zotac Geforce GTX295 Graphics Accel-a-RATOR
- Kingston V-Series 128GB SSDNow
- Antec 1000 Watt Quattro
We figure if the 120 Extreme can keep this CPU cool at stock 3.3GHz or 4 GHz, no one will ever have anything to fear. We kept testing simple this time around. OCCT and Crysis were the only two programs used. Temps were recorded using both low and high fan speeds. Also, any fan speed monitoring was turned off in the BIOS to allow all fans to spin at full speed. Ambient temps were 68 F.
But before we get to that, let’s go over how the actual installation went down and what things you’ll need to look out for when installing this beast into your own system.
Installation and Setup
As I mentioned, the manual was very easy to reference and installation was almost glitch free had it not been for two issues specifically on the LGA1366 test system.
First, the features say the cooler is Tool Free, but you will in fact need a small pair of pliers to tighten the four small nuts that hold the four 1.5 inch screws securely against the motherboard back plate. Without it, the four screws kept wobbling lose because the bolts weren’t tight enough. It isn’t a big deal if they are a tiny bit lose, but I like my installation solid and secure.
There are a couple side notes worth mention. It’s important to make sure those seams in the base of the Tuniq are filled in by the thermal paste for optimal heat transference which you can’t get with any bare, unpasted spots. A little paste applied before mounting works out great before installation.
The four spring mounted thumb screws have one small design issue. The springs are coiled against the direction the thumb screws have to be tightened. The end of the spring kept getting stuck on the oval cut out on the base plate. Being that we are plenty resourceful here at Futurelooks, I found four discrete looking washers and slid them on first. This allowed the thumb screws to spin freely and easily without getting hung up.
While my washer fix was easy, a simple change to the spring used would also work. The edge of the springs just need to be clipped rather than sanded off so that the end can’t get hung spinning either direction. As for the back plate, four wider bolts would be much easier to tighten. Plus, it would maintain the “Tool Free” feature. Now let’s get on with testing it!
OCCT Temperature Results

In case you haven’t tried OCCT, it’s a pretty nice looking utility for torture testing the stability of your system. It also happens to monitor individual temperatures of each of the CPU’s cores. In this case, we had four cores with different temperatures to monitor. Essentially, if your system can’t handle the testing for the initial hour, it isn’t completely stable.
As you can see, we have some interesting results and some that were to be expected. The CM N620 does better at full load for one simple reason; It’s fans are at full speed at all times which is why it was able to slightly out perform the Tuniq at full load.
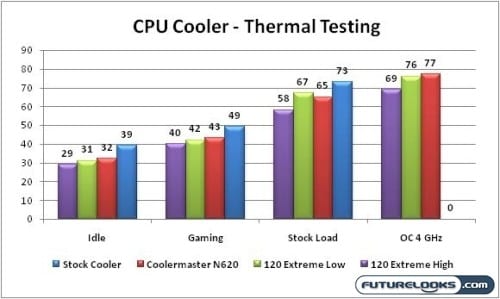

However, when the Tuniq 120 Extreme’s 120mm fan is at full speed, it is very easily able to out perform the N620. And, the fan noise didn’t top 28 dBA which is really excellent given that it was in a DangerDen Torture rack. You can expect even lower noise levels inside a regular computer case.
Final Thoughts
While all the coolers perform admirably, with the exception of the stock cooler, the Tuniq Tower 120 Extreme CPU Cooler comes out on top. This is ultimate evidence that the Core Contact heat pipe base is doing its job. In fact, it’s doing a very good job. That’s because the heat pipes literally sit right down top of the CPU, transferring heat away directly from the CPU into the large fins where they can be properly dealt with. The N620’s heat pipes pass through its base instead revealing to be the weaker of the thermal beasts.
We’re hoping that both the small issues we noted in our installation notes are limited or have already been corrected in later production units. Again, these are small enough issues that we adapted to easily. Tuniq is a pretty resourceful group so it wouldn’t surprise me to see a modification of some fashion made. If these little issues are corrected immediately and I see them properly implemented in another cooler down the road, I would have no reservations giving it my Editor’s Choice, providing that it still gave the killer performance that this cooler does.


Simply put, the Tuniq Tower 120 Extreme CPU Cooler kicks thermal a$$, literally. If you don’t like the blue LED effect, grab the standard Tower 120 model for about $49.99. Otherwise, the T-120-LFB’s blue LED fan looks quite nice and isn’t too bright at $54.99. The cooler’s all black facade and LED create a really clean, slick contrast. If CPU temps have you fired up, the Tuniq Tower 120 series will cool you and your CPU off very nicely.
Pros
- Superb cooling performance
- 5 heat pipe Core Contact
- Pre-mounted bracket
- Jet black theme
- Excellent controllable air movement
- Good bang for buck
Cons
- Spring loaded thumb screws catch on plate
- Not completely tool free
Overall Rating: 9.0 / 10.0


Love This Review? Hate This Review? Tell Us In The Forums!
Tuniq Tower 120 Extreme CPU Cooler Photo Gallery