


If you’re a computer enthusiast, then you’ve probably heard about Thermaltake’s Level 10 computer case, which was designed in conjunction with BMW Designers. You probably dreamed about owning the sizeable aluminum case and where the $800 USD needed to buy one, will come from. The reality for most of us is that we just aren’t able to afford one. But, that doesn’t mean we’re completely out of luck.
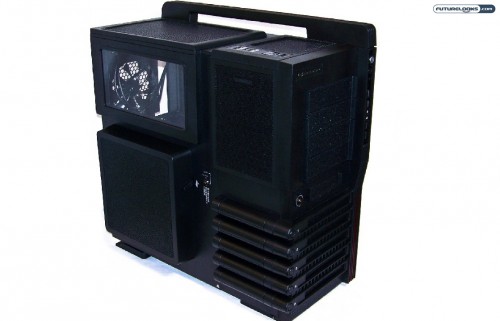
Thermaltake saw the potential in creating something more affordable but still said “Level 10”. The result of this creativity became a case called the Level 10 GT; a much lighter, more affordable sibling that employs many of the features that made the original Level 10 legendary. Let’s see if that’s true!
Features and Specifications

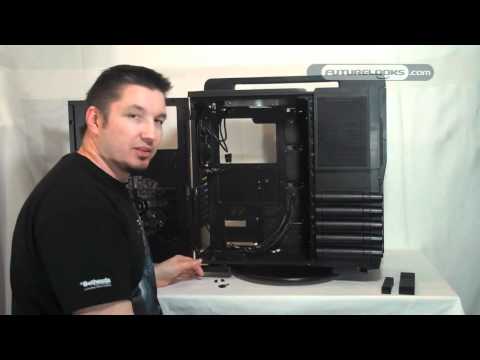
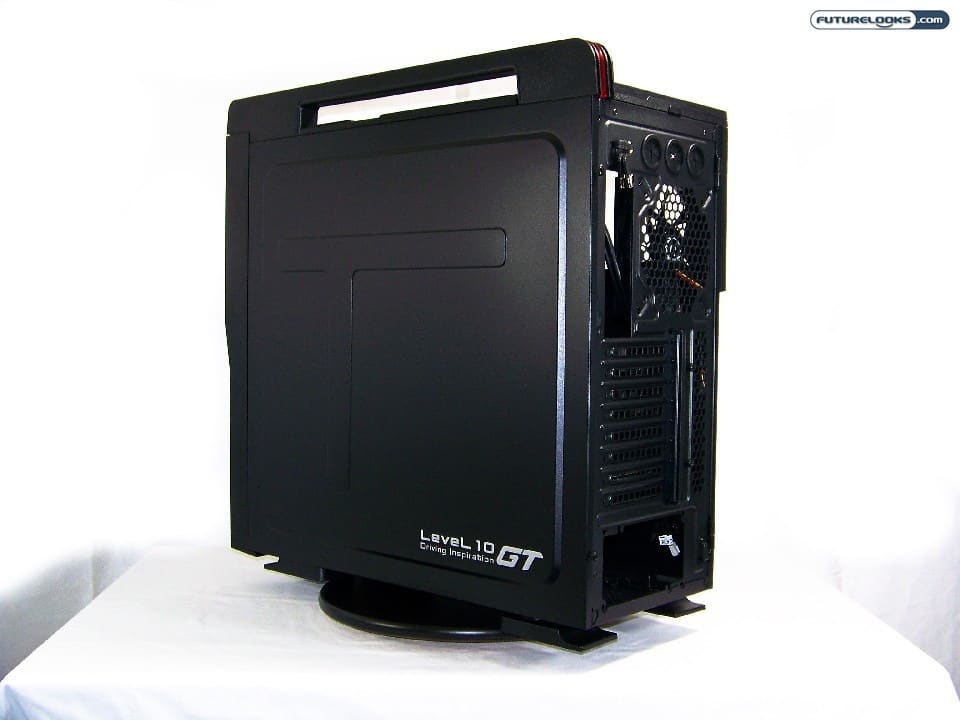
At first glance, you wouldn’t know that the Level 10 GT (L10GT) is tooless, offers removable drive bays, has extra security measures, and lots of space for cable management. That’s why we’ve lovingly crafted a video that takes you through every nook and cranny of this new case. Grab a coffee and check out the video below…

It’s important to note that even though the L10GT is not made with the same quality aluminum used in the original Level 10. The GT is far lighter, making it easier to manage at a LAN party. Yet it still feels very sturdy, especially around the expansion slots. That’s good news for system integrators who’ve already found this chassis to be worthy of doing battle with the “Men In Brown” when building systems to ship to customers. It doesn’t give way to anyone and for a lack of a better phrase, “it’s toight!”
Using high quality, standard steel construction, the L10GT is able to shave off a massive amount off the original cost. Instead of paying $800 USD for aluminum construction, this case costs around $269 USD or less depending on the retailer. The level of attention engineers gave this case seems to make it worth it on paper. Hopefully we make the same conclusion by the end of this review as well.
Test System Setup

Once again, we’re using the hottest components we can find to assemble our test system. We want to find out if this computer case can handle today’s super hot systems. Here’s the system breakdown:
- Processor: AMD 64 Phenom II X4 965 Black Edition (1.4v)
- Processor Cooler: AMD Phenom II Retail Heat Sink
- Motherboard: ASUS M4A89GTD Pro USB3
- Memory: Kingston HyperX 4GB 2000MHz DDR3
- Video Card: NVIDIA Geforce 8800GTX Ultra
- Power Supply: Antec SG-850 Signature Series
- Storage: Seagate Barracuda 7200.11 500GB SATAII
- Operating System: Win 7 Pro 64-bit
- Sensor Unit: NZXT Sentry 2 (5 wire sensors)
We placed the five sensors from the Sentry LXE on the lower side of the AMD retail CPU cooler, back of the video card’s PCB, on the hard drive, and on the north and south bridge heat sinks. We use these sensors on the outside of the sinks to monitor air flow and temps since the components underneath tend to get hot if air doesn’t properly hit these areas. The temperatures will easily be reflected when compared to the base line temps included in the graphs. The case’s system temps were recorded at idle and load with the fans on and off.
Installation Notes
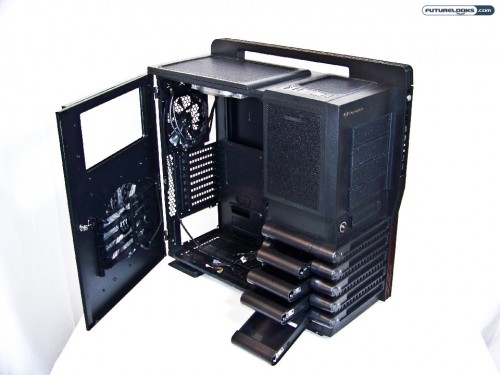

You no doubt want to know how the installation went and if there were any issues. About the only thing I can nit pick about would be how the five removable trays function. They tray holes line up fine with the hard drive, but getting them out can be a little fussy. Sometimes the button needs a harder push and a bit of finesse to get the drive to unlock.

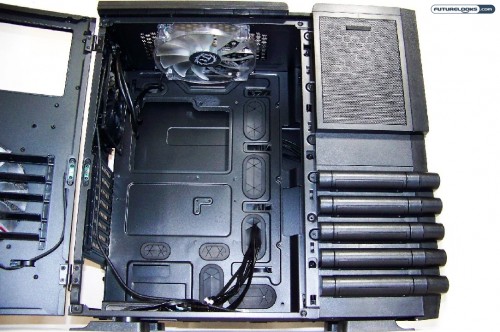
On the other hand, installing the test system in the chassis is very easy. The motherboard cut out is so large that any CPU socket placement on any motherboard will fit in this case without removing the board. There is ample room for hiding a great deal of wiring behind the motherboard tray and the case will help you make any configuration look superb and tidy.

The head set mount on the side of the case actually came in handy. It’s completely removable too if you don’t need it or if you’re transporting the case so it doesn’t snap off. When most everyone is done using their headsets, they put it them on the desk and quite often, at least around here, they get knocked off. The hangar actually kept them off the floor on a fairly consistent manner, preventing headset damage.
Overall, it’s a fairly easy to build with case even with a minimum amount of cable tidying. As you can see, the cavernous interior really helps beginners and enthusiasts alike, have a great system building experience.
Thermal Test Results


Part of our thermal testing includes checking out the air flow design within each high end computer enclosure. The Level 10 GT pulls a massive amount of air through the front and side panel fans. Because the rear fan isn’t as large, most of the air escapes through the rear top. This might prevent the right amount of cool air from hitting the CPU heat sink resulting in higher temps. Let’s find out if this is true.

Based on our numbers here, it would appear that the side fan helps make all the difference. It sends more than enough air in on the video card area which has no other place to go than up through the CPU and out the top. The front fan does more to help push that air towards the back, thus lowering system temperatures.
Noise Test Results

Because the temperatures are so easily managed, the CPU and video card fans only spin towards full speed during the unconventional beatings OCCT and FurMark give the system. Otherwise, the fans were at their typical 70% RPMs during Unigine Heaven Demo benchmarks.
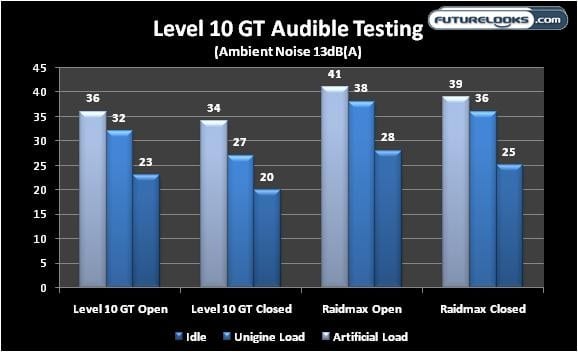
Keep in mind that if you have a high performance CPU cooler like the Thermaltake Frio or Frio OCK, it’s highly likely that you’ll never hear the cooler fans spin up. The same goes for stock video cards. Between the front and side fans, the heat get its butt kicked in the Level 10 GT!
Final Thoughts
The Thermaltake Level 10 GT offers a unique design derived from it’s big brother. It also means that you’ll either love or hate it. Its removable bays are excellent, requiring only one SATA power cable to power all the drives. The motherboard-CPU cut out is just about the perfect size and helps hide wiring behind the tray. But, there are a couple things that would be nice to see in the future when the “Level 10 XT” comes out.
While not completely necessary, it would be great if the enclosure was XL-ATX compatible. Even though there are only a few on the market. The same could be said for making the side window just a little bigger so we can see our elite special forces hardware. It would also be nice to see the USB 3.0 cables use the motherboard proprietary connectors. The hard drive tray release buttons could also use a little better implementation for smoother operation.
When it comes down to quality and performance, the Level 10 GT is a cooling champion that is very well made. It also explains why so many system integrators are more than happy to use them in their latest builds. At about $269 USD, the case isn’t exactly the most affordable, but you are paying for useful features, good quality, and great cooling performance. As a love it or hate it computer enclosure, I personally love it.
Pros
- High quality construction
- Excellent cooling performance
- Easily accommodates the largest of system components
- Level 10 inspired design
- Fans use both 3-pin and 4-pin Molex connectors
- Hot swap hard drives work nicely
- Headset bracket is very useful
Cons
- Hard drive button release is a little tricky to use
- USB 3.0 connectors could use motherboard connector
- $269 USD price may still be too steep for some
Overall Rating: 9.0 / 10.0

Help Us Improve Our Reviews by Leaving a Comment Below!