


More and more users are finding 64-bit Operating Systems like Vista to be quite beneficial and compatible for their computing experience. This is especially true for professional users who are using the latest Intel i7 systems. The i7 system is such a fast number crunching beast that adding a 64-bit OS and more than 3GB of Triple Channel memory really allows the system to do an extreme amount of work in a shorter amount of time.
If you’ve been following the i7, then you know that it’s anything but boring and has proven itself to be a capable in the realm of overclocking. In order to reap the full performance benefits, one needs memory capable of keeping up or exceeding the overclocked processor’s speed. Kingston Technology has made this possible by extending the HyperX series to include their new HyperX 6GB 2000 MHz Triple Channel Memory. Today we’re going to check out what it can do for your “Pro” system.
How Does Triple Channel Work?
We’re glad you asked. The new I7 processor has an Integrated Memory Controller (IMC) that simultaneously accesses three memory sticks at once. The IMC controls the data flowing to and from the Triple Channel Memory. The result is a certain amount of memory bandwidth which varies depending on the frequency of the installed memory. Naturally, lower frequency memory offers lower memory bandwidth while higher frequency memory offers higher memory bandwidth.Think of it as having three hands to accomplish an objective rather than only two like the previous generation processors.
In this particular case, we have three hands moving at 2000 MHz versus three slower hands moving at 1333 MHz. All of that memory bandwidth allows the I7 to perform a great deal more executions than previous generation processors. Rendering and compiling programs, or movie encoding simply goes quicker than ever before.
Features and Specifications
The memory is programmed via the SPD chip to operate at 2000 MHz in a 3 x 2GB configured kit. The memory timings tick in at 8-8-8-30 using a 2T Clock requiring a measly 1.65 Volts. This may not seem that important to you. But, it’s taken some detailed work to produce ICs that can handle these frequencies and so little voltage. Producing quality 2000 MHz ICs that meet or exceed JEDEC standards for Triple Channel memor can be expensive.
Each module offers two different programmed XMP profiles that your X58 motherboard of choice should support:
- Profile 1 – 1866 MHz / 7-7-7-24 / 2T Command Rate
- Profile 2 – 2000 MHz / 8-8-8-30 / 2T Command Rate
If the memory timings confuse you, that would be 8 (CL) – 8 (tRCD) – 8 (tRP/tRCP) – 30 (tRAS) and a Command Rate of 2T (CMD Rate) all found your computer’s BIOS. You never know when you may need to manually configure your memory timings, so it’s good to have the information readily available.
Hyper X three Equals 6GB of Triple Channel Awesome


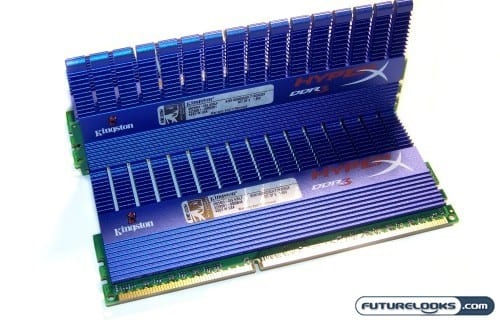
Kingston doesn’t waste much time on flashy packaging. They put their money in to the memory kit’s quality. Naturally, you can tell right away this is HyperX in all its powerful simplicity. The new HyperX Heat Spreaders can be found across the entire series. If the kit you’re researching doesn’t have a model number starting with KHX, it’s not HyperX.
Needless to say, the new spreaders are quite attractive. They’re thicker and look more aggressive than any previous generation HyperX memory. The blue has pretty much become a Kingston standard color for the series and won’t be changing any time soon. It’s very easy to spot the good stuff from the bad stuff in the display cases thanks to the blue spreaders.
Even though the spreaders appear rather girthy, they’re actually quite light being made from anodized aluminum. It’s essentially the same kind of aluminum used on performance based motherboard chipsets. If the aluminum is capable of cooling extremely hot chipsets, it will never have a problem with memory modules.
Test System Setup
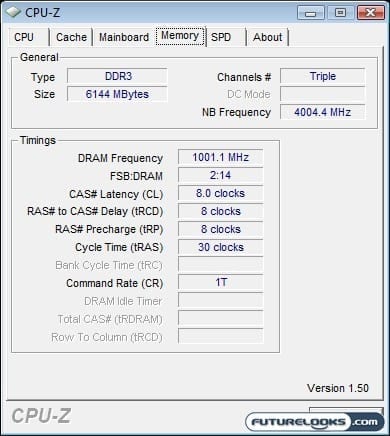
Since I already had a 3GB HyperX 2000 MHz kit installed in my test sysem, I simply swapped the 3GB for the 6GB kit. Before powering up, the motherboard’s CMOS was reset and upon boot up and then set to optimized settings. I set both of my test memory kits up manually and used the XMP 2 profile to show the differences between the memory’s optimized and non-optimized timings and latencies.
Here’s a list of the goods that went into the system:
- Intel i7 965 (3.2 GHz) Processor
- GIGABYTE GA-EX58-EXTREME Ultra Durable 3 Motherboard (F5 BIOS)
- Test Kit 1: 3 x 2GB HyperX 2000 MHz
- Test Kit 2: 3 x 2GB Viper 1600 MHz
- Zotac GTX 295 AMP! Edition Graphics
- Seagate 500 GB SATA II
- Kingwin Mach I 1000 Watt
- Benchmark Suite: SANDRA, MPG4 Encoding, Crysis, and Farcry 2
As far as benchmarks go, we used the latest version of SANDRA from Sisoft offers excellent tools for benchmarking the processor and memory. And, since each component dramatically affects the others performance, Mathematical and Multimedia benchmarks were also included. Throughout the tests, we’ll be comparing our two listed test kits at their advertised frequencies and latencies.
Synthetic benchmarks at 2 GHz
We start off with benchmarks using 3DMark Vantage and Sisoft SANDRA Professional. 3DMark Vantage utilizes the highest bulk of the system that is heavily dependent on the system’s resources, including memory and offers a more overall system performance score. SANDRA is capable of testing the components individually revealing where the memory best benefits the system.
3DMark Vantage
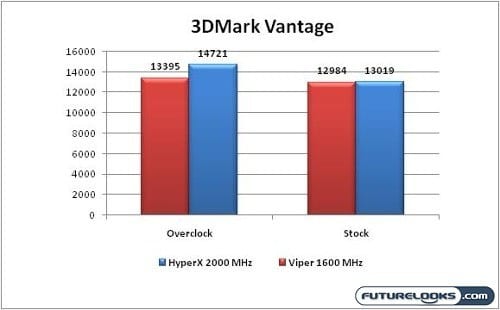

3DMark Vantage thoroughly sinks its teeth into your system as each of the four benchmark components are performed. We used stock program settings. There’s a slight performance gain in favor of the HyperX memory with its lower 8-8-8-30 memory timings vs the Viper’s 9-9-9-27 timings. It’s when the CPU Bus is raised that you see the HyperX show its true capabilities leaving the Viper behind.
SANDRA Memory Bandwidth
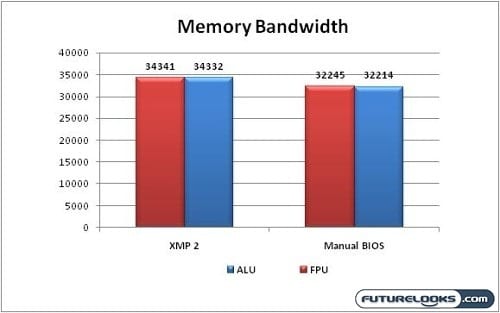

Here, you can see that the memory bandwidth produced via the HyperX 2000 MHz memory using 9-9-9-27 manual timings is roughly 32,200 MB/s, or 32 GB/s. When the XMP 2 setting is applied in the BIOS, the memory’s timings are dropped to a much lower latency of 8-8-8-30 which affords a noticeable bandwidth improvement.
Lower timings always means more memory bandwidth and better performance and it is pretty clear in our tests that this is so.
SANDRA Mathematical & CPU Benchmarks
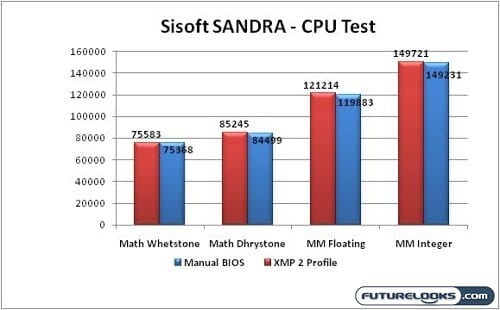
SANDRA’s CPU Arithametic and CPU Multimedia benchmarks also reveal just how much the memory’s timings affect the CPU’s performance. Again, the lower latencies help the CPU offer better performance. The CAS Latency 9 timings are just no match for the HyperX’s CAS Latency 8 timings.
MPEG4 Encoding
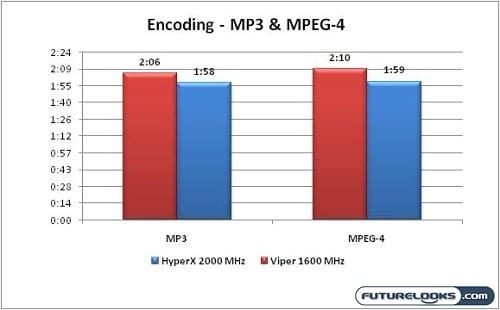
MPeg4 encoding is one task that consumes a computer’s number crunching resources and heavily relies on the memory to keep up. It utilizes every ounce of processing power to format video as well. The more processing and memory power on hand, the faster the task can be accomplished as shown. Now let’s move on to the fun stuff: Games.
Crushing games at 2 GHz


Gaming performance primarily depends on your graphics card and processor. Frame rates are going to be very comparable simply because one of the two tend to hold the system back. It’s when overclocking the CPU that you see the benefits of high frequency overclocking memory like the Kingston HyperX. Let’s see if we’re right.
Crysis
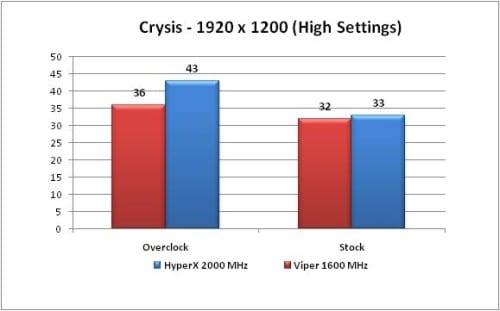
Notice that at stock frequencies, the test system produced nearly the same results with both memory kits. That one frame rate variation most likely has to do with the HyperX’s lower latency memory.
Farcry 2
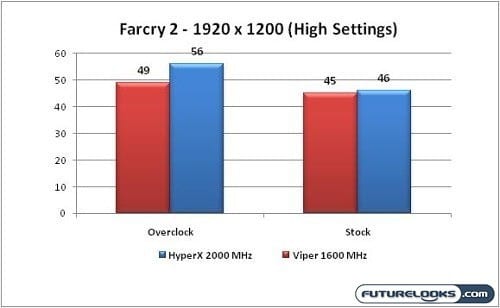

After running Farcry 2, it was apparent that at stock frequencies, the two memory kits were going to continue trailing anywhere from 1 to 2 frames. Again, this is most likely due to the lower timings of the HyperX. It’s safe to say that the results would be the same no matter what games are tested. It’s when overclocking, that you can expect the best results from the HyperX memory.
Memory Quality and Stability
Repeated 3D testing can serve one particular purpose. It will eventually reveal any system instabilities such as game crashes, freezing, or restarts that are often symptoms of questionable memory. This brings us to the final task on the test bench.
The HyperX kit was put through a final test with the Ultra RST Pro 3 PCI Memory Tester. This unique memory testing tool is simply a PCI-X card that validates the memory at every possible level. If there’s a crack in the memory’s proverbial armor, it will definitely find it. It wasn’t surprising to see the kit go through several hours of testing without one single error. This kit is certifiably elite which is a good segue to our next area of evaluation: Overclocking.
Overclocking Beyond 2 Ghz

There’s a little extra head room beyond 2 GHz, but not much. This particular kit maxed out at almost 2080 MHz with higher 9-9-9-30 memory timings and a maximum of 1.7 volts. Anything higher will require more than 1.7 Volts which puts things into the danger zone. At these higher timings, the kit is actually slower than stock frequencies and timings. Also, 1.7 Volts is the extreme maximum Intel advises lest you risk your processor. The memory may be willing, but the CPU (owner) may not be.
Here’s a little extra perspective. The realistic overclocker is going to push the CPU as far as possible rather than the memory. This particular system, like the last two generations before, can maintain the memory’s 2 GHz frequency or a maximum CPU Bus, but not maintain both extremes at the same time.
With this many ICs packed on to a module, there isn’t much overclocking tolerance. It’s a challenge alone finding the right ICs capable of supporting these frequencies and timings. If you’re hell bent on achieving over 2100 MHz, you should try the 3 x 1GB PC3-16000 HyperX memory kit which seems to be a more popular overclocking choice.
Final Thoughts and Conclusion
The only thing more important than overclocking the memory are its timings. Lower timings always produce higher amounts of bandwidth which improves the system’s overall performance with quicker program access and execution times. And sometimes, it’ll produce a couple more frames in your favorite game. It definitely helps with compiling larger files or encoding videos and rendering animations.
Another feature that makes or breaks a memory kit besides its memory bandwidth, is whether or not it’s stable during operations. When selecting this memory, you can rest assured that the memory was perfectly stable and was error free for hours of torture testing. The memory handled the large blocks of data and high system stress perfectly. This wasn’t entirely a surprise since the memory passed validation with the RST Pro3 Memory Tool.
The Kingston HyperX 6GB 2000 MHz Triple Channel Memory Kit literally crushes anything to cross this test bench to date, even at stock frequencies. The 6GB does excellent all around under the Vista 64-bit environment for which the kit was intended. There are cheaper kits out there, but they come at the sacrifice of memory timings (and performance). When looking for a true performance based Triple Channel overclocking memory, the Kingston HyperX 6GB 2000 MHz kit offers the perfect bang for the buck that demanding users need.
Pros
- 2000 MHz of raw high frequency performance
- 8-8-8-30 memory timings
- Sexy new HyperX heat spreaders
- XMP Profiles work well
- Best bang for buck at $250
Cons
- Limited Supply
- Limited overclocking beyond 2000 MHz
Overall Rating: 9.5 / 10.0


Help us improve our reviews! Leave a comment below!/strong>