

When you see the name Kingston, do you think HyperX? Or, when you see HyperX, do you think Kingston? The HyperX team will be happy to know that out of the twenty users asked at a recent trade show, the majority knew that HyperX is Kingston’s elite memory product line. And, only two people had never heard of Kingston, or even knew what PC memory was in the first place.
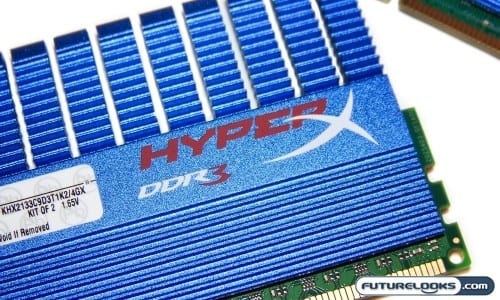
Well, the HyperX fans will be jonesin’ for what’s installed in our new Koolance equipped liquid cooled P55 machine. It happens to be one of the two fastest HyperX 2133MHz DDR3 Dual Channel Memory kits in Kingston’s arsenal. It’s similar to the elite stuff we we saw in action at the GIGABYTE’s P55 launch party clocking in at over 2400MHz and it’s called the HyperX KHX2133C9D3T1K2/4GX Dual Channel Memory. Boy, is this stuff ever fast!
Features and Specifications
The KHX2133C9D3T1K2/4GX kit (No, you don’t have to really worry about memorizing this) is easy to identify. As long as you see KHX in the begginning, you’ll know it’s Kingston HyperX. The following 2133 is actually the kit’s frequency and the C9 refers to the kit’s CAS Latency which is 9. Have a look at your own kits or the ones at the local computer watering hole as this naming scheme encompasses all of their memory kits.
As mentioned, this particular kit’s timings are 9-9-9-xx. Some of the other kits show 9-9-9-27 which is essentially what it should default to in your computer. While it shouldn’t default to anything lower than 27, it also doesn’t reach above 30. For a break down of the timings which you should see in your BIOS, have a look at the bottom of each memory section on Kingston’s webpage. The little chart can help you manually set your timings in the event your motherboard decides not to play well with the elite memory.
Voltages for this kit are 1.65 Volts. This keeps the modules in spec with the LGA1156 Lynnfield processor’s integrated memory controller. Our experiences have shown some modules to run 1.65 to 1.75 Volts. Anything higher results in random instabilities depending on the motherboard. To put this into perspective, your CPU and/or motherboard probably won’t be able to keep up due to the heat issues as its Bus Clock frequencies top well over 200 MHz: An issue with some pricepoint boards if you plan to use these sticks.
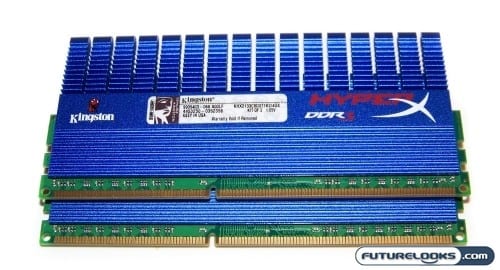
Handling the T1 Heat Sinks
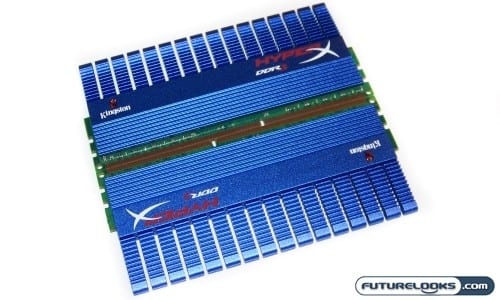
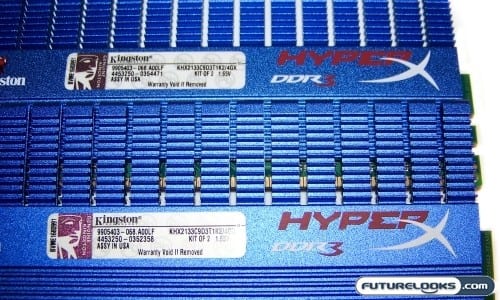
These are called T1 heat sinks. You can see the “T1” reference in the model number sticker. The other type doesn’t have a looks more like the last generation silver on blue due to the machining of the aluminum sinks. While both are used in the HyperX series, it’s the T1 heat sinks that let you know the kit in your hands is “the best”!
Many users like to know what particular ICs were used to build the modules. There are a few to pick from out there, the most commonly found modules are Micron or Elpida. Thanks to some news outlets letting the cat out of the bag, we know that most all the 2000+ MHz ICs available are Elpida made. And, despite some of the recent issues seen in some 2GHz kits, Kingston tests their products and stands by their warranty 100%.
Test System Setup
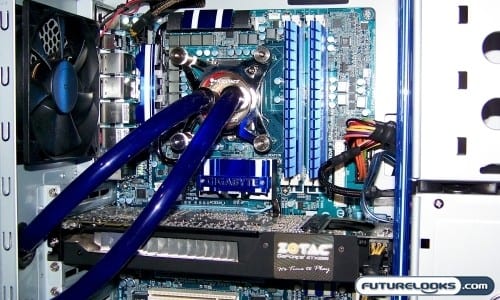
In order to run the system up to the rated 2133MHz that these modules are rated at, we needed a special system and here’s the liquid cooled beast used to test the memory. Keep in mind, you don’t have to use the same cooling method. A really good quality heatsink like the Cooler Master Hyper N620 CPU cooler would work just as well.
Here’s the rundown on the specs:
- Intel Core i7 870 LGA1156 Lynnfield Processor
- GIGABYTE GA-P55-UD5 Motherboard
- Kingston HyperX 2133MHz 4GB DDR3 Dual Channel (As Tested)
- Zotac Geforce GTX295 Graphics Card
- Kingston SSDNow V Series 128GB
- Antec CP850 Power Supply
We used Windows Vista 64 bit in all our tests and are still waiting for Microsoft to cough up our retail Windows 7 keys.
Even though the majority of the tests are based on benchmarking the memory, I still made sure that all of the hardware is utilizing the latest BIOS and firmware. Both, the CPU and Memory overclocking options were disabled in the BIOS so that we could get raw performance numbers.
Installation Notes
If you didn’t already know, your older DDR3 modules that are rated 1.9 Volts, and can’t be used with X58 or P55 based systems. That’s why the 2133 Kit is rated to 1.65 Volts to ensure compatibility with the Intel LGA1366 and LGA1156 processors. There are still stories of a few users trying to do this only to damage their system.
As with any P55 based system, once the memory was installed, you’ll have to select one of two XMP profiles detected by the BIOS.While the XMP Profile was correctly detected, yours might not be. If that’s the case, simply go into the BIOS and make the changes manually.
Overclocking The Stuff
Right away, Profile 1 auto selected the CPU Bus Clock frequency needed to set the memory to 2000MHz. That meant the CPU was now being overclocked to about 3.8GHz. But wait! There’s more!
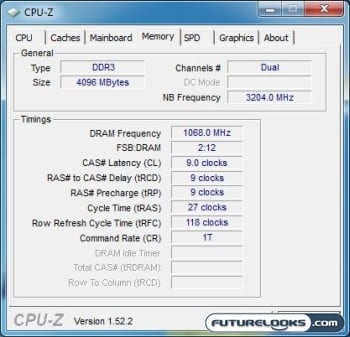

Profile 2 set the CPU BClk even higher pushing the CPU’s frequency to close to 4GHz just so the 2133MHz DDR3 frequency could be maintained. The timings were correctly detected at 9-9-9-27 requiring only 1.65 Volts. But we’re not done yet!
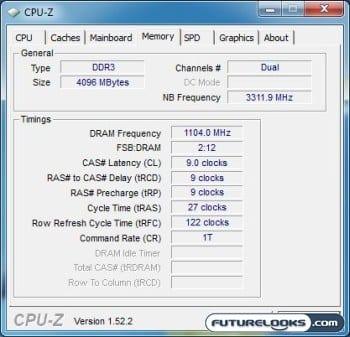
Next, I manually pushed the CPU BClk ever so slightly higher, till the memory’s frequency was at 2208MHz at 9-9-9-27 timings. Despite adding more voltage, the memory would not maintain stability any further using CAS 9 timings. There’s more frequency up to about 2250 MHz, but the CAS 10 timings just negate any performance gains, and could risk the ruining of the memory modules. This pushed the CPU past 4GHz of course.
Now, you can understand why it’s very necessary to choose an extremely capable motherboard when you’re considering DDR3 memory this fast. It is very frustrating when you spend top dollar on the best stuff available, just to find out the cheaper motherboard is the culprit and you’ll have to tear the system apart to replace it to get all the performance you paid for.
Benchmarks Galore
In order to see what the memory is made of we used a whole bunch of benchmarks which included SANDRA, Everest Ultimate, Cinebench and Crysis. We also added the well known SuperPI to our tests.
SuperPI was tossed in the mix just so some extreme readers can see what kind of overclocked performance we got with minimal effort. Since SuperPI is also used in overclocking competitions like the GIGABYTE’s GOOC Events, it makes a lot of sense to include it.
SiSOFT SANDRA
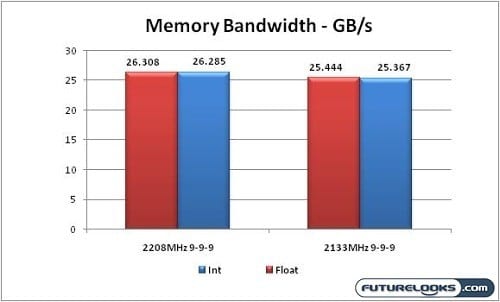

These modules really show off their speed and end up in almost Triple Channel memory performance territory. That’s 26.3 GB/s, or more accuraetely, 26,308 MB/s of memory bandwidth which is very useful to the CPU’s four Hyperthreaded cores.
Everest Ultimate
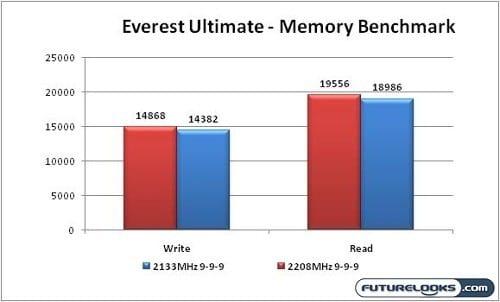
Everest, almost hits the 20K sweetspot. You might be able to break that if your motherboard is a bit more aggressive than our GIGABYTE UD5 test bench. It would’ve been nice to break it in testing though. Perhaps, I should inquire about the 24-Phase UD6 or Rampage III? Or maybe we’ll just wait till the new P55A series boards roll out.
Cinebench


If the system can fly through Cinebench, it can easily handle any encoding or video converting. Here, you can see it hits the 22K mark. The system at this speed actually surpassing the Core i7 965 and 975EE which hang out around the 20.5K level.
Crysis
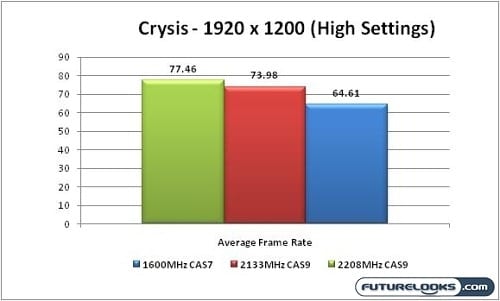

The memory doesn’t do a whole lot for games quite as much as the processor when we take it up to its highly overclocked state. Still, you get a nice performance jump using some settings that normally bring other systems to a crawl. If nothing else, the memory operated flawlessly and was very stable throughout 3D testing.
SuperPI
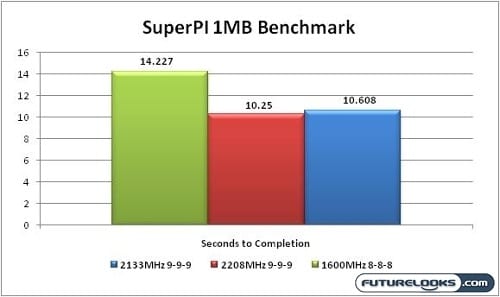

Different from some of the other past reviews that we’ve done, I’ve decided to throw in some SuperPI. Since this benchmark does a nicer job of revealing the level of performance from a tweaked system, it will most certainly detect minute changes in the memory speed. If you aren’t sure where your system places, download the free utility and run your own test. Your system might not even top the 1600MHz results included without some tweaking.
As the results dictate, faster memory will equal faster performance and lower completion times for this challenging benchmark.
Final Thoughts

So now you see why had to water cool the system and push it harder than before. I didn’t want to waste my time trying to attempt these high frequencies only to lose system stability due to thermal issues with the CPU. Fortunately, the Koolance Exos 2.5 kept the CPU temps well below the 70C threshold during testing, putting the main work on the motherboard. This is the second reason you want to consider a very capable motherboard when choosing extreme performance memory (EPM) like the Kingston HyperX 4GB 2133MHz DDR3 Dual Channel Kit.
There are folks who will opt to try pushing the HyperX 4GB 2133MHz DDR3 Dual Channel Memory upwards of 2300MHz using 10-10-10-30 timings. If you can hit this level, chances are the extra performance might be there to warrant the fanatical OC. But, my job here is to help educate users as to how to get the most out of your memory as well as optimal performance. That said, higher frequencies with slacker timings don’t always equate to better performance. Personally, I found the best performance at 2200MHz keeping the memory 9-9-9-27 timings.
Whether you’re a benchmark fiend or extreme performance user, the HyperX 2133MHz Dual Channel Memory is the way to go. At $229, this is some of the more expensive performance memory readily available, but it is the fastest we’ve tested to date.
Pros
- Operates superbly from 1333 (6-6-6) and up to 2200MHz (9-9-9)
- HyperX quality with HyperX heat spreaders
- Top notch customer support (we tested it before)
- Supplies Triple Channel memory bandwidth at Dual Channel Price
- Quality ICs
- Great bang-for-buck extreme performance memory
Cons
- Not all systems can handle the power!
- Price may be out of reach for some enthusiasts
Overall Rating: 9.0/10.0


Love This Review? Hate This Review? Tell Us in the Forums!
Kingston HyperX 4GB 2133MHz DDR3 Dual Channel Memory Photo Gallery


