
It’s just about time to head back to the classrooms. With student loan money in hand, you’re ready to pull the trigger on a new Intel Core i5 or i7 4th Generation “Haswell” system. You may be staring at manufacturer websites and retailers looking at different Z87 motherboards, all promising to be the ideal platform. While each motherboard offers all kinds of connectivity, you have to ask, what are the important features besides how cool the board looks and ultimately, which one fits your budget? If appearance or which is cheapest is all that you care about, then chances are quite high that you’ll be sacrificing some very important things such quality and stability.
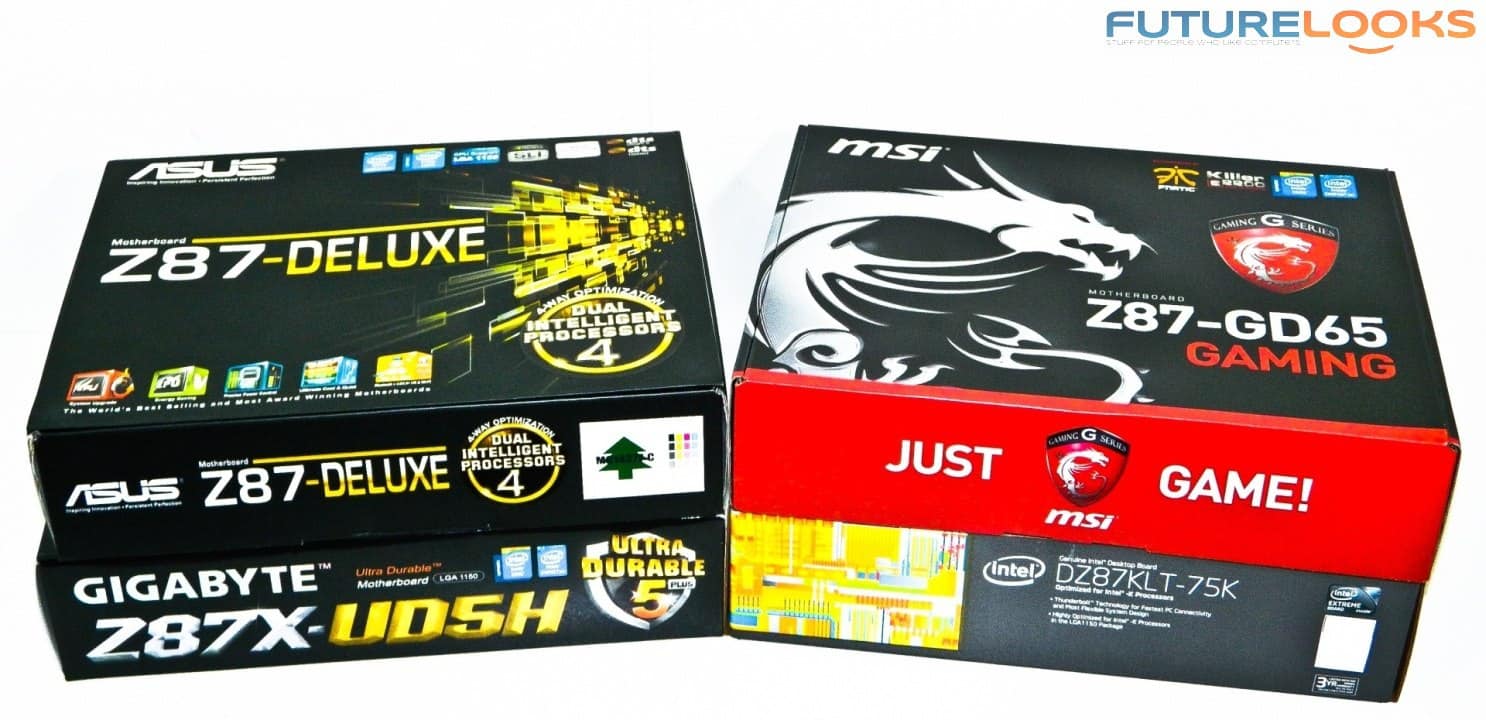
We took three competing Z87 motherboards currently available at different price levels and literally beat them silly in the lab for several weeks. We learned a great deal about each partner’s platform quirks, benefits, personalities, and the features each offers. The three motherboards in question are the ASUS Z87 Deluxe, GIGABYTE GA-Z87X-UD5H, and MSI Z87-GD65 Gaming. With the new Z87 chipset, each board has new learning curves, software, and some even have a completely redesigned UEFI BIOS. It’s time to see which one will get your money’s worth in our latest Z87 Motherboard Round Up!
Features and Specifications

Here are the features and specs of the three boards in this round up from the top three leading manufacturers. Keep in mind that basic performance should always be standardized across any motherboard series. For example, ASUS’ entire Z87 channel series share the same UEFI BIOS and therefore will provide very similar base level CPU performance. However, not all boards overclock quite the same or have the same additional connectivity options. That said, these three boards should be able to maximize CPU performance regardless of specs. We’ll find out in testing after looking at the boards up close.
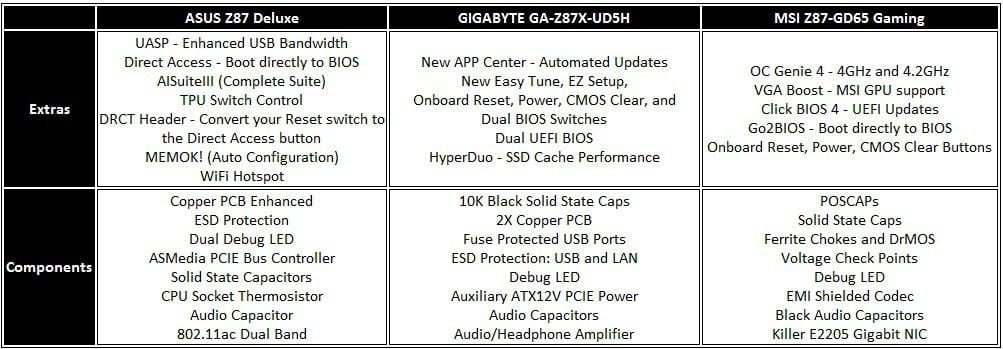
Here’s a quick peek at the extra physical tuning features that come in very handy with each motherboard. Each manufacturer has made specific component selections and do differ from one another. You’ve probably noticed that solid state caps are now standard, although not the same grades/types are used. Basically, there’s a thousand different ways to make a great motherboard. I just want to make sure you notice that manufacturers are putting some serious effort in to offering better quality motherboards today.
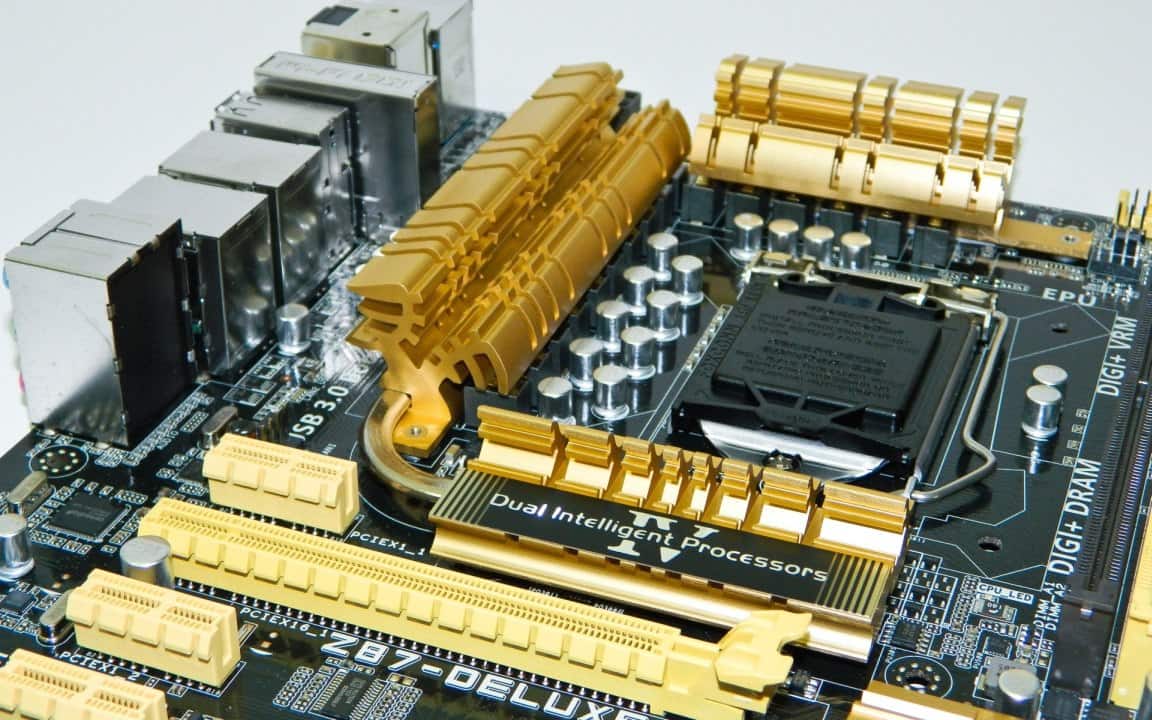
Board #1 – ASUS Z87 Deluxe
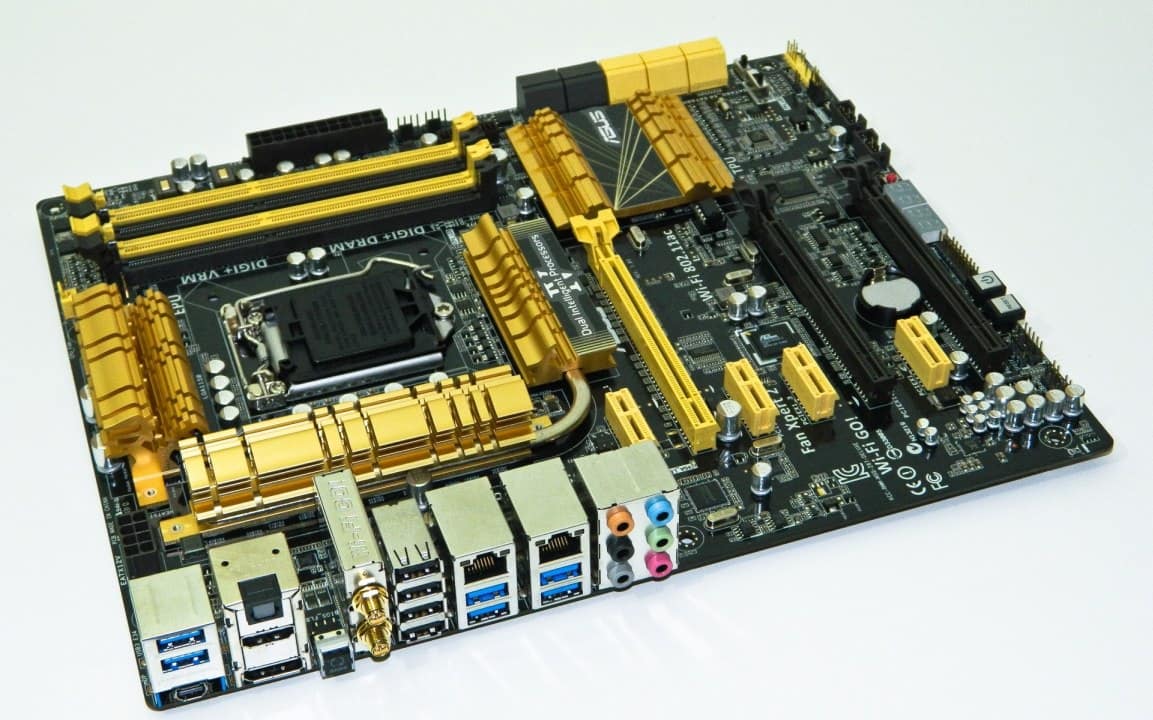
Straying from the safe and conventional design themes is the ASUS Z87 Deluxe. The channel series theme is now anodized gold on black, all the way down to their Z87 Mini ITX series. Some of the expansion slots are just a shade different but ASUS made a careful calculation in terms of what enthusiasts or mainstream users wanted in a board design. I’ve seen some immaculate system designs like the MurderBox shown off at LANcouver 2013 which proves there are plenty of possibilities.
Underneath ASUS’ gold standard is a platform packed with implementation improvements and useable features. ASUS’ 5X Protection focuses on Stable Power (DIGI+VRM) Control for system stability, Over-Current Protection against any component surges using Polyswitch fuses, ESD Guards in the form of ESD Protection ICs for discharging static from ports, use of 100% solid state caps rated to resist 105C heat for longevity, and a stainless steel I/O shield to ward off corrosion.
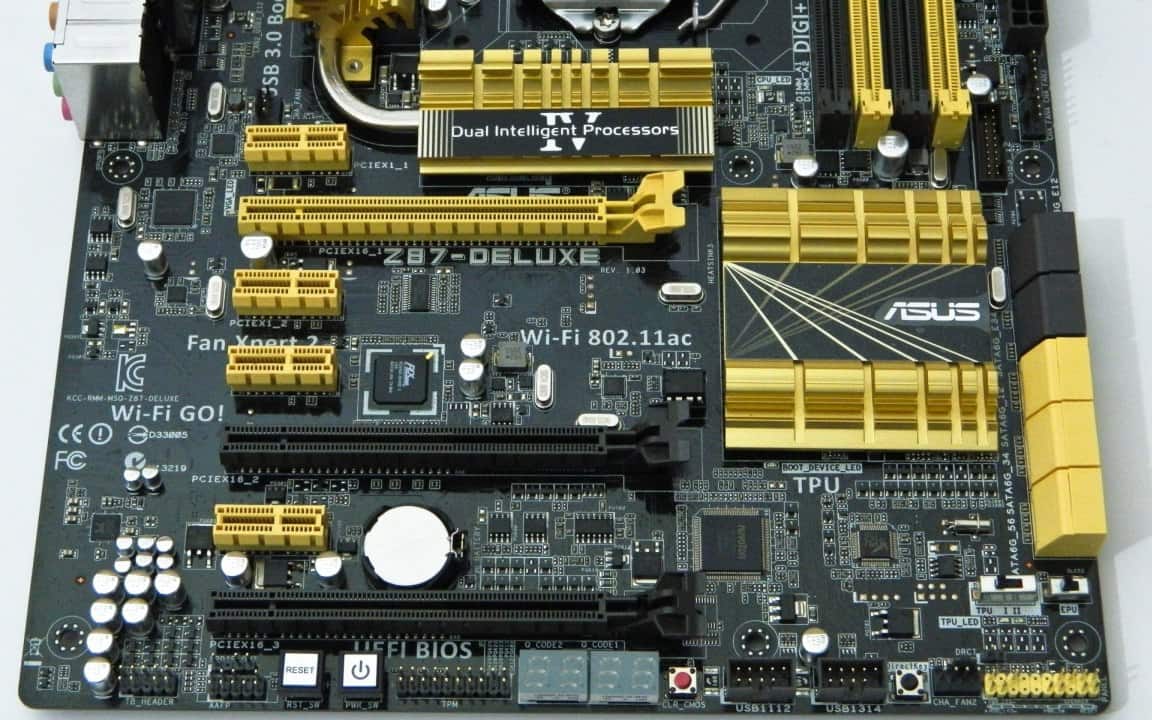
The Z87-Deluxe’s power and overclocking features include 16+2 Phase Digital Power to feed 4th Generation processors. DDR3 support is rated to 3000 MHz which is plenty and currently the upper max available. TPU control adds immediate 4.2GHz overclocking performance. The VREG is complimented by standard solid state caps (SSC) instead of POSCAPs. Electrically, SSC provide better power and longevity. BIOS Flashback allows a user to plug in a USB flash drive, press the BIOS button, and it automatically updates without the system powered up. (Sweet!)
Other key features include Direct Key which auto reboots you in to the UEFI BIOS, MemOK! which automatically configures your DDR3 such as if you have unmatched pairs for example, Fan Expert II for configuring and controlling your cases fans through the all in one AISuiteIII, and finally an integrated PLX controller to balance out expansion bus when needed.
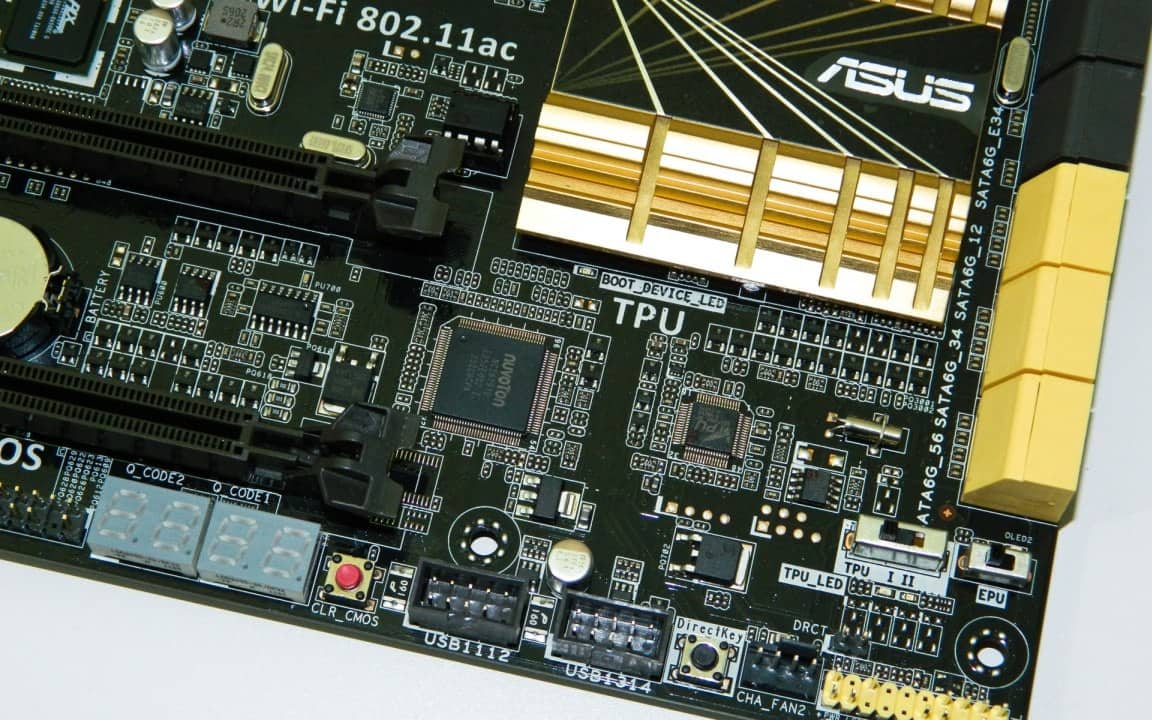
Direct Key is also supported by a DRCT 2pin header just above the button (bottom right). Enthusiasts can plug their enclosure’s 2pin Reset wire in to this header and boot directly to the BIOS. If you’re one to tweak to get the most out of your system, this is a very handy option. I suspect we may see enclosures offer an extra 2pin front panel wire for this purpose in the future. This is a very simple yet innovative feature.
Board #1 – What’s in the ASUS Z87 Deluxe Box?
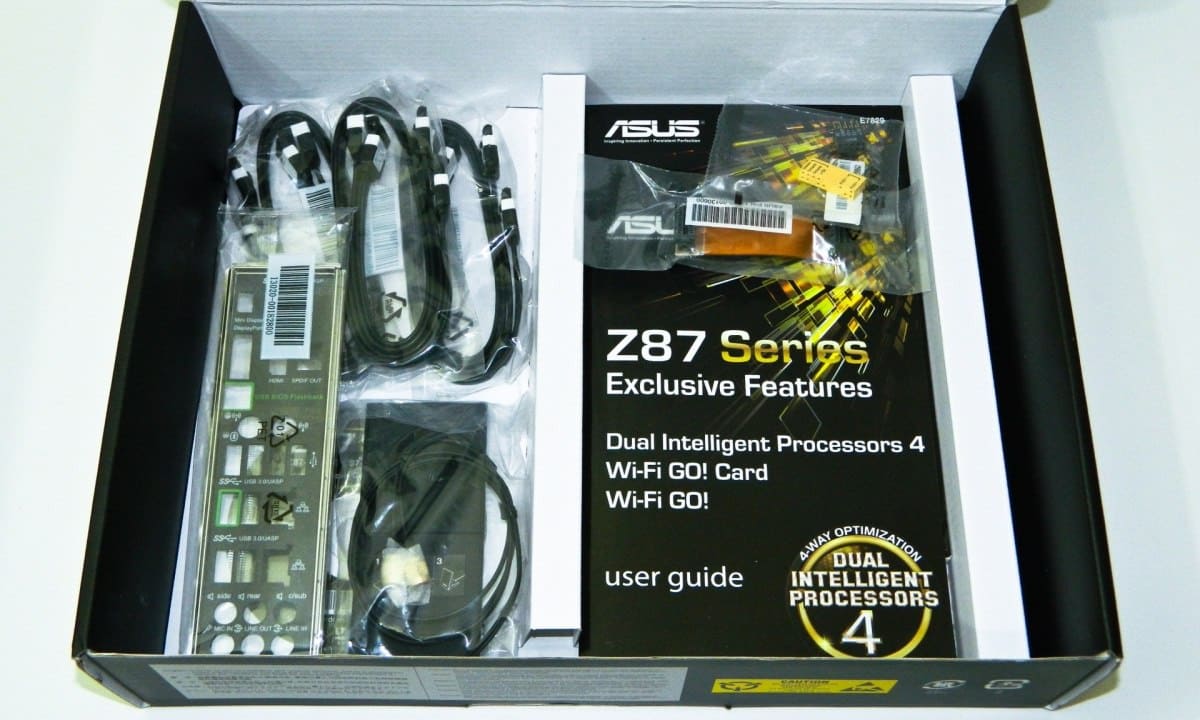
The Deluxe has you covered for quick and painless wireless set up. There are 6 black SATA cables (since it pretty much goes with everything), matching IO shield, Quick Connectors so you don’t have to feel around inside your case trying to connect the front panel wiring, SLI/CrossFireX bridge, and Wi-Fi GO 802.11ac card with dual antennae. The documentation is detailed and quite clear on how to set everything up right down to installing the software and drivers from the DVD.
Now let’s check out what ASUS’ arch nemesis, GIGABYTE, has come up with.
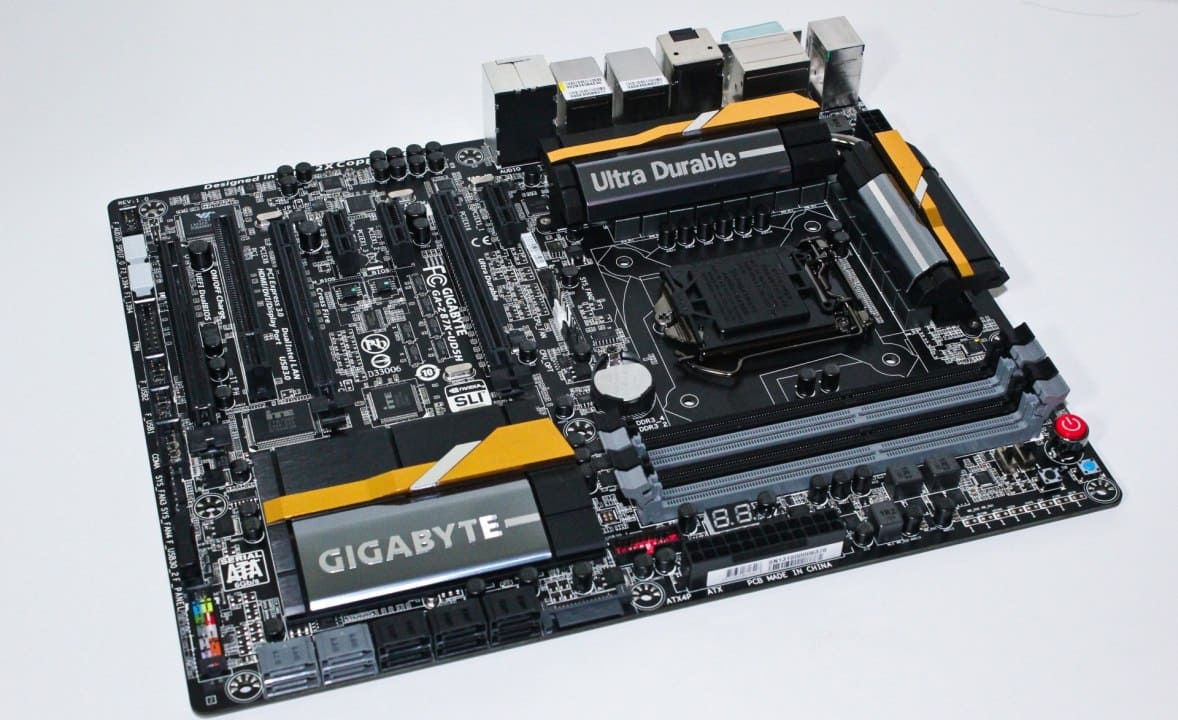
Board #2 – GIGABYTE Z87X-UD5H
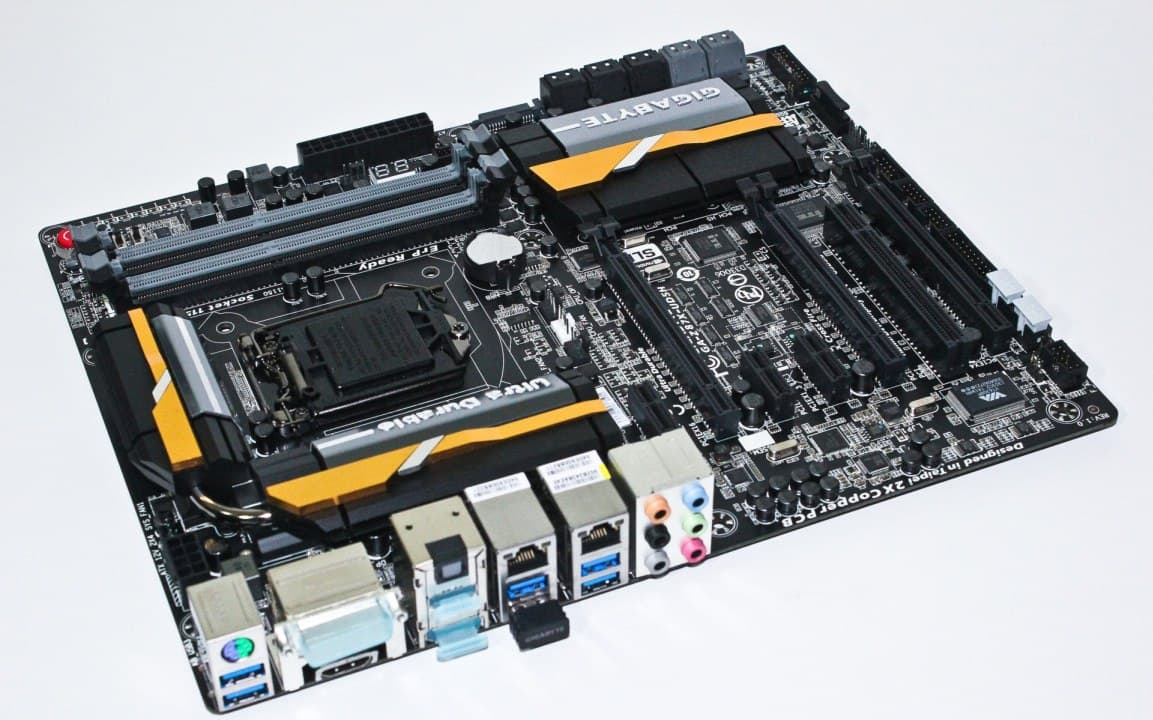
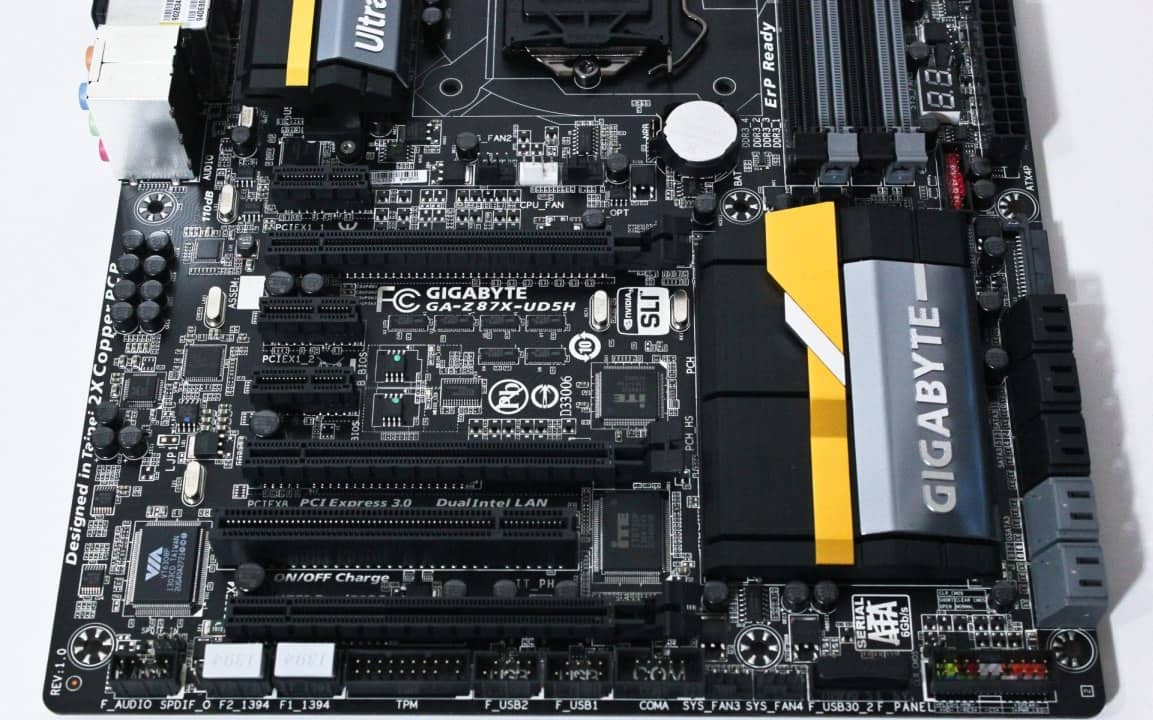
Right before the Z87 launch, we had an opportunity to sample the entire GIGABYTE line up including this motherboard. We saw first-hand the most important improvements to the series which includes new themes for the performance and new G1 Killer series. The GA-Z87X and H87 series all have different color heat sink accents but the overall PCB theme is the same. The UD5H sports a much more conservative gold on black theme. While it’s very clean, it’s just enough gold grab your attention. The red of the UD4H is actually quite nice as well.
Keeping pace with the competition, the UD5H supports 3000 MHz DDR3 memory if you can find some under an astronomical price. 16 Phase VREG accompanied by Ferrite Chokes and solid state caps ensure the CPU is well fed whether stock or overclocked. What you can’t see on the surface is that GIGABYTE created a whole new UEFI BIOS from scratch. The 3D BIOS is gone and never to return, at least in its earlier form. The new interface is cleaner, customizable, and more detailed oriented as we’ll see later in tests.
GIGABYTE also completely revamped Easy Tune and then created a new APP Center around it, addressing many of the criticisms that we’ve had about their software user experience in the past. The App Center will also automatically download and update programs that can be used to monitor and direct enhance system performance. Interestingly, there isn’t a UD5H-WiFi model this time around.
Board #2 – What’s Inside the GIGABYTE GA-Z87X-UD5H Box?

GIGABYTE helps users with extras inside the UD5H box since the board caters to a slightly more serious user. The bundle includes six black SATA cables, SLI/CrossFireX bridge, 3.5″ USB 3.0 tray unit for extra connectivity, black padded IO shield, some stickers, manual and necessary software drivers DVD. The 3.5″ USB 3.0 front panel will plug in to your motherboard’s new standardized port but that means you won’t be able to plug in your enclosure’s cable if they use the same thing. This is meant to upgrade older cases of course as new enclosures all come standard with the USB 3.0 front panel connector.
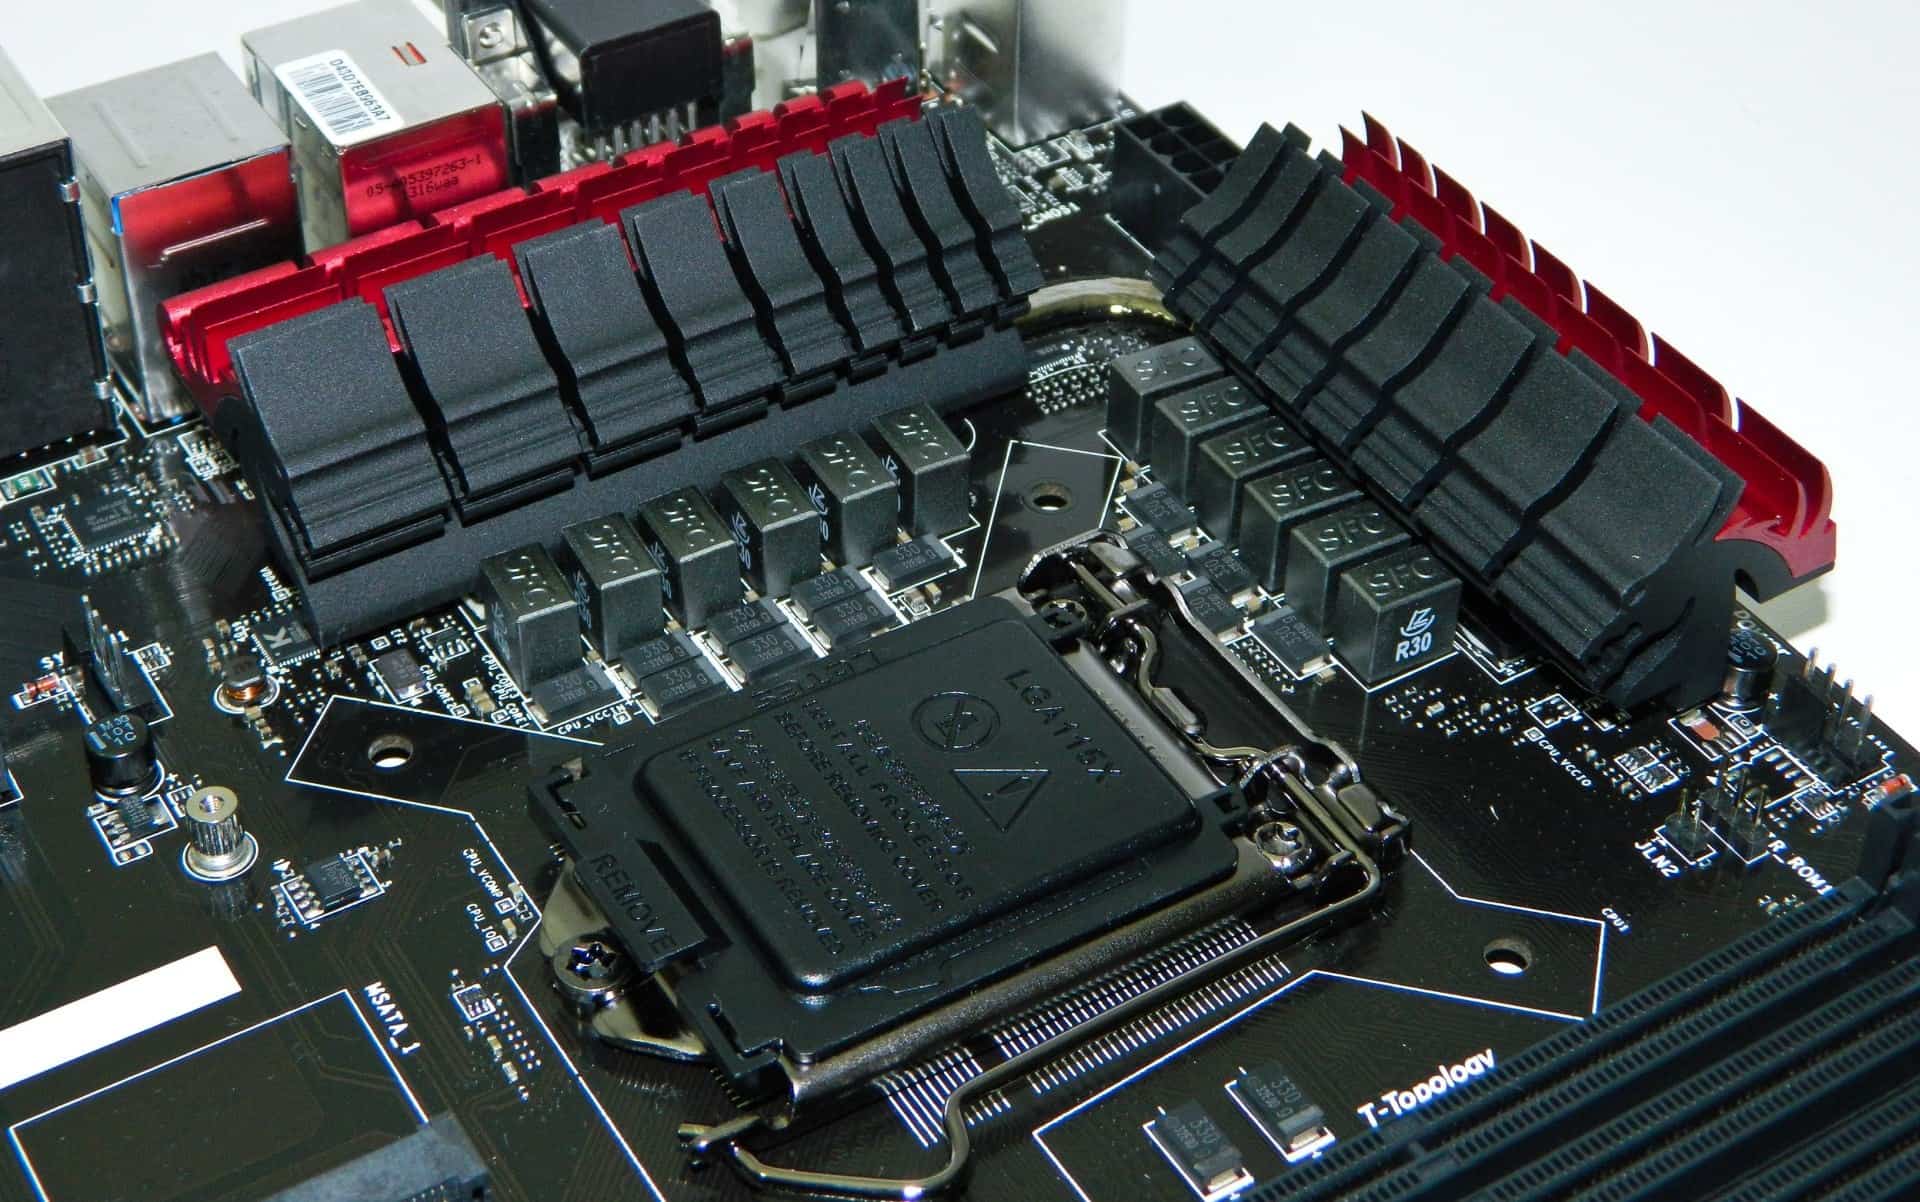
Board #3 – MSI Z87-GD65 Gaming Motherboard
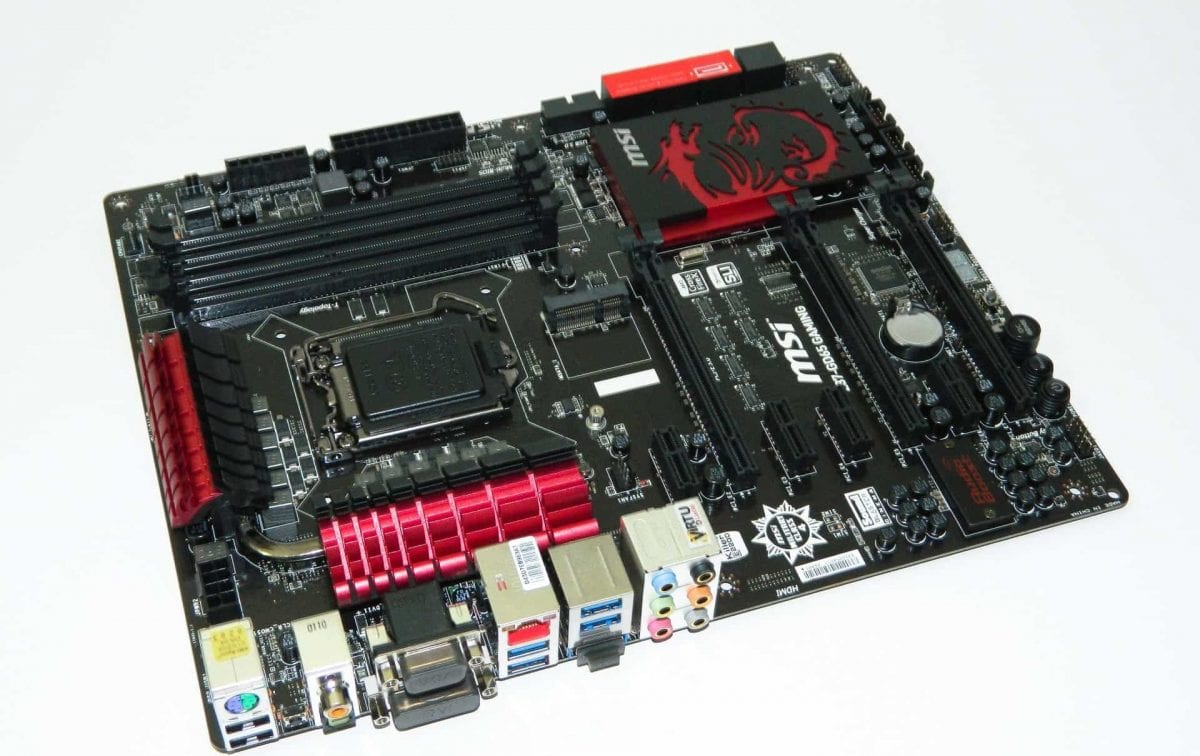
MSI has changed from using common designs. When I opened the box, I was greeted by a jet black PCB and two-tone red on black heat sinks. The south bridge heat sink has a very cool crimson red dragon etched in to the anodized aluminum. The dragon theme is a great “gaming” design compared to the previous Z77 series boards. But what makes it gaming?
The MSI Z87-GD65 Gaming board sports an embedded E2200 Killer NIC from Bigfoot networks and Creative Labs Sound Blaster Cinema audio. For the most part, the Killer NIC does help balance the network during gaming and in some cases can improve latency. The Killer Network Manager software allows users to prioritize what games and programs in terms of bandwidth. Audio Boost is actually a shielded Realtek ALC1150 audio processor which uses emulation software to generate the Sound Blaster Cinema experience. The audio is also coupled with high quality audio capacitors, headphone amplifier, and OPA1625 which we hope offers extended, richer sound. This has elements very similar to what GIGABYTE has done previously in their G1.Killer series.
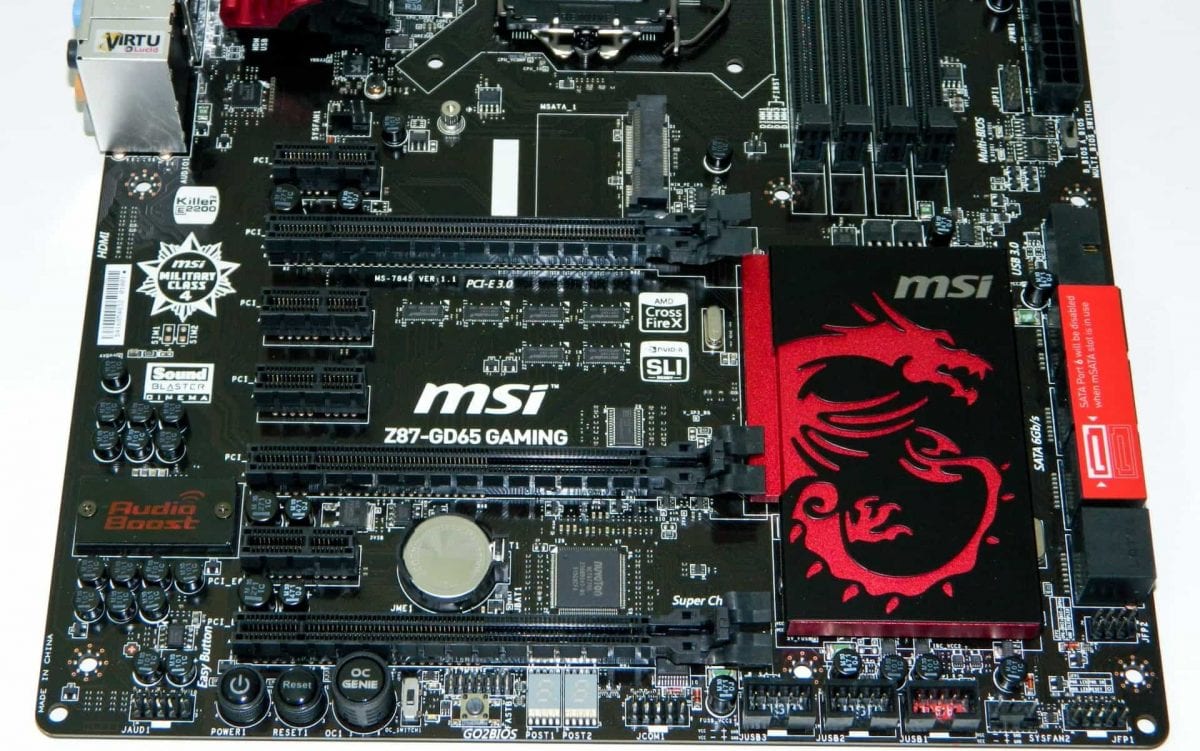
Finally, the Z87-GD65 Gaming continues offering OC Genie 4 overclocking for instant results. OC Genie 4 works in conjunction with the OC Switch that gives users the option of a standard Turbo Mode (3.5 to 4GHz) and Gaming Mode (3.5 to 4.2GHz). Simply choose your mode and press the Genie 4 button for an instant processor overclock to increase system response and in some cases increase frame rates by supporting lower end video cards. Additionally, the “Dragon” supports up to 3000 MHz DDR3 overclocking memory which will be interesting to test when more of the modules are available. The VREG design is 12 Phase and utilizes a few POSCAPs to fit the Military Class 4 design.
Board #3 – What’s in the MSI Z87-GD65 Gaming Box?
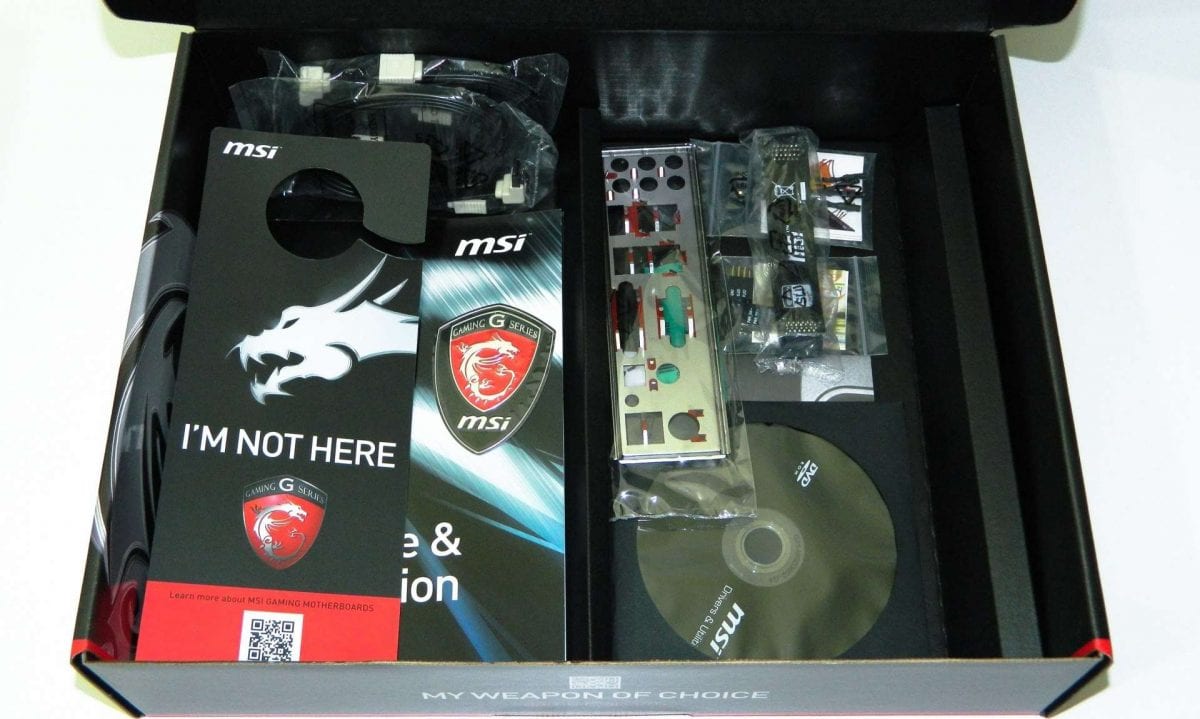
MSI gets creative by including a bundle with the gamer in mind. Along with the door tag (which is actually copied from the ASUS’ ROG series from 2 years ago), users will find four black SATA cables, IO shield, front panel header plugs, wire leads for the voltage ports on the board near the DIMM slots, SLI/CrossFireX bridge, some cool moniker stickers, and the usual manuals and software DVD. Everything you need to get connected is inside.
Now that the candidates are announced and vetted, let’s show off our standard testing setup for this round up and get to breaking down the performance of these front running Z87 motherboards!
Test System Setup
I originally started testing with an engineering and retail sample Core i7-4770K but quickly learned that the retail chip operated a bit cooler and required less voltage when overclocking. It goes against the norm but maybe I just have a hot ES Haswell. Since each CPU scored the same in preliminary evaluations, I used the two between the three boards except when testing overclocking. Here’s the parts list.
- Processor: Intel Core i7-4770K (ES and Retail) Haswell
- Stock Test Memory: Kingston HyperX 2133MHz at 1600MHz (9-9-9-31)
- XMP Test Kits: Mushkin Redline 1600MHz, Patriot Memory Intel Masters 1866MHz, Kingston HyperX 2133MHz, ADATA Gamers V2.0 2400MHz, and Corsair Platinum Dominator 2666MHz
- XMP Large Test Kits: Patriot Memory Viper III 2133MHz 32GB and Kingston HyperX Beast 2133MHz 32GB.
- Motherboard 1: Intel DZ87KLT-75K Extreme (0344 UEFI BIOS)
- Motherboard 2: ASUS Z87 Deluxe (1205 UEFI BIOS)
- Motherboard 3: GIGABYTE GA-Z87X-UD5H (F6 UEFI BIOS)
- Motherboard 4: MSI Z87-GD65 Gaming (1.3 UEFI BIOS)
- Graphics: GIGABYTE GTX 770 OC
- Storage: Kingston HyperX 3K 240GB SSD
- Power 1: Rosewill Tachyon Platinum 1000
- Power 2: Corsair HX750 Professional
- Power 3 (EMI and EMF Tests): Rosewill SilentNight 500 Watt
- OS: Windows 7 Pro
- CPU Cooling 2: NZXT HAVIK 140
- CPU Cooling 2: Thermaltake Water 2.0 Extreme
Three power supplies were used interchangeably at the start simply to test that varying wattage PSU with different standards are supported given Haswell’s low power modes. No one wants to have to figure out if their PSU or board is dead only to figure out it’s simply not supported. Using various memory kits allowed me to confirm board compatibility and spot BIOS quality benefits.
UEFI BIOS – Pass or Fail. Go or No-Go.
UEFI BIOS have come a long way. While some companies needed more time to catch up, it seems that with INTEL leaving the motherboard market, all of its chipset partners have an opportunity to capture that business with a great user experience. This is great news for everyone because it’s going to push easier and more intuitive interfaces to surface from every maker.
The most important goal here was to evaluate each board’s UEFI BIOS in terms of configuration which is the logical layout of the BIOS, description and information provided for any settings, setup as to how easy it is to manage, and hardware to BIOS functionality ensuring what’s on the board reliably works with UEFI.
ASUS Z87 Deluxe – UEFI BIOS and Overclocking
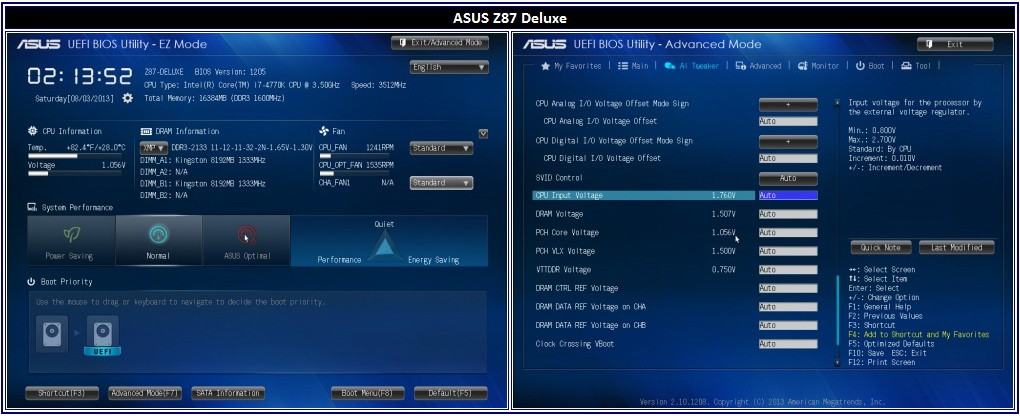
So what’s new in the ASUS UEFI BIOS? The very first page is the Easy Mode which now offers some new and more commonly used settings needed to set up the system. It includes temps, CPU voltage, XMP profile options (excellent), fan control, AHCI configured boot drive options slider, and three main system performance settings: Power Saving (EPU), Normal, and Optimal. Optimal automatically tunes your system to a locked VID of 1.275 volts. I saw a maximum of about 4.5GHz using the automated overclock. Keep in mind ASUS algorithms have been tuned to follow Haswell’s stricter thermal limitations. In other words, high end cooling will achieve the best results and the ASUS board knows how to take advantage.

Customizable tabs or favorites allow users to add short cuts to the most commonly used settings. If you’re a power admin swapping drives a lot, or an overclocker, you can set it up so storage or overclocking settings are more quickly available. Additionally, Quick Notes allows you to save and share notes such as your best overclock settings, or the optimal BIOS settings designed for RAID. You no longer have to commit settings locations to memory or write them down. You also no longer have to write them down or keep word documents. They are all in the BIOS.
One of the newer UEFI power settings is Adaptive CPU voltage. While the former favorite CPU Offset voltage establishes a higher limit, Adaptive voltage settings allow the board to ramp down the overclocked processor’s voltage and frequency when not needed. The benefit is a cooler running system. After comparing manual, offset, and adaptive set voltages, I could get a stable 4.8GHz with 1.4 volts but I found 4.5GHz with adaptive voltage the optimal option for keeping Haswell’s hot blood under control.
When testing the Z87-Deluxe’s memory capabilities, I used the test kits to verify XMP support. Each of the kits were properly identified by the Deluxe. The Deluxe also loaded the memory timings to spec and in some cases located a lower, yet perfectly stable, CAS latency. MEMOK! does work if needed. Granted, some of the kits are probably tuned to run with slightly higher timings for longevity but it’s nice when the board does all the work for you.
Some suggestions for improving the BIOS here are minimal. The ASUS BIOS is quite intuitive. I would think it pretty handy to have a dual default and current CPU/memory frequency window.
Let’s see what GIGABYTE is up to next.
GIGABYTE Z87X-UD5H – UEFI BIOS and Overclocking
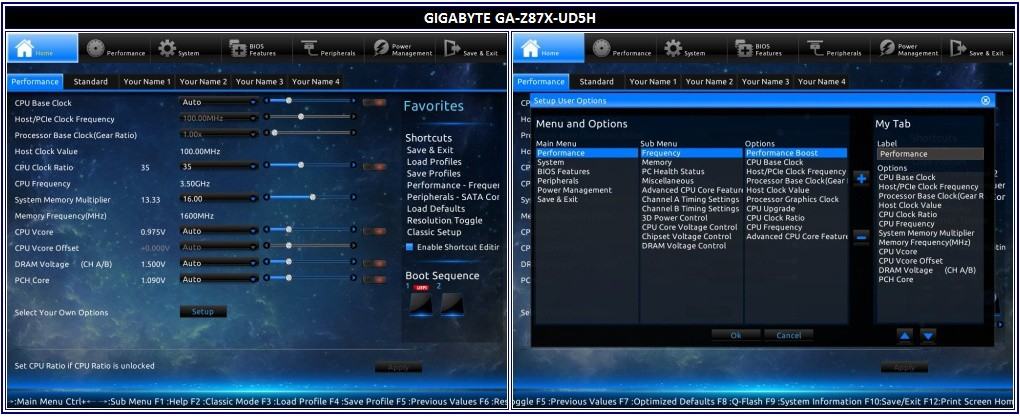
After handling the new UEFI BIOS, I can safely say that the 3D BIOS is a bad memory. The new BIOS allows for customized Favorites, or settings you regularly use but it’s not built in to every page. And, there are On-Off buttons that enable editing the settings. While it’s kind of a neat feature for semi on-the-fly tweaking, it sometimes slows down the process. The Home screen has everything most overclockers and tweakers need. A sliding Boot Sequence option is on the page as well. There are sub-tabs for creating four profiles which can customized to support four of your best performance habits.
Layout wise, the Performance tab is the main page for getting down and dirty with your overclock or simply maintaining the system. The memory, voltage, health status, CPU status, and memory status are all logically located here. The System tab is essentially the security page but also has redundant System Status data. Oddly there is also an option to change the BIOS Start-up page you’d like to see when the BIOS first loads. This would serve better if always visible on the BIOS task bar.
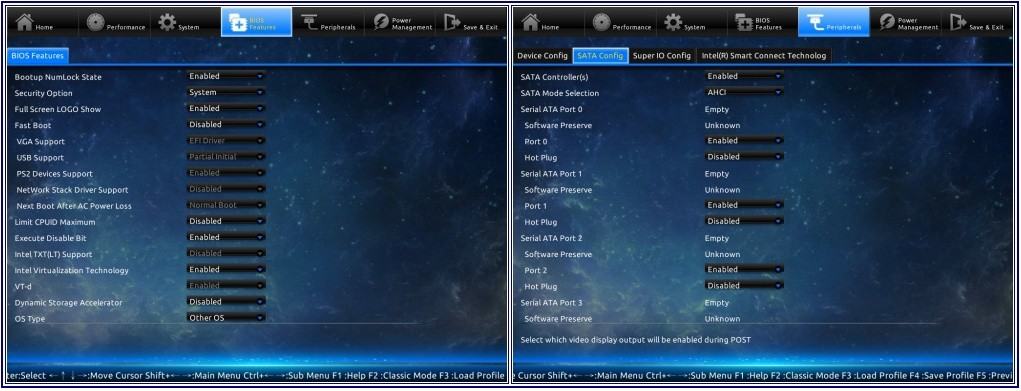
The BIOS Features page contains more miscellaneous settings not commonly used. You’ll find the Peripherals page contains boot device, SATA, IO, and all the Intel built in feature settings. Despite a couple editing issues and crammed text, users will probably be able to figure things out if they’re familiar with BIOS options. I did also notice the lack of explanations and information bar when clicking on settings.
Working through the BIOS and checking out preset overclocking settings, the UD5H was pretty solid up to 4.5GHz but nothing more. The board also manually feeds a loftier 1.35 volts to maintain stability. Manual tweaking revealed the CPU was stable with less than 1.3 volts. As long as you have ample CPU cooling, you’ll be fine. If you have weak cooling and attempt this, you deserve the wrath of the CPU spirits. Top end manual overclocking resulted in 4.8 GHz at 1.43 volts but a little voltage droop was evident. I noticed a couple of the high frequency and large capacity kits used correct XMP frequencies but not always the correct timings. Fortunately, a little manual tweak corrected the settings and the board scaled to meet the fastest 2666 MHz Corsair Vengeance specs.
Things that could use some adjusting: I noticed that the information bar at the bottom was very limited on some settings. For example, when hovering over SATA Mode Selection, the note said “Determines how SATA controller(s) operate.” A little more information about the modes in short hand would help users. The BIOS Start-Up Page option would serve better if moved to the Home page for quicker reference. Also, occasionally, the BIOS would stop communicating with the CPU fan. While only for a second, if you have CPU protections enabled, you’ll keep getting alert notifications or possibly a power down.
MSI Z87-GD65 Gaming – EUFI BIOS and Overclocking
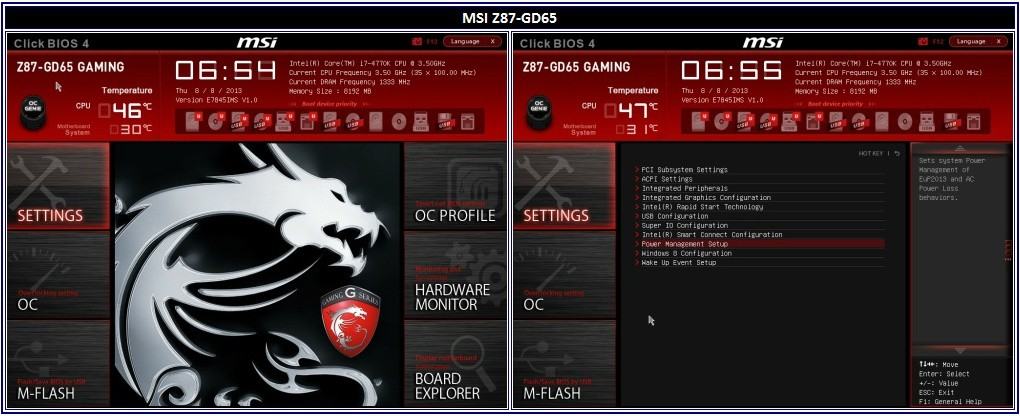
MSI has pretty much stuck with the previous gen UEFI BIOS that was also used in their Z77-GD65 board. The home page kind of resembles Windows 8 where users will find Settings, OC, M-Flash, OC Profile, Hardware Monitor and Board Explorer tiles. A row of sliding boot drives and current system specs make up the header.
My favorite MSI hardware to BIOS feature this round goes to the Go2BIOS button. OC Genie 4 switch control 4GHz and 4.2GHz selections worked flawlessly as well. These are achievable with decent CPU cooling. Anything higher, requires manual tuning and very good CPU cooling.
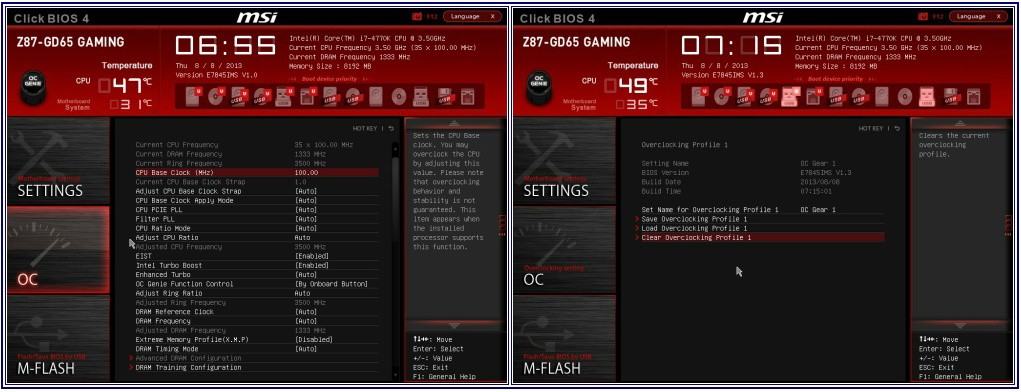
In the Settings, you’ll find peripheral, IO, storage, and component options. A lot of built in Intel configurations are here as well. The OC tab has all the frequency, voltage, memory timings, and XMP options. Basically, the OC is all about tweaking your overclock if you prefer over the OC Genie 4. OC Profile saves several choice configurations. One very handy setting is the Offset voltage options. This option is safer to use than setting a constant manual core voltage. A stable 4.7GHz with 1.29 volts was achievable relatively easy. Going for anything hire like 4.8GHz required voltage that gets entirely too hot with Haswell.
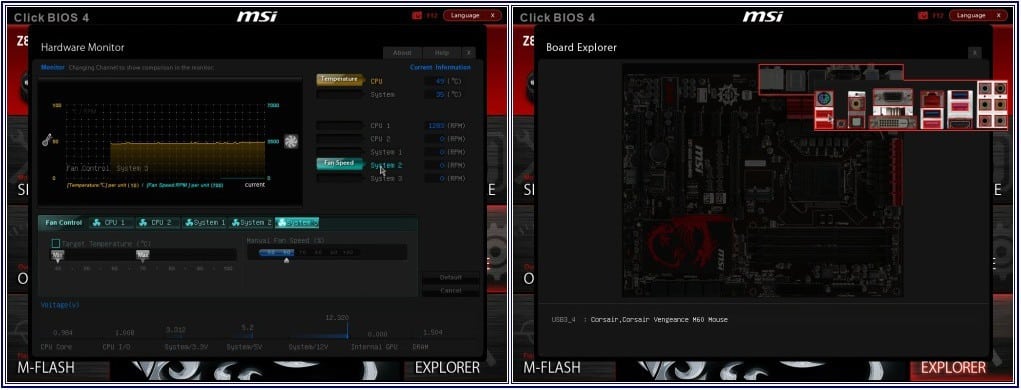
Hardware Monitor basically contains the system’s “medical” statistics such as power settings, voltage reports, temperatures, and fan control. I used this tab quite a bit while keeping an eye on Haswell’s nuclear core. Cooling is very important so it’s nice to see some kind of fan control. While there is full CPU and CPU optional fan control, there is only partial chassis fan control instead of full fan control like the ASUS BIOS.
While the functions of the MSI BIOS are better than the previous gen, I found it to be the least fluid in terms of layout and interactivity. You have to get use to clicking the Settings tab to find the option to Save and/or Quit as there are no quick note options.
Quality Control and Thermals
I took the time to examine each board’s component and operation quality looking for noises and any thermal issues. The ASUS Z87-Deluxe was very quiet and operated noticeably cooler than its Z77 cousin. It was especially cool when the 4-Way Optimization setting switches to “Away Mode” cutting back on wasted power. Forget EPU mode, 4-Way lets you have the best of both worlds.
The GIGABYTE Z87X-UD5H was also very cool and quiet bringing back impressions of the UD5H-TH from last gen which basically set a new low thermals standard. Easy Tune’s power saving mode will help lower the VREG heat just a little more. There isn’t much there by default.
The GD65 Gaming surprised me this time keeping cool and quiet. Command Center has a similar option to conserve power which can lower heat just a bit more. In either case of these boards, it takes quite some effort and overclocking to these boards to top 55 C.
Power Consumption and Voltages
Power consumption was measured at the socket using the Rosewill Tachyon Platinum 1000. This gave me a general idea as to how each board manages power from idle to load running the same exact load tests (Prime95 and Unigine Heaven 3.0 Demo) in intervals. Voltages were monitored using each board’s corresponding software and corroborated with Hardware Monitor Pro.
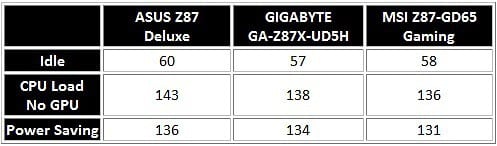
As expected, the ASUS Z87-Deluxe consumes a little more power because it has a couple more monitoring processors and featured connectivity. However, notice the idle power consumption at a low 60 watts. It’s surprisingly close to the UD5H and GD65 which are both good representations of average power consumption you can expect among medium range motherboards. In each system’s corresponding power saving modes, only a few watts less was consumed. Voltages stayed well above further supporting the great need for 80Plus efficient power supplies.
Now let’s start breaking down the boards even further!
Audio Performance
I take any integrated audio performance seriously since it’s an important feature all end users intend to use. I used RMAA along with powered Altec Lansing speakers, Sennheiser and Sony high quality headsets. Any noise RMAA might find should be audible when listening through these audio sources. If you have 60 to 150ohm speakers or headsets, you’ll pick up on any inline noise, clipping (when the audio pops because of poor output), and cross talk (when the channels leak over in to the other channels) as well.
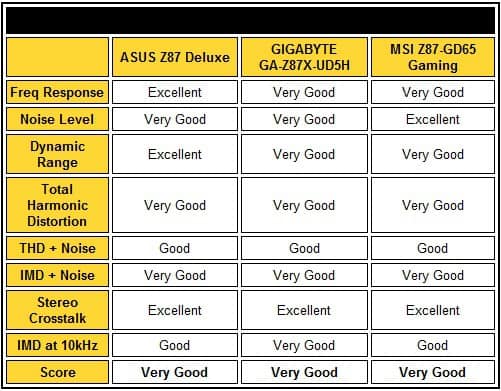
It’s evident that each manufacturer has stepped up the audio experience by adding capacitors and improving implementation. The ASUS Z87 Deluxe produced surprisingly clear and relatively strong audio without any noise or clipping. The MSI Z87-GD65 Gaming was very similar but uses the Creative Sound Blaster Cinema software to unlock some emulation. However, the Gaming’s audio fell just a little bit short in keeping up in volume yet still a decent experience. The GIGABYTE GA-Z87X-UD5H didn’t present any issues producing pretty decent quality but the ALC898 codec doesn’t seem to have the volume even with the Sound Blaster X-Fi MB3 emulation software.
In the end, all the boards create volume levels that won’t make ears bleed but will more than suffice.
Processor Performance – SANDRA Math and Multimedia
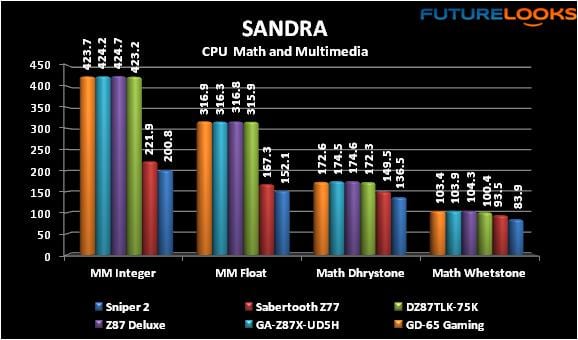
Motherboard tuning plays a significant role in overall performance. To identify which boards are wired for the best results, the platforms were tested with SANDRA Mathematical and Multi-media. I was surprised to see the three boards perform so similarly this time. Usually, there is more than just a miniscule 5% difference and there really isn’t even that. There’s just no decisive winner here.
CPU Rendering – Cinebench R11.5
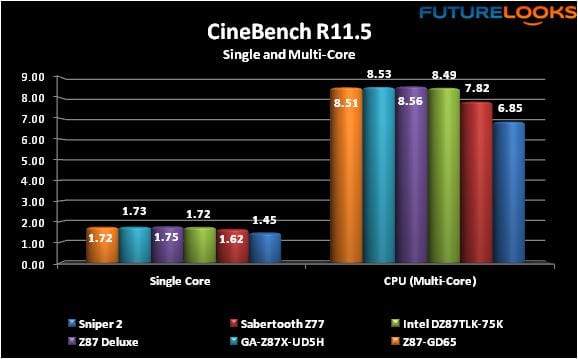
While Cinebench is a synthetic rendering benchmark, it does reveal any CPU, memory, and motherboard tuning benefits. I discovered the Deluxe to be a bit more aggressive here but only by some. Both ASUS and GIGABYTE tune their BIOS to run right at the Intel validated CPU limit. MSI doesn’t always tune their boards quite the same. In fact, I found the MSI board’s CPU clock to run 99.5% versus the other two 100.6%. Is anyone going to notice this difference? Not very likely.
Media Transcoding – Media Espresso 6.5, Media Convert 7, and Graysky 4.0
Just about everyone has a video capturing device these days. Many people aren’t aware that Intel worked closely with Arcsoft and Cyberlink to optimize affordable software for 2nd, 3rd, and 4th Generation processors. You don’t need a high end video card to make very quick work of “resizing” your videos.
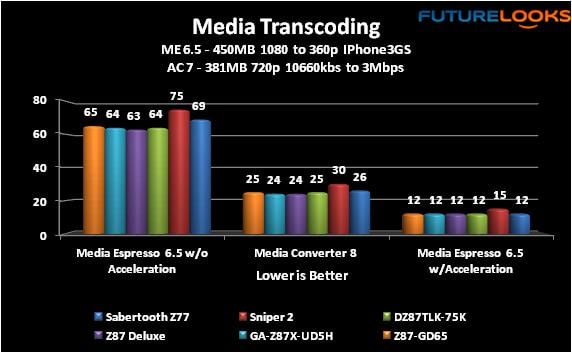
As you can see, these are very similar sized files found on small video cameras and smart phones. Even the old school Core i7-2600K isn’t far behind the three 4th Gen Z87 motherboards. If you’re a social media hound, either of these boards will more than suffice even without a video card.
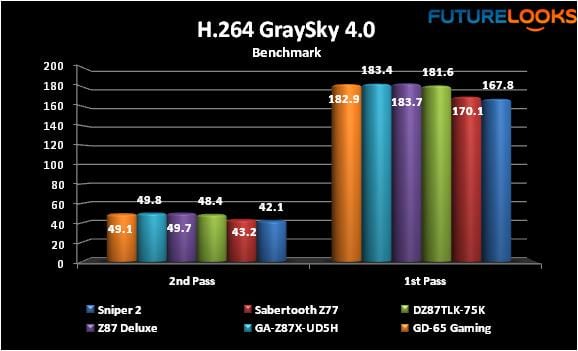
Graysky is another far more serious media transcode benchmark more indicative of people who like transcoding much larger pro level video. In layman’s terms, converting 1080p video over to more easily viewed and stored 720p video goes very, very quickly even if it’s a 2GB video. Again, the trio keep up with each other.
Graphics Support
Graphics support was tested using 3DMark11 Performance mode, Unigine Heaven 3.0 (normal tessellation, max AA/AN) and Metro Last Light at 1920×1080 also max settings. I did utilize two ZOTAC GTX 660 Ti to confirm each board supports SLI. Unfortunately, I don’t have another ASUS HD 7970 DirectCUII video card (my favorite AMD card) to test CrossFireX.
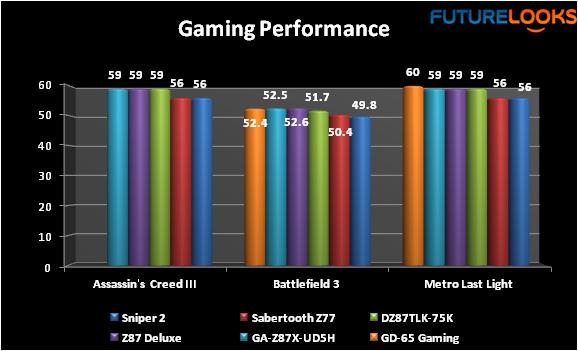
It’s down to mere pennies difference between the Z87 boards. All three support the GIGABYTE GTX 770 OC nicely. Unfortunately, I didn’t have an MSI video card to test the GPU Boost feature which I’d like to confirm later. For now, rest assured either board will support your GPU at maximum settings.
IO Performance
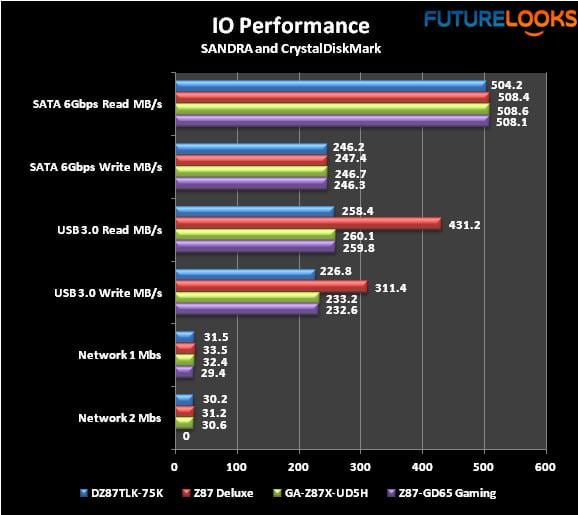
Since the Z68 days, ASUS has been implementing their own special flavor USB 3.0 Boost and UASP drivers. When either is enabled, performance is much faster than the default USB 3.0 devices. As you can see, the enabled setting leaves the rest behind considerably. When it comes to SATA 6Gbps performance, it’s more even since it’s all Z87 Express Chipset controlled. Networking tests over the internal network favors the Intel Gigabit controller whereas the Killer E2100 is just a bit slower.
With the testing now complete, it’s time to wrap this up and give you our thoughts on these three boards and how they might fit into your next build!
Final Thoughts – ASUS Z87-Deluxe
Gold was not a popular color choice, and this is as close to the right amount of gold as I would want to get. Barring this subjective opinion, the ASUS Z87-Deluxe easily set up to handle some of the most extensive benchmarking yet. The stability of the board is a sign of the quality implementation of the platform. The built in hardware features like Direct Access and the DRCT header which boots to the BIOS, TPU performance switching, extra UASP/USB 3.0 Boost performance, and 4-Way digital Intelligent processors all improve performance and the end user experience.
Like any Haswell system, overclocking the Deluxe comes with a learning curve. Adaptive voltage is an intuitive scaling CPU power feature that helps with power conservation and preservation of your processor. Offset voltage is still there for those used to the format. Given Haswell’s visible gains with overclocking memory, users should find the BIOS Easy Mode XMP settings extremely handy. In fact, if you’re serious about getting your overclock on and have extremely good CPU cooling, the Deluxe will help your Haswell K-SKU processor reach 4.9GHz or higher. New advanced BIOS features let you save progress notes, control cooling, and customize the layout as you see fit.
Finally, AI Suite III continues to add the most comprehensive maintenance and new enhanced performance package yet. Users unfamiliar with the UEFI BIOS will feel just like a pro when using the suite to control fans, performance settings, and the built in 4-Way Intelligent utility.
Priced as low as $264.99 US, this board offers a great deal of connectivity, performance, and another positive end-user experience which makes it worth its weight in gold.
Pros:
- Solid on-board features and performance
- AI Suite III: The end-user’s refuge!
- Intuitive UEFI BIOS – Great Easy Mode
- 4-Way Intelligent Optimizer
- Excellent overclocking potential
- Improved power consumption and cooling
- Realtek ALC1150 Audio is surprisingly decent
Cons:
- PCI, DIMM, and other ports don’t quite match the gold
- USB port polling a bit slow to activate
Overall Rating: 9.0 / 10.0


Final Thoughts – GIGABYTE GA-Z87X-UD5H
The GIGABYTE GA-Z87X-UD5H is a solid high performance board underneath the conservative facade. As expected, it kept up with the ASUS Z87-Deluxe board pound for pound, refusing to give up during the repeated onslaught of testing. When pushing the board too far, it was always quick to recover. The quality of the UD5H is excellent, and operates at cooler temperatures without so much as a squeak. The high quality components give the board its stability and continued good audio quality which is what I’ve come to expect from GIGABYTE as of late.
Overclocking doesn’t look like something the GA-Z87X-UD5H supports but I found the board eager to support the new Easy Tune performance utility’s overclocking selections as well as the UEFI BIOS’ selections right up to 4.8GHz. Just make sure you have excellent CPU cooling as the CPU voltage is just a tad bit high when using 4.7 and 4.8GHz respectively. The new UEFI BIOS has a new design and configuration adding quite a few new options like customized pages, default BIOS page, improved cooling control, and works well with Easy Tune. It’s far better and more intuitive than the 3D BIOS of yesteryear. I suspect GIGABYTE will continue bringing new options to their platform.
As an end-user, I found the new App Center a step in the right direction. It wasn’t quite ready when Z87 first launched, but it now has more programs and better support. I like it because you can easily update, add, and customize what you want within the App utility. While you can find this board for as low as $209.78 US, I wouldn’t mind seeing a UD5H-WiFi bundle again for a few dollars more.
Pros:
- Solid stability and quality
- Continued power conservation and cooling
- Great overclocking potential
- Much improved UEFI BIOS
- App Center with many new option controls
- Easy Tune more aggressive than ever
- Good price for the performance
Cons:
- BIOS mouse could be smoother
- Improved BIOS descriptions for us noobs
- Outdated VGA port
Overall Rating: 8.5 / 10.0

Final Thoughts – MSI Z87-GD65 Gaming
It’s about time MSI broke away from previous designs by offering an affordable platform for gamers looking for great stability, decent audio performance, and a theme that is anything but boring. The Z87-GD65 Gaming performed admirably and was quite stable, keeping up with the competition well. While I’m very fond of the fantastic dragon motif, I’m not too fond of the slightly crooked Ferrite chokes visible even on the MSI promotional page. This has been a major nitpick of ours for years. Granted it doesn’t hurt the board’s performance and isn’t noticeable when installed, but it is worth MSI’s attention when competing in such a tight price point.
Even though this is a more affordable $210-220 motherboard at retail, it still feels like an aggressive platform. With an updated Realtek ALC1150 audio processor implemented for a better gaming experience, along with OC Genie 4, it makes it makes for a very easy 4.2 GHz with the push of a button. And, there’s still enough heart underneath to get near 4.7GHz with manual tuning via the UEFI BIOS.
The added Go2BIOS button boots your board right in to the BIOS should something require attention. Unfortunately, the BIOS could use some updating like a visible Save and Exit button, added information as to what’s in each parent tab, and a less cluttered boot device slider up top. Despite a few rough edges, I’m still pleased with the MSI Z87-GD65 Gaming motherboard. I think this series will continue to grow in popularity especially as MSI improves the platform.
Not everyone can afford the elite GIGABYTE G1.Killer or ASUS ROG series motherboards, which gives MSI a unique opportunity to strike. And priced as low as $177.16 US, it most certainly will strike hard.
Pros:
- Very attractive gamer and dragon theme
- Killer E2100 Gigabit networking
- Improved Realtek ALC1150 – Audio Boost
- Low power consumption and thermal output
- Command Center – impressive first step
- OC Genie V – easy overclocking
- Affordable bang for buck gamer platform
Cons:
- UEFI BIOS not as intuitive as others
- Consolidate page buttons need notes
- Cluttered bootable device tree
- Outdated VGA port and crooked components
Overall Rating: 8.0 / 10.0

Three Intel Z87 Super Hero Motherboards for Different Enthusiasts
Overall, base level performance between motherboards is so similar it’s really like splitting hairs. If you’re an overclocker or need the hairy edge of performance along with plentiful connectivity, you’ll want to spend more money for the higher end boards like the ASUS Z87 Deluxe and GIGABYTE GA-Z87X-UD5H. If you’re not really a tweaker, then the MSI Z87-GD65 Gaming may be more what you are looking for. The decision really comes down to what features you need, the end-user experience that appeals to you, and finally, whichever fits into your budget.
Help Us Improve Our Reviews By Leaving a Comment Below!