


Everyone is going green these days, and they are trying to find more and more products that are as green as they want to be. One way people go about is to try to reduce their electricity usage, which has lead to a whole host of power sipping products being inserted into nearly every technology company’s product line. Computers are definitely not exempt from this, and companies like GIGABYTE are hoping that they can provide high performance motherboards that are also the foundation of a greener personal computer.
Features and Specifications
The GA-EP45-DS5 Energy Saver motherboard represents one of GIGABYTE’s efforts in providing a motherboard that has both guts and an green streak. This latest mobo is fairly well appointed, with the huge selection of ports and connectors you would come to expect from a top end part. It also represents one of the last few boards to use DDR2 memory in the INTEL chipset lineup.
Here’s a quick rundown of some of the highlights found on-board:
- Supports 45nm Intel® Core 2™ multi-core processors with FSB 1600 MHz
- Dual channel DDR2 1333+ for remarkable system performance
- 2 PCI-E 2.0 x16 graphic interface with CrossFireX support for ultimate graphics performance
- Built-in TPM chip with 2048bits encryption to highest level digital data protection
- Smart Backup provides data backup solution with 4 serial ATA device attachment from 2 hardware RAID chip
- Diagnostic LED and ACPI LEDs on board to display system and power status
- 2 Gigabit Ethernet LAN with Teaming functionality
- Supports Dolby Home Theatre® audio to create a stunning surround sound listening experience.
- DualBIOS solution gives a multiple security to the system
- Blu-ray playback outputs supported by high quality 106dB SNR ALC889A HD audio
In addition to all those computer-centric features, the GIGABYTE EP45-DS5 has a whole host of additional power management components and features that should allow it to use the electricity provided in the most efficient way. This includes features like Dynamic Energy Saver Advanced, which implements the VRM in a fashion that reduces power usage at idle. There’s also Green Ethernet, which adjusts power consumption automatically according to your LAN cable lengths and is purported to provide up to 10% power savings.
For a full list of all the features on this motherboard, you can check out the product home page.

When it comes to pricing and availability, things get a little more interesting for the GIGABYTE EP45-DS5 mobo. This motherboard is actually only available in GIGABYTE’s home country of Taiwan. I’m not even sure if there are plans to bring this particular model to North America. Still the power saving features on this board are present on many other boards from GIGABYTE, and they do have some similar configurations.
Basically this is going to be a test of GIGABYTE’s technology, to see if it uses less power then . . . say . . . my normal test rig. We’ll definitely get to that, but let’s see what else the Gigabyte EP45-DS5 mobo has to offer.
What’s In The Box
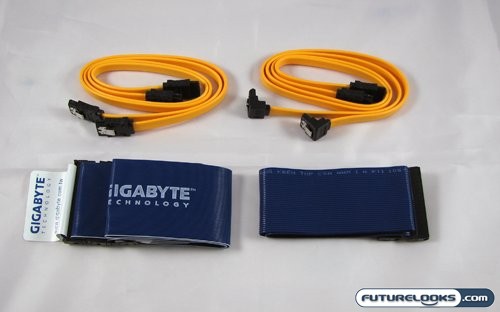
GIGABYTE includes a nice collection of bits and pieces with the EP45-DS5 mobo. This includes cables, brackets, accessories, and paperwork. In the cables department, you get your standard IDE and Floppy cable, as well as some not so standard SATA cables. It seems GIGABYTE is one of a select few companies who are delivering on the promise of the SATA2 spec to have self-securing SATA cables. The ends of these included cables do indeed have little metal clips on the end, and are indeed quite secure. Too bad there’s only four of them, because . . . you know . . . there’s ten SATA ports.
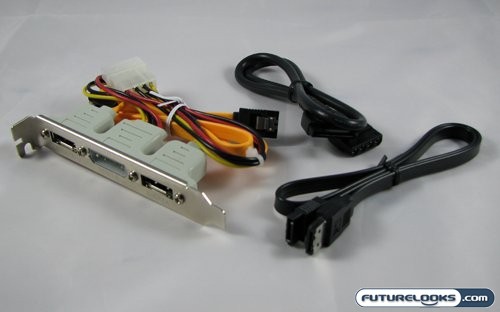
Well there’s eight ports internally, after you install this little tool. This is easily one of the best eSATA brackets I’ve seen included with a mobo. Not only does it have SATA pass through cables to connect to a drive, but it also has an external power connector. This means you can, with a great deal more ease, hook up a SATA drive without an enclosure. This will come in quite handy for those that need to pull a quick backup of data, or SneakerNet extremely large amounts of data between machines.

Rounding out the hardware included with the Gigabyte EP45-DS5 is the rear bracket, installation DVD, and a small cadre of stickers denoting all the features and benefits of this motherboard.

Finally we get to the included paperwork, which is actually quite well thought out. There’s two separate manuals; one for installation and one for operation of the motherboard. Both are quite easy to follow, and they really cover the bases of what does and can go with this board.
The DVD found in the package further extends these instructions with specific technical guides for the Dynamic Energy Saver, EasyTune, and much more. EasyTune is a Windows-based utility for accessing a variety of performance features on the board and CPU. There’s also some online update tools, an mobo info tool, and even a way to change the BIOS bootup screen.
Layout and Design
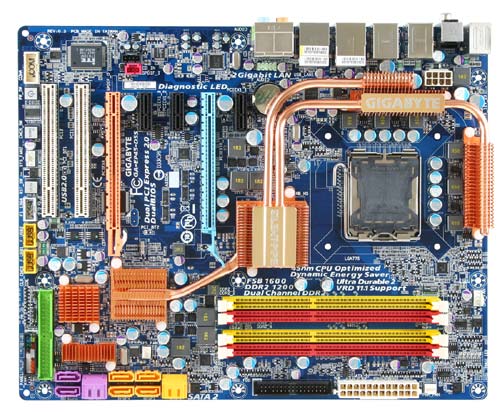
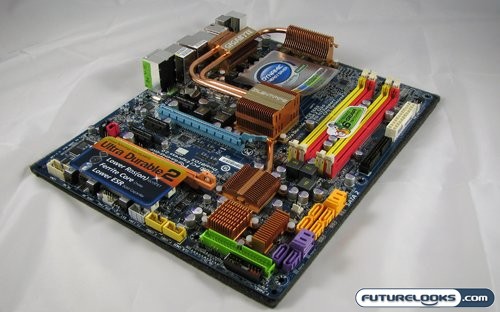
The layout of the GIGABYTE EP45-DS5 mobo is actually fairly typical, and doesn’t divert from what we’ve seen on countless ATX motherboards before hand. The CPU socket and memory slots, are in a normal configuration. The major difference is that, like many enthusiast boards, this GIGABYTE model crams a lot of hardware into that standard ATX configuration.
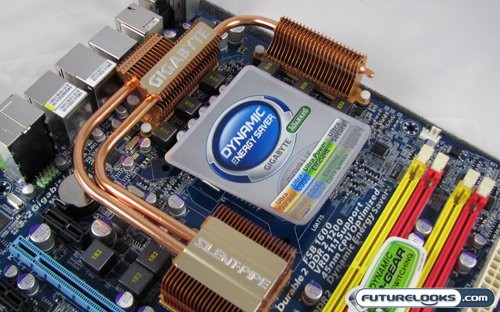
The area around the CPU is one such area that has a fair degree of hardware surrounding it. There’s a decently sized set of heatsinks used to cool the VRM and Northbridge chip, and they’re tied together using a contiguous heatpipe. The 8-pin power connecter is nestled in just above the “GIGABYTE” logoed heatsink, which makes it a little difficult to reach when installed in a case. While on the topic of difficult to reach ports and connectors, I need to draw your attention to the top-most x1 PCI Express slot in the lower left of the picture. What you’re seeing is true; the Northbridge heatsink does indeed block the port, rendering you unable to use any x1 PCIe card that has some length to it.
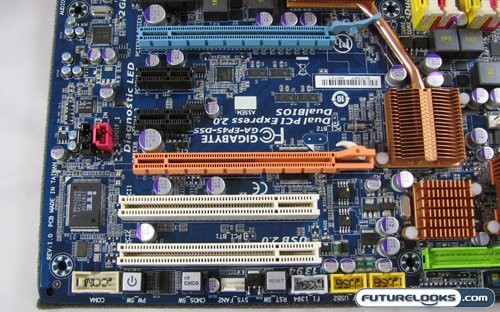
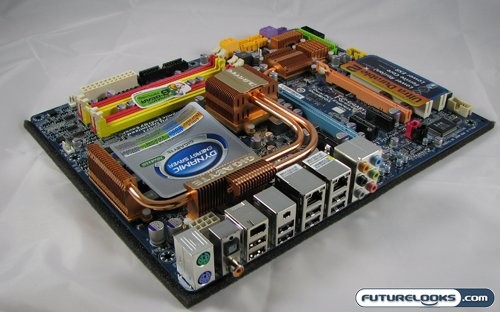
Even with losing that top x1 PCIe slot, you still have quite a few options for expansion. The Gigabyte EP45-DS5 mobo features two more x1 PCIe slots for a total of three, as well as two x16 PCIe slots (which drop to x8 when used in Crossfire), and two standard PCI slots. Below the PCI slots there lies some standard ports, as well as some nice additions. There is of course the standard USB and FireWire headers, and there’s also a COM port should you need such a thing.
In-between all that is a rather nice addition by GIGABYTE; a set of switches soldered to the motherboard to turn on your system, reset, and clear the CMOS with one press of a button. This is excellent for enthusiasts, because if you royally screw up your system settings you can quite easily reset them. The switches even light up blue, allowing them to be easily found. Unfortunately there still is one gripe with the layout of the ports, and it’s associated with the SATA connectors.
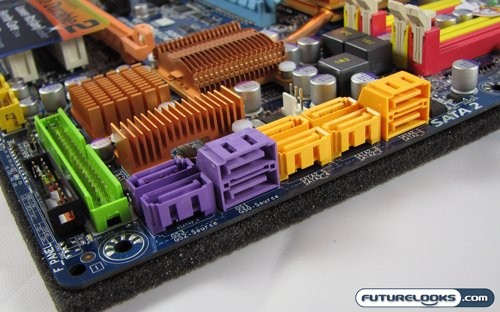
The GIGABYTE EP45-DS5 mobo has a total of ten internal SATA connectors. The first six are coloured orange and supported by the ICH10R controller that is built into the Intel Southbridge. They support the SATA 3.0Gb/s and 1.5Gb/s standard, and can run in RAID 0, 1, 5, and 10. There are four more purple coloured SATA connectors the run on a separate Sil5723 controller. This is where you would plug in the included eSATA bracket, or just plug in more devices should you need to. This controller only supports RAID 0 and 1.
So where’s the problem you may ask? Well it’s with where and how the connectors are laid out. The six ports that are pointing straight up, if something is plugged into them, have a potential to block large video cards like the GeForce GTX 260, as well as smaller cards like the Radeon HD 4850. The connectors on the cable will stick up too high to clear the card. You’d think one could just use the right angle plug on the SATA cables, but Gigabyte recommends against it, and the way they have oriented the ports would prevent you from doing so anyhow.
All is not doom and gloom in the RAID department though. These ports are backed by a hardware RAID controller that auto configures itself without user intervention. Since this is a hardware solution, the RAID is transparent to the OS so drivers are not needed. This means that all you need is a minimum of two drives and you’ve got RAID. GIGABYTE has also implemented a feature in hardware that allows you to configure automatic backing up of your array so you don’t loose data in a hard drive failure. Currently these features are only found on some of the DQ6 series boards found on this side of the Pacific. They aren’t even present in the EXTREME series of boards. The downer with this is that the DQ6 series has an insane amount of ports on it that may contribute to higher pricing and scare some people off. The DS5 is a much more manageable package, while still sporting these premiere features. It makes me wish a little bit more that the EP45-DS5 was available in North America.
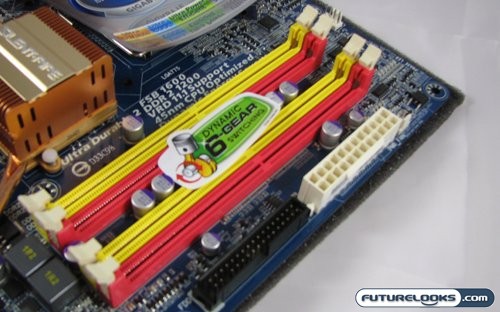
The area around the memory slots is pretty well trouble free. The EP45-DS5 supports up to 8GB of DDR2 at a top speed rating of PC1200. Right next to the memory slots, along the leading edge of the motherboard, is the 24-pin ATX power connector. Right next is a floppy connector, should one still need the oft never used drive. Above all that, near the top edge of the board, is a series of diagnostic phase LEDs. These LEDs not only tell you what is going on with the system, they also display what power mode the motherboard is in, as well as overvoltage warnings. More on that later.
Speaking of power, if you’ve seen all the pictures thus far you’ll also notice that this board uses nothing but solid state capacitors, which according to Gigabyte’s PR come straight from Japan. This is important as solid state capacitors regulate power much better then the standard capacitors found on cheaper motherboards. That and they don’t have the potential to pop and leak electrolytes all over your precious motherboard.
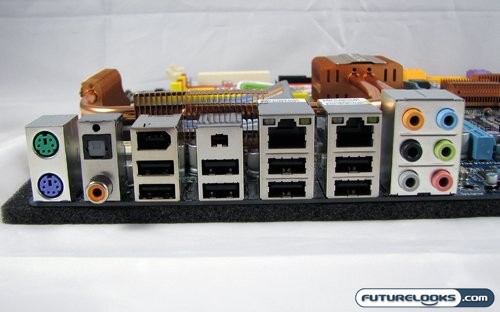
The ports found on the tailing edge of the GIGABYTE EP45-DS5, much like many other modern enthusiast motherboards, eschew most of the legacy connectors. The only two present are the PS/2 ports for mouse and keyboard; other than that it’s all fresh and modern. From left to right we have digital audio outs, USB and a 6-pin FireWire, more USB and a 4-pin FireWire, still more USB and the first GigE NIC, yet even more USB and the second GigE NIC, and the audio block. Both NICs can be joined together to get an effective 2 Gbit/s over your network. There’s a notable absence of eSATA ports, but that’s fixed with the included accessories.
Overclocking and the BIOS
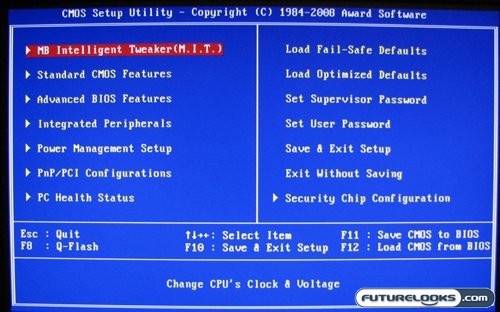
GIGABYTE has been know to not only pack it’s BIOS and CMOS with a whole load of features, but also keep those features and settings as safe as possible. That means that the EP45-DS5, like many other boards, has implemented Gigabyte’s Dual BIOS system. This feature has been seen on boards stretching far back to when processors we plugged into slots, and has always been a great lifesaver. If you really really pooch your BIOS (failed firmware load, over-zealous overclocking attempt) you should be able to use this feature to restore your BIOS from an onboard backup.
When it comes to overclocking with the EP45-DS5 mobo, things couldn’t be easier. When I say that I’m of course referring to the process of overclocking; actual results are completely dependent on your hardware, and your mileage may vary. Still it’s great that all the features needed to perform an overclock are on one sub-menu, and that sub-menu is numero uno option one on the main BIOS menu. Within this menu you can setup automatic overclocking based on CPU load, and tweak frequency and voltages manually and til your heart’s content.
System Setup
To test the GIGABYTE EP45-DS5 motherboard, we set up a test system with the following components:
- Intel Core 2 Quad Q6600 2.4GHz Quad Core CPU
- Corsair Dominator DDR2 4GB PC2-8500 RAM Kit
- ZOTAC GeForce GTX 260 AMP! Edition Video Card
- Western Digital VelociRaptor 300GB 10000rpm SATA2 Hard Drive
- Thermaltake Toughpower 1000W Power Supply
- Antec Skeleton Open Air Computer Case
This will look extremely similar to the test rig readers have typically seen me use. In fact the only different part here is the processor and motherboard. With that in mind it should be obvious that we are pitting this mobo, along with the most popular Intel quad core CPU, against my standard test bed to see how it fares. We’ll be checking up on raw performance, video encoding, gaming, and of course overall power consumption. The GIGABYTE board is of course touted as an “Energy Saver.” Well, let’s get started.
Synthetic Benchmarks
We start our benchmark run with the synthetic benchmarks, and our first test is Futuremark’s PCMark Vantage. This advanced suite is an update to PCMark05, and adds optimizations and performance tests that are more suited to modern computers running Windows Vista.
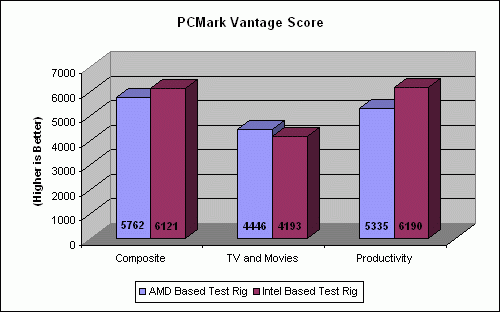
When placed up against the results we get from our standard test rig, the rig running the Gigabyte board was 14% faster on it’s composite score, and 6% faster in productivity. Though the Q6600 is 100MHz faster then the Phenom 9850, the contribution of that difference to these results is going to be negligible. That’s further shown by the TV and Movies score, which favours the AMD hardware. What we’re seeing here is where each system shines. The Intel hardware is faster overall, and seems to be quick in desktop apps, but the AMD setup is faster in multimedia and rendering.


The assertion made from the PCMark Vantage tests carries over into out SiSoftware Sandra run-throughs. In the processor Arithmetic tests, the Intel hardware was faster by a decent margin overall. Dhrystone tests showed the biggest gains, while Whetstone tests were neck and neck between the two architectures.
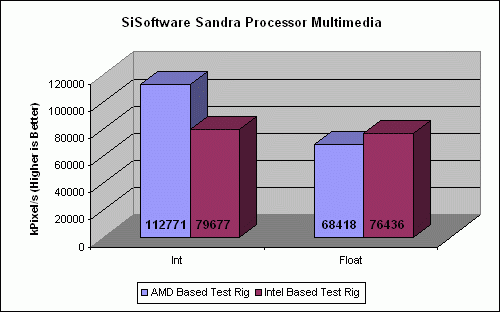
Things become a little more muddled in the Processor Multimedia tests. SiSoft Sandra reported a clear win for AMD on the Int tests, and and a clear win for the Intel rig on the Float tests.

Finally we test raw memory bandwidth, and the AMD rig thoroughly beats the Intel hardware in this test. This can most likely be attributed to AMD processors having their memory controllers on die with the CPU. In the long run, these tests are still synthetic. We need to get to some real world testing to see how well the Intel rig really does.
Nero Recode
Our first real-world test, and really the only desktop test to be used, is a run-through of Nero Recode to encode a DVD to iPod video. For this test, I’m using Star Wars II: Attack of the Clones. I wanted a movie with a wide selection of both bright and dark scenes, lots of action, and a decent amount of detail. Though the reviews of this movie are mixed, it fits the bill nicely for what I’m looking for in a benchmark title.
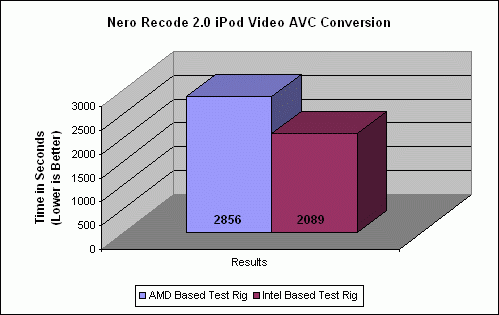

Nero Recode turned the tables on what was observed with our synthetic test. Though the two Intel and AMD procs were separated by 100MHz in favour of the Intel chip, the results still showed the Intel rig beating the AMD test bed by more than 12 minutes. This is a result of the efficiency of the Intel CPU combined with the memory and I/O performance of the motherboard. The performance of the new rig in this test actually sparked a gear change in our remaining benchmarks.
Gaming Benchmarks
For gaming we decided to keep things brief, focusing only on a couple DX10 based titles. Our first benchmark title is World in Conflict. This latest RTS game is our replacement for Supreme Commander. SupCom is getting a little old for us, both physically and as a benchmark. The results it’s been outputting haven’t been very conclusive, and the DVD copy I have has worn out to the point of being very spotty to read. World in Conflict is then a welcome change.
World in Conflict

As for that gear change I had just mentioned, for testing with WiC we ditched the old AMD rig and decided to see how the game scales across multiple resolutions. We started with a low resolution, to isolate the CPU and memory, and ramped things up from there. The good news is that the rig running the Gigabyte motherboard scaled quite well, with playable performance all the way up to the native resolution of my test LCD.

The bad news is that I didn’t get a chance to really sit down and play through some of this game. World in Conflict is quite a nice looking strategy game, and there were only a few drops in frame rate during use of the highest resolutions. This would be more to the video card then any other component in the test rig.
Crysis
The next and last game in our round of gaming benchmarks is Crysis. Even with so many games released since this title hit the streets, we still find that Crysis puts the most stress on our test rig. Still we applied the same principles used in benchmarking WiC to testing with Crysis. We wanted to see how well the game scaled across multiple resolutions, and if the CPU and memory became a limiting factor.
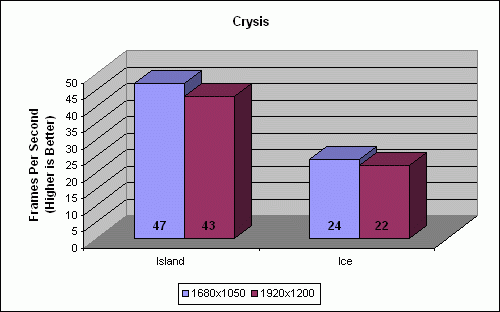
Well unfortunately we lost the results for 1024×768, so they were rightly not included in the chart. Still I have to say that the results from these benchmarks were similar to those seen in World in Conflict. Between the lowest and highest resolutions there was only a single digit percentage difference in performance. This means that the video card was where things were tripping up, and the CPU and memory were operating in peak form.
The Grand Finale
Now that I’ve spent a couple paragraphs already in this review talking about the energy efficiency of this motherboard, and how GIGABYTE calls this an “energy saver” motherboard, I think it’s time to test those assertions. Using an energy meter found at Canadian Tire, I measured exactly how much power was used by this system. I then compared the results to our standard test rig, to see which one is truly more efficient.
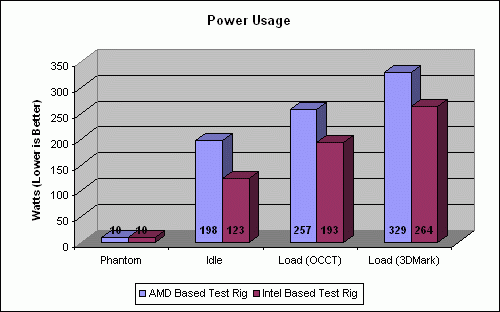
Under idle, load, and extreme load conditions, the Intel rig using the Gigabyte motherboard was universally less power hungry. Though the Q6600 has a lower power rating then the Phenom 9850, it doesn’t quite compensate for the drops we see here. It’s hard to say anything other then the Gigabyte GA-EP45-DS5 is indeed an “energy saver.”
We can’t just leave it there though. The GA-EP45-DS5 may be an energy saver when compared to a AMD rig using stock settings, but how do the power saver features of this board affect both power usage and performance when they are fully enabled? Luckily we can easily find out, as one of the programs included with this board can tweak the power saver settings one of three ways. I only picked the minimum and maximum settings, but it still managed to produce some interesting results. The first of those results was that I noticed the status LEDs I mentioned were changing with each power mode. These LEDs, which are positioned on the motherboard above the RAM, quickly indicate what power mode you are in, saving you an unnecessary ALT+TAB to check the Energy Saver program.
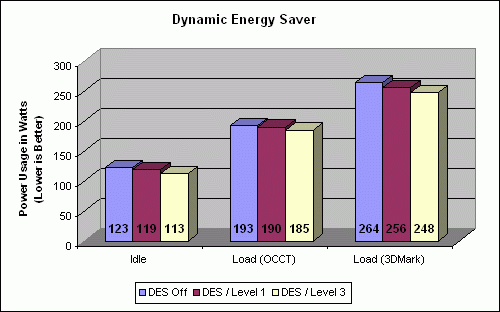
As for actual test results, the power saver actually worked, and fairly well at that. At idle, power usage dropped 4W and 6W with each successive load increase. Placing load exclusively on the CPU and Memory produced a similar gap between the different modes. This is most likely due to all the load being placed on the CPU and RAM. This makes sense, as the DES settings only affect the CPU, Northbridge, and RAM.
Moving over to 3DMark Vantage placed much more strain on the system as a whole, but not as much on the CPU and RAM. This is inline with the results we’ve seen, as the CPU would have been throttled back if it wasn’t being heavily used. This applies to each core individually, as opposed to the entire processor. Now all this scaling back may make you think performance took a hit, and you would be completely and totally wrong. Each run-through on 3DMark Vantage produced results that were either nearly exact, or so close that they were statistically insignificant. Overall this is an impressive enthusiast board, which means it’s time to wrap things up.
Final Thoughts
The GIGABYTE GA-EP45-DS5 motherboard lives up to its name in more ways than one. The board is truly efficient, and is indeed a power saver. It also provides more then enough performance for your Intel based custom rig. It’s laid out in a fashion that is mostly easy to work with, and promotes safe and cool use of all the components.
The biggest thorn in the side of this motherboard is still its availability. Though some boards in GIGABYTE’s line share some of the features of the GA-EP45-DS5, they don’t all have the same features. It would be nice to see this particular board in North America, but you’re going to have to buy into the EXTREME series if you want this exact set of features, whether you overclock or not.
As for any glaring technical problems, there’s still the placement of the SATA ports and that one x1 PCIe slot. The SATA ports need to be placed in a fashion that don’t interfere with any add in cards you may want to use. As for that lone x1 PCIe slot, it’s pretty well useless since you can’t remove the northbridge heatsink.
In the end, we still have a decent motherboard that lives up to its claims. It is indeed power efficient, feature loaded, and a great foundation to any green performance PC. The price point this board is offered at makes it even more desirable, as it sports features only seen on the more expensive Extreme series boards. Overall this is a recommended motherboard, if you can find one in North America.
Pros
- Features a plenty
- Excellent selection of ports
- Energy efficient
- Top notch performance
Cons
- Problematic layout of some ports
- Northbridge heatsink interferes with top x1 PCIe slot
- Not widely available outside of Taiwan
Overall Rating: 8.5/10.0


Help us improve our reviews! Leave a comment below!