

One factor in every component purchase decision is the budget. Components on your wishlist are always in flux, as you decide which can be downgraded to save money and which can’t. My Electronic Circuits professor’s favorite answer to a question about component selection is always “it depends”. I personally downgrade my choice in power supply and motherboard as a last resort when I have to get a PC under a restrictive budget. If you need proof of my rule of thumb I will be happy demonstrate with the GIGABYTE GA-990FXA-UD7. This time we truly saved the best for last.
Features and Specifications

There is not much difference here from the previously reviewed GA-990FXA-UD3 and GA-990FXA-UD5 boards as all three boards are in GIGABYTE’s FX lineup. They are by definition of GIGABYTE naming nomenclature, the best product line they offer for AMD. Since this is the third time we’ll be looking at a board from the company’s FX line up, I’ll refrain from going through all of GIGABYTE’s great features such as DualBIOS, Hybrid EFI Technology, On/Off Charge and USB 3.0 Support. Instead, I will just concentrate on what is unique to the 990FXA-UD7.
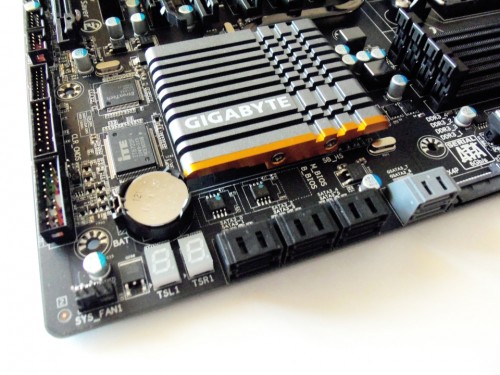
The key feature differences on the UD7 are the luxury items, some of which may make overall usability easier. On the motherboard itself you find two led number pads. During the POST (Power-On Self-Test), these two panels follow the POST routine and stop if there is an error. The normal operations code is “FF” as it is coded in hexadecimal. If your PC does not start, you can simply look at the code and check your manual for the exact reason why there was a failure. This can literally save hours in troubleshooting, but I will get back to this during installation.
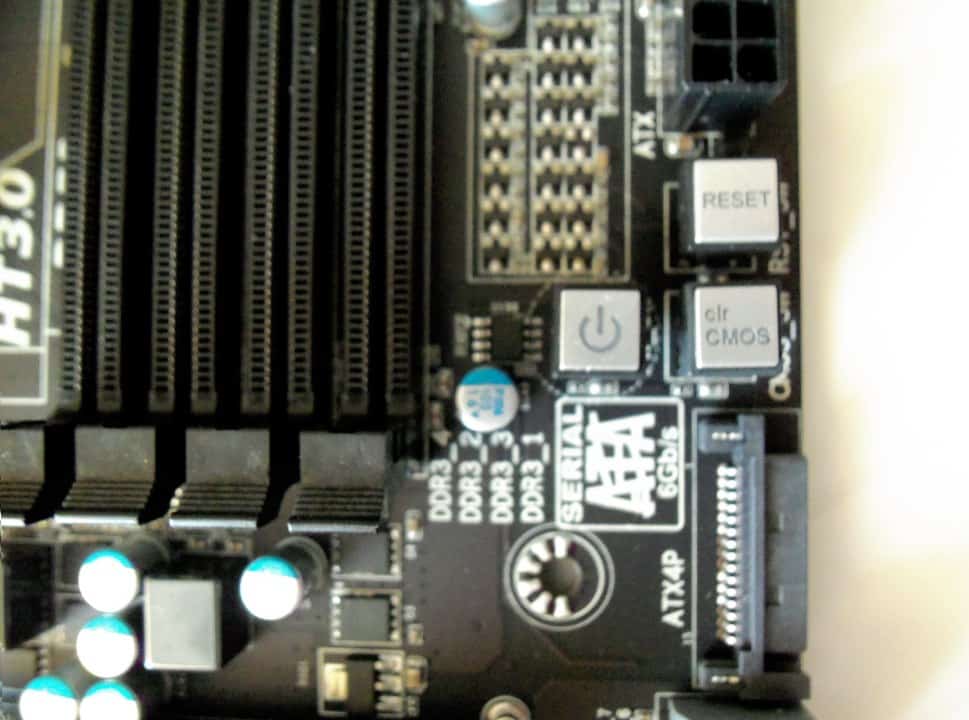
The second feature you can see on the GA-990FXA-UD7 is the Onboard Quick Switches. They are simply Power, Reset, and Clear CMOS buttons built into the board itself but they serve so many purposes. The first is they all glow blue when there is power through the board. A quick glance and you can tell if your PSU is plugged in and is turned ON. You can also power on your system without connecting the front I/O panel on your case. This is a quick way to test if you have the front I/O connected properly. Finally, the feature I think should be on every motherboard, is the ability to reset CMOS back to default with the press of a button. No tiny jumpers to lose and no battery to remove in order to accomplish this operation.
You can also see the difference of the UD7 on the back I/O panel. As you know from the GA-990FXA-UD3 review the rear I/O for it and the 990FXA-UD5 are identical. On the 990FXA-UD7 there is the addition of a coaxial S/PDIF Out connector to improve connectivity with older audio systems in a home theater environment. Side by side you would think there was one less USB port, but the UD7 also has a eSATA/USB Combo connector in replace of the two eSATA ports you find on its counterparts.

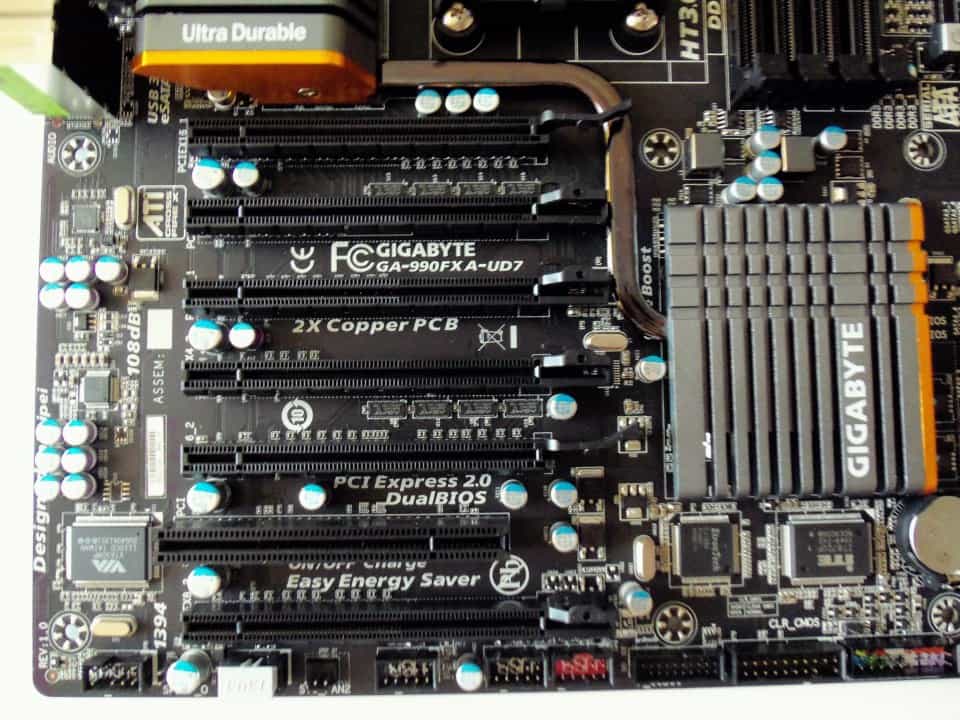
The last feature the UD7 has over its two counterparts is the layout of the expansion slots. On the UD7 you will find a single PCI slot and six PCIe x16 slots. Two of these slots run at full x16 speed, two at x8 speed, and two at x4 speed with all conforming to PCIe 2.0 standards. What this means for you as the end user is up to 4-way Crossfire or 4-way SLI support. For additional power to the PCIe connectors you can also find the ATX4P connector as a front facing SATA plug just above the two addition SATA ports (8 internal SATA 3 ports in total). This keeps you from needing to use a molex connector in an awkward position when your board needs the extra power.
Of course, the other major difference between the flagship UD7 and it’s other brothers is the price. The GA-990FXA-UD7 has a retail price of $249.99 as of the writing of this article and it’s up to us to find out if it’s worth it.
What’s In The Box?
The GIGABYTE GA-990FXA-UD7 also likes to arrive in style with a unique design to the box compared to the UD5 and UD3. The box has a flip open window that allows you get a glimpse of the motherboard prior to opening it. Once you remove the outer shell and get to the inner box, you will find the plastic screen you were looking through was actually apart of this box. I also could clearly see the box was the same length and width, but was at least 1/2 an inch talker. This is very similar to the treatment of the the similarly flagship GA-890FXA-UD7 reviewed many moons ago.
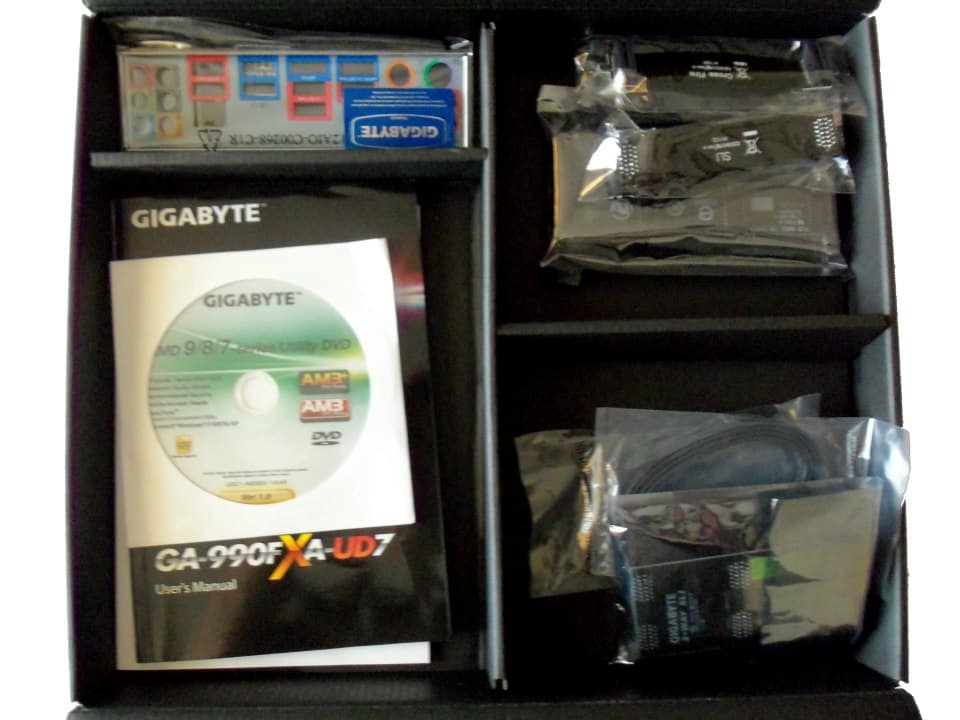
Once you get to the motherboard you will find the GA-990FXA-UD7 in its own box with an anti-static foam bed. This is how they can protect the board and show it off at the same time. All of your other items can all be found below the motherboard in there own compartmental box. This includes the user’s manual, quick installation guide, four completely black SATA 3.0 cables, rear I/O shield, two Crossfire bridges, one 2-way SLI connector, one 3-way SLI connector, and one 4-way SLI connector.
The content of the package is great as it provides anything you would need for any possible configuration. While all Crossfire capable AMD video cards come with one bridge, I was glad to see they include two extra. I would personal liked to see six SATA cables instead of just four. I also enjoy the fact all the accessories are completely black which helps to maintain your rigs color scheme if you have a side window. As we figured out from a previous article, the included DVD and manuals also add a lot of value to the bundle.
Test Setup
The test system I used for the GA-990FXA-UD7 is the exact same as the one one used for the GA-990FXA-UD3 review and will become my standardized test bench moving forward. This time I did use a different chassis, but we will get around to that very soon as well. For now, the new case has very good cooling and will not affect overclocking performance.
- Motherboard: GIGABYTE GA-990FXA-UD7 Rev. 1.0
- CPU: AMD FX-8150 AM3+
- CPU Cooler: Noctua NH-D14
- Memory: G.Skill Ripjaws X 2133 MHz (9-11-10-27) @ 1866 MHz (9-10-9-27)
- Power Supply: Antec High Current Pro 850W 80PLUS Gold
- Graphics Card: AMD Radeon HD 6850 1GB Reference Card
- Case: SilverStone TJ04-E Evolution
- SSD: Patriot Pyro SATA III MLC 60 GB (Sandforce 2281 controller)
- HDD: Seagate Barracuda XT 2 TB
- Sound: Realtek ALC889 (Integrated)
- OS: Windows 7 Ultimate 64-bit
- USB 2.0 Test: Corsair Flash Voyager 16 GB
- USB 3.0 Test: Rosewill USB 3.0/eSATA Enclosure + Samsung SpinPoint F3 1 TB
Now that we have the hardware out of the way. Lets move on to software.
Test Software
For this review, here are the applications we’ve selected for testing.
- PCMark07
- 3DMark11
- Alien Vs. Predator DX11 benchmark
- Resident Evil 5 DX10/DX9 benchmark
- FRAPS
- Metro 2033
- Battlefield 3
- CrystalDiskMark 3.0.1
- OCCT’
- ATTO Disk Benchmark
- FurMark Burn-in
- RightMark Audio Analyzer 6.2.3
This is pretty much the same software I have used in all my reviews thus far. I did have to add a new piece to the collection in the form of ATTO Disk Benchmark for testing the true performance of an SSD on this motherboard. I have also included benchmark testing for Battlefield 3 which I will be using to replace Metro 2033 as it is a more up-to-date game.
BIOS, Overclocking, and Installation Notes
We will start with the BIOS as it is often the first thing the user interacts with during the build process. GIGABYTE still uses the true blue Award BIOS they use on all of their motherboards. You do have the option of installing the GIGABYTE TouchBIOS which the GA-990FXA-UD7 fully supports, but it is important to first update the BIOS to the latest version first. The latest stable version of the BIOS for this motherboard is F7 which has one major difference between it and the F6 BIOS used on the UD5 and UD3.
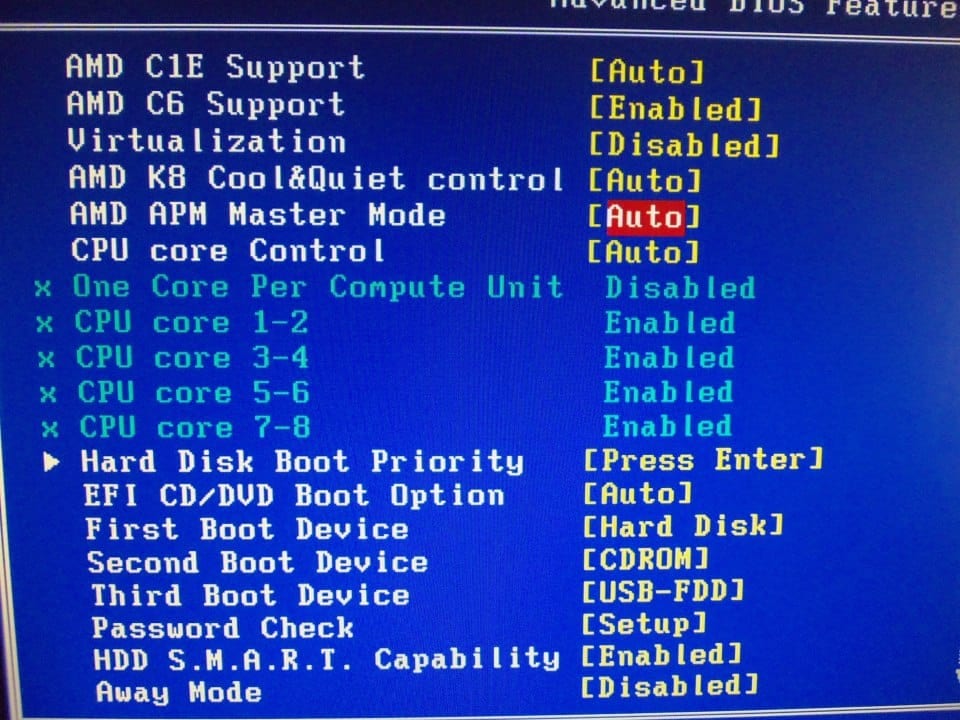
In the BIOS you will find an extra AMD feature called AMD APM (Application Power Management) which goes one step further with power control. I will be honest and say I was unable to find much information about this feature. From what I gather, it is the same technology as the TDP capping feature found on AMD Bulldozer Server chips. It allows the chip to push individual cores into lowest power states when not being utilized. This is designed to save even more power as the shift to these states is controlled by current demands of the applications being run by the OS. We will see how well it works very soon.
Next on the agenda is overclocking on the GA-990FXA-UD7. This time I had very few issues with the overclocking process, but was a little disappointed by my final results. I could only match the 990FXA-UD5 in maximum stable overclock of 4.73 GHz. After two motherboards and two different approaches to overclocking I believe this may simply be the limit of my FX-8150 chip.
In subsequent attempts, I was once again able to get the FX-8150 to POST and boot into the operating system up to 5.0 GHz, but was not able to do much beyond that. Not only does this require redlining several power options, it would also crash the instant any application was started. Bringing the clock speed back down to 4.73 GHz allowed me to play my games, run any application, but does show some instability in CPU intensive applications such as Folding@Home and Intel Burn Test. In other words, it wasn’t 100% rock solid stable.
To get the GA-990FXA-UD7 to 100% stability in all application including torture test I could not go beyond 4.62 GHz. Much like the UD5, any time the POST would fail, my system would simply restart with default settings. To reach a stable overclock at 4.62 GHz and the 99% stable OC at 4.73 GHz I had the CPU running at 1.475 V, 1.65V memory, and other options tweaked within the safety zone, with some red numbers as needed. This obviously increased power use due to the increase in power through components, but also because many of the power throttling features had to be disabled to ensure fluctuation in power did not cause instability issues.
I normally don’t include a section with information about installation with components. This is because the issue is almost always related to the design of the case being used and not the component itself. I just need a place to bring up this one glaring flaw with the layout of the GA-990FXA-UD7 PCIe slots.
The primary slot, PCIEX16_1, is the first PCIe slot and entirely too close to the CPU socket. When you are using an aftermarket cooler such as the Noctua NH-D14 I use for testing, the area between the cooler and primary GPU is too cramped. This does not affect installation or airflow, but does make it very difficult to remove either component.
When you have to remove the GPU or coolers with fans held by metal clips, you will need to use a flat metal object to slide between the two components. In my case I used a knife to reach the metal fan clips and/or PCIe release clip. Its not a big issue, but it just seems so easy to avoid by simply placing the PCI slot here. The few legecy PCI cards still in use by consumers like myself are single slot cards with minimal cooling requirements. The PCI slot also has no retention clip, so its removal would not need additional clearance. There could be some other reason this was done the way it is done, but this is something one should be aware of.
Overall System Performance (PCMark07)
I will start with PCMark07 and a total system performance break down. PCMark07 provides a very comprehensive set of real world simulations to gauge performance. Results show a variety of categories and can often comparatively show weaknesses in a system.
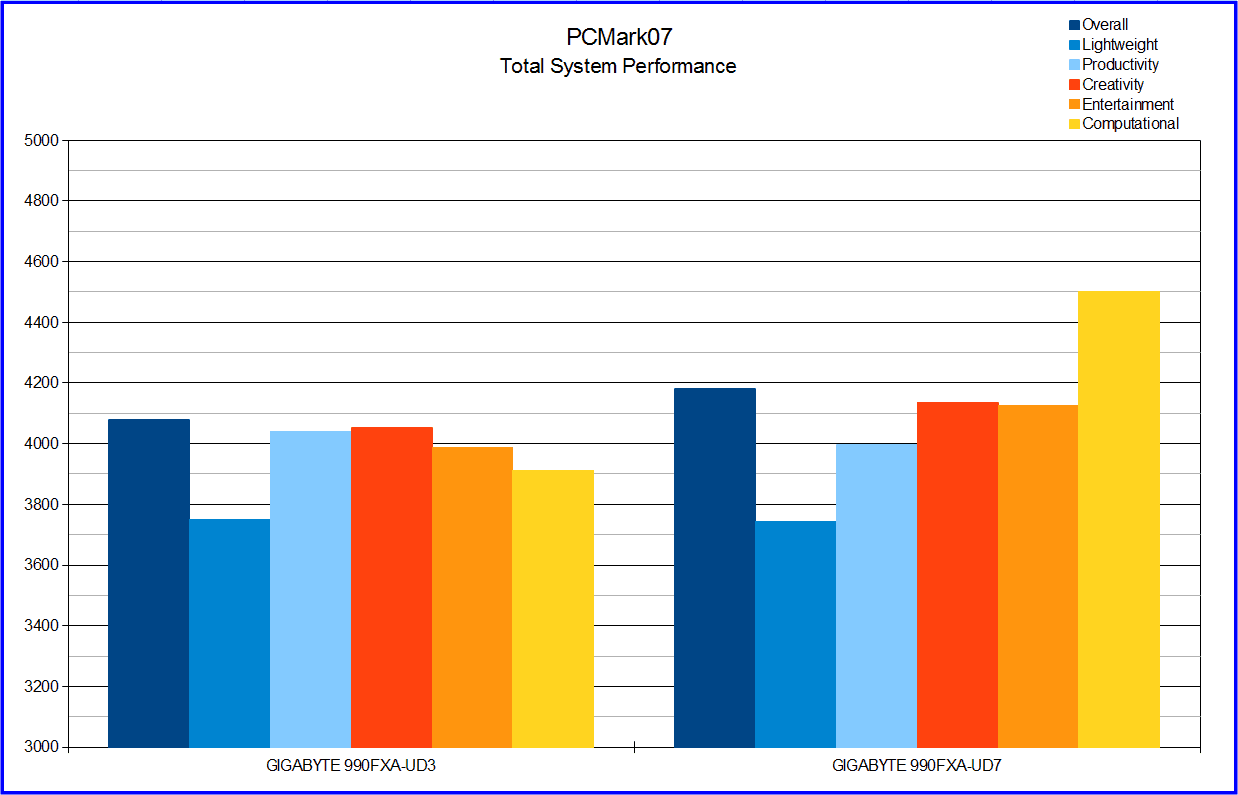
There just isn’t any real competition. The GA-990FXA-UD7 takes the lead in Overall performance, Creativity, and Entertainment tests. There is a significant advantage in Computational due to the improvement in power management which the GA-990FXA-UD3 had issues with. The Lightweight and Productivity tests are virtually identical with the UD3 taking a very small lead.
Synthetic Graphical Performance (3DMark11)
In this benchmark we will test how well we should expect the GIGABYTE GA-990FXA-UD7 to perform when it comes to gaming in general. This test also allows me to look at performance when gaming at low to medium graphical levels. I will address high and extreme levels in real world testing. Also note the Physics score is taken from the Performance Test.
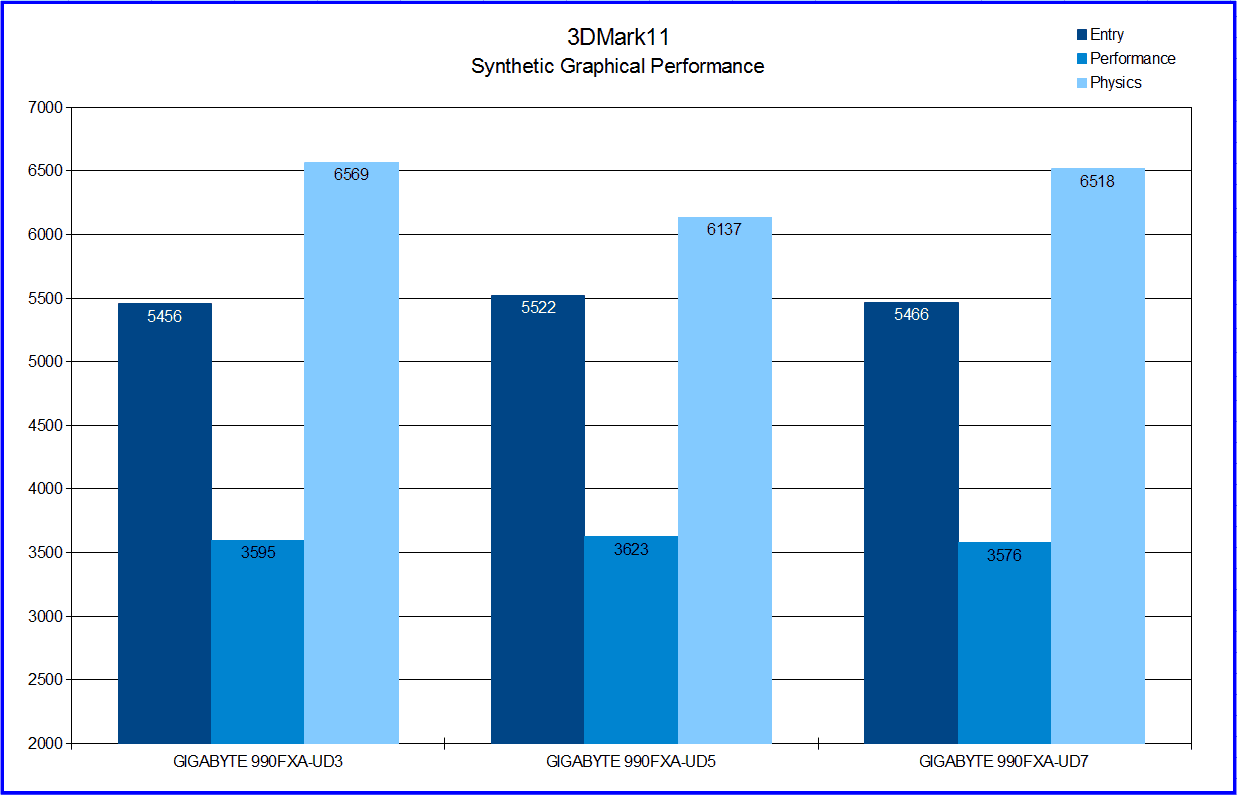
In this test all three of GIGABYTE’s 990FX boards come within less than a 100 points of each other in each test, except for Physics. For some reason the UD5 falls a little behind in this category, but this is because those numbers were done prior to the Windows 7 Bulldozer patches. While these patches reduce performance by a very small percentage, it did improve multi-core performance which affect tests such as Physics.
Real World Graphical Performance (Alien Vs. Predator, Resident Evil 5, Metro 2033)
The selection of games I use are not a comprehensive test as it is only 3 games. I use these games to test the widest range of game variables with the least number of tests. This set covers DX9, DX10, and DX11. It shows performance on a game with a lot of graphical features in Metro 2033 and a game with relatively few graphic features in RE5. In the near future I will be replacing Metro 2033 with Battlefield 3.
Testing for Alien Vs. Predator is done with the default high DX11 settings. Resident Evil 5 is tested with all options set to as high as possible with frame rate unlocked, motion blur off, and VSync disabled. Metro 2033 is tested at its maximum settings. Battlefield 3 is tested with the games chosen settings based on my GPU which is High. This has the Antistropic Filtering at x16, Post Anti-aliasing on High, AA Differed set to Off, and all other options on High.
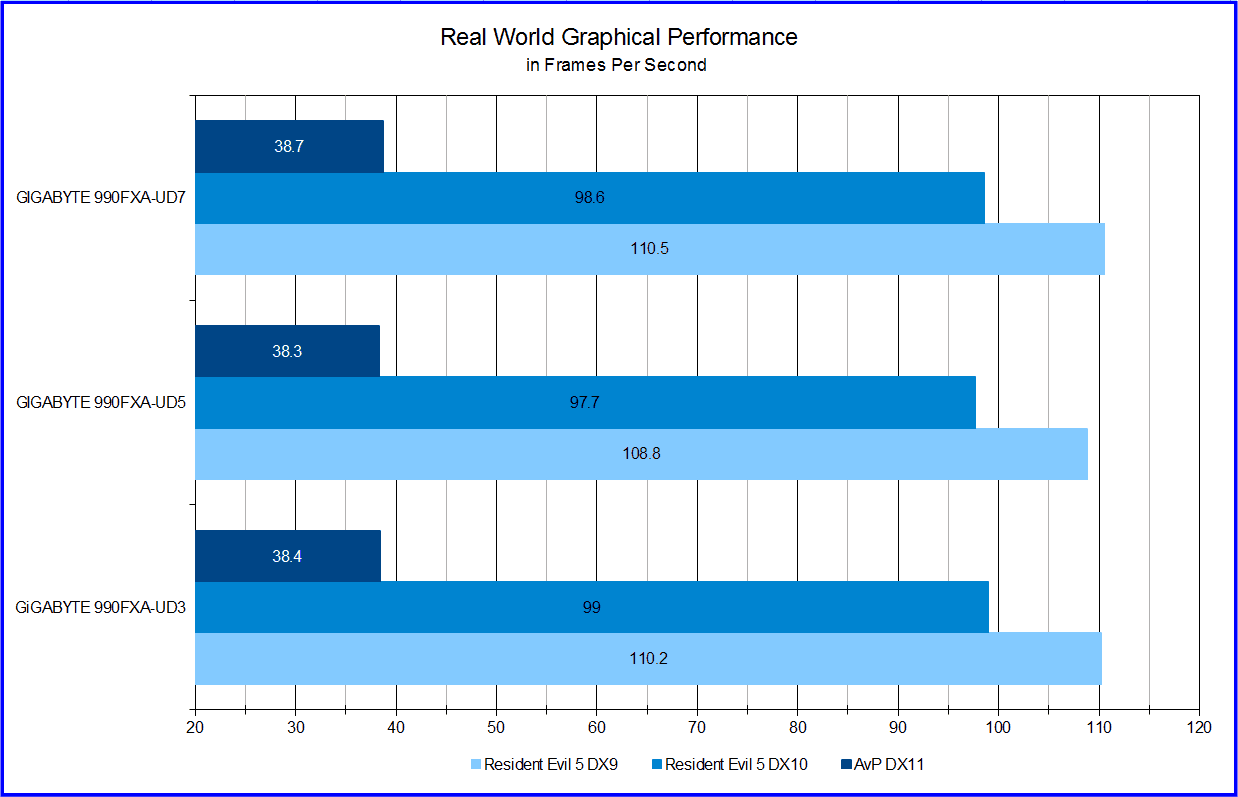
In real world performance the UD7 did come out on top, but not by enough to consider it a definitive win. These results are virtually identical with it being very clear the bottleneck is the GPU’s performance and not the motherboard. Now lets take a look at a DX11 title that will push the system to the limit of its capabilities.
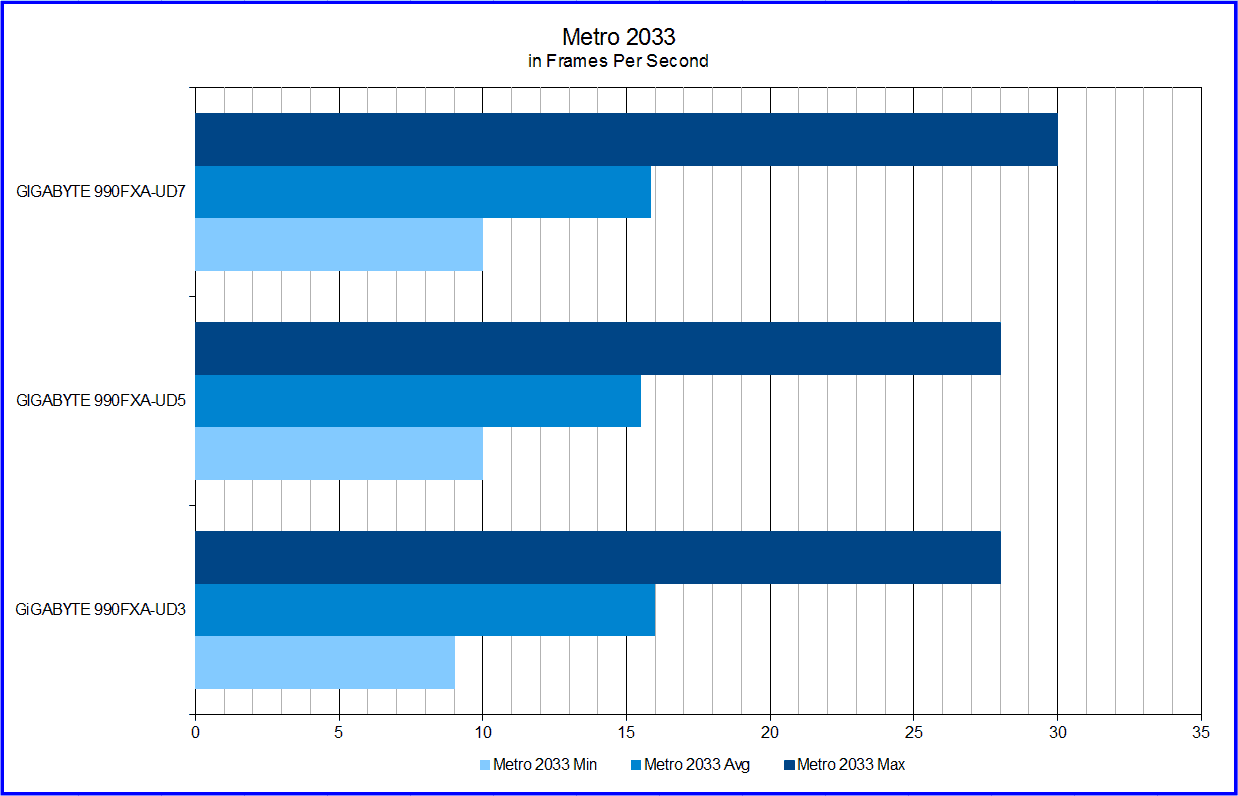
This time we see performance of the GA-990FXA-UD7 matches the UD5 in minimum, matches the UD3 at average, but takes the lead by 2 FPS at maximum. This would seem like the UD7 is giving a little more breathing room and may provide wider improvement margins with more powerful GPUs.
SATA 6 Gbps I/O Performance (CrystalDiskMark 3.0.1 and ATTO Disk Benchmark)
I use CrystalDiskMark for all testing except with the testing of sequential Read/Write testing for the SSD. CrystalDiskMark provides an average performance level of the 1 GB data set in four common scenarios. I use ATTO as it provides a better idea of maximum performance of the I/O by using a smaller 256 MB data set being transferred in varied packet sizes.

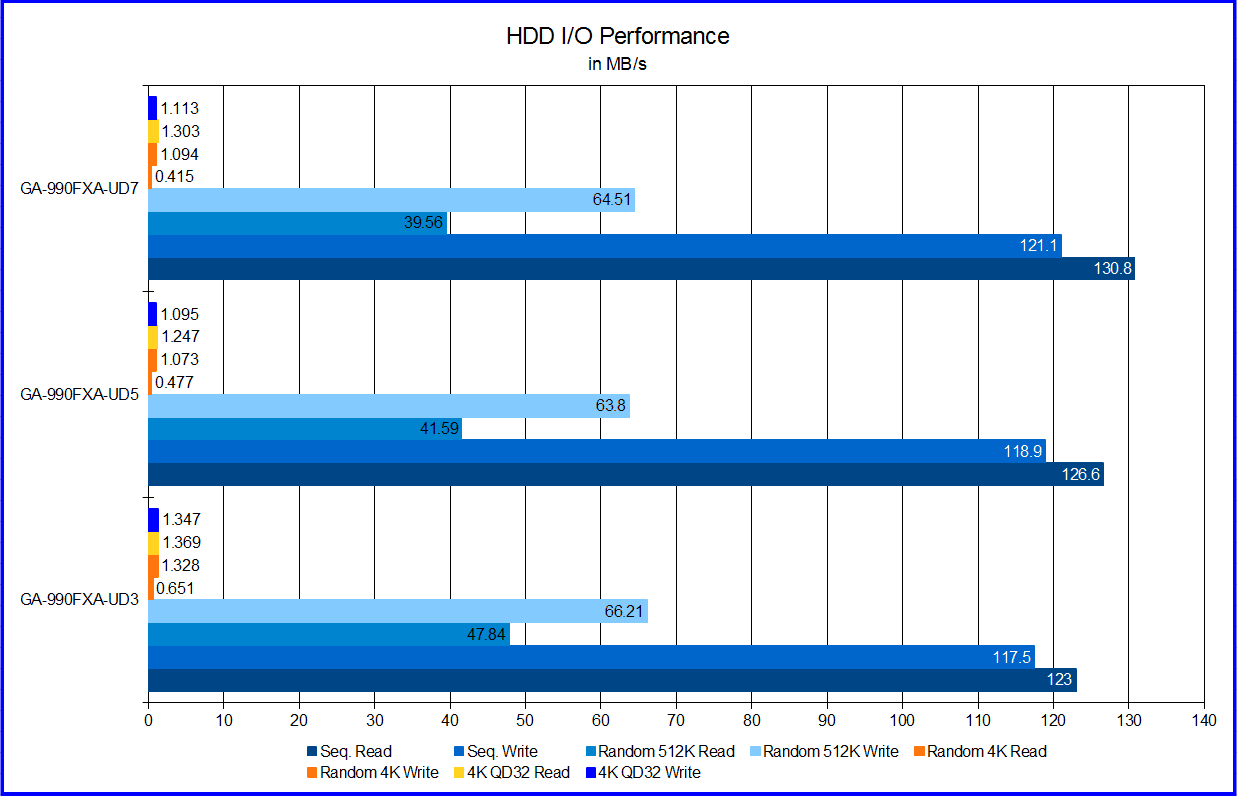
The performance when it comes to the SSD is pretty back and forth between the 990FXA-UD7 and 990FXA-UD3. Each taking that fair share of victories. The results for standard mechanical drives is a little different as the UD3 takes a consistent lead in everything but sequential read/write performance. Keep in mind all three of the GIGABYTE 990FX boards use the same ITE IT8720 chip and I was using the AMD I/O drivers so the exclusion of the UD5 is not relevant.
USB 2.0 I/O Performance (CrystalDiskMark 3.0.1)
This test is done with a Corsair Voyager 16 GB USB drive. This should give a good idea of performance for your average thumb drive when used with the GA-990FXA-UD7.
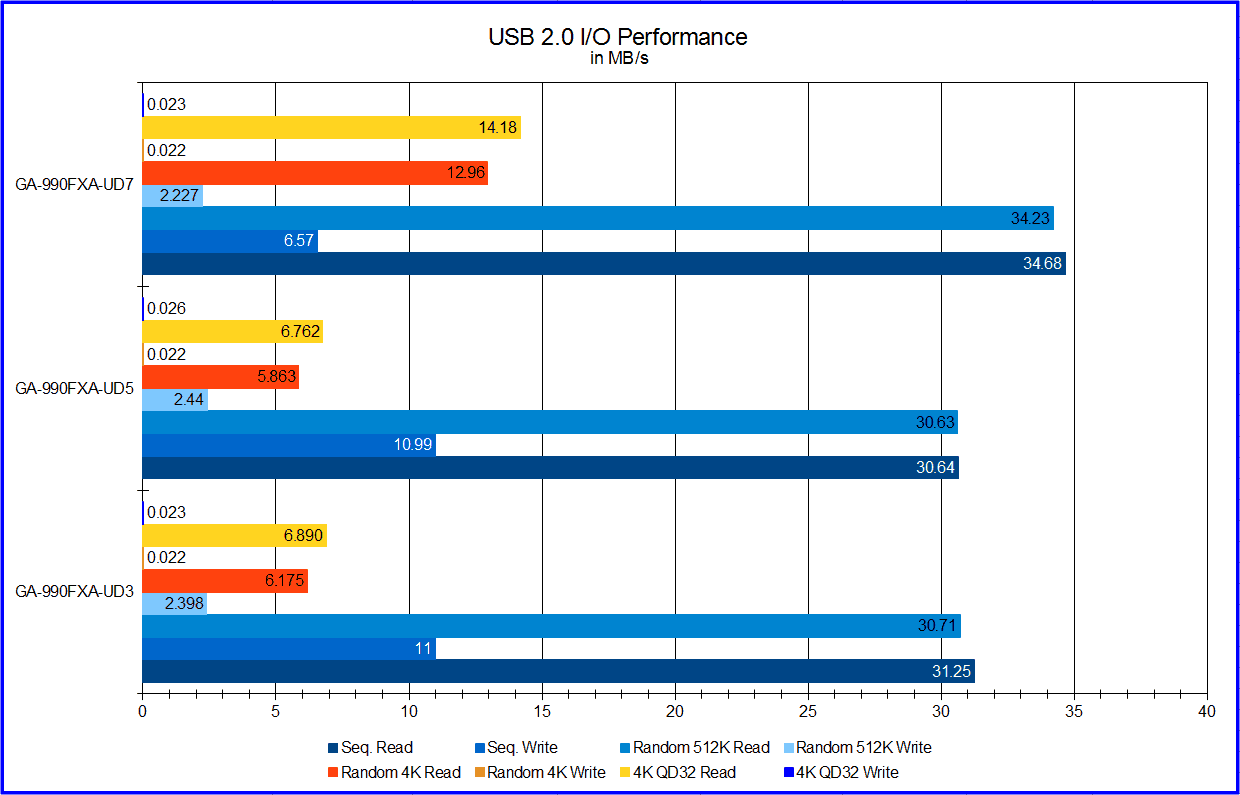
The GA-990FXA-UD7 has a very strong showing here. It takes a commanding lead in all four read tests. It does fall a little behind in two of the write tests with the sequential writes taking a huge blow. While a little discouraging to see the 41% lose in seq. write speed, the consistent read speed improvements may make up for it for some people, unless you’re waiting for the drive to copy a file over.
USB 3.0 I/O Performance (CrystalDiskMark 3.0.1)
The final I/O test will be with the external HDD connected via USB 3.0. For this test I load the Samsung F3 1 TB drive with around 550 GB of data to simulate expected performance of the drive after use.
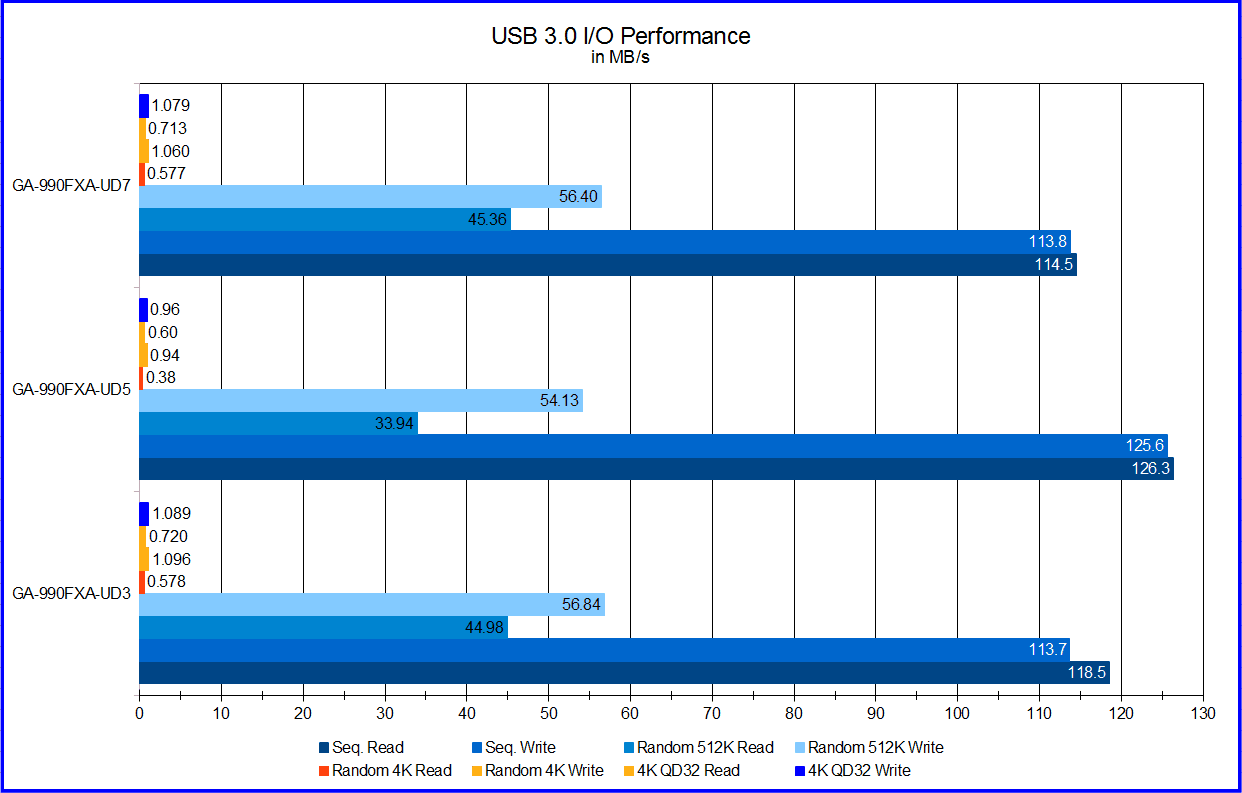
These tests are also a little different as the 990FXA-UD7 is pretty much on par with the other two boards. The only stand out result is the sequential tests which the 990FXA-UD5 takes the lead in by 8 to 12 MB/s overall.
Audio Performance (RightMark Audio Analyzer 6.2.3)
I did not expect much difference in the audio performance as we’re again faced with a Realtek audio chip and Realtek ALC889 codec. As promised I will also include the performance of the included Dolby Home Theater codec which comes with all of the GIGABYTE 990FX motherboards. I will start with raw performance and then detail personal experience with both.

Lets get right to the question at hand. Should you use the Dolby Home Theater or the Realtek codec for your system? The answer is, “it depends”. As you can see in the chart the Realtek ALC889 codecs work better with the Realtek audio chip. The reason for this is the improved freq. response range and improved noise control with the intermodulation distortion. Basically it expands the range of frequencies and improves on control noise when a single line has more than one signal.
How this affects the listening experience is much easier to understand and much more apparent. The Realtek ALC889 codecs reproduce far more accurate sound as it processes spacial orientation better. Sounds that are far away sound far away. Things that are to the left or right or higher or lower also sound exactly as such on my 5.1 system. This is what you need for gaming because you need to know where the enemy is located. This could be the difference between victory and defeat in a game.
Switching to the Dolby Home Theater, no matter which mode, literally changed the focus of sound reproduction. Instead of accuracy, the codec seems to be aiming for clarity. It uses the center channel as center for everything and disregards distance all together. While sound as far as left and right are produced correctly, it is the Y and Z axis that just seem to be ignored. While the sound is very two dimensional, it is loud and very clear. I found this to be a very good thing when watching media on my PC. Often times distance is simulated by the included audio track using volumetric controls, so it doesn’t matter if the codec is ignoring it.
While the Dolby Home Theater codecs can be useful, I just don’t see a need to use them. I found I could get the same clarity by turning the volume up on my speaker set. If you are using a low quality two channel or 3.1 channel system, it could improve your listen experience, especially if you do not have good mechanical volume controls. You should also note the Gaming setting provided the best scores in RMAA and are the results I used above.
Power Consumption
This test is going to be interesting. As we have tested and seen before, often the less complex boards simply use less power because there is less on the board to power. In this case, the GA-990FXA-UD7 is more complex than either of the other GIGABYTE 990FX boards, but has advantage of the AMD APM (Application Power Management). It is time to see how much of a difference the more robust BIOS can make on power consumption.
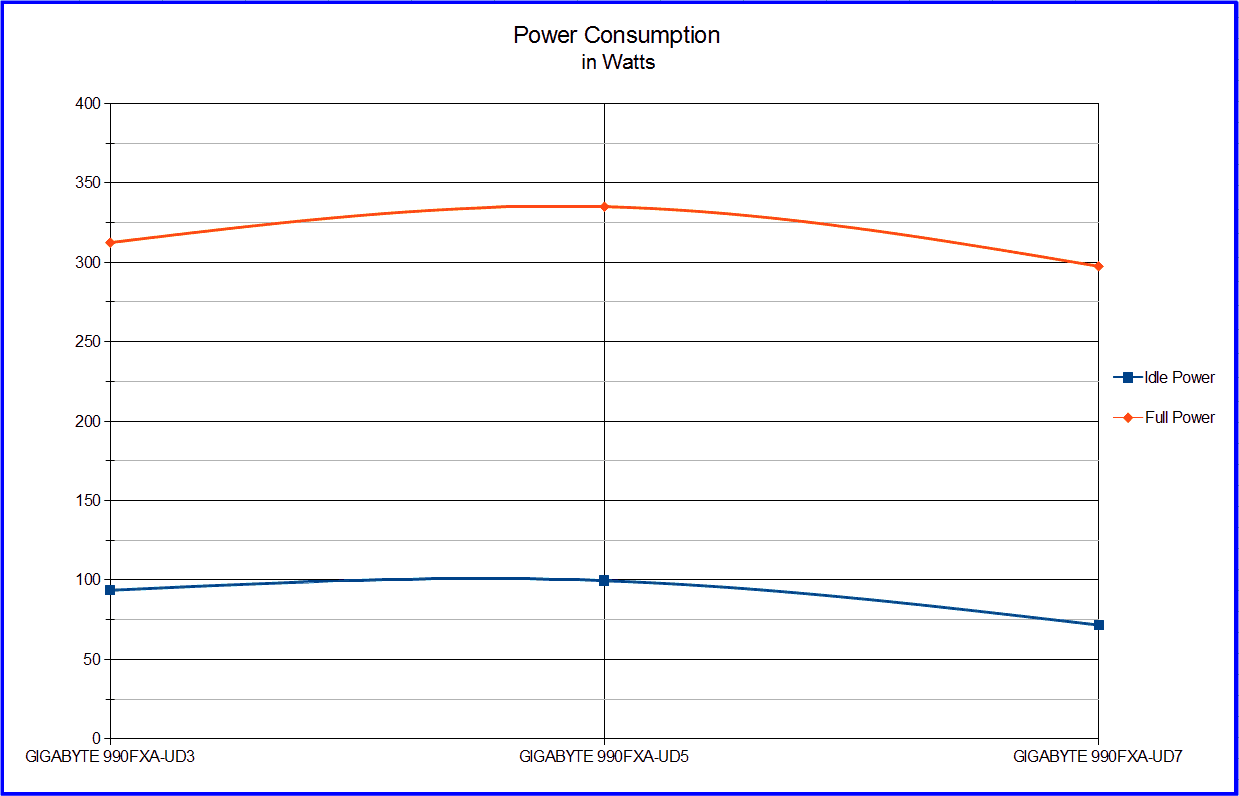
The important thing to notice here is that the GIGABYTE GA-990FXA-UD7 uses less power at idle and full load. At idle the UD7 is a almost 24 watts less power than the UD3. At full load it uses 14 watts less power than the UD3. There is no comparison with the UD5 at all since it uses 25 watts less at full load and nearly 30 at idle. I believe this is due mainly to the addition of the AMD APM addition in the BIOS which is a unique feature of the UD7.
Final Thoughts

There are very negatives about the GIGABYTE GA-990FXA-UD7. But they do exist. For example, I do not like the placement of the primary PCIe X16 slot as it makes it difficult to remove graphics cards when a large CPU cooler is in place. I also wish they would include six SATA 3.0 cables instead of just four like similarly priced AMD AM3+ motherboards. Finally, the price of $249.99 retail is a little on the expensive side compared to others on the market. I would really like to see the price of this board down at least $10 – 15 to make it more competitive price wise.
Everything else the GA-990FXA-UD7 offers is given in spades. While it does lose in a few tests against its own brothers and doesn’t really show much improvement in gaming, the board is a GIGABYTE 990FX motherboard which is built almost identically to its siblings. They all use the same AMD chipset, additional I/O chips, same audio setup, and mostly the same power management. And while it doesn’t really pull ahead of the pack it does do this using 10% to 30% less power. While it is a more power efficient motherboard, is that enough justification for the GA-990FXA-UD7 at the price asked?
The bottom line is this motherboard is available at most retailers for $249.99 and offers everything you could ever want or need out of a current generation motherboard. There is support for up to 4-way Crossfire/SLI, better audio quality than any other built-in solution thus far, USB 3.0, and plenty of connectivity on the back I/O. While not something I normally document in my test, I also saw an improvement in consistent Internet throughput of 1.9 MB/s up from the 1.6 MB/s on every other motherboard thus far.
There is clearly some additional tuning that the UD7 has that sets it apart. It really is the top of the top in the line up. So in the end, if you want every bit of performance that the 990FX chipset is capable of, and you’re looking for a GIGABYTE board, this is where you’ll get it.
Pros
- Superb Power Management
- Solid Overclocking
- Easy to use
- Easy Troubleshooting
- Very Good I/O Performance Overall
- Beautiful Color Scheme
- Good Built-in Audio Performance
Cons
- Primary PCIe Slot can cause difficulty when removing cards
- Premium price may deter value oriented buyers
Overall Score: 9.25 / 10.0

Help Us Improve Our Reviews By Leaving a Comment Below!