
Every so often we receive questions from readers asking for a recommendation on some new dual channel DDR3 compatible with P55 motherboards. It can be confusing to figure out what would be “enough” to get the job done. Basically, that depends on the purpose of the system and if overclocking might be something you’ll tinker with in the near future.
If all you do is play on the PC these days, you can easily get by with just about any good quality DDR3 memory. If you dabble in things like Photoshop, create movies, or compile code or do any audio editing, then you’re a content creator and can benefit from lower latency performance memory. Factor in some overclocking and one should seriously at least consider good quality memory like some Corsair Dominator 4GB 1600MHz DDR3 Dual Channel that we’ll be looking at today.
Features and Specifications


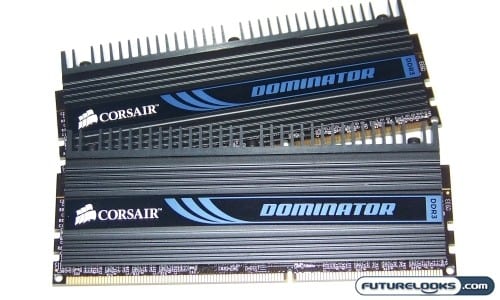
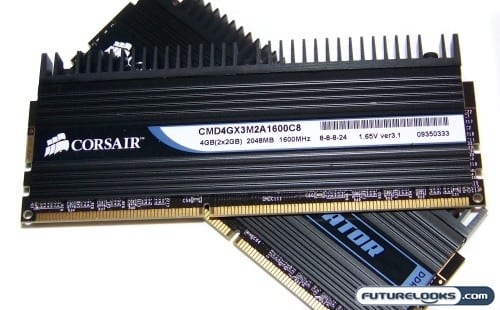
The subject of our review today carries a rather long model number: CDM4GX3M2A1600C8. It comes from the original Dominator series boasting 1600MHz DDR3 frequencies, 8-8-8-24 memory timings and just 1.65 Volts to run them. There are no slower frequencies or memory timings in the Dominator series.
The Dominator series has been around for a couple years now. At one point, it seemed like there couldn’t be anything faster or better but that was before Corsair released their top end Dominator GT series. Nonetheless, the Dominator kit still offers those really cool, contemporary looking memory heat spreaders. These bad boys are still pretty tall measuring in right at 2 inches. This won’t be a big deal for anyone with a regular desktop case but if you have a very small, compact micro-ATX or ITX computer enclosure, you’ll want to consider the amount of space you have inside and whether or not it is enough to house these modules.
When possible, I try to find out what particular ICs are used to build a particular kit. Keep in mind, that doesn’t mean that one brand using Samsung will be any better than another brand using Elpida. There’s no true captain of performers in this respect since they’ve all had there issues whether it be weak yields or frequencies. Unfortunately, I couldn’t narrow down what chips are used to build these modules.
Based on early field reports, one thing that separated the Dominator series from other brands was that often many of the modules would run well beyond spec. For example, some users have reported being able to run their 8-8-8 kit at 7-7-7 without any tweaking if any. If this proves true here, then it won’t really matter what’s underneath the hood. It just means you’re going to get your money’s worth. Let’s find out.
Test System Setup
These new Dual Channel DDR3 kits are primarily aimed at supporting motherboards with the Intel P55 Chipset which supports the Lynnfield Core i7 and i5 processors. You don’t want to buy these for your Core 2 based system.
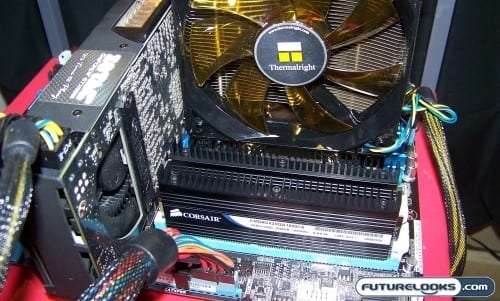
In order to test out these modules, we constructed a system with the aforementioned chipset and CPU. Here are the specs:
- Intel Core i7 870 “Lynnfield” Processor
- ASUS P7P55D Pro Motherboard
- Kit 1: Corsair Dominator 4GB 1600MHz 8-8-8
- Kit 2: Kingston HyperX 4GB 1600MHz 9-9-9
- Zotac Geforce GTX295 Video Card
- Kingston 64GB V+SSDNow
- Antec CP850 Power Supply
Testing was performed with stock system settings. Turbo, Intel Speed Step, and any other auto overclocking settings were all disabled. The main reason for this is that systems can respond differently with these settings on, resulting in artificial performance differences. This method removes those variables and will give us the raw performance capability of the Corsair Dominator DDR3 memory.
Since memory frequencies and timings have very little influence on games, only Crysis was used since it’s still a super resource hog. SISOFT Sandra Memory Bandwidth, Everest Ultimate, and some DIVX 1080P encoding. This should cover the benefits of memory frequency and timings sufficiently.
Installation Notes

One of the particulars I look for when installing new memory is how it automatically configures in the BIOS and whether or not XMP profiles work properly. While engineers do their best to program the profiles properly, we are quite aware that not all motherboards will recognize every kit correctly.
In two seperate installation tests, the Corsair 1600MHz 4GB kit was recognized by one motherboard and not by the other. However, that incorrect reading resulted in a 1600MHz frequency using 8-8-8-24 timings at 1.67 Volts. But, the Dominator 1600MHz kit passed every test using 9-9-9 and 8-8-8 timings as well. This really answered the most important question of stability and compatibility. Let’s get on with the benchmarking.
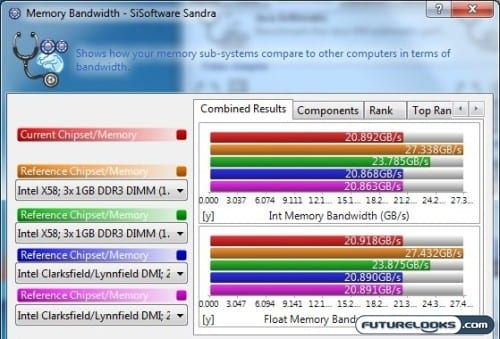
SANDRA Memory Bandwidth
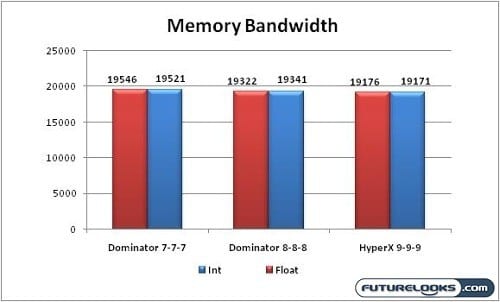

At stock settings, the lower latency Dominator produces a bit more memory bandwidth compared to to the higher latency Kingston HyperX 1600MHz DDR3 kit. As mentioned in the previous paragraph, the Dominator kit can operate at even lower timings with very little effort. The system received another 224 MB/s boost at these frequencies as a result of the tightening of the timings.
Everest Ultimate

Everest tells a very different story. The stock Dominator easily out performs the HyperX. It’s easily over 200 MB/s faster thanks to the already lower timings. The gap increases to 385 MB/s in favor of the Dominator using even tighter 7-7-7-21 timings.
Whatever the visible differences in SANDRA, Everest doesn’t produce similar results. Let’s keep with the benchmarks to see if the SANDRA results are just some unknown issue.
DIVX Encoding
While 720p encoding might be enough for some, 1080p can seriously tax a system and also derives benefits from things like memory frequencies and timings, allowing the CPU bus to be saturated with data. If you’ve ever converted an HD movie, you’re well aware of how long it can take.
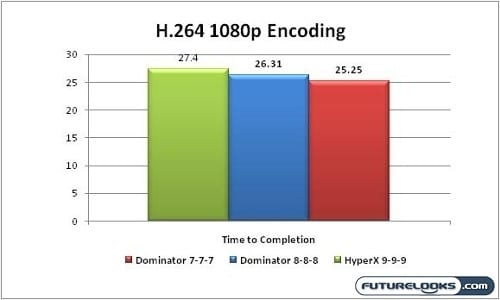
As you can see, there’s a noticeable difference in time to finish the conversion. This is a great indicator for reinforcing our recommendations for spending the extra cash to get the better quality memory with lower latencies, especially if you like your HD movies. Having said that, this also benefits any non linear editing software like Premiere Pro CS4.
Crysis
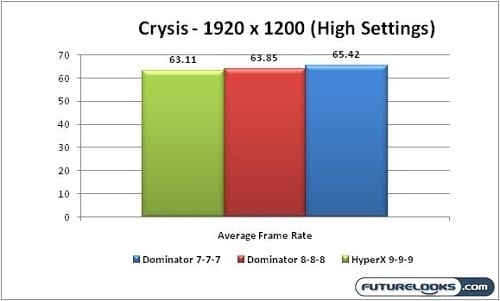
Frame rates are pretty comparable differing only by a couple frames at most. The Dominator’s lower latencies offer a little extra horse power even though the video card is doing the biggest amount of work. This also a good comparison for users who are contemplating spending too much for RAM they may not need for the purpose of gaming.
Cinebench R10
Since rendering is heavily dependent on processor and memory resources, it just seems fitting to give Cinebench a try. This should give us an idea of just how latencies affect CPU performance.
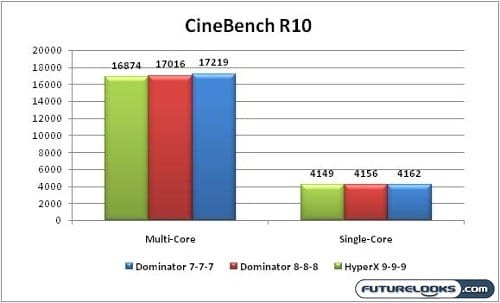

What’s interesting here is that while the single core operation saw only minimal performance gains, you can see the impact that latencies have when the processor’s HyperThreads go looking for resources. Remember, this is without Turbo or any Auto overclocking options enabled in the BIOS. You will definitely see a performance boost upwards of 18,000 when you do decide to enable those features on your own.
Does the Memory Overclock?
You bet your extreme back side it does! Do keep in mind that this was all possibly due to the extremely capable ASUS P7P55D Pro Motherboard. The Pro was, well “a Pro”, at overclocking the CPU Bus Clock to the point that proper memory dividers were accessible to push the memory.

I was able to run benchmarks and Memtest with the memory at 1728MHz using the same default 8-8-8-24 timings. The RAM was also capable of 1800 MHz 9-9-9-27, but the voltage needed was just a bit too high as well as the latencies for my own tastes. Sure, it’s nice to show off 1800MHz, but the timings penalize its performance equally.

Here, you can see the performance gains in SANDRA running 1728MHz 8-8-8-24. There’s a 3673 MB/s, or roughly 3.7 GB/s performance gain over the CAS 7 timings thanks to the higher CPU and memory frequencies. These new frequencies unlock hidden resource potential that will improve overall system performance, especially where encoding or other resource intensive tasks are concerned.
Final Thoughts
The message here is pretty simple. The more memory bandwidth available, the faster the processor can accomplish number crunching objectives. Data intensive programs that encode, compile, or convert benefit the most. If you’re a gamer, you’re probably only experiencing half of what the Dominator 4GB 1600MHz DDR3 Memory has to offer. It’s not going to improve frame rates very noticeably by default, but you’ll definitely appreciate the professional level of stability free from blue screens or system crashes and you’ll like the system’s level of responsiveness and improved load times.
The other thing to keep in mind is that in order to benefit from this memory properly, you should select a quality motherboard or else you run the risk of disappointment. Without platform stability, all that overclocking will be for naught. Pick something up like the matching black themed ASUS P7P55D Pro or Intel DP55KG Motherboards.
Based on what you’ve seen here, allow us to strongly recommend the Dominator 1600MHz DDR3 Dual Channel Memory if you want your money’s worth. This is thus far the strongest dual channel 1600MHz DDR3 memory to grace this test bench. It’s a surprising beast of a memory kit capable of exceeding its streamlined Dominator GT sibling without the GT price tag.
Pros
- Extremely reliable performance
- Top notch stability under pressure
- Overclocks very well
- Classic Dominator theme
- Overall, exceeds specifications
Cons
- Just a bit pricier than similar kits
Overall Rating: 9.5 / 10.0


Love This Review? Hate This Review? Tell Us In The Forums!
Corsair Dominator 4GB 1600MHz DDR3 Dual Channel Memory Photo Gallery