

The Intel Haswell Extreme (Haswell-E) edition processors have taken the desktop computing world by storm. They are basically capable of doing just about everything possible, and really well too. Sure, we all would love the biggest and baddest processor but that means spending a lot of money. Then you have worry about which X99 motherboard best suits your needs. Maybe you don’t need all the high end connectivity that drives the cost of X99 boards upwards, or maybe you just need a solid board that will let you enjoy your top end CPU.
The GIGABYTE GA-X99-UD4 motherboard is one such board that promises to deliver stability, reliability, and performance whether doing something task intensive or playing your favorite epic game. It doesn’t cost near the premium of other boards so we’re curious to see how it stacks up.
Features and Specifications

(Click Each to Enlarge)
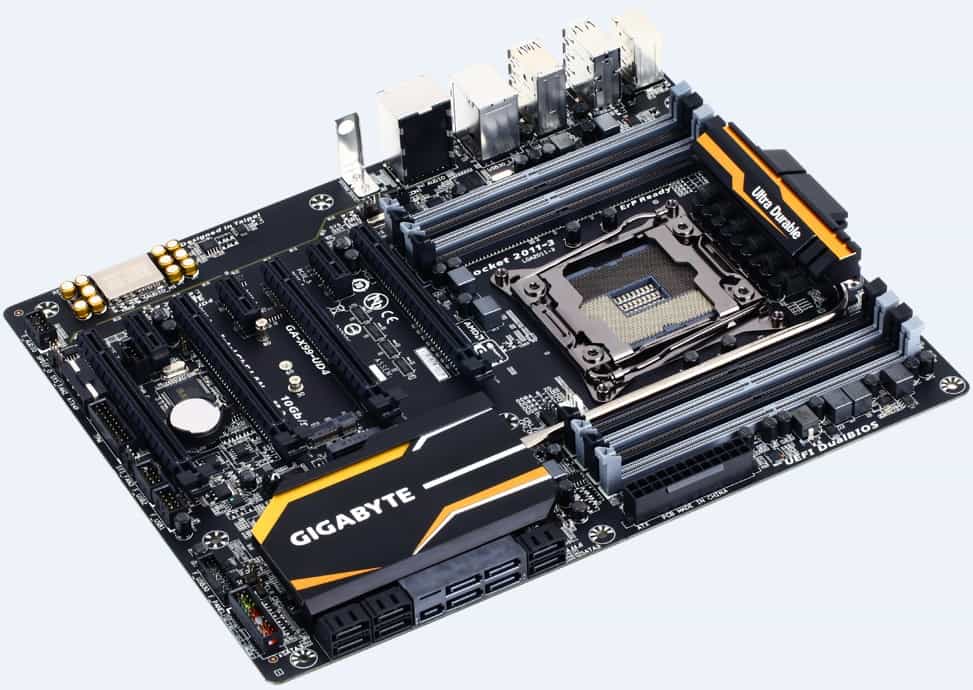
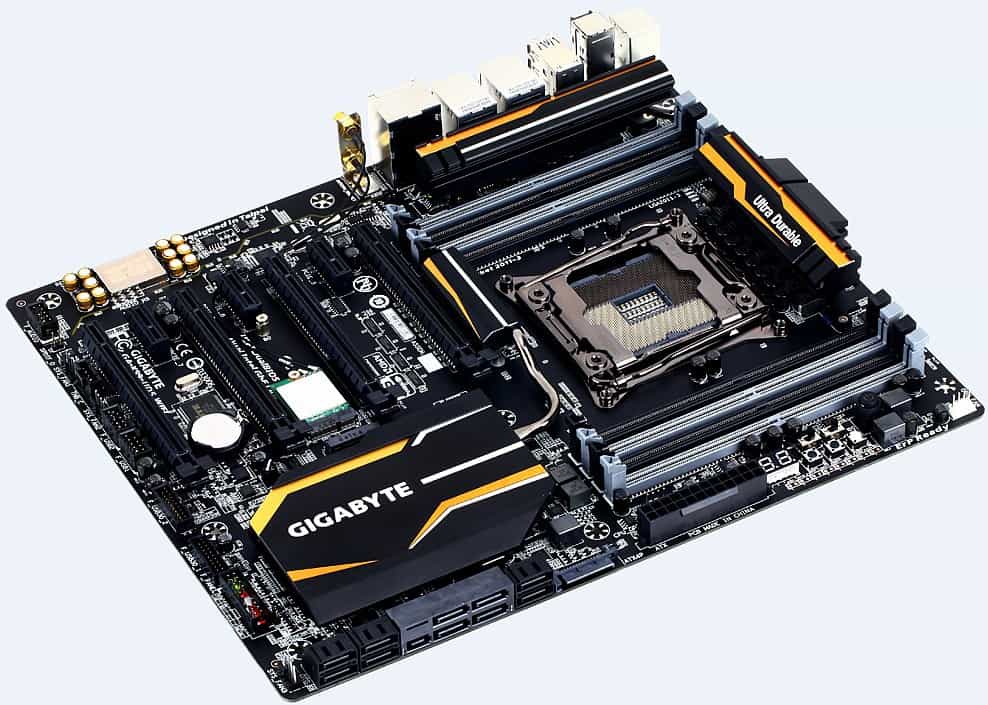
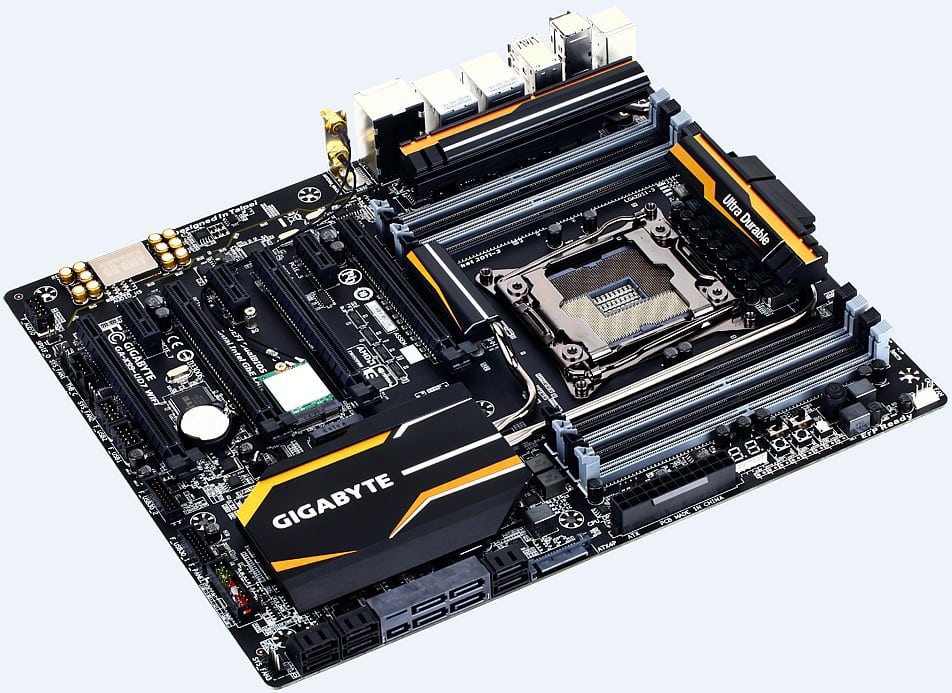
GIGABYTE offers, from left to right (above) the following GA-X99 series boards: UD3, UD4, UD5 WIFI, and UD7 WIFI. These represent their Ultra Durable line up of channel boards. They also offer an OC Force and G1 Gaming line but that’s a different animal for a different review. I’m sure a Black Edition will also be in the works soon, as that type of workstation level testing would be great for this level of motherboard.
Features that separate the boards are higher overclocking, network connectivity as well as WIFI and Blutooth, and automatic OC (overclock) buttons. Otherwise, they all share the Easy Tune and App Center software.
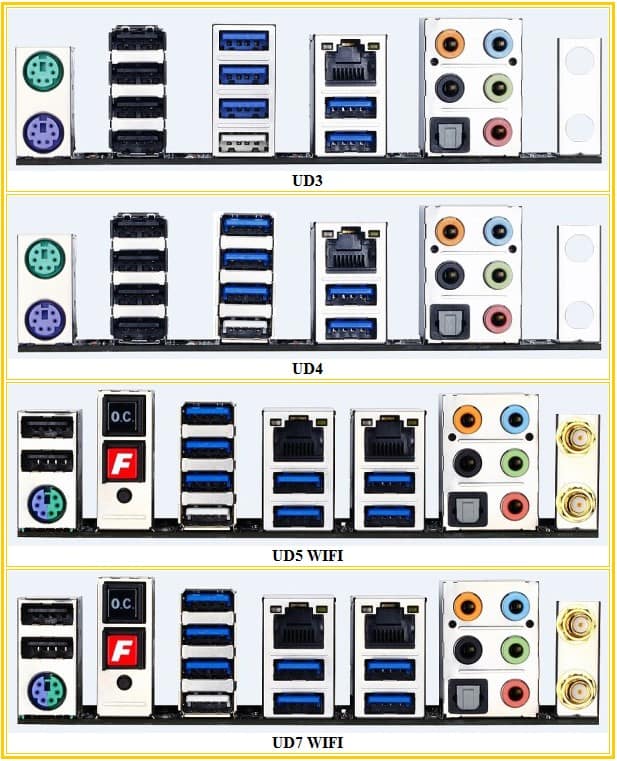
Above, we put together the IO comparison table so you can plan for your own system build. The UD5 and UD7 come with dual antennae WIFI as part of the default package. The single white USB port is GIGABYTE’s new Q-Flash port for updating the motherboard BIOS even without a CPU or memory. The onboard ITE controller will do it automatically and the FBIOS LED will let you know of the progress. Since top chipset boards usually end up sticking around for a very long time (we still have X58 systems in use around here), this is a wonderful new feature that will make CPU upgrades down the road a piece of cake.
So, what’s all this connectivity cost? Overall, the GIGABYTE GA-X99-UD4 is a pretty attractive board for a mere $258.99 US. In fact, current pricing for the channel boards ranges through $240, $260, $298, and $325 respectively, so it sits in a very solid fighting range in pricing. We’ll just have to see if stability and user experience balance out because lower prices can sometimes mean a lesser experience.
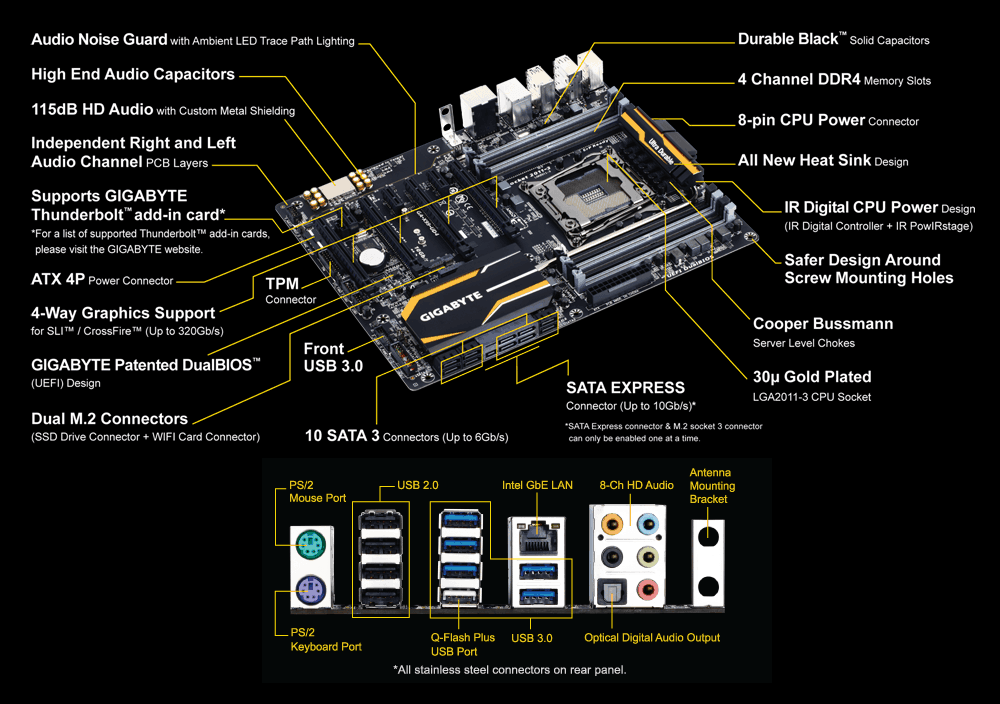
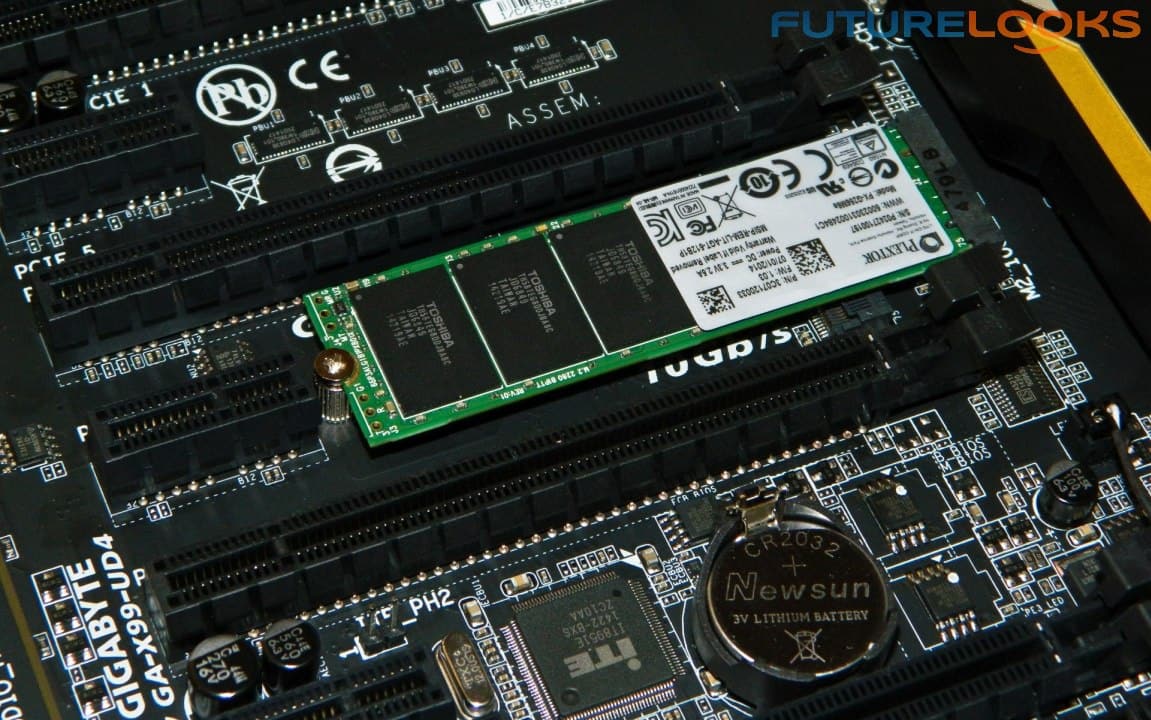
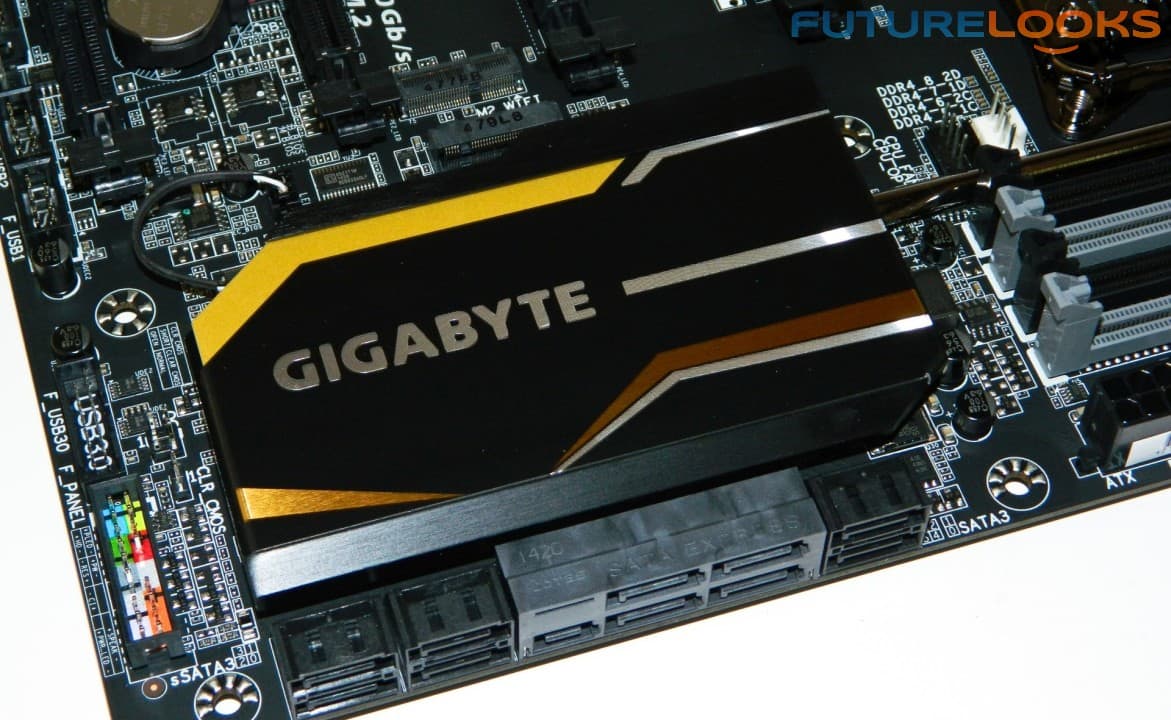
Some of the features new to Intel’s mainstream Z97 chipset are also native to X99. In that list there’s SATA Express and dual M.2 SSD interface ports. They’re stacked in case you want to add two. The ports support both M.2 PCIe and M.2 SATA. Supporting both types of SSDs is actually a smart move as users aren’t stuck to one format.

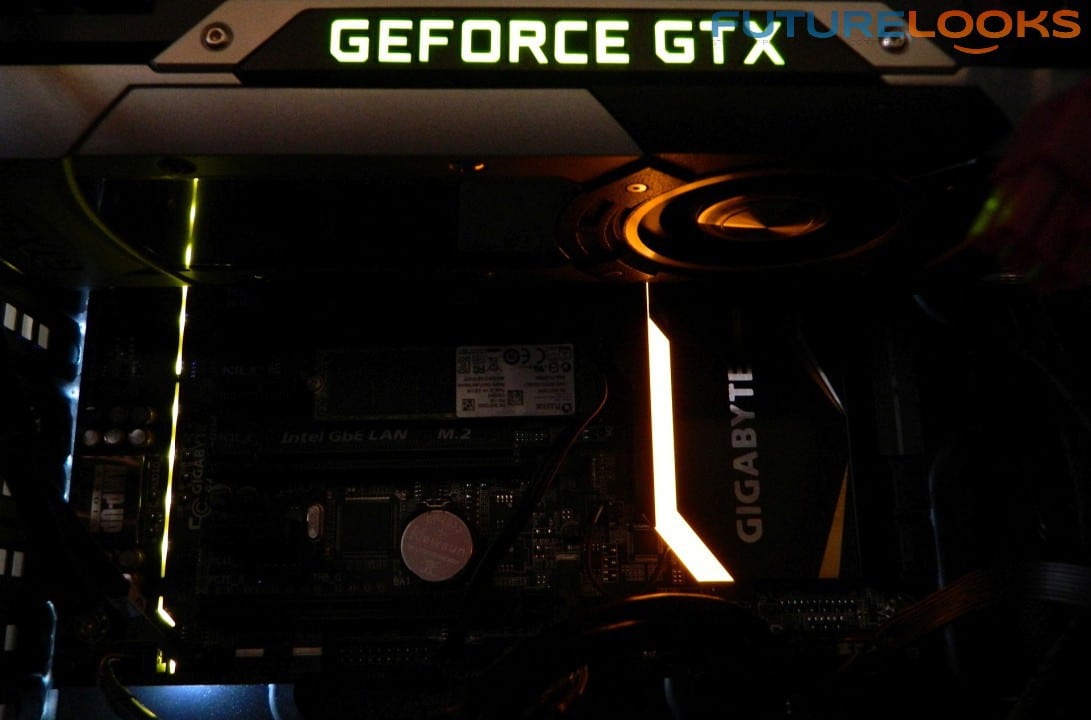
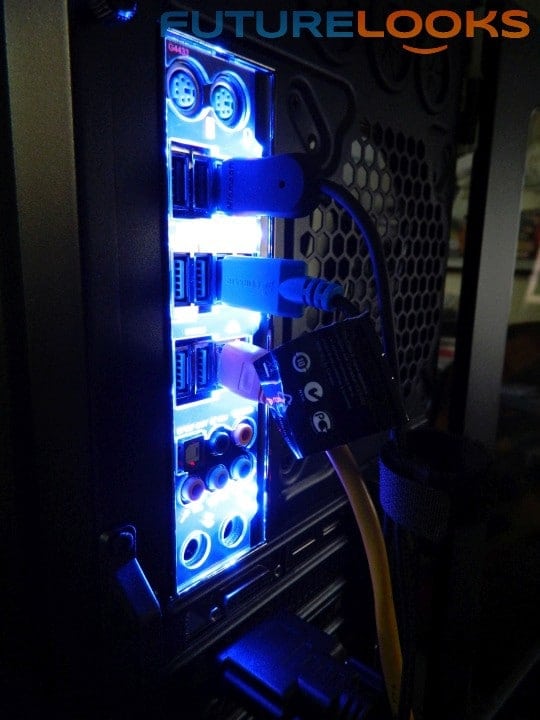
One of the coolest features we’ve seen the last couple years is the LED back lit IO Shield and Chipset Ambient Lighting. The IO shield actually glows blue when active, and users can select from four modes. Personally, I wouldn’t mind seeing some other type of lighting on the board PCB do the same since the IO is in the back and not typically not seen (although we can see this as a huge benefit when reaching behind the case to plug something in).
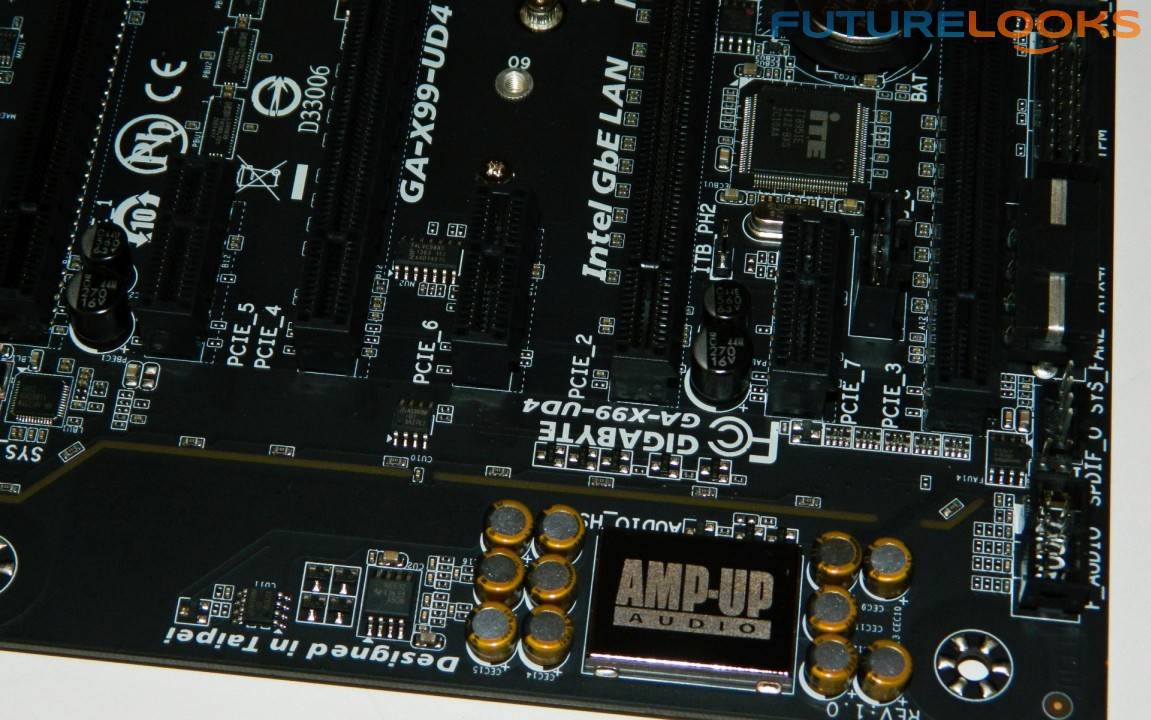
Other features worth mentioning are the continued goal of providing better than stock integrated audio performance. The board features independent left and right audio channels as well as separation from the rest of the PCB to eliminate feedback. An amplifier paired along with the Amp-Up audio implementation means more robust audio. And, you really don’t have to worry about clean CPU power the last couple generations thanks to the PowIRstage ICs and IR digital power controllers. Those are used across all the boards.
Let’s have a look inside the box and see what you get in the package next!
What’s in the Box?
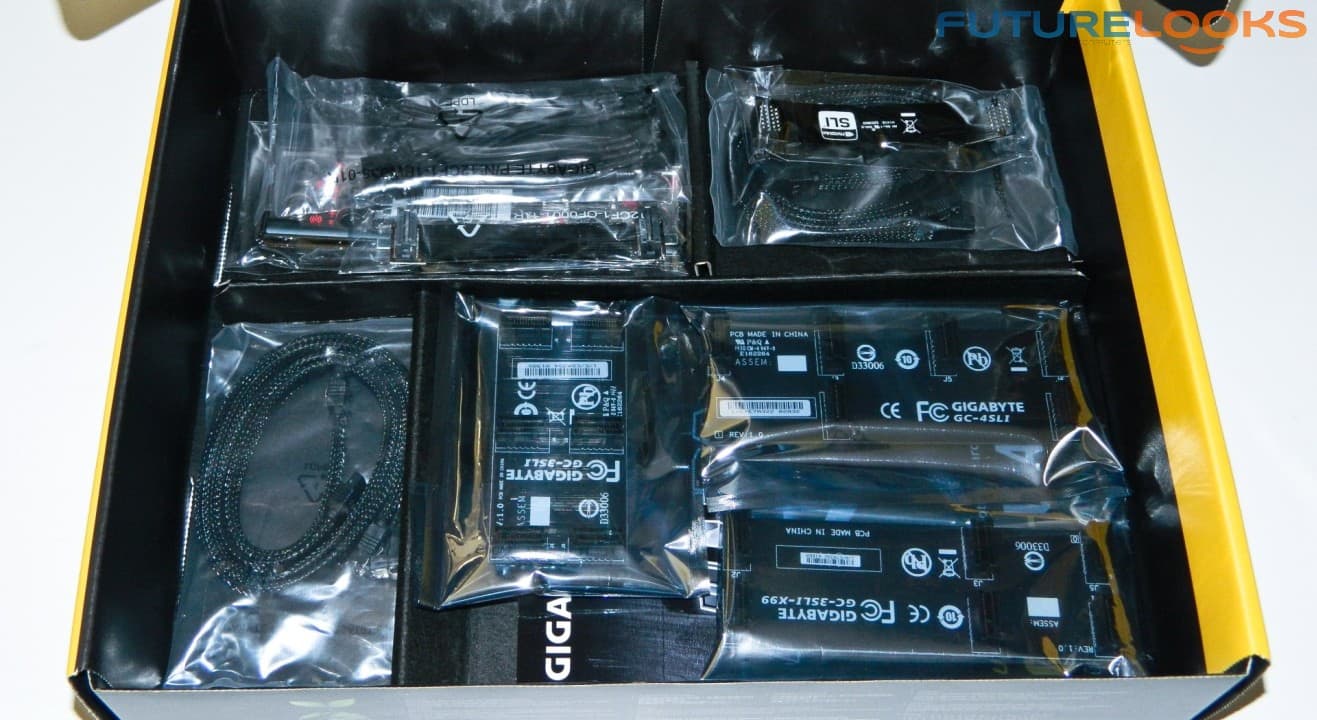
The bundle is pretty basic as far as X99 SLI/CrossFireX motherboards go. There are two different length flexible SLI/CFX ribbons and a stack of PCB bridges too, ranging all the way up to quad-CrossFireX. There’s also a couple case badges, four nicely braided SATA cables, LED active IO shield, software DVD with App Center, Easy Tune, and Norton OEM Internet Security to help keep bad code down. However, the bundle doesn’t include a Thunderbolt card to pair with the onboard TB port or the WiFi module like the UD5 and UD7. But at the asking price of $258.99 US, we can give it a pass.
The only thing that makes the board “Thunderbolt Ready” is the small dedicated 5pin connector above the last PCIE slot. When you consider expansion, all motherboards are technically Thunderbolt ready if you consider adding a Thunderbolt PCIE expansion card. I was a bit excited when unboxing the board till no TH card was found. But I’d be more excited if there were more things that used this port, so we could actually enjoy it more.
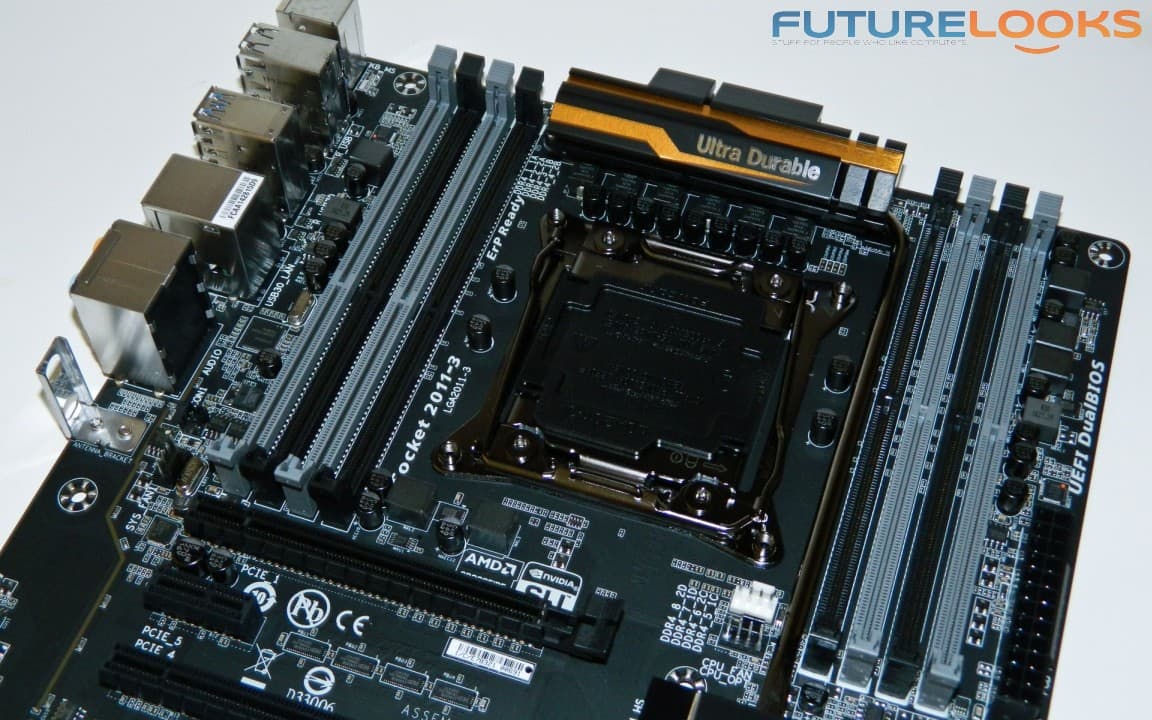
GIGABYTE GA-X99-UD4 Motherboard Layout
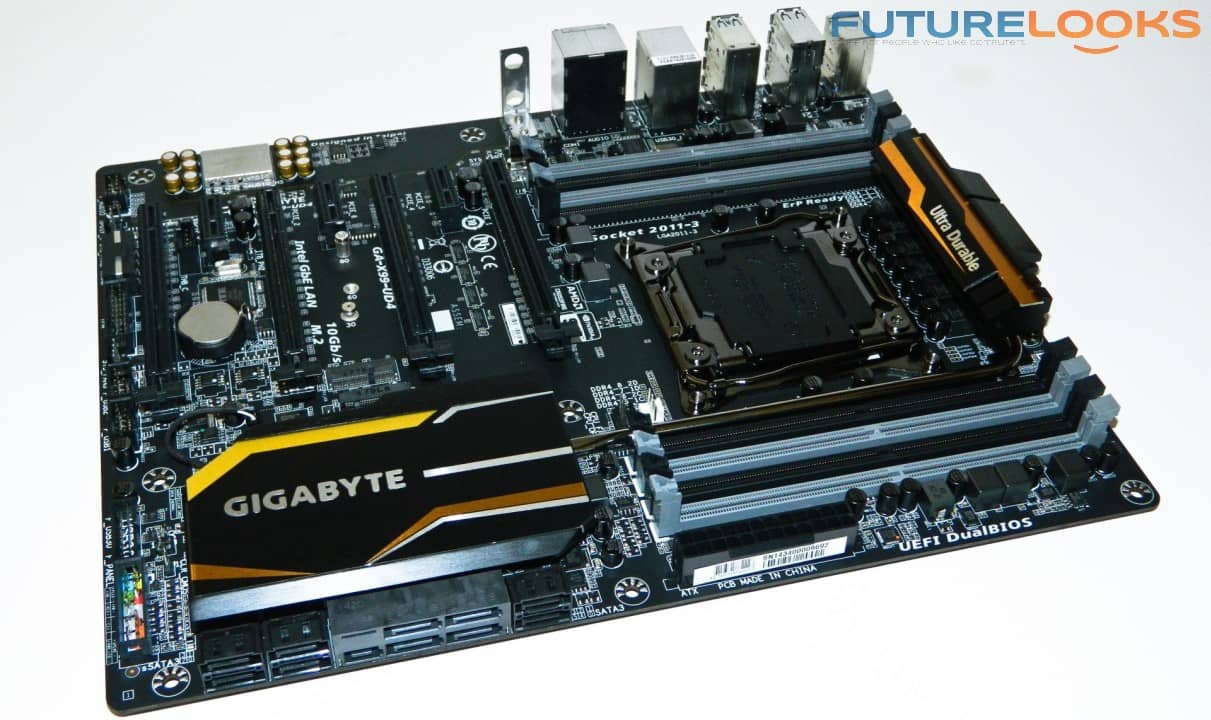
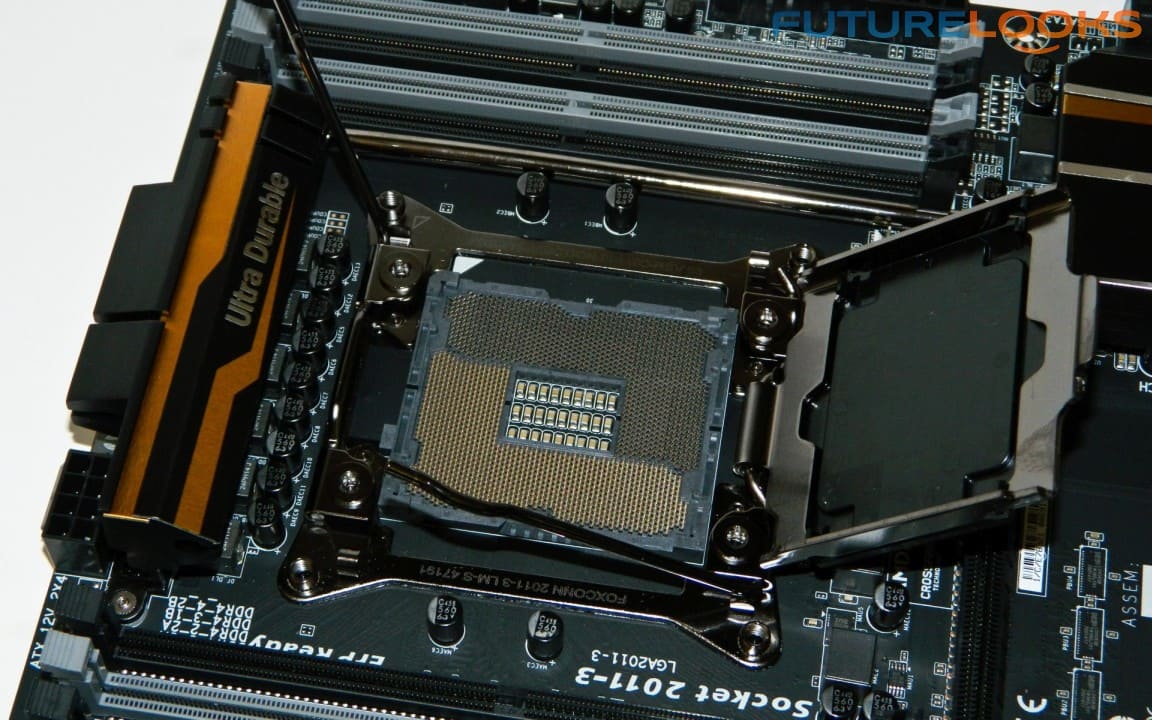
The GIGABYTE GA-X99-UD4 appears to have a logical layout. Since the board utilizes quad channel DDR4 memory, a lot of the components get pushed to the edges to make room for the slots. North of the CPU socket is the main VREG just low enough to support massive coolers. We did notice just a couple oddly askew CHOKES around the CPU area. They don’t hamper performance in any case and could be attributed to being one of the first boards rushed off the line.
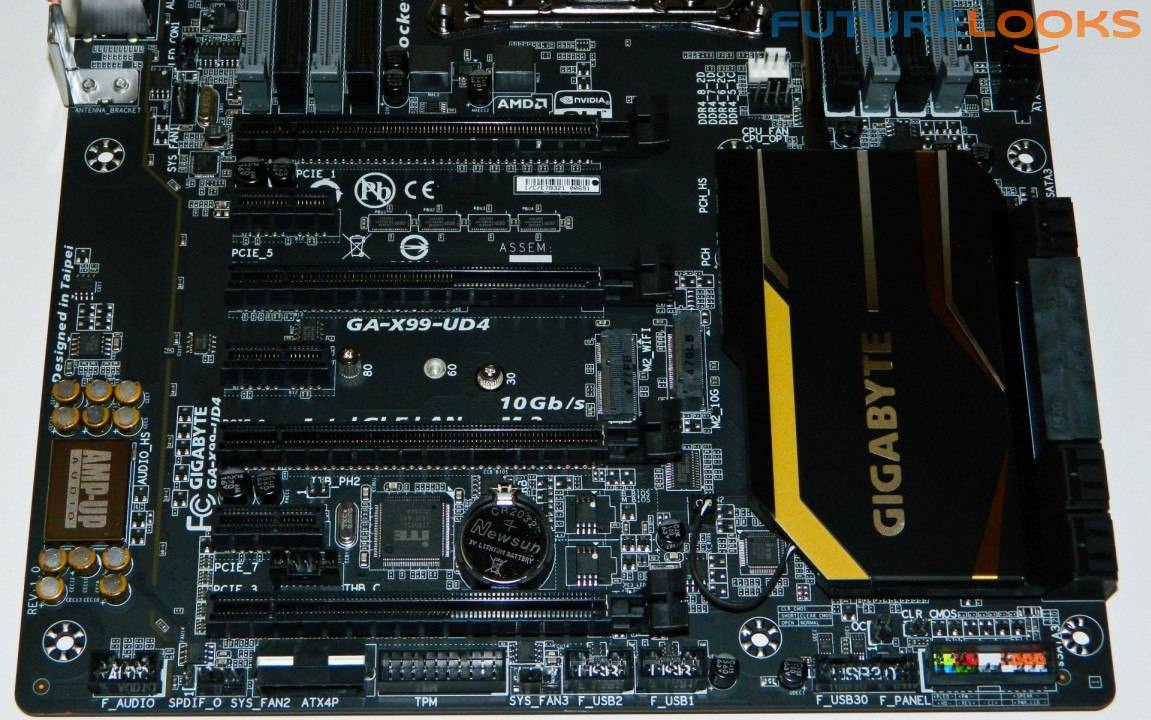
The expansion area of the board is very low profile. The chipset and IO Shield LEDs both use two very small 2pin wires for power and controlling the output. But they don’t get in the way of any peripherals at all especially around the PCIE slots. The M.2 devices are so thin that they don’t interfere either. All other USB, front panel, audio, or extra 4pin power are all arranged around the bottom edge of the board. Depending on the space inside your computer case and placement of the board, that 4pin power might be a bit tough to access – if needed.
One very minor detail we noticed is the chipset heat sink LED and audio PCB LED lighting colors didn’t match. Also, since this is a higher end X99 chipset, at least a couple 4pin fan headers would be nice towards the top since most high end cooling systems mount to the top or top back of the computer enclosures. That would be most helpful on these elite systems that you might want to put a high end water cooling system on.
Test System and Setup Notes
Easy of installation and setup is an essential part of any motherboard on the market today. And I weigh the experience of installing and managing the motherboard heavily. The board should work with all peripherals easily, right out of the box. And we expect that if issues do come up, updates are available promptly.
Here’s the test system before we drop the notes:
- Processor: Core i7-5960X Haswell-E
- Motherboard 1: GIGABYTE GA-X99-UD4 (as tested)(F8 and F9c BIOS)
- Motherboard 2: ASUS X99 Deluxe
- Memory: Corsair Vengeance LPX 2800MHz 16GB DDR4 (at 2133 MHz)
- Graphics: NVIDIA GeForce GTX 780 3GB (Driver WHQL 344.11)
- Power Supply: be quiet! DarkPower Pro 850W 80Plus Gold
- Air Cooling: be quiet! DarkRock Pro 3
- Liquid Cooling: Thermaltake Water 3.0 Ultimate
- OS: Windows 7 Pro (Patched)
Setup is sometimes technically interesting. The Intel Z97 boards all tend to require dual memory sticks in the first (closest) and third DIMM slots otherwise the system doesn’t boot right. The Intel X99 are opposite in that the second and fourth slots on both sides are used. If you can’t remember this, just remind yourself that the colored DIMM slots are the slots you should use first. Since many enthusiasts will choose really large tower coolers for their Haswell-E, this works out for the best anyway.
As I assembled the system and tested memory settings, I found myself wishing the board had the LED code display. That little feature comes in handy if you encounter an error installing memory, graphics, or storage devices. Without it, it’s harder to guess what may be causing the issue. Even though these are very affordable boards, I think it’s time LED codes become standard, especially since they’re rather cheap to add, and give crucial information when it is needed.
Speaking of setup, let’s have a look at how the BIOS looks on the GIGABYTE GA-X99-UD4 next!
GIGABYTE GA-X99-UD4 BIOS Featrures and Layout
The BIOS is very similar to the Z97 boards with the exception of different frequencies, voltage, and memory options. If you’ve figured out from the previous generation BIOS, you’ll be able to navigate through this one more quickly. New users to GIGABYTE will also find the experience fairly intuitive. Here are a few notes.
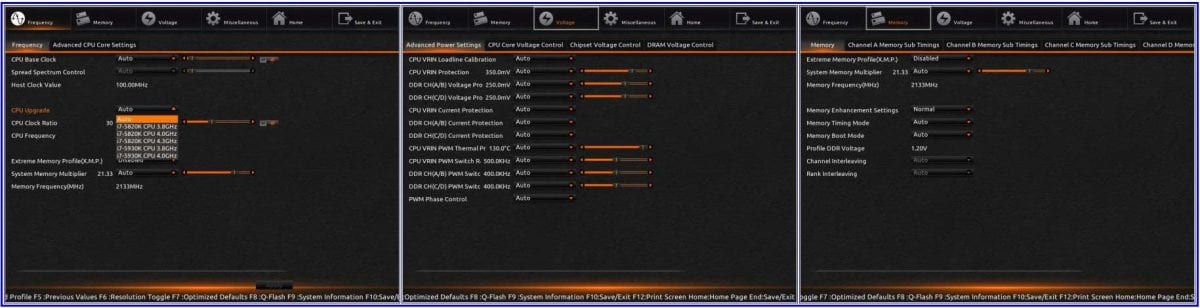
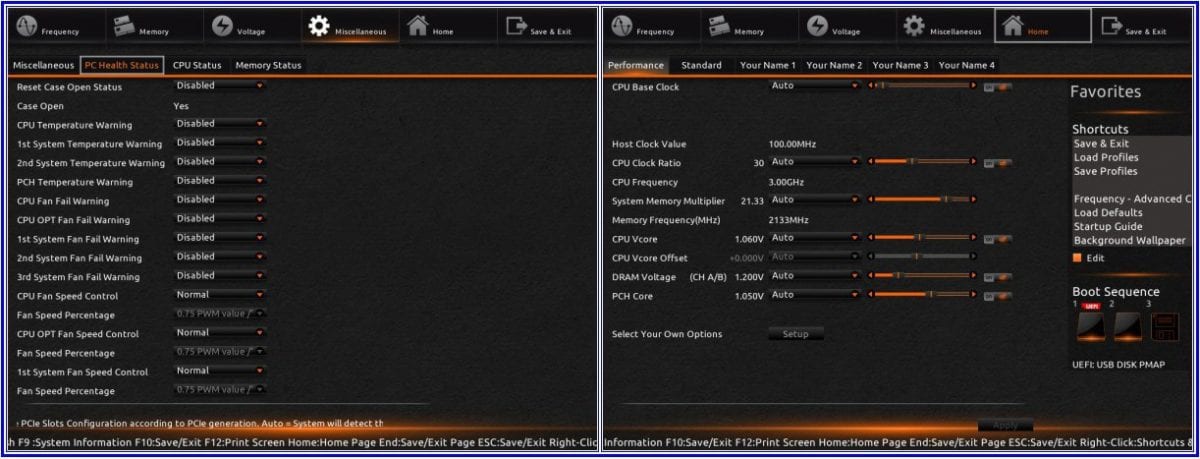
First, you’re greeted with the Startup Guide page. Each box should be self explanatory, but just in case you miss it, the Start-up Options doesn’t change the boot devices. Instead, it allows users to select one of four modes to enter in the BIOS if you want to skip the Startup Guide. Those four choices are Smart Tweak HD (for 4K style displays), Smart Tweak Mode (the cool orange BIOS for overclocking enthusiasts), Classic Mode (the dark blue basic BIOS of old), and back to Startup Guide if you like booting in to that every time.
One minor thing that continues to show up in the BIOS is the jumbled text across the bottom on certain screens. Since 1080p monitors are so common these days, it would be nice to see GIGABYTE use some of that BIOS page to stack text rather than cram it in on one line. We brought up the same issue on GIGABYTE’s Z87 and Z97 platforms, and we can’t be the only ones noticing this.
A couple other issues originally encountered at initial setup, were quickly cleaned up by the latest F9c beta BIOS available for download. It’s great to see GIGABYTE (specifically the legendary overclocking master HiCookie) putting a lot of effort to get new BIOS out quickly to fix any issues end users may find. The setup experience leaves a lasting impression and I’m glad they are taking it seriously.
Software APP Center, Easy Tune, and Overclocking
The App Center is easy to use. It’s the first thing you have to install before all the other programs “attach” to it. In fact, it’ll bundle Ambient LED control, Easy Tune, and any other utility you install right inside the software. It’s just one location which is much simpler than several others. The Ambient control was cool in that you could go off, constant, beat mode which does so with music, and pulsating which is neat at night.
Once you install the software, it’s worth hitting the update button so that all the apps can pick up their latest versions. And GIGABYTE has also made this easy by building the utility into the app, rather than creating a separate app for it, like they used to.
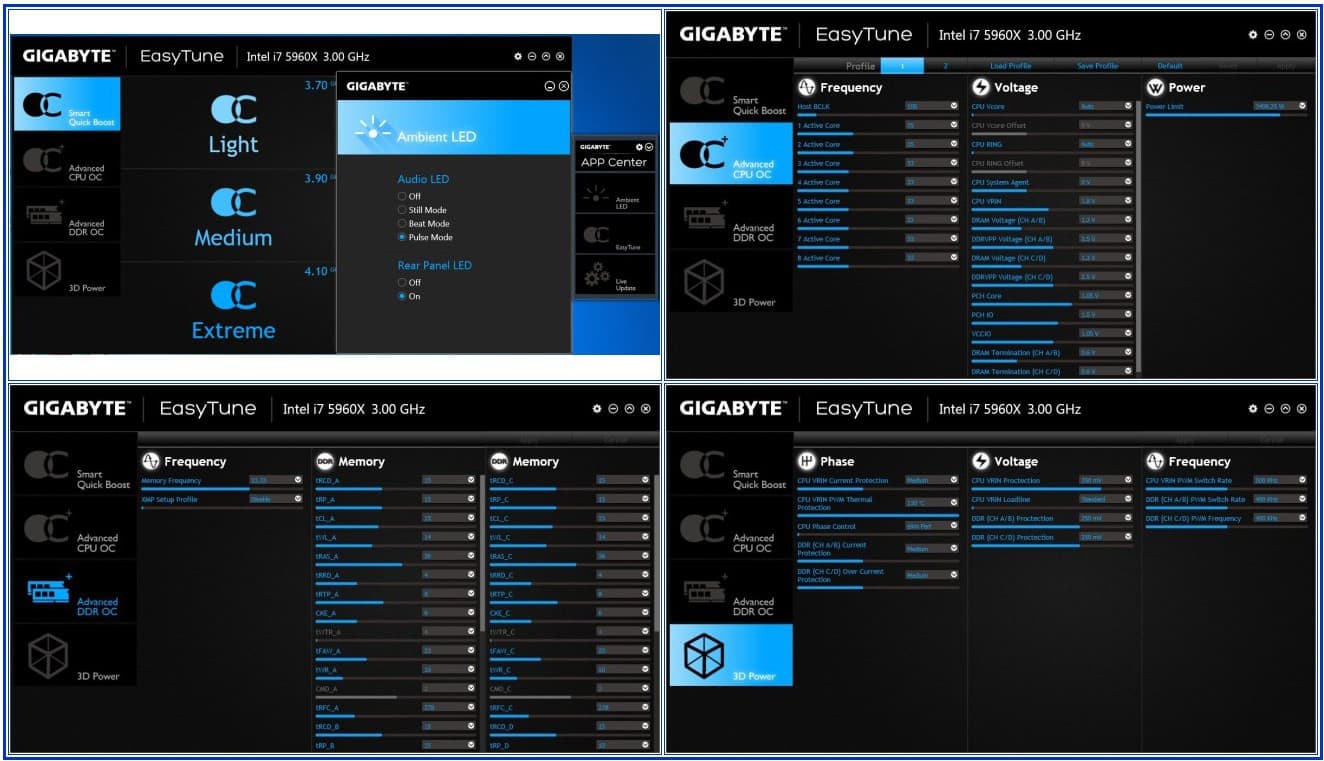
There weren’t any notable issues with any of the software which is nice to see. And, as you can tell from the screenshots, there is a lot of information and settings accessible by anyone needing to manipulate the system.
In terms of overclocking, Easy Tune has a conservative yet worthy overclocking scheme. All of the options worked consuming less power (380 Watts) to quite a bit more (545 Watts) when using the Extreme option. Extreme boosted the system to 4.1 GHz on all eight cores automatically applying voltages as well. The system was easily stable for hours upon hours. Manual overclocking continues to be laboratory 24-7 stable on our Core i7-5960X at about 4.5 GHz on the UD4. That is considered a win!
With all the setup and software tuned and tweaked, let’s get the GIGABYTE GA-X99-UD4 benchmarking to see how those numbers stack up!
Performance and Benchmarks
Some benchmarks are carried over from our original Intel Core i7-5960X Haswell-E review. It’s important to include them as the X99 platform isn’t the right choice for mainly gaming simply due to the overall cost premium. Granted, Intel nor its partners are going to discourage anyone from buying the Extreme series processors or any high performance X99 motherboard for that purpose. But as reviewers and consumers like yourselves, we must point out that $700 to $900 will buy you a surprisingly capable quad Core i7 + Z97 system that will game for years.
That said, the Intel X99 chipset and its new processors, are truly meant for content creation, in particular, video editing/transcoding, audio encoding, rendering, and compiling projects. Or basically, any tasks that take advantage of more cores and more threads.
In order to get warmed up, here are some SLI Gaming benchmarks with Metro Last Light, Battlefield 4, Assassin’s Creed III, and Crysis 3. Both Intel Core i7-4790K – Z97 and Core i7-4770K – Z87 scores were included in some of the test results to give you an idea of comparative performance. We’ll then move on to more multi-threaded tests.
Gaming Performance
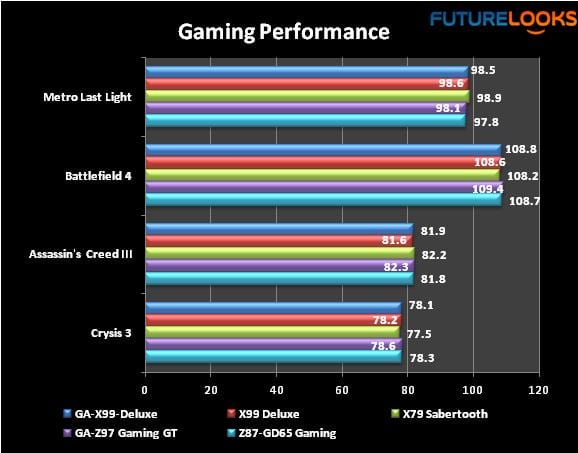
All of the game settings were set to the highest possible details and sampling to tax the system properly. Performance isn’t exactly an earth moving event, but we still, we see the GIGABYTE GA-X99-UD4 handle games in SLI just as well as the ASUS X99 Deluxe. The only way we might see a variance in frame rates is if we were using much weaker (CPU dependent) video cards.
Synthetic System Test – PCMark 8

To give us an idea of what to expect from the next battery of tests, we have to run the system through PCMark 8, which gives us a nice round number to look at. Overall, the GIGABYTE GA-X99-UD4 performs comparatively well. Keep in mind the UD4 is priced at a cost effective entry level point, which means it doesn’t have all the extra connectivity as the more costly ASUS X99 Deluxe. But in terms of overall performance, it’s right on par with what an X99 platform should be capable of.
H.264 GraySky 5.0
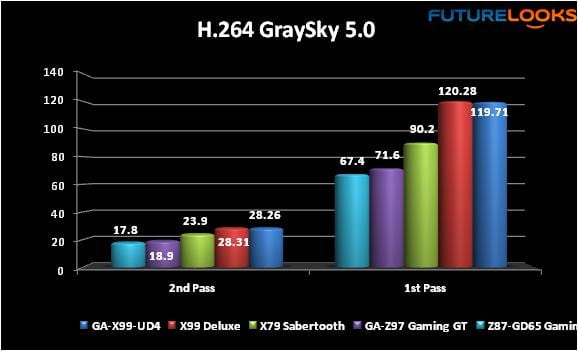
Since the Haswell-E is designed for content creation, this benchmark fits the profile. Also, it’s the motherboard and CPU communication that most heavily influence this type of benchmark. As you can see, the GIGABYTE GA-X99-UD4 is just a few points shy of matching the much more expensive ASUS X99 Deluxe. Paired with some lower CAS DDR4, the UD4 would do much better, and that could be in the budget given the price difference between the two boards.
CineBench R15
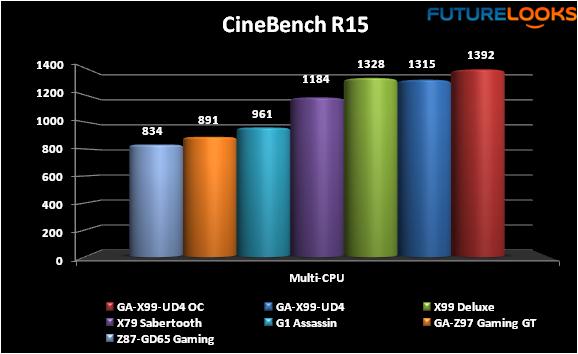
The motherboard and CPU pair, again, influence CineBench, which is heavily multi-threaded. After a few passes, the GIGABYTE GA-X99-UD4 is only a bit behind. The main reason is that the CPU turbos up more quickly due to internal BIOS tuning. The UD4 is only 13 points behind.
The next few tests will check out the overall hardware and connectivity of the GIGABYTE GA-X99-UD4
IO Connectivity
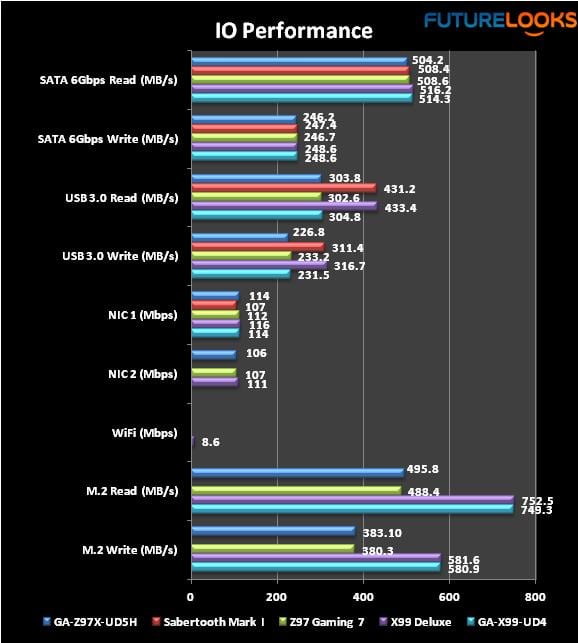
We conduct IO tests to make sure all the ports and any connections/expansion features work properly. The GIGABYTE GA-X99-UD4 manages storage devices perfectly fine. It also makes good use of the integrated NIC. M.2 PCIE performance is right on par, strapped to the high performance Plextor PX-G256M6e PCIE device.
The only area worth noting are around the USB 3.0 tests, where both ASUS boards pull away from the pack. The implementation of the UASP (USB Attached SCSI Protocol) technology on those two boards give substantial gains. So if USB 3.0 performance is one of your primary concerns, this might be a place where you may feel the need to spend the extra money.
Moving on, let’s cover off a few important hardware items, and take this review home!
Audio Performance
RightMarkAudio Analyzer gives us an objective look at the audio performance of each board’s onboard capabilities. Attributes like noise, stereo crossover, signal leakage, frequency response, and volume can make or break a platform, and are quantified well. But we still have a listen just to double check. Here are our objective findings.

Audio differences between the boards tested the last few months were minimal. The GIGABYTE GA-X99-UD4 utilizes a small amplifier to slightly boost the volume which is apparent compared to older non-amplified boards. While the audio was clear, it wasn’t as loud as what audio enthusiasts typically like. The more expensive ASUS X99 Deluxe has a bit more audio volume to offer, but it does cost quite a bit more. Almost enough to purchase an external digital audio interface which would increase quality further. But in reality, both boards are comparable.
One thing we do want to point out in terms of user experience is that, out of the box, the GIGABYTE GA-X99-UD4 detected all of the various USB powered audio headsets without fail. Whereas the ASUS X99 Deluxe had a couple issues. ASUS is aware and is working on fixing it. This issue could also manifest itself in digital audio interfaces, so if you wanted this for an audio workstation, for instance the GIGABYTE would be the more stable choice due to this issue, for the time being.
Quality Control
Only after handling a computer component thoroughly do we really notice any performance or build issues that may or may not impact the user experience. Sometimes, it’s just really minor cosmetic issues which is nothing to worry about. That said, the issues we noticed in terms of design were minimal but worth noting.
A handful of random CHOKES were mounted crooked but did not impact performance whatsoever. There aren’t many fan headers which means you’ll need some fan splitters or adapters for full CPU cooling towers with multiple fans, or liquid cooling systems. Otherwise, no discernible noise, EMF, or EMI came from the board. We would like to point out that the the board feels extremely solid.
Typically, poor implementation creates noise over the audio feed but there was absolutely no noise or popping. As mentioned, USB headsets (and various devices) were quick to detect and work properly on the GIGABYTE GA-X99-UD4, which the ASUS X99 Deluxe seemed to have a little more trouble doing.
Final Thoughts
GIGABYTE has been seriously focused on creating a positive user experience for the Intel X99 platform. Most all attributes that create that experience like useable features, easy installation, software, stability, performance, and BIOS were all polished up for the Haswell-E launch. The board’s connective features as well as setup went smooth and worked correctly which adds to the confidence in the platform. The App Center and all the supporting software (LED control, Easy Tune, etc) are easy to figure out working properly without a single glitch. Additionally, the performance and stability, even when overclocking, were right on point which is very important if you’re choosing a platform for some serious mission critical projects. Finally, the BIOS felt as solid as ever giving us stable Easy Tune 4.1 GHz and manual 4.5 GHz overclocking.
However, our engineering hawk eyes did notice one very minor issue with the cluttered function key shortcut text at the bottom of the BIOS screen. But that is the only thing that could really be noted. Anything else would just be griping over non essential details. GIGABYTE has done a very good job with the GA-X99-UD4 by releasing quick, timely BIOS updates to remedy any issues at launch. That is quite evident in the performance of such a highly affordable board.
Again, the GIGABYTE GA-X99-UD4 hits the steets at $258.99 US, which is a remarkable “fighting price” for the quality. Between that great personal enthusiast touches, the clean installation from start to finish, and great performance, the GA-X99-UD4 should please any price conscious end user that wants to add the most expensive Haswell-E processor they can afford. Because experience is really everything in today’s PC DIY world, it earns a very rare Editor’s Choice Award from Futurelooks. Well done GIGABYTE!
Pros
- Very stable and reliable platform
- Flawless, responsive connectivity
- Easy setup and installation
- App Center now pairs smoothly with everything
- Easy Tune solid for tweaking and overclocking
- Very affordable X99 ATX choice
- Quick BIOS updates available
Cons
- Minor: BIOS F keys still cluttered
Overall Rating: 9.5/10


Help Us Improve Our Reviews By Leaving a Comment Below!