
Based in Sweden, Fractal Design has been designing cases and marketing them in the UK since 2007. Over the last couple years, they’ve continued to carve a swathe out in the American market thanks to their immaculate and contemporary designs. Once upon a time Antec offered similar style, but has since stopped, leaving a void amongst the DIY users who are looking just for what Fractal has to offer. Their vision is one of close attention to detail, balanced features, and a clean “less is more” image. Those concepts are found in many computer enclosures including the one we’re reviewing today.
I’ve been working with the Define R4 for about the last two weeks now, studying every straight line right down to the air flow. It’s a very feature rich, extremely classy enclosure. Naturally, we wanted to know is it a work of art, or if it’s just another square? Let’s find out!
Features and Specifications
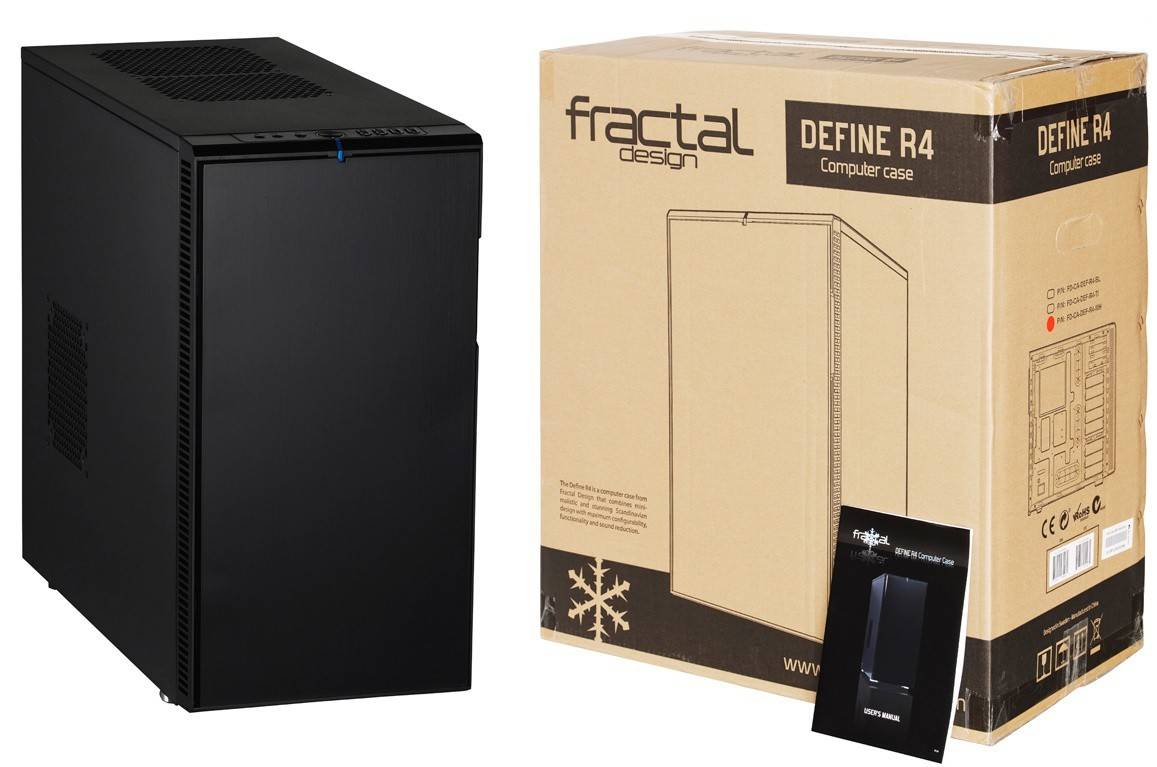
Before we pop open the case, lets cover the features that Fractal feels is important to offer in many of their enclosures. The Define R4 now comes in a solid and windowed models which is obviously cool for enthusiasts that like to see their elite hardware. Here are the other feature highlights:
- High density noise-reducing material used on side, top, and front door to silence the system
- ModuVent (patent pending) design that enables silence or max airflow
- Top HDD cage can be rotated 90 degress, or removed for max air flow, or to fit super large GPU
- 3-speed fan control switch top front of bezel (up to 3 fans supported)
- Two Silent Series R2 140mm hydraulic bearing fans included as a standard
- Wider chassis design for cable management
- Tooless front 120mm fan holder for simple maintenance
- Two SSD slots behind the motherboard tray
The specifications of the case may seem redundant to experienced users but some are in fact different than many of the enclosures we’ve scrutinized. The size of the case, specifically the depth and length, are more important as it helps explain why so many components can be packed inside. Those specs are below.
- Supports ATX, Micro ATX, and ITX motherboards
- 7 + 1 PCI expansion slots
- 2 x 5.25″ ROM drive bays
- 8 x 3.5″ HDD trays – all are compatible with SSDs
- 2 x 2.5″ SSD behind motherboard
- 3 – ModuVent plates with sound dampening (2 top and 1 side)
- 7 total fan positions (2 top 120/140mm, 1 rear 140mm, 1 bottom 120/140mm, 1 side 140mm, and 2 front 120/140mm positions)
- Front and bottom removable fan filters
- Allows large 6.7″ (170mm) tall CPU heat sinks (Side fan removed)
- Supports standard (1 bottom fan) and large power supplies (No bottom fans installed)
- Supports 11.6″ (295mm) GPU with HDD cage installed and 17″ (430mm) GPU without the cage
- 1″ space (26mm) behind motherboard tray for cable management
- Rubber grommets on all wire and water cooling holes
- Case dimensions: (WxHxD) 232 x 464 x 523mm (9.1″ x 18.3″ x 20.6″)
- Net weight 12.3 KG (27 pounds)
Cooling potential rests in the configuration of the fans. It comes with front and rear 140mm Silent Series R2 fans. They’re rated for roughly 600 RPMs @ 53 CFM (14.9dBA<) to 1000 RPMs @ 66 CFM (18.5dBA). They aren’t quite as silent as some other case fans but they will seem quieter thanks to the enclosure’s sound dampening. Let’s see what else comes with the Fractal Define R4.
What’s in the Box?
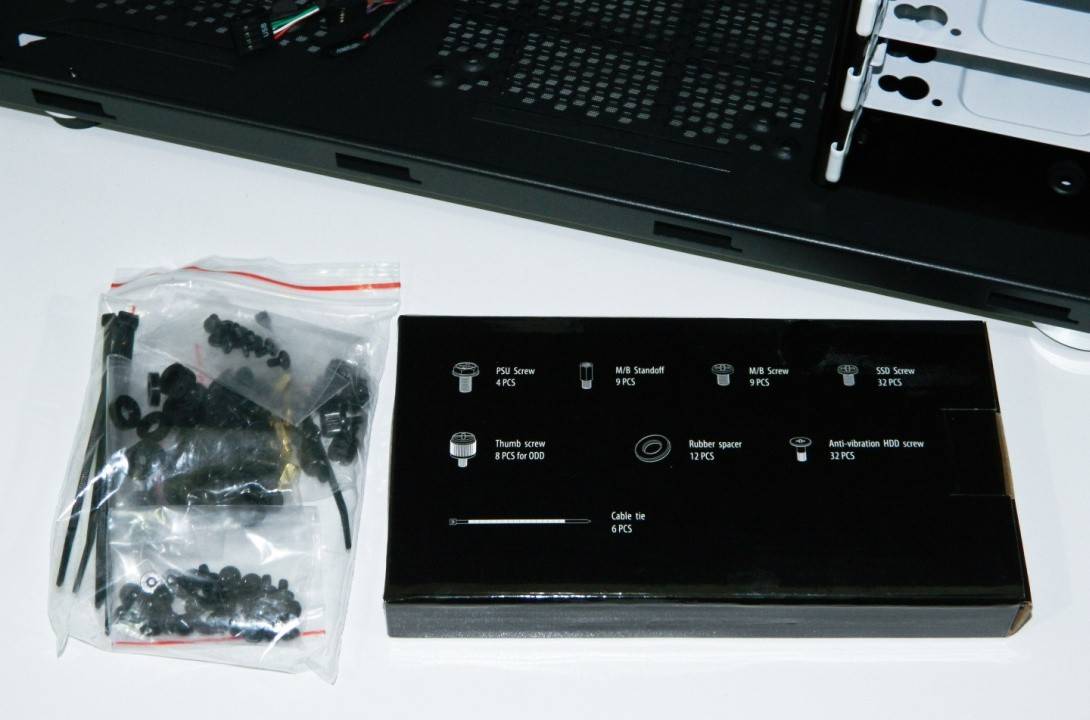
It’s a pretty standard accessory bundle as far as enclosures go. However, there are a lot of black screws which have different purposes which are clearly marked on the accessory box. For instance, you’ll find special screws for SSD tray mounting. There are also rubber spacers and anti-vibration HDD screws all designed to help silent your drives. The eight ODD thumbscrews were helpful for mounting the motherboard which kind of changed up the look. Finally, six cable ties round off the bundle. I’m beginning to think enclosure and PSU manufacturers are allergic to Velcro, or reusable ties.
Now let’s move on to inspecting the chassis, pointing out interesting things along the way.
Inspecting the Fractal Define R4 – Exterior Inspection
In the spirit of innovative ideas, I broke down the case inspection into subsections in order to properly itemize features. It should be easier to digest plus it should help you decide if the enclosure fits your particular needs.
Front and Top
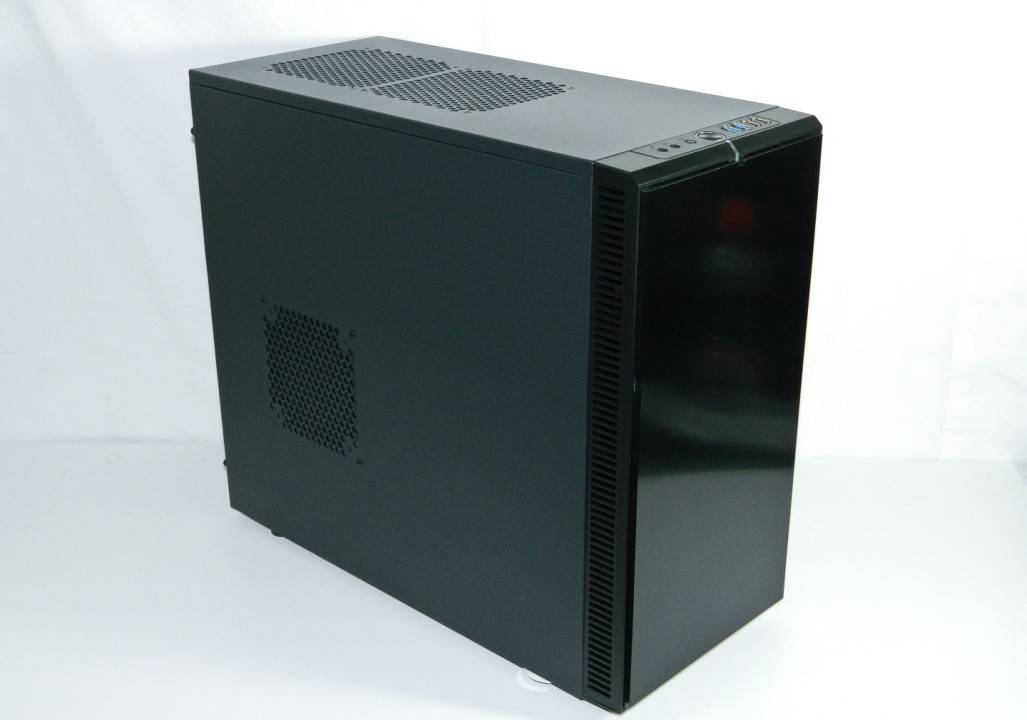
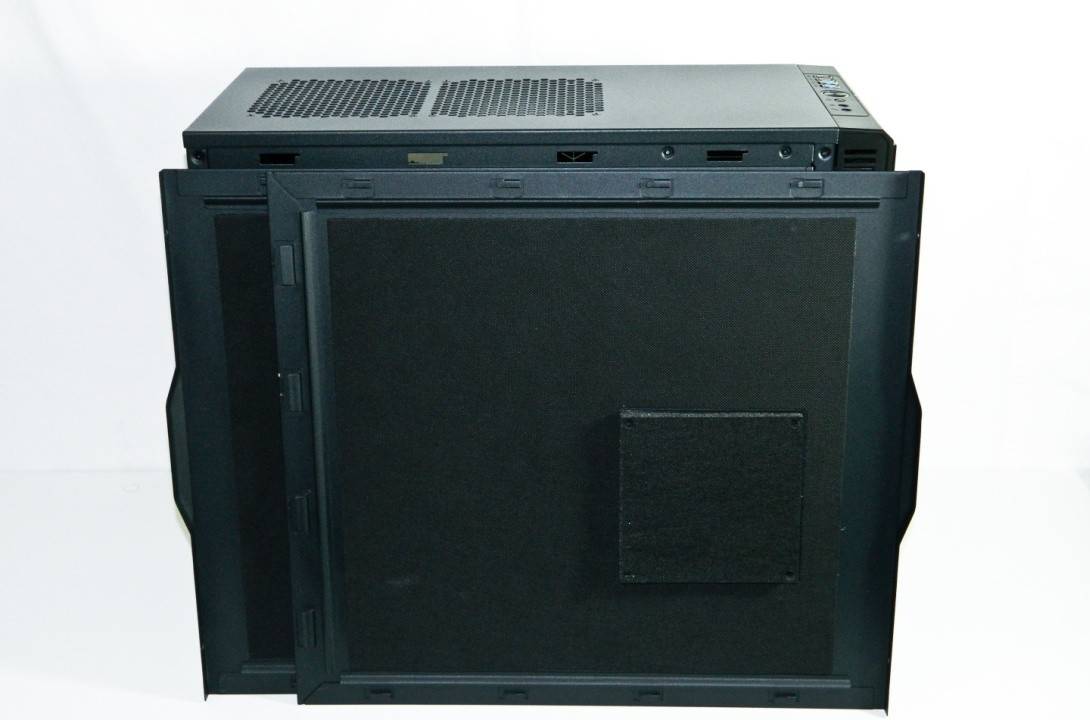
The Define R4 really does have a nice even jet black finish all around. The metal panels are quite sturdy which helps all the joints and seams fit together nicely. The front door has an especially nice finely brushed black finish with equally well machined beveled edging that anyone will appreciate. It blends well with the vented front bezel chassis which also shares a similar beveled edging.
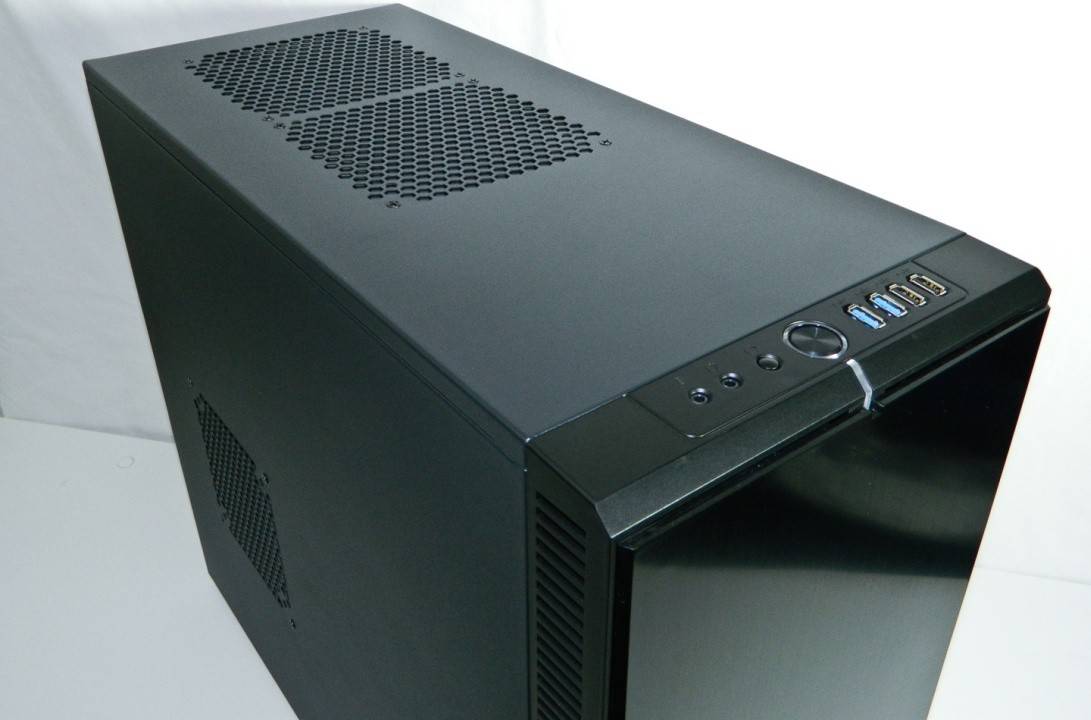
You can see the 120/140mm side panel fan port and two top 140mm fan ports which come covered with vent covers. Why? For creating a wind tunnel effect. More on that later. The ports work with both 140mm and 120mm case fans. Having 120mm holes allows users to pick from a selection of great fans already out on the market or reuse the ones they already have. Finally, all audio, USB, power and reset buttons are located within the bezel frame up top.
Bezel Front
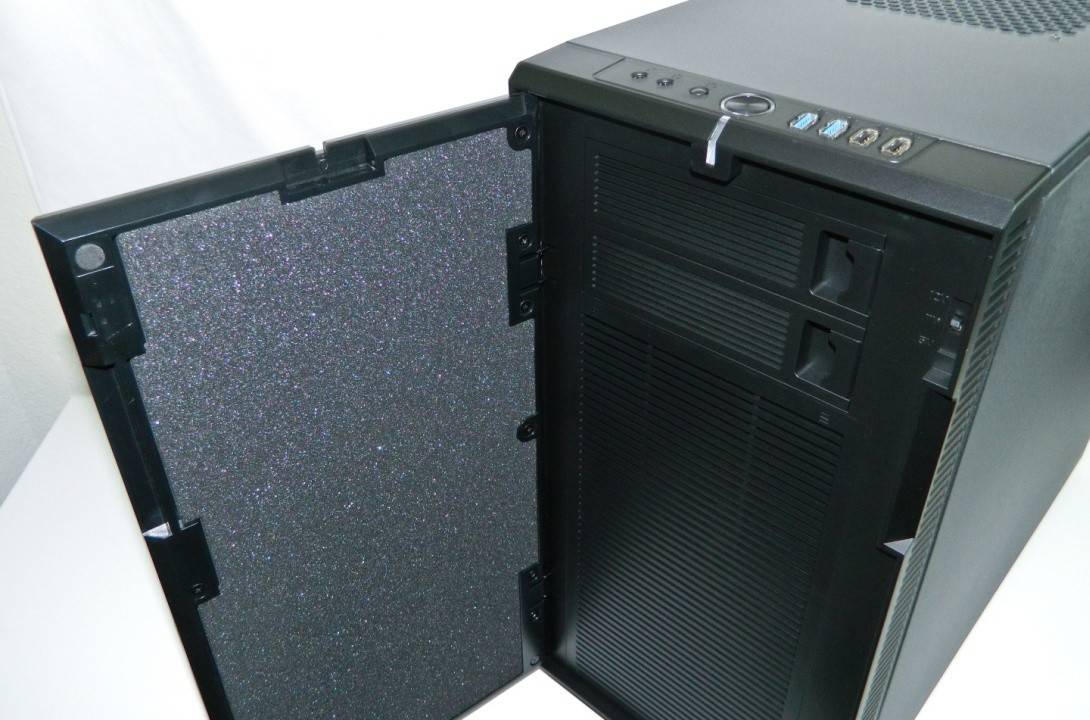
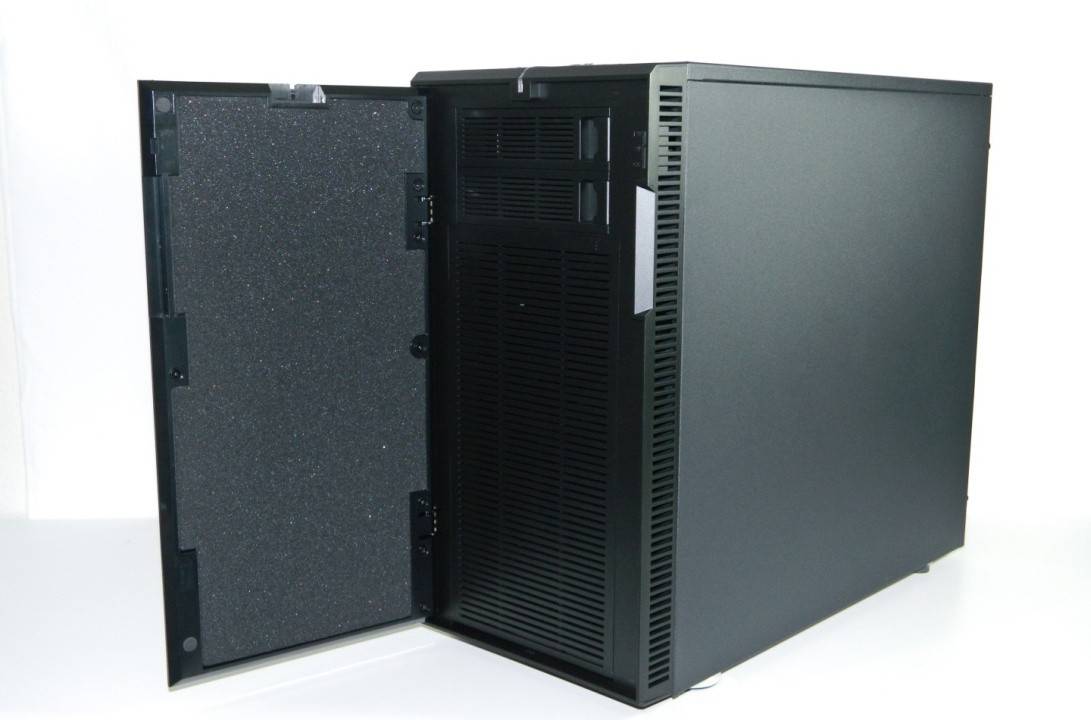
The door smoothly swings open to reveal a familiar vented design seen on many a pro server type enclosures. There’s only two sturdy 5.25″ bay covers that release or lock back in to place with a single thumb lock. The top slot is prepped for one unit. To the right of the bays is a 3-speed fan control that supports three fans. However, we’ve had good luck using splitters for four. Fractal leaves it up to you to connect the fans.

There is a discreet vented door within the front bezel that is hinged at the bottom. Press the two top corner tabs to release the spring loaded locks which allows the door to swing down. Behind it is also a hinged, removable filter that slides right out for easy cleaning. Further behind that is a tooless dual fan bay with space for stacking up to two 140mm cooling fans. The ease of access and maintenance of the fans and filters is simply fantastic.
Back
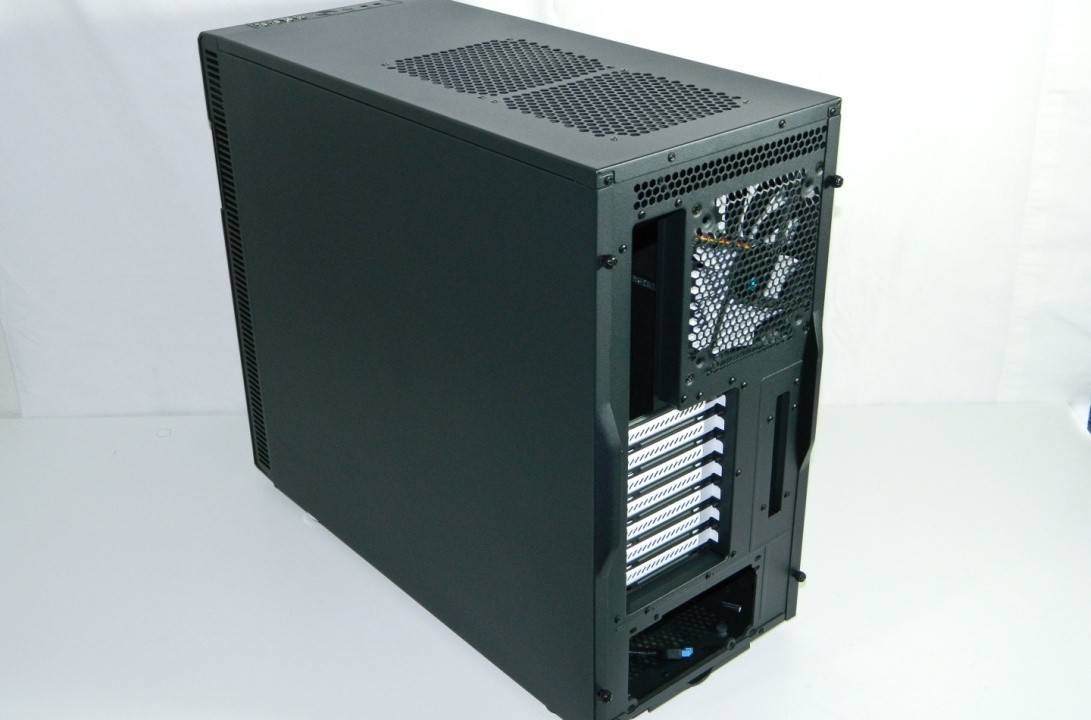
Looking at the back of the enclosure, you get a better understanding of the chassis’ width. White PCI slot covers and 140mm fan blades contrast surprisingly nicely. I especially like that the fan has plain white untextured fan blades not that you can see them well. But golf ball textures don’t make a fan cool.
Notice the lack of water cooling ports? That’s because the chassis is built to work better for supporting internal custom and all-in-one systems. And honestly, I haven’t seen an external cooling system that would blend well with this design.
Bottom
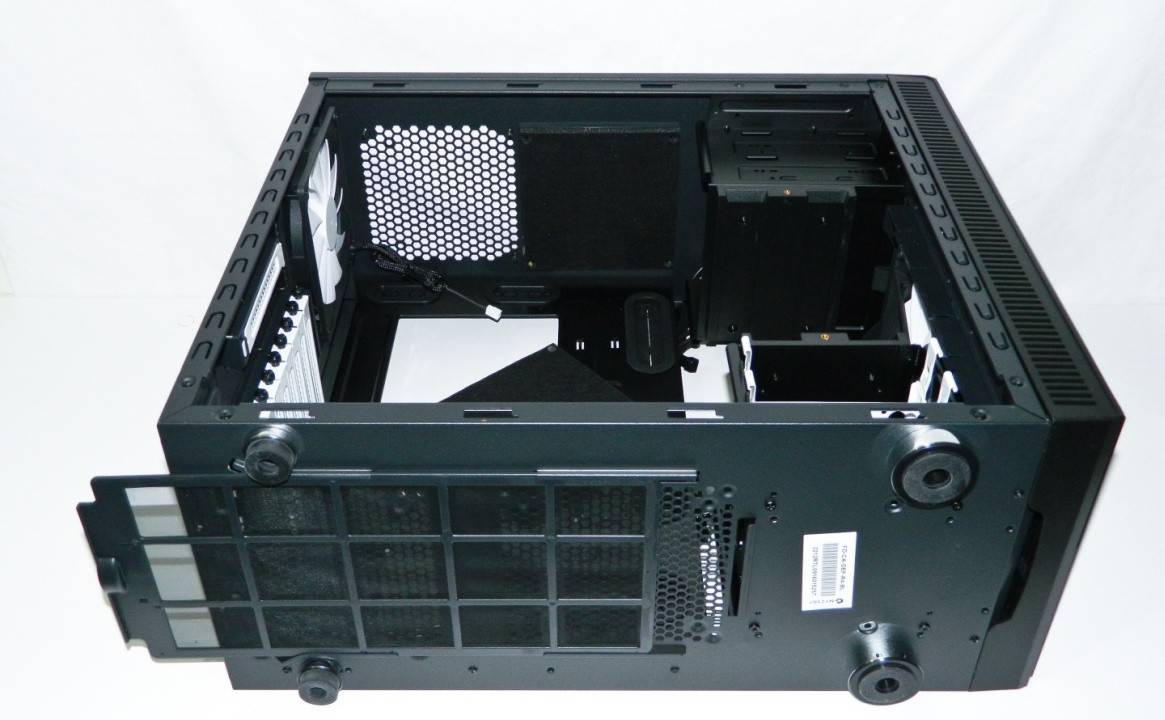
Finally, the bottom of the case features rubber feet and a removable vent. The feet will keep the case from sliding around and help absorb any vibrations. They put about 3/4″ space between the case and supporting surface so the two bottom vents allow some air movement for your PSU and/or any case fan you may add. Simple and logical.
Fractal Define R4 – Interior Features
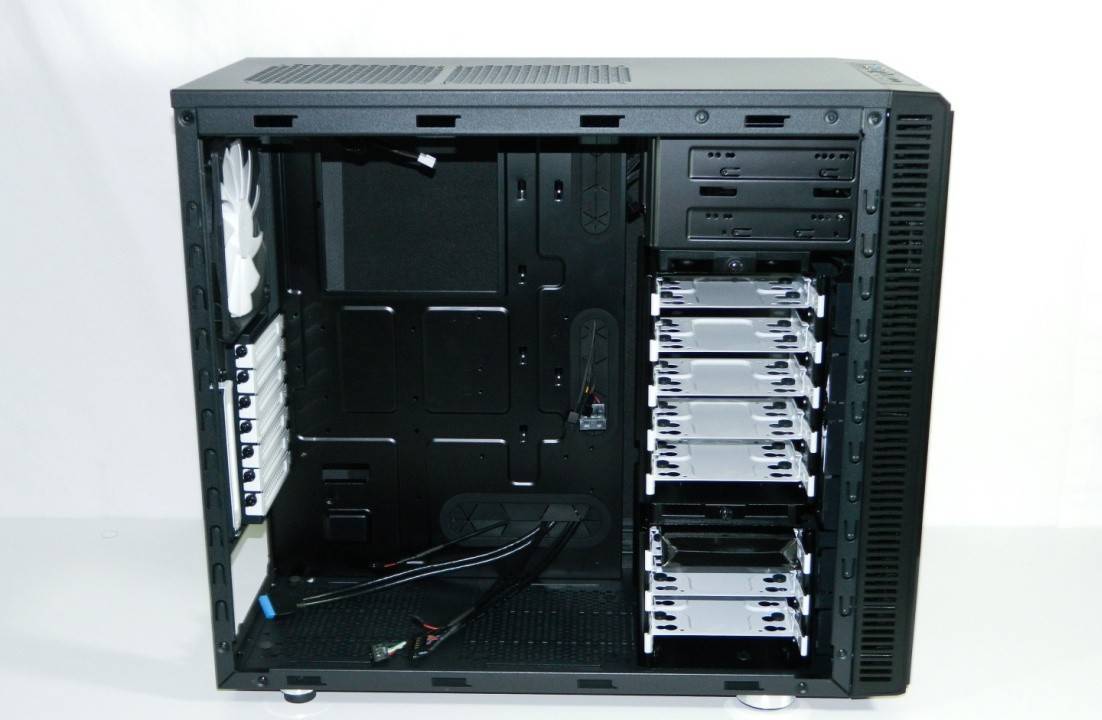
Black thumb screws secure the left and right solid panels. Once inside, you can better see the white painted removable hard drive trays with locking tabs. Special long neck screws are included to secure drives through the bottom rubber grommets. There are also four holes in every tray that work for securing SSDs also with included screws. Simple and clean. The middle drive cage is removable if you need more GPU space or want better air flow from the front 140mm fans. Interestingly, the 5.25″ are not tooless.
The side and top panels are lined with a noise cancelling insulation comprised of bitumen and fabric. Bitumen is an organic tar like substance that appears naturally in Sweden and is similar to California’s La Brea Tar Pits. This is the first time I’ve heard of the material used for this application. And additional benefit is its ability to absorb and limit vibrations as well. I guess this is why it’s also used in road surfaces.
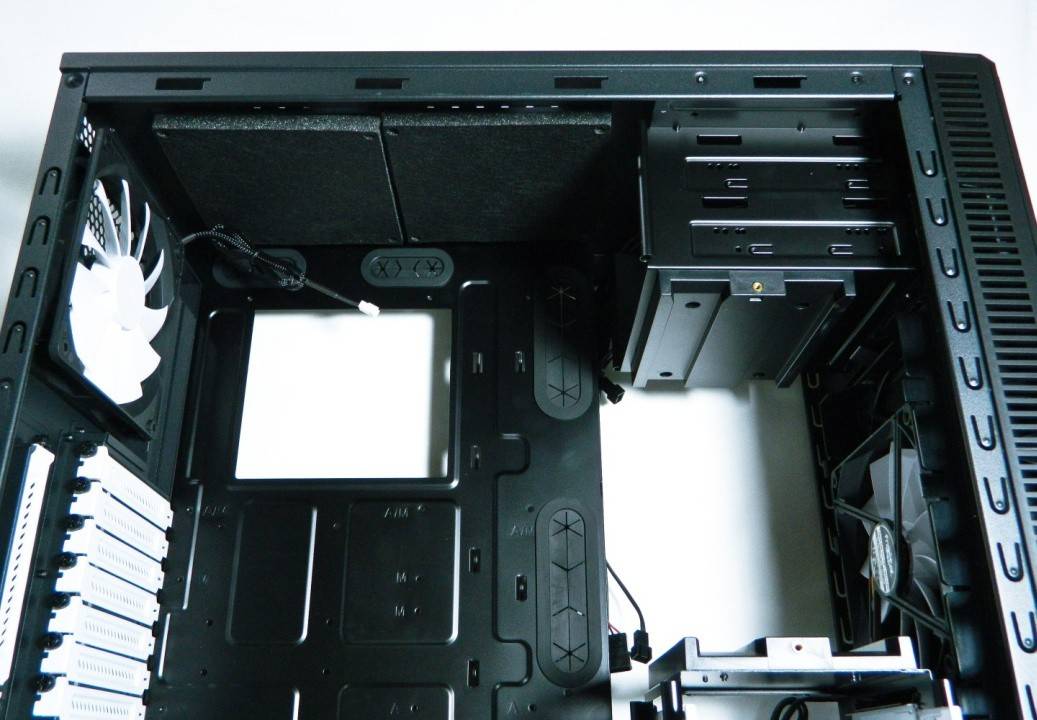
The two top 140mm fan ports use a Moduvent system which is essentially more noise cancelling foam but also seals off the top which helps to create a wind tunnel, ensuring cool air coming from the front reaches the components, then gets exhausted out the back. This is still the most efficient method for keeping things cool while allowing fans running at lower RPMs to create less noise. Unfortunately, the top fan ports only support 140mm fans which kind of complicates attaching more common dual 240mm radiators.
The rest of the features are what we consider standards in $100 level cases. This includes a large motherboard tray cut out, three rubber lined wire routing grommet holes, and two 140mm bottom fan ports if you need more cooling. The PSU area has rubber case feet to support even the largest power supplies and also keeps them from getting scratched up from bare metal contact.
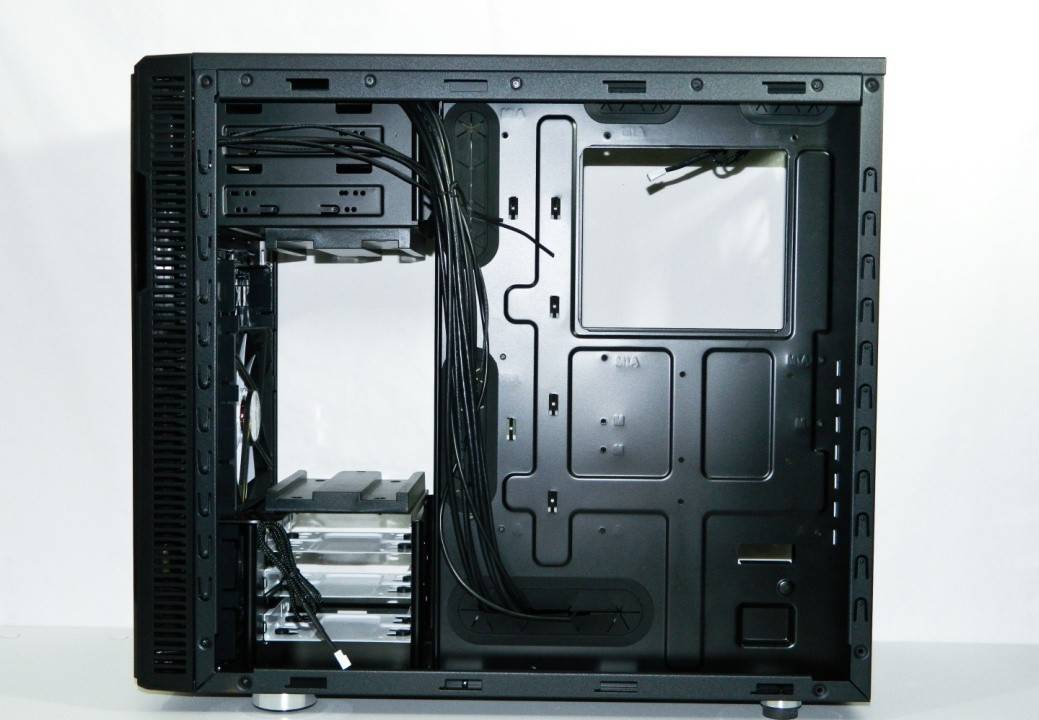
Behind the motherboard tray is about 1″ of space for wire management. This means there is ample space for large cables, making it one of the easiest cases to build a system in while keeping it clutter free. Those pesky 1″ wide and extra thick PSU connectors fit easily.
Test System Setup
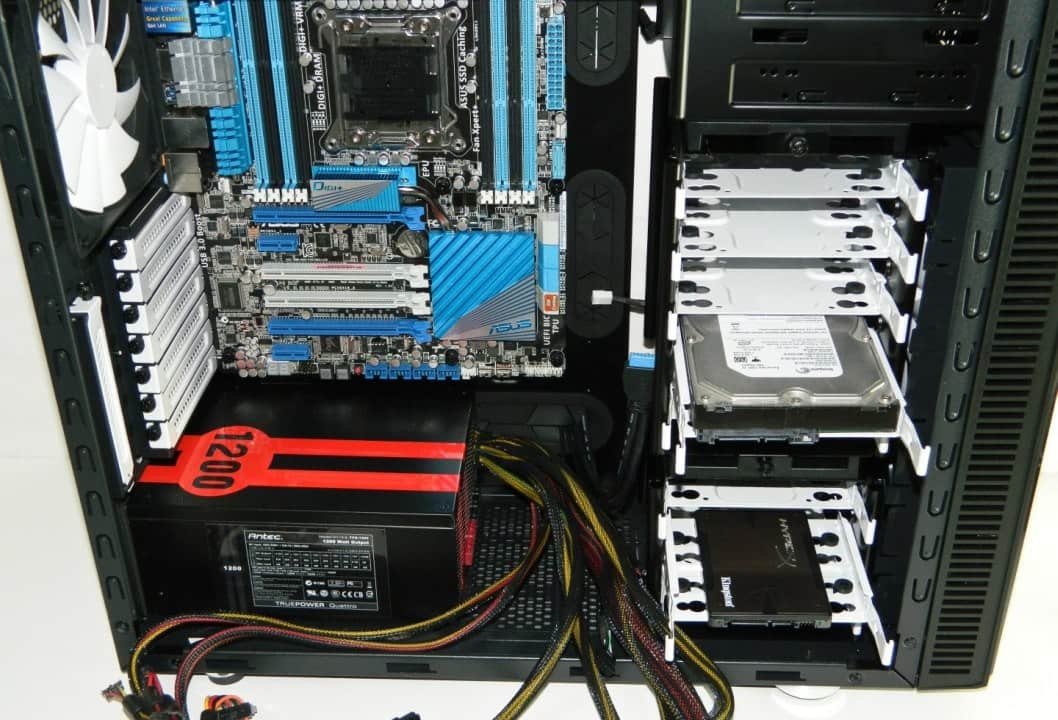
When I see a new case design, I like to examine how well the features function and how efficient the air flows throughout the case. This is done using my tried and true loud test system. The test includes an AMD Phenom II X6 1100T, ASUS M4A89GTD PRO/USB3 motherboard, Corsair Dominator 4GB 1600MHz DDR3 memory, NVIDIA 8800GTX Ultra, Antec 1000 Watt High Current Pro power supply and Seagate 500GB SATA2 hard drive.
Four sensors connected to the NZXT Sentry LX were attached to the side of a stock Intel CPU cooler, Southbridge PCH (chipset), and center most back PCB of each video card. Temps and system noise were monitored with the fans off, low, medium, and high. Both Prime95 and Furmark were used to fully load the system so that all the important components would heat up. This represents somewhat of a worst case scenario, but should also help us cover broad spectrum of environments this case my end up in.
Fractal Design Define R4 – Noise Levels
Good cool air flow will help control system noise by helping the component cooling fans work less hard. Balancing your system noise depends on your components and front enclosure fan placement. Here’s what we found out testing the stock enclosure.
At the highest position, cool air primarily hits the CPU cooler more than the VGA. At the lowest point, cool air better hits the VGA. That said, I found placing the fan at the bottom was the optimal position for quieting high performance components. The vents at the bottom allow warm air to rise quicker and out the back while being replaced with cool air which creates a nice wind tunnel effect. Adding a top fan actually hurt air flow revealing this to be best used for dual radiator liquid cooling systems instead.
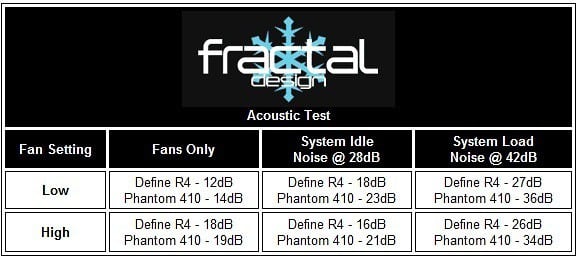
Stock CPU coolers can typically be heard in most any enclosure, however, it could hardly be heard, whether idle or gaming, in this chassis. Any stock CPU cooler can of course just slightly be heard, but the Define R4 does a great job. This is thanks in part to the air flow as well. The Define R4 helps negate about 15 dB(A) of noise on the average but your results may vary with different parts selection.
Fractal Design’s Define R4 – Thermal Results

Now that we have the optimal case configuration, the test system was put through some benchmark loads to see how the Define R4 manages system temps compared to a generic mid-tower case. The fans were connected to the front panel 3-speed fan control to see how it effects performance. I allowed the system to run idle and load 60 minutes each because all computer enclosures kind of act like giant heat sinks since components like the motherboard and GPU transfer a little heat to the chassis. Keep in mind that these are sensor temps and not the internal component temp.
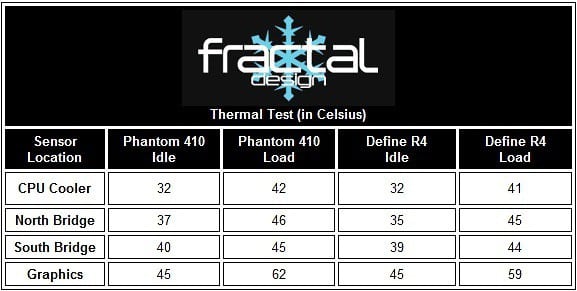
The performance table basically solidifies my preliminary performance estimations. The Phantom 410 is a pretty darn good enclosure when it comes to keeping things cool. But the Define R4 on the average ran a bit cooler and quite a bit quieter. The final proof of optimal air flow is that the system temps were pretty consistent with the side panel on or off.
Final Thoughts
Good air flow plus sound dampening make the Fractal Design Define R4 computer enclosure one of the quietest mid size tower enclosures available on the market. The air flow alone helps keep component noise down while the noise management Bitumen helps block quite a bit more of it too. With the right high performance components, the enclosure offers the potential of creating such a quiet system that you’ll find yourself double checking to make sure the system is powered.
The Fractal Design Define R4 is an extremely attractive and functional enclosure as well, available in jet black, gun metal and white. While the white contrasting parts make it stand out, it’s features like the HDD/SSD friendly trays, motherboard placement, removable tray drive bays, potential for extra cooling, innovative filtering, fan control, and extra wire management space that round off the enclosures impressive features.
The final test is value. Leading retailers like Newegg and NCIX offer the base Fractal Design Define R4 for $109.99 and $119.99 for the windowed model. When you consider features, quality and value, it’s no wonder system integrators are stocking these cases by the pallet. After all, if their customers are happy, then so are they and what better way to help that relationship along than with a quality case for their custom system.
If you’re looking for an extremely clean, feature rich, conservative case design, the Fractal-Design Define R4 is my top recommendation and earns our very rare “Editors’ Choice Award”.
Pros
- Very attractive, clean design and quality
- Sound dampening Bitumen materials
- Great stock optimal air flow
- Three speed fan control for three fans
- Innovative front filtering and fan system
- All the right stock features
- Very good overall value
Cons
- Reusable Velcro or ties would be a nice touch
Overall Score: 9.0/10


Help Us Improve Our Reviews By Leaving a Comment Below!