Self contained, low-maintenance all-in-one liquid CPU cooling systems are quite popular these days, especially amongst system integrators. What makes them popular is that they don’t require a masters degree or any experience at all in liquid cooling to enjoy near silent computing. All one needs is the aptitude to work a Philips screw driver and a little dexterity. CoolIT System’s Vantage A.L.C. (Advanced Liquid Cooling) is the latest self contained compact cooling innovation. Let’s see if that same early innovations we saw at CES 2010 offer real world benefits and performance today!
Features and Specifications


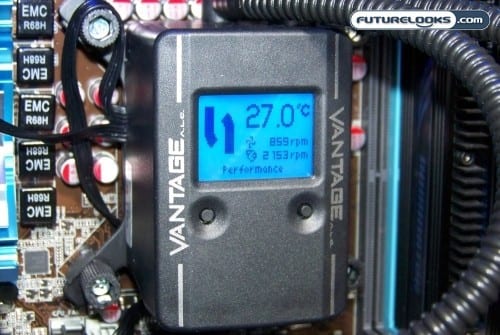
The most prominent feature on the Vantage is the small LCD screen built in to the back of the cooling block-pump assembly. It offers 6 color themes for enthusiasts who like bling. The screen text can be orientated so that it is readable in any direction. A must for case windowed enclosures. Also built into the display unit are three speed settings: Quiet (for silent operation), performance (for balanced noise and cooling performance), and extreme (for maximum cooling performance). The 1100-2500 RPM cooling fan features something called CoolIT Fan Node which is compatible with any 3 or 4 pin third party fan and allows remote temperature detection.
And, while we know that Coolit’s special coolant contains low toxicity fluid with anti-corrosion/anti-fungal additives, we aren’t quite sure of the actual chemical make up. There could be some advanced aerospace quality coolant inside for all we know. Suffice it to say, their engineers say it’s really well engineered “stuff” that is more than capable. Check out the video below for a breakdown of a few more of the Vantage A.L.C.’s features…
Those who buy the Vantage A.L.C. will soon be able to download their new Maestro software system. Maestro allows you to completely manage the Vantage A.L.C., regulate system fans and case extras all via a wireless module that is not currently active inside the display unit. Once enabled however, users will be able to make changes to the Vantage A.L.C. without opening the case and customize the logo on the LCD screen with your very own creation.
The CoolIT Systems Vantage A.L.C. should hit the market running at $114.99 US. In the big scheme of things, this is an unbelievably low price when you factor in what you actually get with the system. While currently only available on CoolIT”s website, we expect places like NewEGG to be carrying it soon.
The Vantage Box Contents
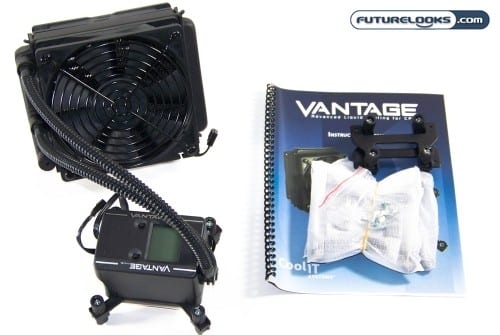

Because the Vantage A.L.C. system arrives completely assembled and ready for operation, there isn’t much that needs added to the box. You’re just responsible for installing it in your computer system of choice. The Vantage ships with the universal Intel retention brackets already mounted.
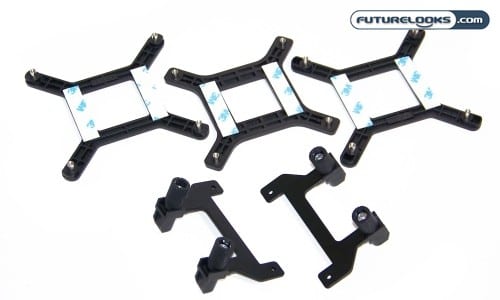

In addition to the Vantage A.L.C. itself, inside the box is the Vantage, the optional AMD retention mounting clips, Intel back plates, as well as for gray thermal paste and four mounting screws for the radiator installation. Also included is a very simple installation manual with good illustrations.The Vantage fully supports Intel LGA775, LGA1156, and LGA1366 processors. It also supports AMD AM2, AM2+, and AM3 socket processors. Needless to say, means you can pretty much install it on any CPU on the market all the way up to Core i7 and Phenom II X6.
The Vantage A.L.C. Controller Unit


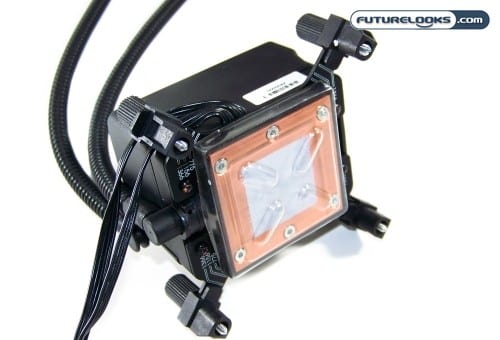
As you can see, the Vantage A.L.C. is a very unique and innovative product with its integrated LCD control panel. Preliminary viewing of the screen revealed that the text is easy to read and manage as you flip through the screen options. There are two small buttons just below the screen that assist in accomplishing this. One maneuvers you through the menu and the other selects and sets the options.
What’s even more impressive is that the entire Vantage unit is powered off of the motherboard’s CPU fan port. It does not require any extra power even for operating the cooling fan. It simply splices in and is controlled off the main unit. This means that the unit is impressively energy efficient and shouldn’t use much more power than your regular high end dual fan air cooling solution.

Another feature that makes the Vantage more innovative is the unique, patented retention clip for mounting to Intel based motherboards. There is no assembling of screws, bolts, washers, or clips here. All one has to do is pull on the clip slightly and move the standoff to the desired LGA socket position. That’s it. If you thought that the Domino A.L.C. was easy to install in a few minutes this should break some records for quick install times.
Looking at the bottom, you can see that the copper base comes with some thermal paste already applied. It’s worth nothing that the paste is also applied evenly in a thin coat vs the slathered on state that we find some pre-applications in. Even though there isn’t a mirror finish, closer inspection revealed the base finish to be very smooth and free of rough spots or anything else that could hinder the block from contacting the CPU correctly. This really is the most important feature of any cooling block as any additional polishing may or may not increasing cooling performance. It may just add extra cost instead and we’re sure CoolIT weighed the pros and cons when it came time to meet their aggressive price point.
The Radiator and Tubing
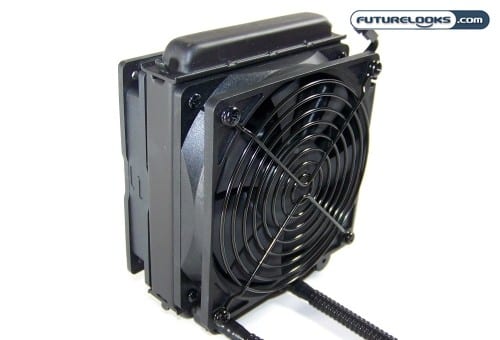
Though you can’t tell by looking at the black painted finish, there is actually an aluminum radiator underneath it. The aluminum micro channels do most of the work dissipating the heat within the coolant. One nice thing about an all-aluminum radiator and copper block is that it resists any chemical reactions with coolant. CoolIT’s own formulation just further prevents things from ever going awry.
As in previous cooling systems like it’s brother, the ECO A.L.C. (reviewed here), the Vantage uses very similar FEP corrugated plastic semi-flexible tubing. While it is flexible plastic it does still have a flex limit that you just don’t want to pass. However, there is more than enough flex in the line that it will accommodate most any computer tower case. There is also pivoting fittings in the block itself to allow you some additional latitude in tubing placement as well.


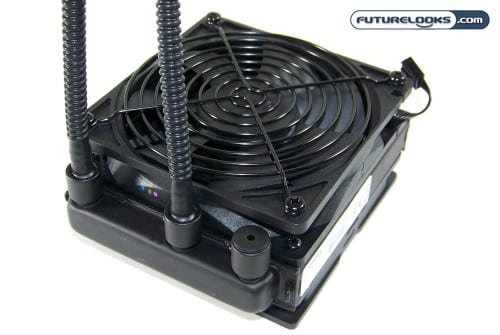
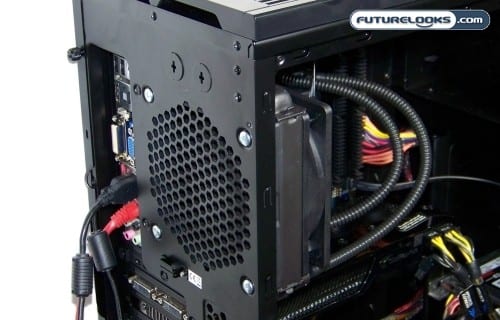
The mounting the rear radiator is made possible by spacer that resembles the shell of a very thin case fan. It’s roughly 20mm in depth and provides a buffer between the case and the radiator itself. The nice thing about the spacer is that you can remove it and substitute an actual case cooling fan, allowing you to create a push/pull fan setup that accelerates air flow through the radiator by sucking the air passing through it more quickly. It’s possible to give the radiator a little extra cooling performance with the right fan which is around 60 CFM min.
Now that we’ve had a good look at what makes the system special, what it costs, and what it looks like, let’s put the installation to the test!
Test System Setup
In order to test the Vantage A.L.C. we assembled a selection of parts that would provide both a real world example of standard parts to test the installation process and to test the ability of the system to perform. Even though I have no doubt that the Vantage can handle the beefiest processors available, it seems more feasible to test it on a mainstream processor. For that reason, the Vantage was installed on an Intel Core i7 800 series processor with an LGA1156 socket.
Here’s a quick breakdown of the other parts that were used to evaluate our experience with the Vantage…
- Processor: Intel Core i7-870 Lynnfield (LGA1156)
- Motherboard: ASUS P7H55M-EVO
- Memory: Corsair Dominator 4GB 1600MHz DDR3
- Graphics: ZOTAC NVidia Geforce GTX 280 1GB
- Storage: Kingston 128GB SSDNow V+
- Power Supply: Antec CP-850 Watt
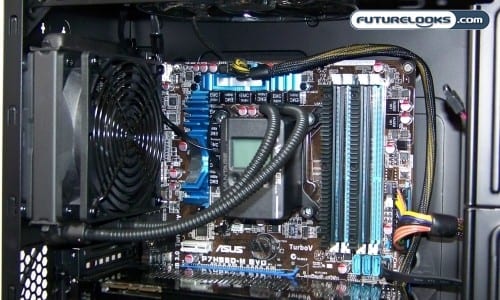
Our operating system of choice was of course, Windows 7 64 bit pro. Since the the Vantage A.L.C. was designed to work within an enclosure, we ditched the test bench and installed the system right into a brand new Thermaltake A90 case that we’ll be posting a review of in short order. We felt that this chassis provides both a mix of performance, price and silence that is a very good match for the Vantage in a reasonable gaming setup.
Installation Experience

Overall, the installation is easy. First, the cooling unit’s adjustable Intel mounting clip standoffs were adjusted to LGA1156 (the middle setting). After double checking the positioning, the plastic base cover was removed and the base unit was centered over the back plate protruding through the motherboard. Then, a few twists were given to each standoff till the base unite was securely fastened. Then, the radiator was then orientated with the tubing to the bottom. The four included machine screws were used to fasten the radiator. Some care had to be taken as these screws are finely threaded and can easily strip the black spacer if tightened too much. Finally, the base unit 4-pin connector was plugged in to the motherboard and the 4-pin fan cable connected to the base unit.
For AMD fans, installation is even easier. All you have to do is unbolt and remove the plastic bracket from the motherboard while it is still mounted in the case, replace the INTEL bracket with the AMD bracket on the controller block, and mount it to the existing CPU back plate that is still mounted to the motherboard.That’s it! All done. However, we did have a few notes to pass along to you.
First, the installation manual has you install the radiator first. However, that puts a little twisting stress on the tubing and makes it hard to hold the control unit in place while tightening. Also, if you push too hard on the clip, it can slide to a different socket setting. For this reason, we found it much easier to install the base unit first and then the radiator to avoid the frustration. It also makes minor routing adjustments to the tubing much easier.
We also found that the black spacer that mounts to the back of the case is about 20mm deep instead of 25mm deep like the common case fan. If you can’t mount the radiator for whatever reason, you can use your case cooling fan as a spacer instead. As long as your case fan RPMs are higher than the Vantage and flows at least 60CFM this should work fine and provide a bit better performance.
Figuring Out Operations and Settings
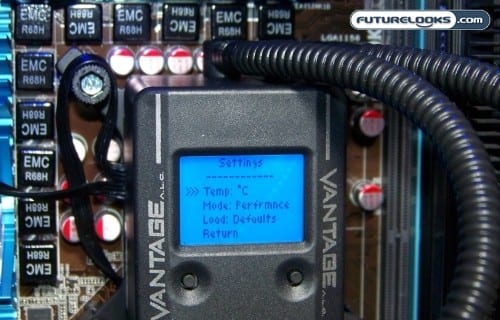
Everything about the Vantage is pretty darn simple to understand. The left button maneuvers you through the main menu and settings. The right button changes the setting. Your modes are Quiet, Performance, and Extreme:
- Quiet mode does just what it says. It manages the cooler and CPU temps with the least amount of speed and noise. Without the case fans powered on, the noise is somewhere in the area of 13dBA. Pretty darn quiet!
- Performance mode offers a little more fan RPM potential as long as the internal coolant tops 35C, or so. This is the ideal setting if you’re using a beefier quad processor and doing regular intense CPU work. It’ll help manage temps by ramping up the fan RPMs just a bit as the coolant temp rises.
- Extreme mode is for those doing some intense CPU work as well as some overclocking. As coolant temperatures rise, the Vantage gets more aggressive turning the fan up to 2400-2450 RPMs to help cool the radiator and coolant. You can expect more audible fan noise as the coolant temp approaches 40C.
There is also a “load defaults” menu option that allows you to return things to factory settings in case you don’t like what you did.
The important thing to keep in mind is that the internal coolant temp has to top 36C before the Performance and Extreme settings reveal their nature. Until then, the Vantage’s cooling fan will continue to spin at lower RPMs and remain pretty much utterly silent, being drowned out only by the case fans and other system components.
Now that we’ve gone through the very easy setup process, we’ll now assess the performance of the cooler and what it can do for your system in terms of thermal performance.
Thermal Testing
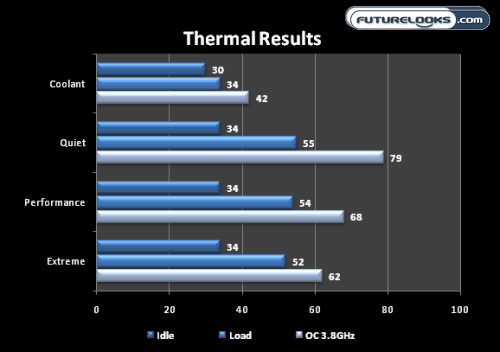
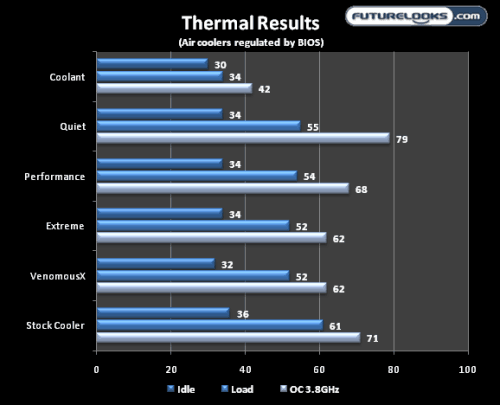
Since we’re dealing with just cooling performance, I opted to use OCCT: CPU Linpack for heating up and monitoring the processor’s temps. All three speed settings (Quiet, Performance, and Extreme) were tested for 2 hours each. Ambient temps were 23C (74F). Here are the temperature results graphed up for your pleasure.


Since the coolant stayed below 35C in all three modes, the Vantage A.L.C. never needed to ramp up fan speeds. The only thing that could be heard is the soft hum of the case fans which easily overpower the Vantage. Now, when overclocking the CPU, the Vantage detected the warmer 39C coolant and ramped up the cooling fan on its own as specified. Basically, the unit is designed to balance the noise and temps to give you performance without noise. This resulted in the above CPU temperature results that rivaled the best air cooler we tested so far, the Thermalright Venemous X. Not surprisingly, both coolers took the stock INTEL solution to town but the Vantage A.L.C. does a fantastic job especially when you factor in the next test: Noise.
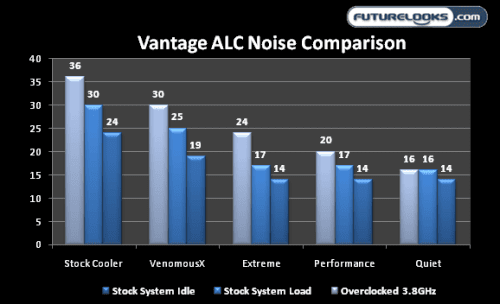
Noise Levels
We did a quick check with the noise level meter as well just to make sure we weren’t just hearing things…


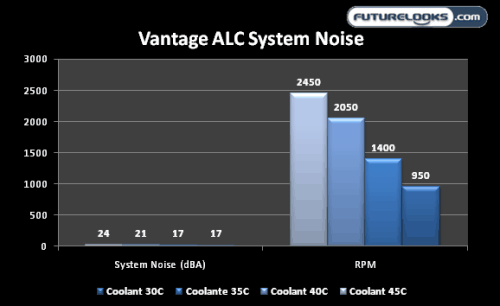
At 3.8GHz, the Vantage finally out paces the A90’s case fans resulting in some measurable noise. The Vantage cooling fan finally reached its 2400 RPM adding another 7dBA to the A90’s meager 17dBA case noise. Still, I find 24dBA to be very acceptable given the amount of air it’s expelling out the back of the case. And, this was also the only time the Vantage was ever audible over the case at all. The Vantage was also quieter than the Venemous X at the extreme settings while performing neck and neck in the 3.8GHz overclocked cooling test.
While the Venemous X is a slightly less expensive air cooling solution, it doesn’t have the advanced monitoring or the ability to become the cooling control center of your system when the Maestro system becomes available. You do get a lot for your money.
Final Thoughts

The CoolIT Systems Vantage A.L.C. is a silent, yet very innovative high performance cooling system. At first, I was a little concerned that its self-monitoring of the coolant temps over CPU temps would result in less than ideal CPU cooling performance. However, it did an excellent good job of balancing the two which resulted in extremely quiet cooling operations even on one of the latest quad core processors. As with any overclocking, there is a limit to the unit’s cooling capacity and you can expect some noise as the coolant temps begin to climb. That’s just the nature of the overclocking beast. Most of the time though, you can expect a mix of performance and silence when you’re doing everything else.
It’s obvious that some advanced thinking went in to its design, from the installation to the functions. Users with computer cases that feature a single rear 120mm case fan will be cocked, locked, and ready to rock in no time. Users with multiple rear fans might have to improvise just a little due to the spacer not being a standard 25mm width. Either way, the Vantage is designed to work with whatever case configuration with minimal fuss. It’s definitely not complicated to figure out.
Getting down to brass tax, the Vantage A.L.C. is essentially an ECO A.L.C. with the same muscle but more brains. The Vantage did seem to do a better job of managing thermal performance by balancing CPU with the coolant temps as a result of the unique monitoring system. It’s impressive that it’s able to cool so well while remaining near silent even during load. With sufficient case cooling, users can expect similar experiences. If I had to sum up the Vantage A.L.C. in a phrase, it would be “inspiring innovative silence”. Not to mention, all of this innovation is backed by a 2 year warranty and better yet, a $114.99US MSRP when it finally hits the shelves. That’s a win-win in our books.
Pros
- High quality construction
- Simple installation process for INTEL CPUs with an even easier AMD CPU installation
- Extremely efficient and quiet cooling
- Better performance than most air coolers
- No vibrations or added case noise
- Easy to operate and manage
- Top Secret No-Maintenance, High Performance Coolant
- Impressive 2 Year Warranty
Cons
- Costs a little more than the best air coolers
- Radiator mounting screws may strip plastic after repeated use
Overall Rating: 9.0 / 10.0


CoolIT Systems Vantage A.L.C. CPU Cooling System – Photo Gallery