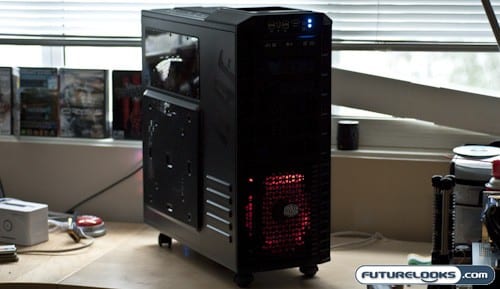
Not too long ago gaming cases used to look like this. Unfortunately, some of them still look like that. In the last couple of years, companies like ANTEC with their Twelve Hundred and NZXT with their Tempest have taken cases to a new happy place. Gone are the flashing lights and bright color choices of old. In their place, we get designs that look tougher, meaner, and most importantly they offer a lot more airflow for today’s hotter running high performance systems.
The folks at Coolermaster have come up with a case that represents this new trend of tough guy gaming cases. In fact, the Coolermaster folks have big plans to make this style of case one of their signatures and will be rolling out a series of new cases bases on this style very soon. Today we’ll be checking out the case that started it all for Coolermaster; the HAF932 Full Tower ATX Chassis.
Features and Specifications
The HAF932 is a rather odd sounding name, but deciphered it means:
- 9 for the case series
- 3 for the size (Full Tower)
- 2 for the 230mm fans
Finally, the HAF part stands for High Air Flow. Still, I would have just stuck with HAF and dropped the 932. If it wasn’t for a quick email to our friend at Coolermaster, I would still be scratching my head trying to figure out what the 932 meant.


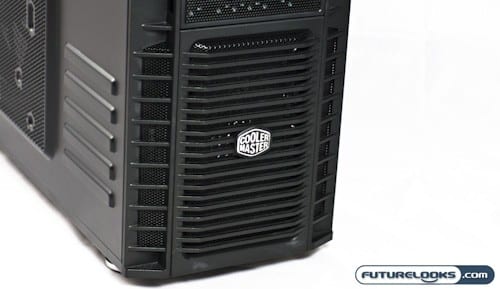
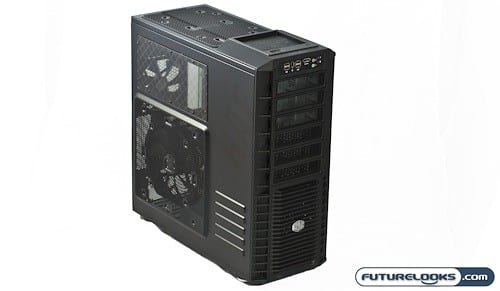
As you can see, the HAF932 has a very rugged looking exterior and is made of a mixture of steel and high impact plastic. When checking out a prototype at COMPUTEX last year, they were still calling it the “Tank Case”. I would have stuck with that name. At least it’s a bit more descriptive than HAF932. You can also make out quite a bit of swiss cheesing around the case especially in the front, top and side case panels. This helps with the HAF part of the HAF932.
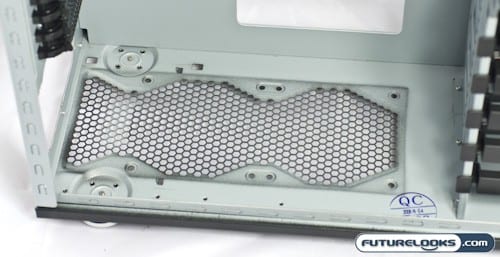
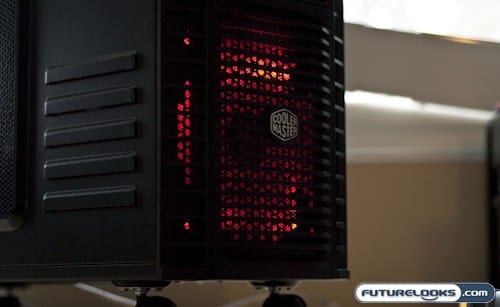
In order to live up to the HAF part of its name, the case has two 230mm fans pulling air into the case, one in the front and one on the sidepanel. The one in the front has red LEDs inserted into it while all the other ones don’t get this treatment. Another 230mm fan on the top of the case acts as an exahust fan and there is also a 140mm fan mounted to the back of the case, also for exhaust. All the fans feature removable adapters to allow them to use the motherboard fan headers for power. Unfortunately, there are no filters on any of these fans so expect to be vacuuming or dusting often.
The case is constructed of steel and measures (W)9.0″ X (H)21.5″ X (D)22.7″ and weighs over 29.1 lbs so we won’t be toting this one around to Lan Parties. The lack of security features on this case doesn’t help either. It supports MicroATX, ATX and E-ATX boards (except for Dual Xeon Nocona boards) and you can have any color you want as long as it’s black. The case also uses a completely tool free design with the exception of the motherboard and initial mounting of the power supply which requires you to get familiar with your favourite screwdriver.
All this can be yours for around $179 or less at places like NCIX and NewEgg. More details can be found on the official Coolermaster Product Page.
What Inside the Box?


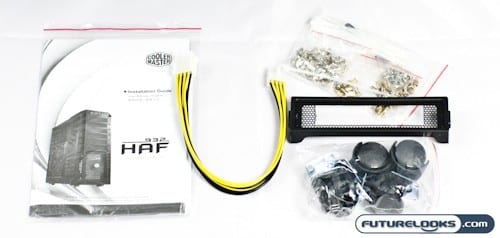
Besides the HAF932 case itself, you get all the necessary accessories that you need to assemble a system into it from scratch. Coolermaster includes way more hardware than you need to mount your board, just in case you’ve got butterfingers and tend to drop and loose screws. They even include zip ties for tidying up your work.
Highlights include a 5.25″ to 3.5″ adapter, matched to the style of the case, and allows you to mount a floppy or media card reader into the bottom of the six drive bays. An 8 pin ATX extension is also included for those boards with hard to reach power connectors. Rounding out the included extras are wheels that can be mounted in place of the fixed feet.
First Impressions
As a full tower chassis, the black definitely has a slimming effect. It’s a big case, but it doesn’t look all that huge. However, you do feel the 29.1 lbs when you pick it up.


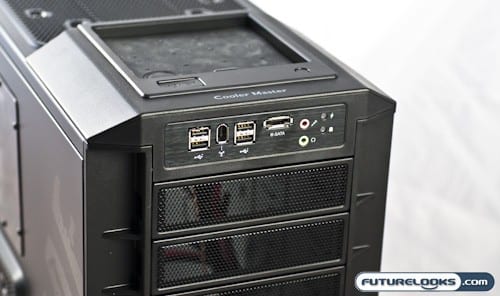
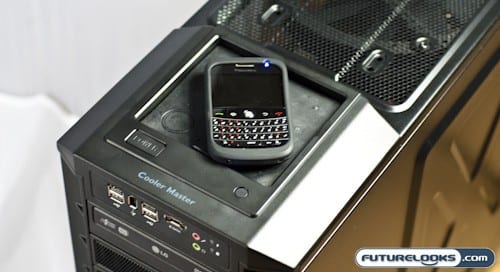
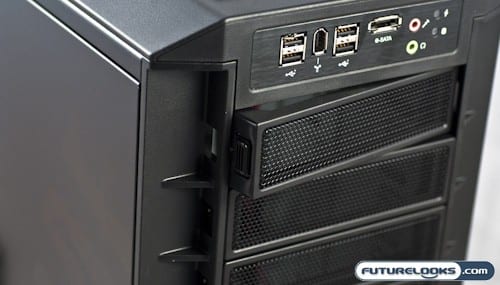
The front panel is mounted to the top of the case and features four USB 2.0 ports, a firewire port, eSATA and your standard microphone and headphones jacks: all of which are shielded to prevent interference from internal components. To the far right are your power and hard drive activity indicators, both of which glow blue. I would have preferred red and green so that you could tell them apart a bit better from a distance. The panel is finished off with a brushed aluminum faceplate.


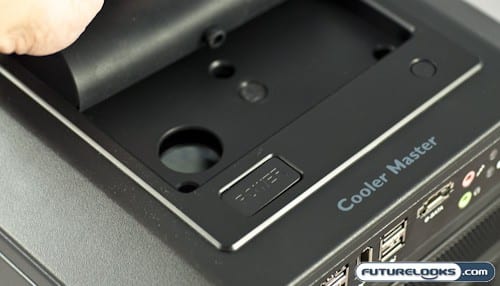
Directly to the top of that is a small tray that you can use to toss your loose change, cellphone or keys into. Heck, you could even put a coffee mug here, but just don’t knock it over. This is similar to the made famous on the Antec Twelve Hundred. Near the front of it are your main power (larger rectangular button) and your reset switch (smaller circular button). They aren’t easily pushed by accident because they require quite a bit of travel before being activated.


The rubber flap covers up a fill hole for an optional water cooling system. This allows you top top up easily without ever having to open up your case.


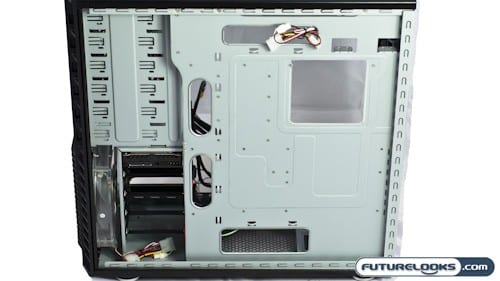
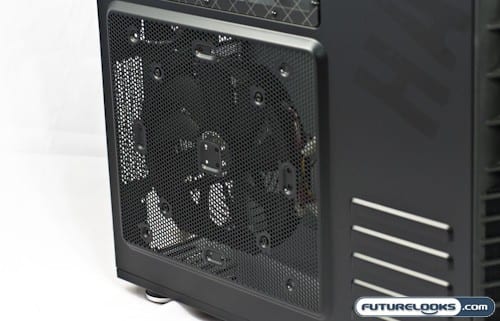
On the sidepanel, you can get a closer look at the swiss cheesing that is used throughout the case. Mounted to the sidepanel is one of three 230mm fans. You do have the option of replacing the single fan with four 120mm units. Above the fan is a clear panel that is etched with a cross pattern and allows you a glimpse of the stuff inside.

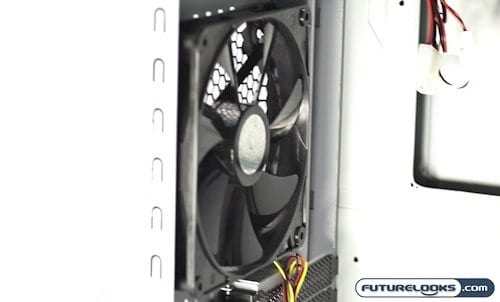
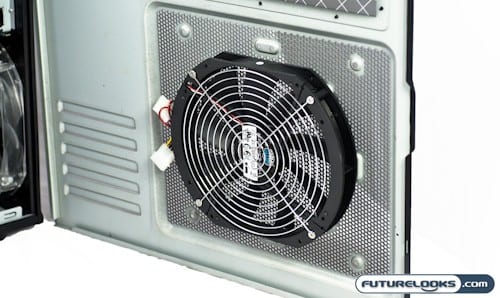
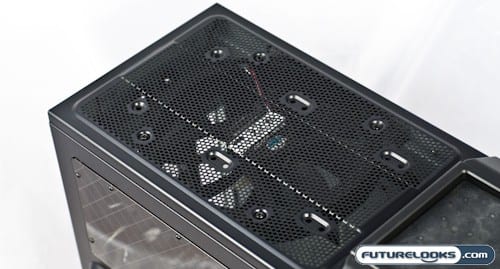
The back of the case gives you a look at one of the unique features of HAF932: dual power supply mounting options. The top plate has fittings for a water cooling solution, but it can be removed to allow the mounting of a power supply instead. You can also see the 140mm fan, which can be replaced with a more common 120mm fan if you so choose.
Inside the Coolermaster HAF932


Once you pop off the thumbscrews, the case opens up to reveal a very roomy space that will accommodate microATX, ATX and most EATX motherboards. All metal edges were deburred and rolled where necessary.


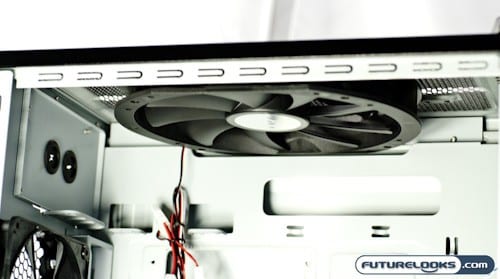
The top 230mm exhaust fan is pointed directly over the CPU area and like the other 230mm fans, spins at 1700RPM and pushes over 110CFM of air. The side panel fan can also be replaced with three smaller 120mm fans. Removing the fan also allows you to mount a radiator to the top of the case and take advantage of the fill port that is under the rubber mat.


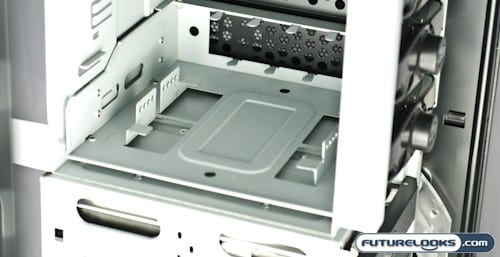
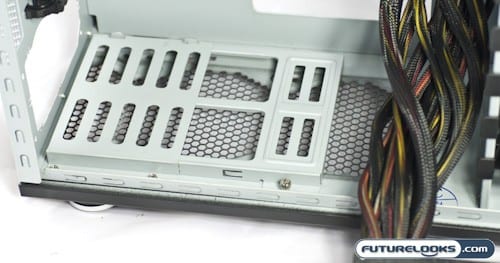
If you’re looking for even more “High Air Flow” in the HAF, you can mount two more 120mm fans at the bottom of the case. This is accomplished by completely removing the power supply mounting mounting bracket.


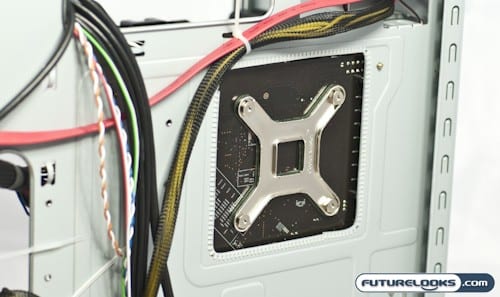
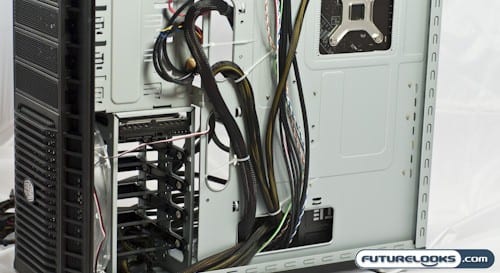
The HAF932 is also setup for clean and clutter free cable routing. Popping off the other side panel, which is also held on by thumbscrews, reveals lots of cable routing options, keeping the main area free from the rats nest of cables that can impeded airflow. The gaping hole where the CPU would mount is actually one of the many ways Coolermaster has made assembling a system easy and we’ll tell you why in a sec.
Well enough show and tell on the features. Let’s get to throwing in a gaming rig to see how well it sets up and most importantly, how noisy and hot it can get in there.
The Test System
In order to test out the Coolermaster HAF932 for noise levels and thermal performance, I assembled a test system with the following components:
- eVGA nForce 790i SLI FTW DIGITAL PWM Motherboard
- INTEL Q6600 2.4GHz G0 stepping OC to 3.6 GHz
- AENEON Xtune DDR3-1866 4x1GB Memory Kit
- Coolermaster V8 CPU Cooler
- Seagate Barracuda ES.2 1TB 7200RPM SATA Hard Drive (Provided by Seagate)
- Western Digital Raptor 74GB SATA Hard Drive (Provided by Western Digital)
- Foxconn 9800GTX-512N Extreme OC Video Card
- LG DVD Writer
- ASUS Xonar D2 PCI Sound Card
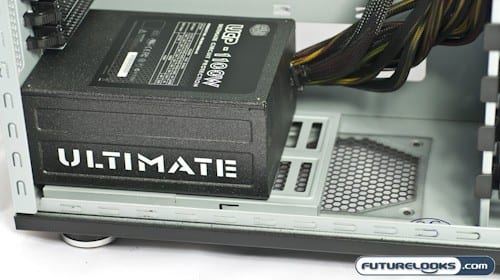
Coolermaster also provided us with one of their Ultimate UCP (Ultimate Circuit Protection) 1100W Power Supplies which also comes in 700W and 900W flavours. All of them offer up high quality components and a five year warranty. As we’ll see, the UCP is a perfect match for this case. If you’re looking for more information, you can check out the product info page.
All tests were performed under Windows Vista 64bit and we used 3DMark Vantage to heat things up. But first, we’ll run you through some of the things that we noticed that made the setup easy (or difficult).
Installation and Setup
There were a lot of things that made setting up a system easy with the HAF932…


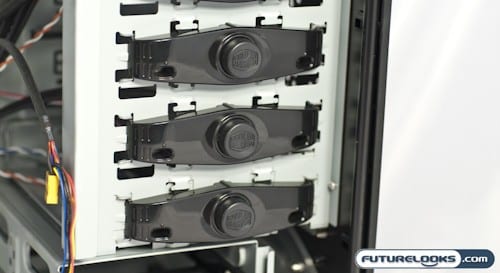
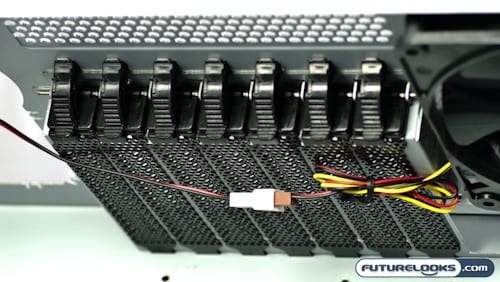
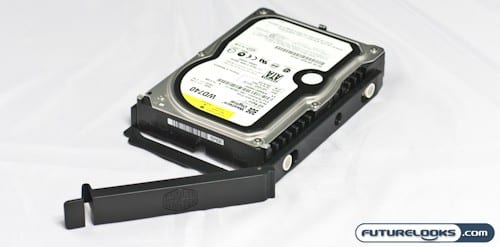
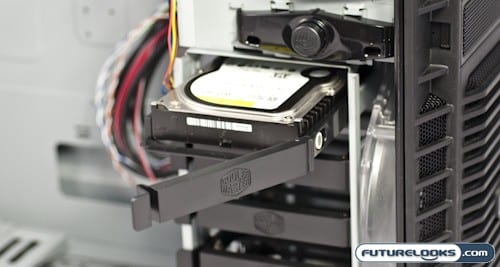
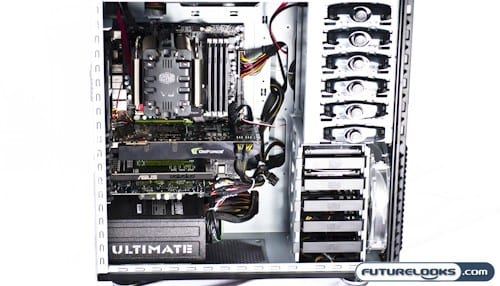
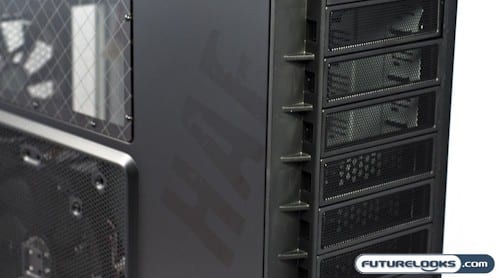
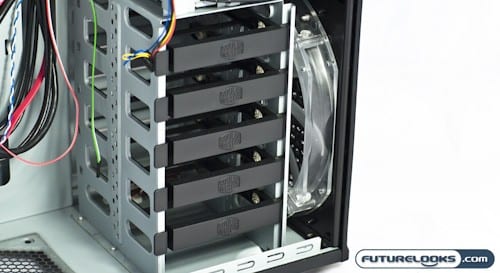
The hard drive bays used a completely tool free system that even combines rubber grommets for noise dampening purposes. The 90 degree mounting of the drives also provides more room in the motherboard area, giving you more space. Aiming the cables away from the motherboard area keeps the rats nest to a minimum. The 5.25″ drive bays all uses Coolermasters push button retention system, allowing me to quickly mount the optical drive.


I chose to mount the power supply in the bottom of the case using the existing mounting system. Using a thumbscrew, you can slide the tray to match the size of the power supply. Unfortunately, there weren’t enough holes to really match it up to the length of our Ultimate UCP 1100W Power Supply. No biggie, but something to ponder.
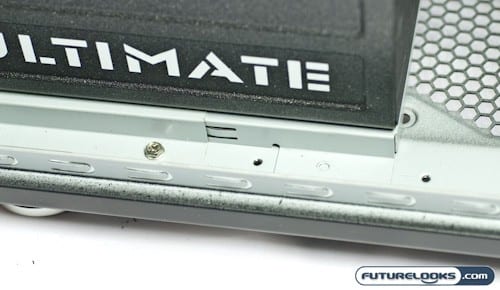
As mentioned earlier, this PSU is a great match for this case. For starters, the fan grill was reinforced so that it doesn’t compress when mounted fan side down. I’ve used power supplies in the past that simply could not be mounted face down because it would compress into the fan. The other thing, which I initially thought was a mistake, is the fact that the word “ULTIMATE” is upside down on one side. This actually allows it to be right side out facing you whether you mount the power supply at the top or the bottom of the case. Nice detail!


Tool free action is also available on the expansion slots using clips that rotate up to release the slot and then flip down to secure the expansion card. For the most part, it worked well, especially with dual slot video cards. However, I did find that the ASUS Xonar D2 Audio card mounted in the bottom slot had a tendency to slide down as there wasn’t enough pressure to secure the card properly. Coolermaster could easily solve this by adding a metal lip to the left of the final slot.


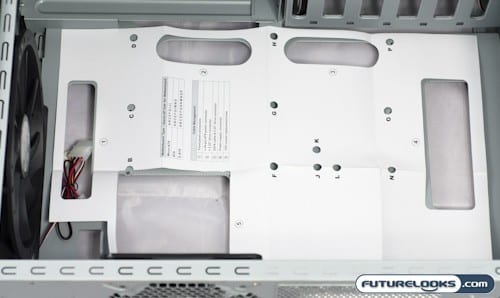
When we moved to mounting the motherboard, we were assisted by a template that was included with the instruction booklet. This allowed us to easily figure out which motherboard stand offs were required to fit our form factor of choice without having to guess.


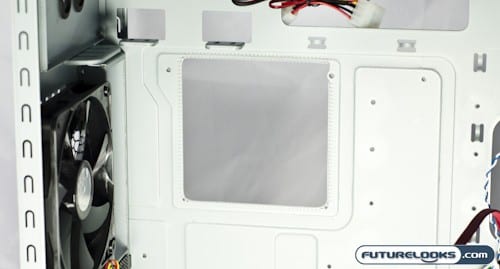
Typically, installing a new CPU Cooler entails the complete removal of the motherboard. Coolermaster has implemented probably one of the simplest fixes for avoiding full system disassembly in the form of a cut out that exposes the space behind the CPU. This allows you to easily mount any heatsink without taking things apart.
Tying Up the Loose Ends


As mentioned earlier, the HAF932 offers plenty of room under the back panel to hide all your cabling. There are plenty of holes and tie down areas to run zip ties and snug things down. Even if you do only the bare minimum, you can fake cable tidiness by just covering the mess with the sidepanell. On some cases, there simply isn’t enough room to fit the fat cables of today’s high end power supplies. It’s nice to see that Coolermaster thought about how much clearance would actually be necessary to pack in the cabling.

As a result of all the cable management space on the back of the motherboard tray, we were able to produce an extremely clean system build without much effort. The included cable ties came in very handy when it came time to make things look neat and tidy. As we know, clean cases can increase airflow which reduces system temperatures and that’s a good thing.
The only thing I was looking for after assembly was a way to fine tune the fan speed. There are unfortunately no fan speed controls so the only speed you get is on. We’ll definitely be paying attention to this in our noise level and temperature readings.


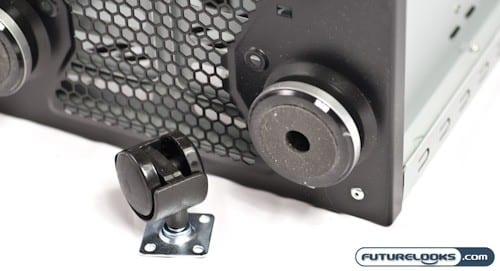
Finally, I decided to install the caster kit so I could roll this thing around instead of having to pick it up all the time. You can install this kit at any time and only requires one screw to remove the existing feet and four screws to attach each caster.


Once installed, they raise the bottom of the case up quite a bit. If you’re putting the case on carpet, you might want to install them anyway to increase air flow underneath the case. This is especially important if you choose to install the power supply at the top of the case and run two more optional 120mm fans. Wheel locks help you avoid having the case roll away.

As you can see, the HAF932 builds up into a fine looking machine. It’s almost menacing. The only thing I would have loved to have seen is maybe red LEDs in the top and side panel fans to give it a more uniform look, though I do appreciate that fact that not everyone likes having lights in their LEDs.
Anyway, let’s get some performance numbers and wrap this one up shall we?
Noise Levels
With all the swiss cheesing in the case, there really aren’t a lot of mechanisms to keep the noise from reaching you. Since there is only one fan setting, which is ON, we wanted to see just how noisy this case was would be. Readings were taken using a noise level meter pointed at the center of each area, and held six inches away.
Here’s what we found out:


When compared to competitors like the ANTEC Twelve Hundred we can see that the two cases are fairly similar in terms of noise levels. In fact, thanks to the 230mm fan in the front, the HAF932 is actually a little quieter than the Twelve Hundred on the lowest settings. It’s also quieter than the NZXT Tempest. Having said that, none of the cases are quite as a mouse and you definitely know when they are turned on.
Thermal Performance
The other aspect of performance that a case needs to be sufficient at is thermal performance. A case needs to provide adequate airflow so that it doesn’t roast your components. We took temperature readings at both idle and load conditions using nVidia system monitor.
Idle conditions were established after booting into the desktop and lettings things settle for 30 minutes while load conditions were established using a looping run of 3DMark Vantage and taking the highest logged temperature. Ambient temperature at the time of these reading was 23C.
Here’s what we found:


Despite the highly overclocked nature of the system, CPU temperatures never exceeded 59C under load on any of the cores in our Q6600 CPU overclocked from 2.4GHz to 3.6Ghz using the Coolermaster V8 CPU Cooler. There was no temperature variance between load and idle in terms of system temps (stuck at 30C) with a jump from 61C to 64C for the MCP when under load. Overall, I’d say the HAF932 definitely lives up to its name. Well, at least the HAF part and not so much the confusing 932 part.
Final Thoughts and Conclusions
The Coolermaster HAF932 Full Tower Chassis definitely lives up to its “High Air Flow” name. The big fans clearly revealed that one setting was enough to sufficiently cool a highly overclocked system down. The noise levels for this performance were also excellent and could likely be a result of the use of the larger fans vs a larger number of smaller 120mm fans. Coolermaster does give you the option to mount other fans if you so choose. I’d just leave them alone and enjoy the performance. It’s obviously working.


The other aspect that I really enjoyed about the HAF932 was just how easy it was to assemble. Except for the mounting of the power supply and motherboard, the system was put together completely tool free and all of it was held together well despite not being screwed down. I did run into one issue with the bottom most expansion slot as the last card would tend to slide down. If security is an issue, you can remove the tool free slot retention mechanism and go old school with screws.
Finally, I loved just how clean the build ended up being even with minimal cable tidying. I was also quite pleased with Coolermaster’s solution to the problem of having to disassemble a system just to install a better heatsink. Not only was it effective, but also simple.
Overall, I really like this case, but I would like to see some filters on those fans. Even after a few days of use, there is a thin layer of dusty inside. Other than that, this case is winner and one that I highly recommend.
Pros
- Excellent thermal performance and low noise levels (for a high air flow case)
- Builds up easily thanks to tool free features
- Very easy to tidy up thanks to great cable management
- Easy to install any CPU cooler without yanking out your motherboard
Cons
- Lack of filters can cause a dust storm inside the case
- Expansion slots need a bit more clamping pressure
Overall Rating: 9.0 / 10.0


Discuss This Review in the Futurelooks Community Forums
Coolermaster HAF932 Full Tower ATX Chassis Photo Gallery