The past few months, Thermaltake has been launching more of the products we saw at CES 2010. At the event, we saw a demonstration that involved the Frio versus a Zalman CNPS9900A which is a very common, performance cooler still in use by many enthusiasts. With the Core i7 screaming at 4.4 GHz on a pair of ASUS motherboards, the system with the 9900A eventually blue screened due to very high temps, whereas the Thermaltake Frio kept things cool enough to run for the length of the entire demo.
Some this was a “hand-picked” special demo model with some kind of behind the scene improvements. Others say that someone handpicked the CPU underneath the Frio. All we know is, we wanted to see if the Frio is really that good.
Features and Specifications
Let’s cover the technical information first and start un-complicating a litt bit of the complicated. Weighing in at roughly 1,042 grams, the Frio is one of the heavier tower heat sinks we’ve tested. The heat sink is fabricated mainly from Aluminum fins and attached to copper heat pipes and base. This alone accounts for most the weight of this heatsink.
The Frio is designed to expel up to 220W of heat generated by any CPU and is designed to work with the following CPU sockets:
- Intel: LGA775, LGA1156, and LGA 1366
- AMD: AM2, AM2+, and AM3
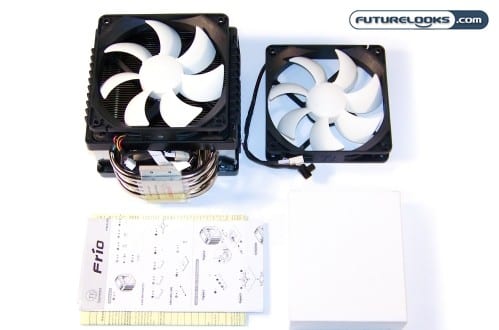
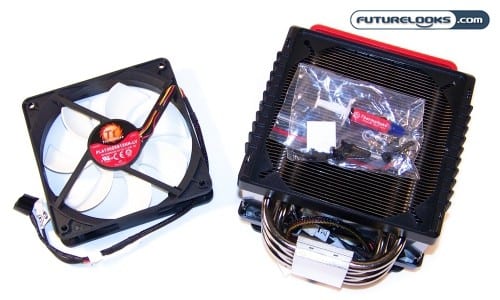
The Frio ships with two 6-12 volt 120mm VR Controlled 120mm fans. While only one fan installed at the start, a second one is included for additional performance. The VR control allows you to control the fan speed from 1200 to 2500 RPM. This translates to a noise range of 20 to 43 dBA for those extra RPMs. At the highest speed, you can expect a whopping 100+ CFM passing through the heat sink.
The Frio is available now and is available for around $59.99 at NewEgg.
What’s In The Box?
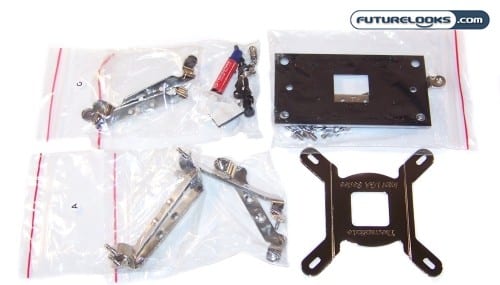

Inside the box there are different packages with labeled letters on them. Each labeled package is suppose to coincide with the instructions in the manual. Our particular sample unfortunately did not correspond to said labels. It would appear someone at the factory had problems with the English lettering, or was very far behind on the production line and needed to make up time.

Fortunately, the manual includes relatively good pictures that will make it easy to figure out installation. Just match the washers and screws with the pictures and you’ll be fine.
Also in the box are four rubber fan stand offs. These replace legacy fan screws are actually quite nice. Users just have to slide them on to the extra fan shroud and pull through the fan till it doesn’t pull back out easily. It really cuts down on fan vibrations.
Closing in on the Frio
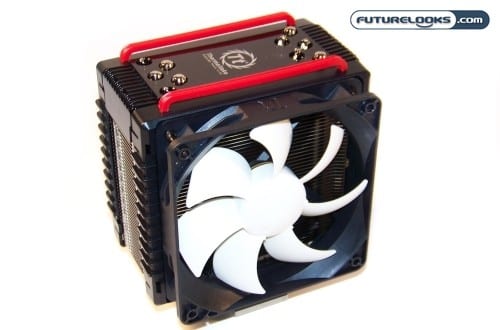

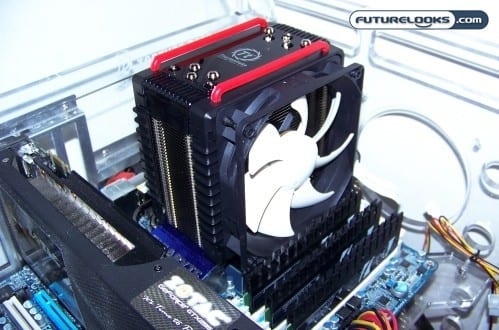
While not much bigger than other tower coolers, adding the extra 120mm fan suddenly gives it some mass that covers a very big portion of the motherboard. The Frio’s design is quite simple and is only partially shrouded by fan frame and a smokey, clear cooler cap. You will recognize the cap due to its two sporty red rails. These rails have no other purpose other than looks. It does at least go well with many of the black and red motherboards and cases on the market.
The white 120mm fans should look sharp with any UV lighting. The included 120mm fans don’t require screws to mount as all you are the rubber fan stand offs to attach them.
Got Heat Pipes?
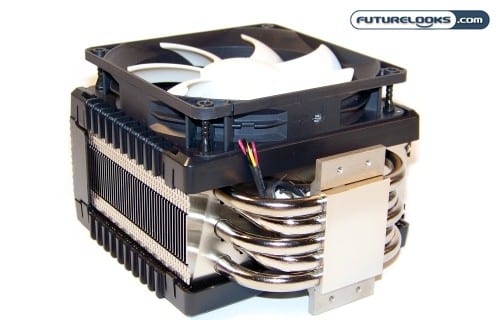
Most of the Frio’s weight comes in the form of five massive 8mm copper heat pipes that completely span the base. They form a series of very large U’s and connect to every single aluminum fin. Those joints are very, very clean and well manufactured which help spread the heat away from the base and through the network of aluminum fins.
Cleaning the cooler shouldn’t be a problem either. You can’t quite tell, but the shroud is held on by some screws. Once you remove the screws, the shroud slides off pretty easily. Just make sure you have plenty of canned air in stock. This is a killer of cooler performance so being able to easily clean a cooler is welcome.
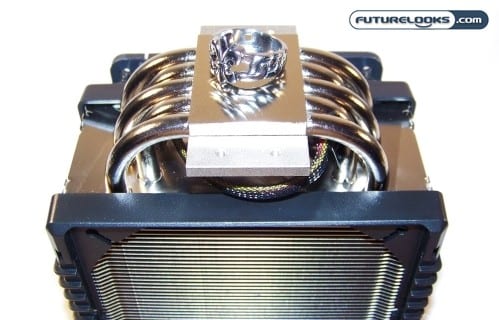

Moving to the shiny electro plated copper base, we see that it doesn’t sport a perfect, mirror finish. However, it’s still quite smooth and doesn’t have any grooves leftover from machining. As long a copper base is relatively smooth, you will get maximum heat transference. Mirror polishes are often just cherries on your ice cream sundae of heatsink happiness.
Installation Notes and Testing

You’ll want to keep a small Philips head screw driver on hand when you go to assemble the Frio. The mounting screws that secure the base plate are quite small. Don’t forget to thoroughly clean the paste off your CPU first with some Arctic Silver remover and purifier or whatever you choose to use. While we prefer the Arctic Silver products, anything similar to cut through the paste/grease will work in a pinch.
After applying and spreading out your heatsink paste of choice (we choose Arctic Silver 5 for all our reveiws), simply lower the Frio in to place by orienting the four screws down through your motherboard. The real trick is using some patience and dexterity while screwing on the four tiny flat head bolts. During installation, the screws got away from us a few times, so pay attention as they’re easy to lose.
Test System Setup
In order to test the Thermaltake Frio properly, we chose some of the highest end equipment we could get our hands on which included INTEL’s six core 980XE CPU.
Here’s the break down of our test setup:
- Intel Core i7-980XE Gulftown (aka Thor)
- Test Cooler 1: Thermaltake Frio (as tested)
- Test Cooler 2: Zalman CNPS10X Extreme
- Test Cooler 3: Tuniq 120 Extreme
- Test Cooler 4: Thermalright Venomous X
- Test Cooler 5: Noctua NH-UH12P
- Test Cooler 6: Coolermaster N620
- Test Cooler 7: Thermalright MUX 120
- GIGABYTE GA-X58A-UD5 Motherboard
- Patriot Memory 6GB ViperII 2000MHz DDR3 Memory
- Zotac Geforce GTX295 Graphics Card
- Antec Quattro TPQ-1200 Watt Power Supply
To maximize each of the powerful 980XE’s cores and Hyper Threads, a bit of OCCT and Intel Burn Test were used to heat things up. Both of these are very reliable programs for validating any stock or overclocked systems for stability.
Testing Environment
Let us first just say, that the Frio was tested with one fan installed at first since this is going to be the most common configuration. This gives us an even base line between each all-in-one cooler. Note that the room’s ambient temp was 20C (65F for non metric types). All the temperatures were rounded off since “point 4” degrees doesn’t make any difference to 99% of the users who need capable cooling.
Noise was kept to a bare minimum in our test area so that we could at least tell whether or not there was a noticeable difference in noise levels between the respective coolers. We put the noise level meter away for this one but it will be back.
Single Fan Configuration
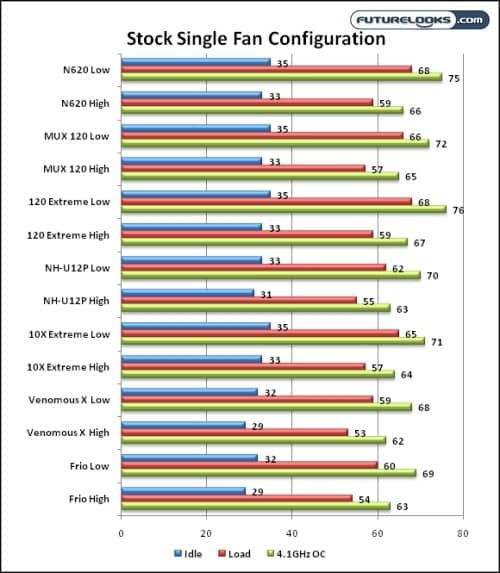

Our retail Frio seemed ready to cool right out of the gate. The cooler was noticeably more efficient at lower RPMs than at higher RPMs. It came extremely close to matching the Venomous X at the higher RPMs. There was very little fan noise at lower RPMs and noticeably more than the other coolers at higher RPMs, except for the Venemous X.
While the field of coolers were extremely impressive, the Thermaltake Frio was definitely surprising for a $59.99 US cooler. It almost matched the Venomous X and tied the NU-12P for the most part.
Dual Fan Testing
Dual fan configurations haven’t really impressed too many folks. In many cases, the earliest dual fan coolers actually performed worse due to inconsistent or improper air flow. In other words, it’s really important that the two fans being used are identical, or the exhaust fan on the back of the cooler spin just a little faster than the intake. With that in mind, we only tested the coolers that were made to accommodate a second fan in this next test.
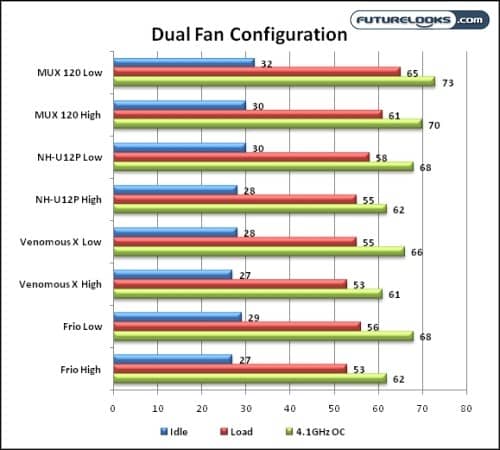

In the dual fan configuration the coolers benefited more at lower RPMs than higher ones. That’s most likely due to the consistent air blowing across the heat pipes at all times. Again, the Frio matched the NH-12P almost perfectly which is again a nice surprise since both gave the Venomous X a run for its money. Let’s just say that the unrounded temps revealed a closer fight between the three.
Final Thoughts

The Thermaltake Frio is an all around great performer especially for an all-in-one cooler. It isn’t very often that we see a first revision CPU cooler perform so well out of the gate. Besides the fact that it usually takes one or two revisions to find the sweet spot, there are very few all-in-one coolers that can keep up with extreme tower coolers like the Venomous X. This alone makes the Frio a very enticing choice.
Something else to consider is that tower coolers don’t usually include the cooling fan or fans. Add that extra cost to the cooler and you’re easily spending quite a bit more than the Frio’s seemingly measly $59.99 US price tag. This will definitely attract enthusiasts that can’t justify the extra scratch for a Venemous X which doesn’t include cooling fans.
Being that the Thermaltake Frio is the coolest performing all-in-one CPU cooler available, we are highly recommending this one for everyone who wants their money’s worth and for folks living in the warmer regions.
Pros
- Quality made cooler
- Great cooling performance
- Includes two 120mm cooling fans
- Integrated VR fan control
- Good
Cons
- Theme could use some polishing
- Slippery mounting bolts
Overall Rating: 8.75/10.0


Love This Review? Hate This Review? Leave a Comment or Hit The Forums!
Thermaltake Frio CPU Cooler – Photo Gallery