
There is overclocking and then there is extreme overclocking. Overclocking a computer in the basic sense is simply the act of pushing the processor frequency beyond specifications whether using the motherboard BIOS, motherboard hardware, or some software overclocking program. Extreme overclocking typically means enthusiasts venture outside of any frequency and voltage safe zones to push their processor to the edge of CPU destruction. Despite your level of overclocking skill, the motherboard you choose must offer the settings needed to achieve your frequency goal. It just so happens, we have just such a board that has many a local enthusiast drooling.
Today, we’re taking a detailed look at the GIGABYTE GA-Z87X-OC Force motherboard. The OC Force is designed to support any level of overclocking performance. It has the BIOS, component features, and physical design needed to ensure the very best results. With this in mind, we grabbed some of the best CPU coolers available as well as a couple Haswell LGA 1150 K-SKU processors to see if the OC Force can bring it, even in less extreme circumstances.
GIGABYTE OC Series Specifications
We originally saw the new OC series motherboards at a GIGABYTE press event in California earlier this year. In addition to seeing all the other new Haswell boards at the time, we enjoyed some more in depth demos of some of the features we will be checking out in a later section. If a thermos and LN2 is part of your daily diet of fun, then these boards are for you.
Before we start cooking processors, it’s important to note that there are two Z87X-OC motherboards: A regular and a “Force” model. Even though these boards are intended to support high end overclocking, connectivity is still important as the boards target both the enthusiasts and people who simply want a great looking board. GIGABYTE’s website allows you to compare both board specs and connectivity. Rather than spam you with a very long nearly identical list, I’ve broken down the main differences between specs and features in the next section.
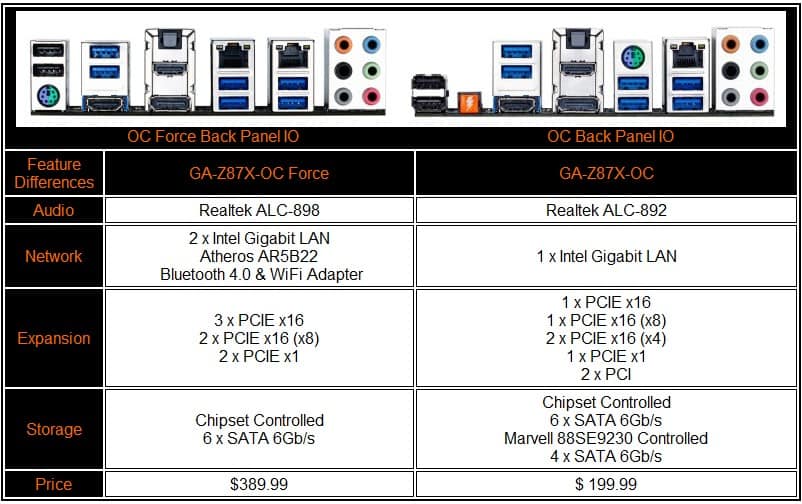
As you can see, different audio processors, network ports, expansion slots, SATA3 controller, and a few IO ports in the back are different. The Force has a bigger PCIE highway which is best for enthusiasts who want to utilize up to three PCIE 3.0 NVIDIA graphics cards to set some world records. However, if you only plan to use one or two, the regular OC will do just fine. A significant $190 US MSRP difference separates the two as the top end GA-Z87X-OC Force retails for $389.99 US MSRP while the regular GA-Z87X-OC retails for $199.99 US MSRP.
The more expensive Force also comes with dual integrated Intel LAN ports and an Atheros WiFi adapter making more suitable for a high end build with the machine pushed to the limit and a custom liquid cooling loop employed. In terms of audio performance, there’s going to be very little difference between the the two integrated audio processors.
GIGABYTE OC Series Features
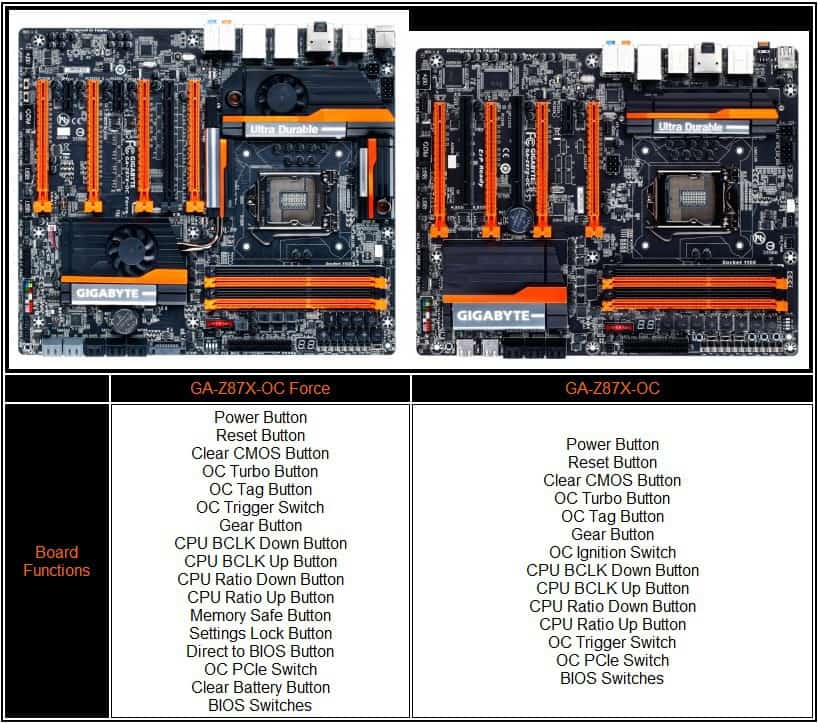
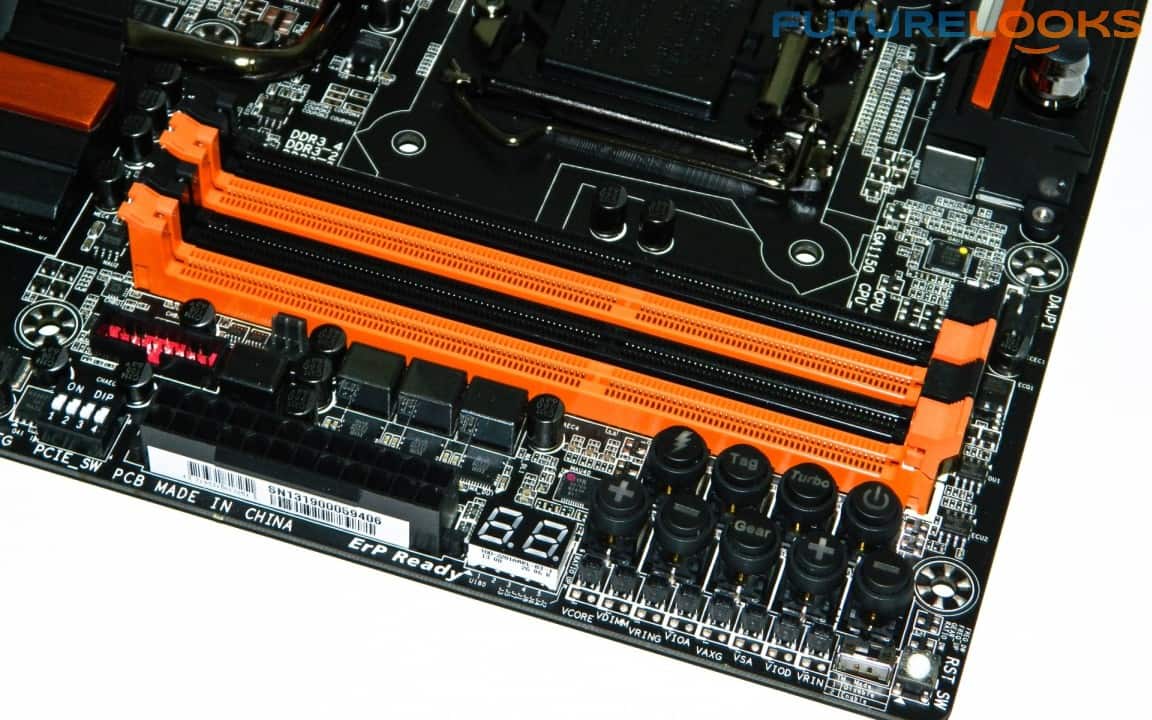
Moving over to interactive board features, you can see each board offers an array of usable physical features for insane overclocking of your Haswell processor. Mastering these features will depend on your patience and K-SKU Haswell processor as well as the user manual which is a basic reference guide. Otherwise, don’t be afraid to use Google if you need a little bit of help.
For the “Coles Notes” of what the buttons do, here you go:
- Power and Reset – These two are easy to figure out.
- Clear CMOS – Clears the current running BIOS settings if your board locks up.
- OC Turbo – Automatically loads the most optimized overclock for memory and CPU.
- OC Tag – Loads your customized, saved overclocking profile after clearing CMOS.
- OC Trigger – Jumps from low frequencies (such as during boot to OS) to your target frequencies instantly for quicker screenshots
- OC Ignition – Shuts down the system while maintaining power to the board and components for quicker overclocked start up.
- Gear Button – Changes the BCLK stepping from 1 MHz to .1 MHz increments
- CPU Ratio Down – Decreases the CPU Ratio (multiplier)
- CPU Ratio Up – Increases the CPU Ratio
- CPU BCLK Down – Decreases the CPU base clock (100 MHz default)
- CPU BCLK Up – Increases the CPU base clock.
- Memory Safe – (OC board) Finds the optimal setting for memory.
- Settings Lock – (OC board) Locks your settings in place so you don’t have to start over.
- Direct to BIOS – Automatically boots your system directly to BIOS.
- OC PCIE – Manually cuts power to the orange PCI Express slots (safe for removal when off).
- Clear Battery – Resets the board BIOS power.
- BIOS Switches – Switch 1 boots to the main BIOS. Switch 2 boots from the back up BIOS.
Each board also has voltage points and an LED post reader next to all the buttons. This is a good place to easily see the boot code process. It’s also one of the easier places to reach with your meter if you suspect your power supply isn’t feeding proper voltage. LN2 enthusiasts tend to use these most as they tweak their way to world records. And, don’t let the regular OC board fool you. We’ve seen the board pushing 6 to 6.2GHz at GIGABYTE’s California offices.
Let’s have a closer look at the OC Force including what you get with this stunning extreme overclocking board!
What’s in the Box?
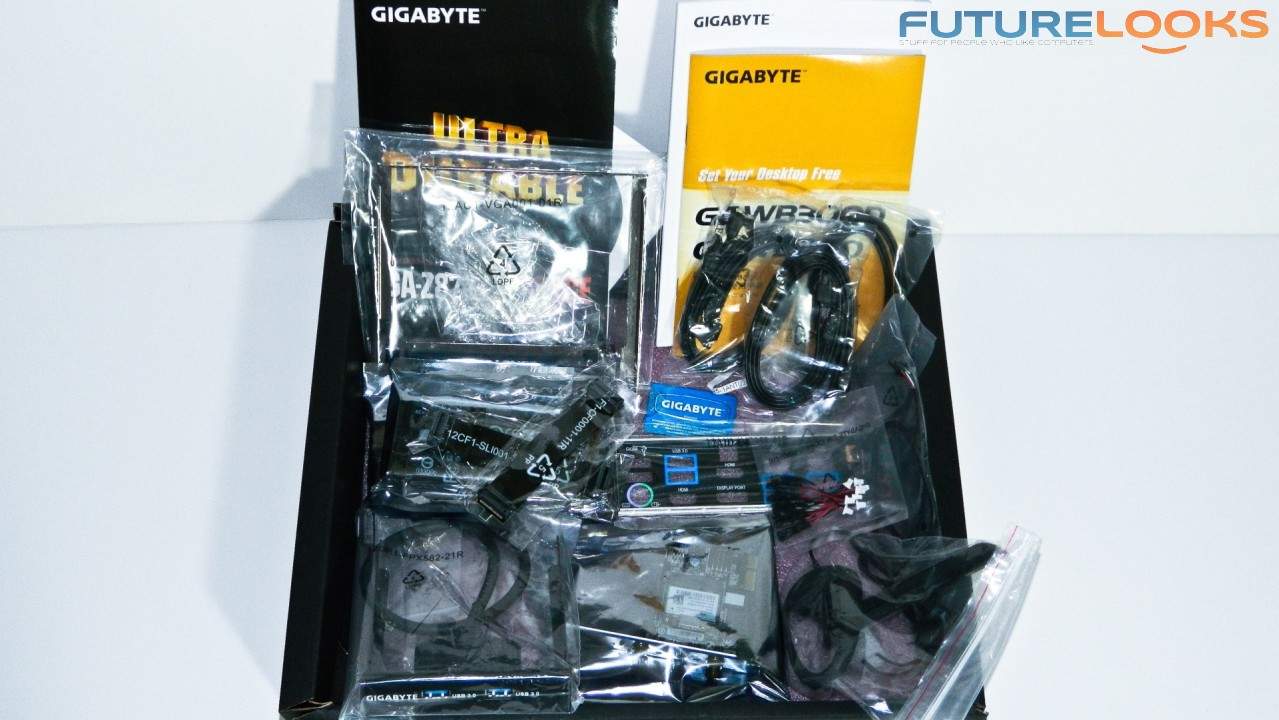
The OC Force provides a very good bundle (it’d be excellent if it came with useable software or even a video game bundle) that includes six black SATA cables, 3.5″ USB 3.0 front enclosure bracket, SLI and CrossFireX bridges, black IO shield, voltage lead wires for the measurement tweaking feature, chrome IO bracket in case your elite open tech station lacks proper support (thanks to HiCookie of GIGABYTE), and Atheros dual antennae 802.11n WiFi PCIe network card.
Granted, LN2 overclocking professionals won’t care so much about too many of the accessories, but the standard pro or enthusiast will appreciate the extra connectivity at home. System builders will also have the headroom and features they need to craft a highly overclocked system with ease.
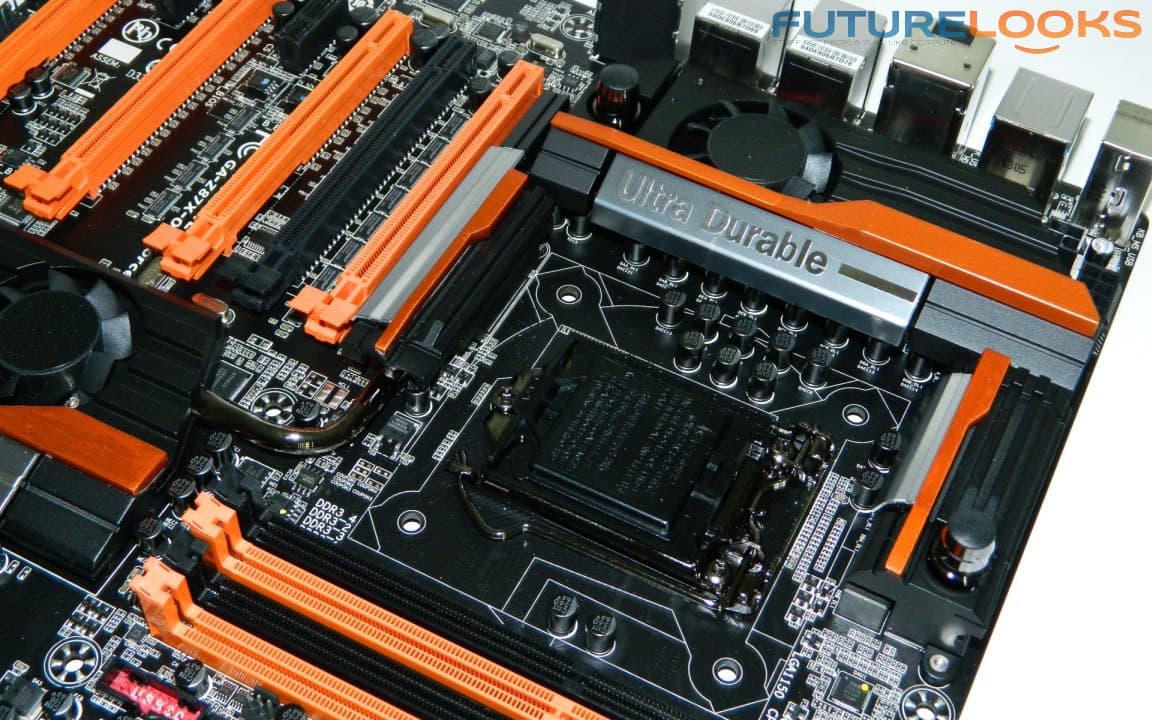
GIGABYTE GA-Z87X-Force – Full Sized Platform
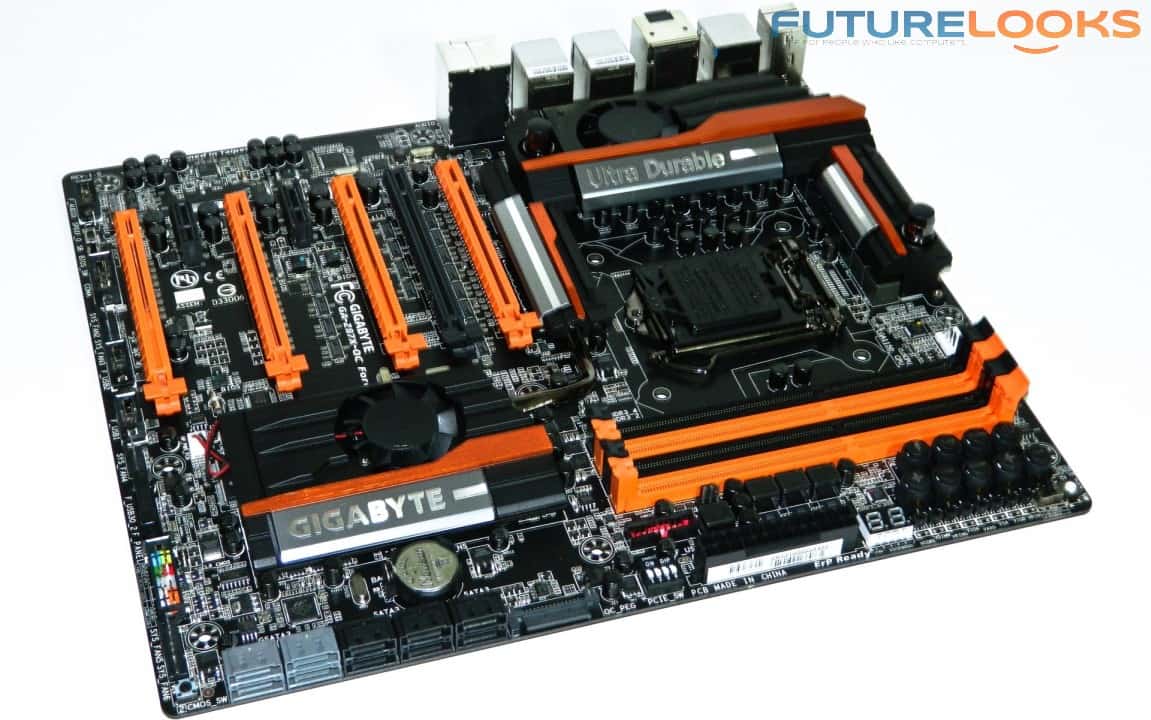
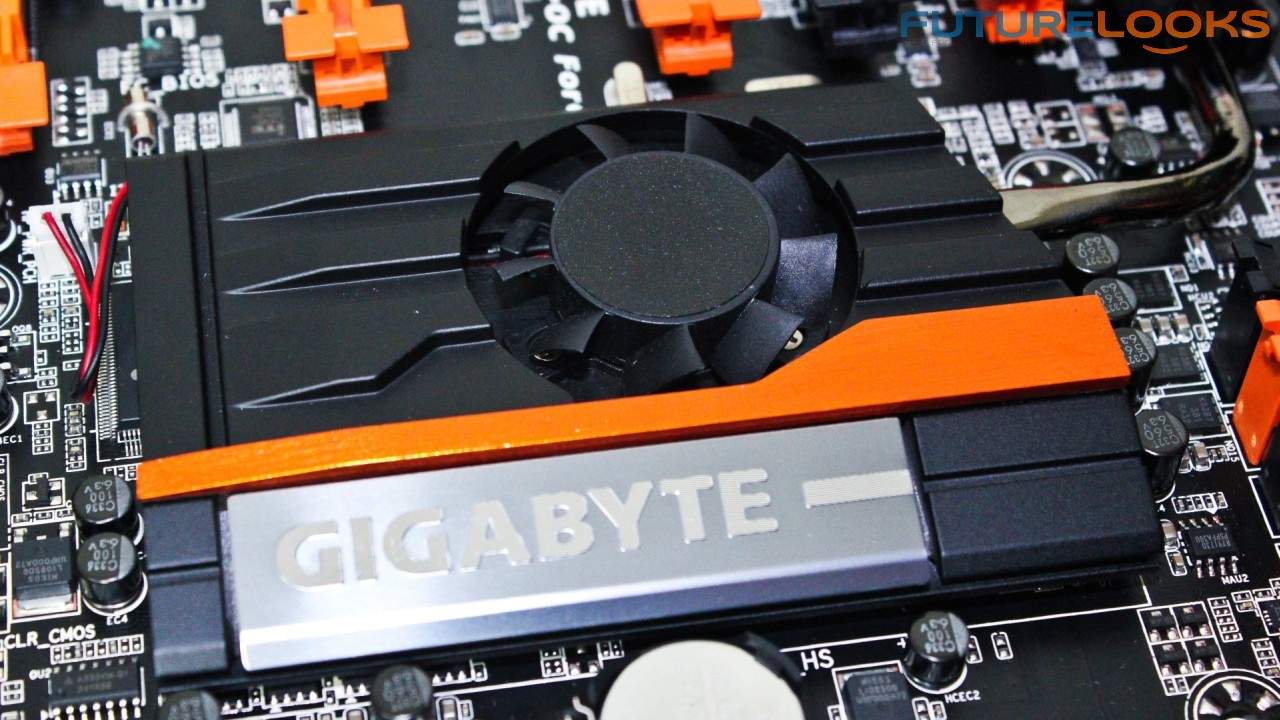
The OC Force is a powerfully designed overclocking board sporting the OC orange on black, which is very similar to the first “OC” board that GIGABYTE put out called the X58A-OC, which was designed like the OC series for pure overclock performance. That also means that this board has some extra power supply requirements.
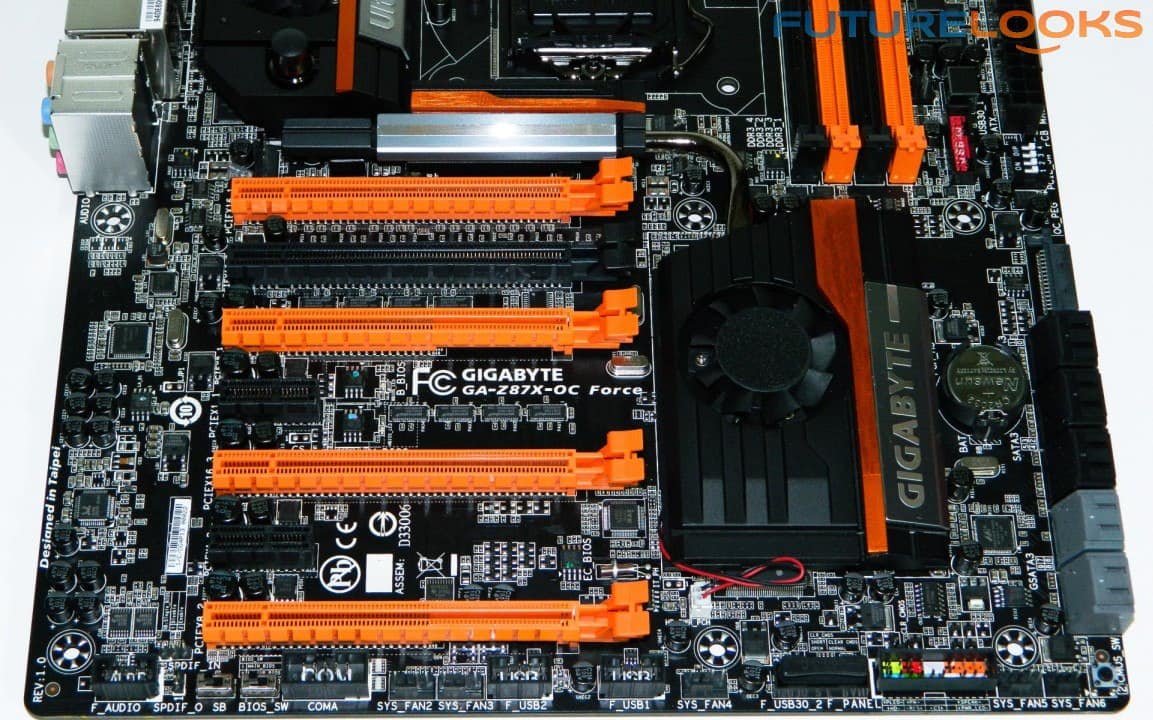
Both the OC boards will require a PSU that has a 4pin and 8pin power connector which are found next to the CPU VREG heat sinks. Thankfully, a lower wattage 700 to 900 Watt PSU will typically have those two connectors. Otherwise, enthusiasts running 3-way NVIDIA SLI or AMD CrossFireX will naturally need the higher end power. To help with this daunting task, an auxiliary SATA power port can be found next to the SATA data ports. This will ensure steady power to all the populated PCIE ports under extreme load.
There are seven individually controlled fan headers for auxiliary cooling strategically placed around the board. That’s not counting the two CPU 4pin to support your CPU cooler. All of these are controlled through the BIOS or through GIGABYTE’s new APP Center software. Speaking of fans, you’ve no doubt noticed the main VREG and south bridge chipset heat sinks both come with fans which is helpful when pushing crazy overclocks. The VREG heat sink also doubles as a water block. Custom liquid cooling can cool the circuits off as well as potentially help with overclocking stability.
New Easy Tune and App Center
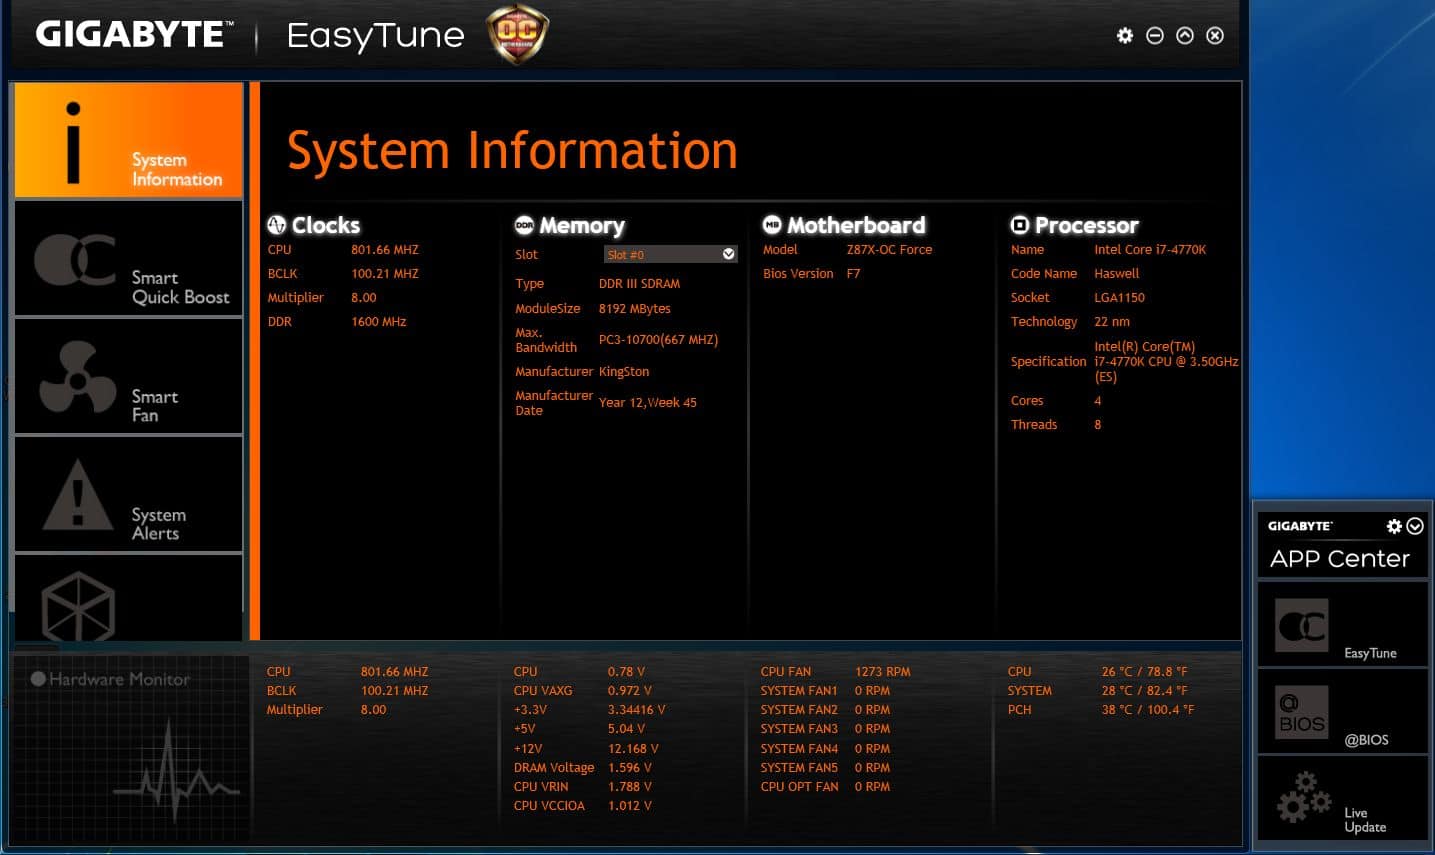
What about enthusiasts who are not quite so confident in their manual overclocking skills? Like we highlighted at the GIGABYTE Z87 launch event, users get the all new Easy Tune system control utility through the new App Center software. Finally, the DIY user has all of the software GIGABYTE offers in one location.
The software DVD includes all the current apps which installs at once. However, there isn’t a current mega-bundle on the download support page. Fortunately the App Center however does alert you when a new update is ready based on the apps you have installed.
One more oddity users are still figuring out is that the App Center must be installed if you want to pick and choose your apps. The individual apps won’t install without it. After you install the App Center, everything else gets plugged in all modular like inside the interface. A successful install puts everything in the App Center tool bar which can be accessed as long as the system is up and running.
UEFI BIOS and Overclocking Features
Before anyone attempts overclocking, it’s best to get to know your new BIOS. The BIOS comes in OC orange but can be customized by users. It’s very similar to GIGABYTE’s retail Z87X boards in many design respects. Of course, the OC and OC Force both have several added settings designed to control the CPU just short of rewriting its internal VREG code.
There are six main tabs: Home, Performance, System, BIOS Features, Peripherals, Power Management, and Save & Exit.

The BIOS is highly detailed. Most overclockers are going to venture in to the Performance tab. All the frequency and voltage options are present including current operating settings. In this respect, the Performance tab is a little redundant as it has multiple tabs showing very similar information. It would be easier to have both the voltage options and current voltage reports all on the same page. Perhaps future designs will be more consolidated.
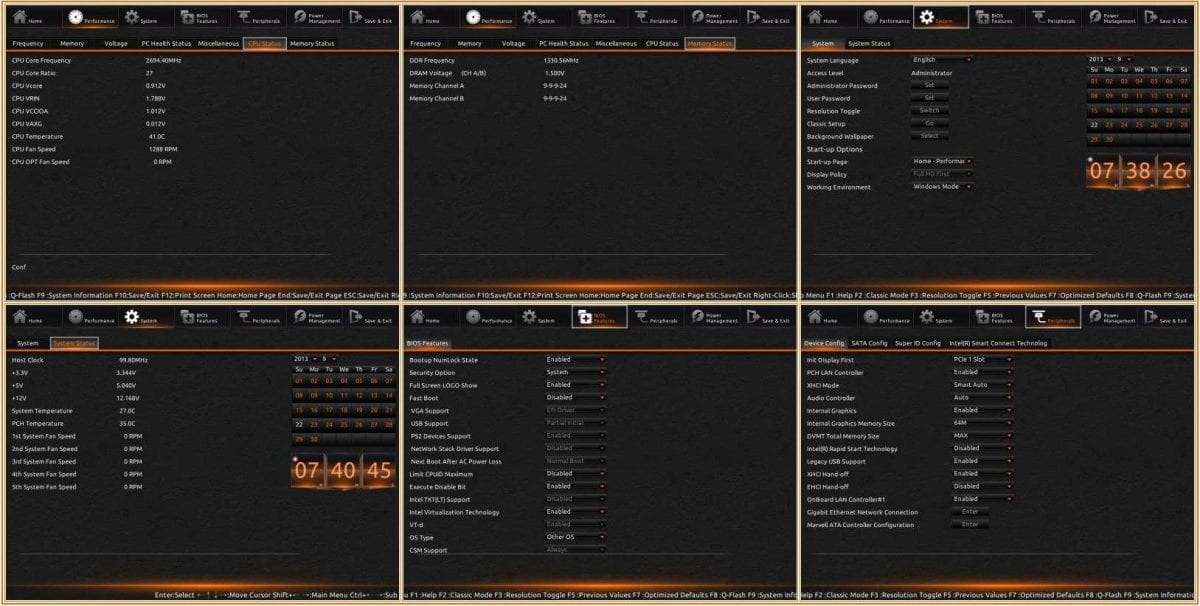
Continuing with the Performance CPU and Memory Status tabs, which both show some of the redundant info. The BIOS Features tab contains mostly the integrated and IO set up options. The final two tabs include the Peripherals and Save & Exit options. The peripherals contains most of the storage settings including features associated with the Intel chipset storage options like SSD caching and Smart Connect technology.

The Save & Exit page includes another calendar, boot selection, profiles, and Q-Flash. One of the things that hurts the BIOS is the F key information that is crammed in at the bottom. The information should be easily readable on all the screens.
Now that we’ve gotten to know the BIOS, let’s put a system together and push it a little!
Test System System

I’m keeping everything identical from the Z87 round up except for the board of course. The latest BIOS ensures everything is comparable so we made sure to update every board used. I used all the memory kits collected to date to look for any platform anomalies or incompatibilities. Just make sure you purchase a good quality kit from a reputable manufacturer and you should be fine.
Here’s the list of parts:
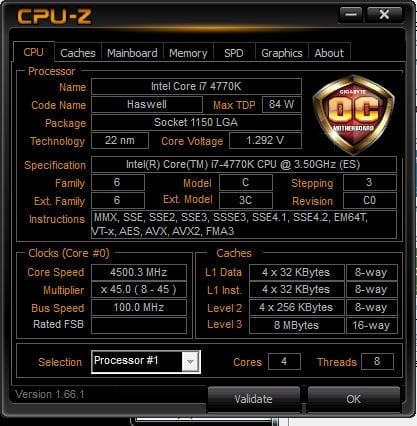
- Processor: Intel Core i7-4770K Haswell
- Motherboard Set: From Z87 round up
- Motherboard as tested: GIGABYTE GA-Z87X-UD7 OC Force
- Memory: Kingston HyperX Predator 1866MHz 8GB DDR3
- Graphics: GIGABYTE GTX 770 2GB OC
- Storage: Kingston HyperX 3K 240GB SSD
- Power: Rosewill Tachyon 1000 Watt Platinum
- Power 2 (EMI and EMF Tests): Rosewill SilentNight 500 Watt
- OS: Windows 7 Pro
- CPU Cooling: Thermaltake Water 2.0 Extreme
- Case: Epic Case Designs Tech Station
Since you’re no doubt curious what memory kits I have collected, it consists of ADATA V2.0 Gamer 2400MHz, Corsair Dominator Platinum 2666 and 2800MHz, Kingston HyperX (1600, 2133, 2400MHz) Genesis, HyperX 1866MHz Predator, and HyperX 2133MHz Beast memory, and Patriot Memory (1600, 1866, 2133MHz) Viper III, and Intel Extreme Masters DDR3 memory kits.
Now let’s put everything together.
Installation and Set Up Experience
The physical installation was as easy as any DIY user would expect. All the test peripherals installed in each expansion or DIMM slot worked quite well out of the box. I used ten different varying brands of DDR3 as listed above, with speeds ranging from 1600 to 2800MHz without issue. Most of the real work happens during the software and driver set up.
As mentioned in the app section, GIGABYTE includes a software driver DVD which takes care of the bulk of all the applications. However, if you lose the DVD, you’ll have to download everything individually. GIGABYTE doesn’t currently have a complete suite bundle like ASUS AI Suite II, which takes the guess work out of installation.
One thing that may confuse users is that you must have the App Center installed before installing each program. Otherwise, users will execute the individual app and nothing seems to happen. So make sure to install the main App Center first and then download the newer software to avoid confusion.
Overclocking Results – Cooking Silicone!
Overclocking my ES and retail sample Haswell processors had mixed yet positive results both manually as well as through Easy Tune. Memory overclocking ran great up to 2800MHz (currently the fastest kit in the lab). Memory bandwidth scaled from roughly 19GB/s to 29GB/s. The board also worked well with all the certified XMP memory in the lab. The Performance tab’s “Performance Upgrade” setting range 20% (4.3GHz) to 100% (4.7GHz) in CPU frequency increase. These presets worked perfectly up to 4.7GHz. Easy Tune and surprised me even further by matching the UEFI BIOS presets.
Manual overclocking proved that the boards can go well beyond except when voltage is set near 1.4 volts, and when used, CPU temps quickly reach more than 90 C. There just isn’t enough hea transfer going on underneath even top end CPU air coolers. Obviously, more extreme methods are available if you’re up to it.
One particularly great capability of the OC and OC Force motherboards is that both manage CPU VREG power more efficiently compared to manual tuning especially when using the BIOS or Easy Tune overclocking presets. For example, when using the 4.5GHz (60% Upgrade) setting, the board commanded a maximum of 1.29 volts. In fact, the board also commanded the higher auto overclock settings with less voltage than manual tuning. This is a great unspoken feature of the GIGABYTE GA-Z87X-OC Force motherboard.
Reviews often talk a lot about overclocking capability. But the question is, does that equate to any tangible benefits? Let’s investigate with our serious of benchmarks!
Performance Results
As our trend of improving motherboard reviews continues, I selected some benchmarks that are more congruent with platform testing. Granted, motherboards impact every performance characteristic but some benchmarks depend more on each individual component. We’ll start with some of the more interesting ones.
Power Consumption and Voltage Regulation

Consumption wasn’t any higher than the GA-Z87X-UD5H or ASUS Z87 Deluxe boards at idle or under regular load. However, the Force does get a little thirsty when I started overclocking. Voltage droop and stability were not a problem even during overclocking.
The only instability encountered was due to pushing the 2800MHz DDR3 as well as the Core i7-4770K a bit too far. Heat continues to be the biggest challenge for keeping Haswell cool enough to reach a stable non-nuclear 5GHz. I suggest pairing the OC Force up with a high quality 80Plus Gold or Platinum efficient power supply for best results.
Audio Performance
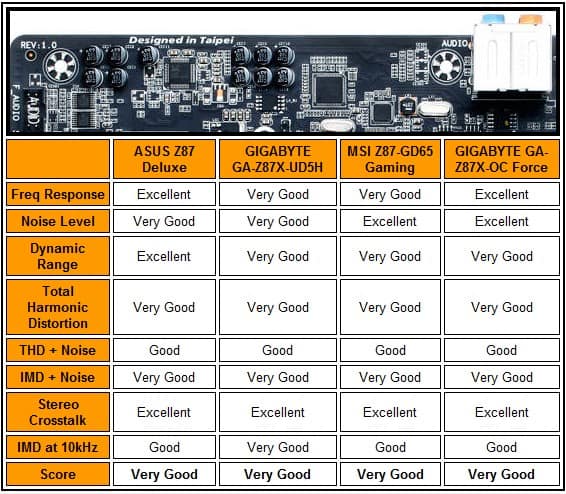
Thanks to GIGABYTE adding more capacitors that ensure clearer, sustained frequencies, decent quality audio production just doesn’t seem to be a problem. After several tests, I found a similar experience to the GA-Z87X-UD5H.
Audio frequencies rise and fall more nimbly. The volume isn’t as loud as some of the Creative hybrid integrated audio codecs but it also doesn’t suffer from stereo cross talk which is evidence of the better implementation in the Z87 series. One plus I noticed is that the front panel audio sounds more amplified (thanks to an onboard headphone amp) which is good news for music fiends or video gamers who like the thunder of a winning blow.
Processor Performance – SANDRA Mathematics and Multimedia
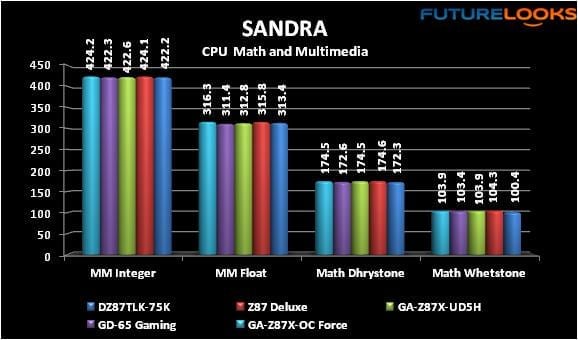
BIOS tuning appears to give the Z87 Deluxe and OC Force a slightly better benchmark result. Honestly, it’s just pennies so to speak but it does show that extra tuning can make a difference.
PCMark 7 – Overall System Test
I had to rerun many of the boards with the latest drivers and same GIGABYTE GTX 770 OC because it greatly influenced the scores. For a little overclocking comparison, I’ve included the results from a meager 4.5GHz overclock with Turbo still enabled.

Here, the OC Force stands just as tall as the rest. However, after several passes, the scores were just a bit higher no doubt thanks to the BIOS tuning and better quality components. As you can see, when overclocked to a perfectly stable, yet thermal friendly, 4.5GHz, the scores increase immensely. If you’re looking for 24-7 perfection without the worry of heat or crashing, this is your optimal window.
Video Transcoding – Graysky 4.0
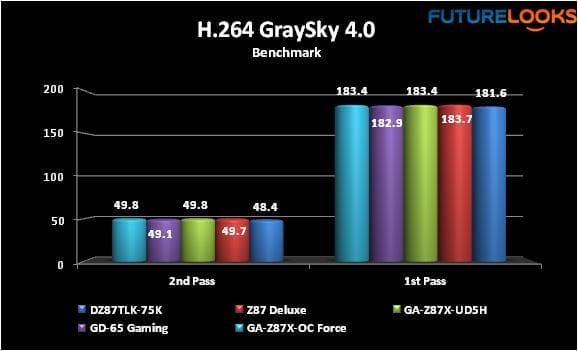
Video transcoding again shows more of the BIOS differences in regards to CPU tuning. It’s very close between the GIGABYTE Z87X-UD5H and the ASUS Z87 Deluxe. If you’re wondering, the 4.5GHz overclock pushed the 1st pass score to 215 and 2nd pass score to 56. That will shave off a considerable amount of time if you have a 1080p video that needs to be converted to other formats or resolutions.
Just a few more benchmarks and hardware tests on the next page and we’ll be taking it home to a conclusion!
Synthetic Gaming Benchmark – 3DMark11
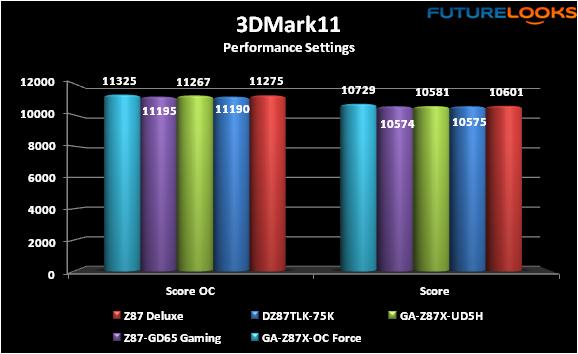
Gamers like to overclock their CPU and their graphics for whatever advantage they can get in frame rates. Here, I overclocked both to the same across the board to look for performance differences. The GIGABYTE GTX 770 OC made it very easy to get a noticeable boost. Overclocking the video card will no doubt always increase graphics scores which is the goal of benchmark overclocking. If you’re a gamer, you would see anywhere from 10 to 15 more frames. The GA-Z87X-OC Force also seems to benefit the overall overclock experience.
Real World Gaming Performance
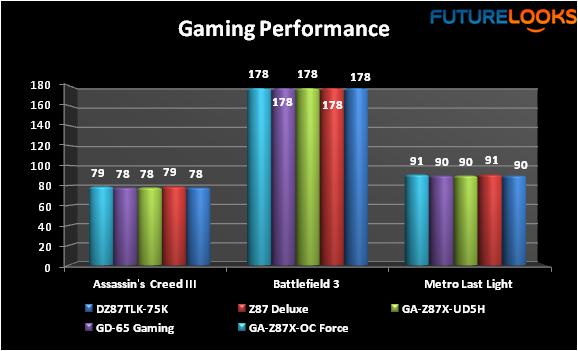
Gaming tends to be a graphics dependent features, but we entertained ourselves play Assassin’s Creed III, Battlefield 3 (because Battlefield 4 is broken), and METRO: Last Light. Instead of using the usual modes, I set everything to Ultra where possible and enjoyed 3D mode with NVIDIA 3DVision2. We can at least say with certainty that the OC Force is just as great a gaming platform as it is an overclocking platform.
IO Performance
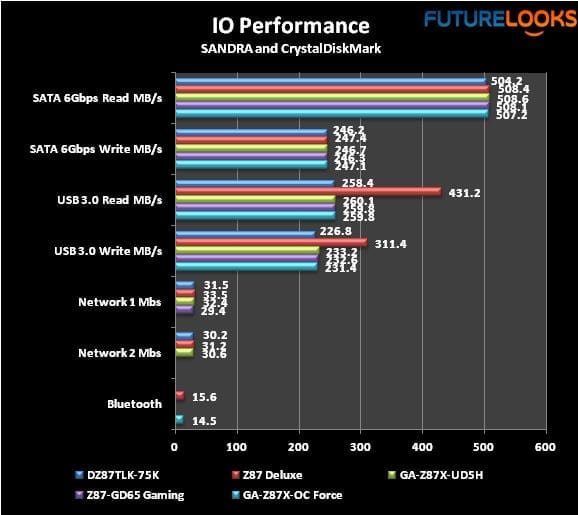
IO is often pretty uneventful. We do the testing to make sure the data bus is free and clear of glitches as this can be a “cost cutting” area. The OC Force is pretty comparable. Till someone challenges ASUS’ USB 3.0 Boost feature, it will be tough to keep up. You will of course need a proper UASP device to garner the benefits though so you still need the right combination of parts. Still, the GA-Z87X-OC Force is right in there with the rest of the pack.
Final Thoughts
The GIGABYTE GA-Z87X-OC Force is simply an extremely well tuned Z87 motherboard. It has all the necessary tools to push a CPU well beyond safe zones as long as it’s well cooled with something like LN2 or Phase Change coolers. It’s definitely too much platform for high end air and water coolers when fully unleashed. Still, regular enthusiasts will find the Easy Tune and BIOS overclocking presets to be more than enough given Haswell’s thermal limitations. Extreme enthusiasts will relish the detailed manual tuning potential that GIGABYTE engineers built in to the platform. Overall, the platform is rock solid. In this respect, you simply will not be disappointed.
As expected, there is a learning curve as the board requires some bench time to become efficient (or rather, for you to become proficient) at operating it. From a regular end user perspective, there are a couple of minor set up issues around the new App Center. Like for example, that a full install is required in order to utilize the individual software tweaking utilities. It would also be a good idea to bundle it into an all in one software bundle onsite. Still, these aren’t deal breakers by any means, but would add to the overall user experience in a very positive way. Something that we’ve criticized GIGABYTE for in the past.
The GIGABYTE GA-Z87X-OC Force carries a price tag of $389.99 US MSRP and is available from most online retailers. It’s a premium price for a premium motherboard with all the right features right down to WiFi support. This is one motherboard up to the challenge, if you can keep up with its High Performance nature.
Pros
- Beginner and Elite overclocking friendly!
- Great quality and solid platform
- Onboard overclocking buttons
- Innovative integrated features built specifically for extreme overclocking
- Full control of onboard PCIE expansion
- Complete with WiFi connectivity
Cons
- A little App Center confusion – No all in one App Center bundle
- Bottom BIOS information header cluttered and messy
Overall Rating: 9.0 / 10.0


Help Us Improve Our Reviews by Leaving a Comment Below!