
CoolIT Systems is known for providing high performance pre-built water cooling kits for enthusiasts with the money to push their hardware as far as possible. However the enthusiast market isn’t where they’re targeting their latest product. The Domino A.L.C. CPU cooler is CoolIT’s attempt to bring a high performance water cooler to the masses for as little money as possible. But this isn’t some half baked kit, produced with the idea of putting something on store shelves as quickly as possible. The Domino has spent over 12 months in research and development and was literally just released yesterday. Even with its recent release, the Domino has already been recognized by the Consumer Electronics Association with the 2009 CES Innovations Honouree Award in the field of Computer Peripherals. Say that ten times fast.
An Interesting Tale
This award isn’t earned without doing some work though. The history behind this product is rather storied, as CoolIT’s CEO Geoff Lyon was quick to point out. It pretty well started with a whiteboard drawing mapping out every feature they have at their disposal and wanted to put into the Domino. This eventually lead to them building a cooler that Geoff claims will last 7 years at 50°C without leaking and needing a refill. They then went on to use the best thermal interface material they could, with cooling results even better then the TIM found on their previous coolers. They also focused on the retention mechanisms, rebuilt the radiator from the ground up, and made sure the Domino was safe, reliable, and the best performer it could be. You can check out all the specifications on the product home page.
Still, was all this worth it? Well I guess we’re going to find out in the following pages.
Sticker Shock…or Lack There Of…
One thing CoolIT did nail was the price, to the point that even I was shocked when our own Editor-in-Chief, Stephen Fung informed me in our product brief. At the risk of sounding like a cheesy infomercial host, you can have all that is offered with the CoolIT Domino for the low price of $79 USD. That’s in the same price range as many high end air-cooled CPU coolers. So what exactly does one get for that price? Well we’ll have to take a look at both the physical package as well as the performance, and that will be done in the next few pages.
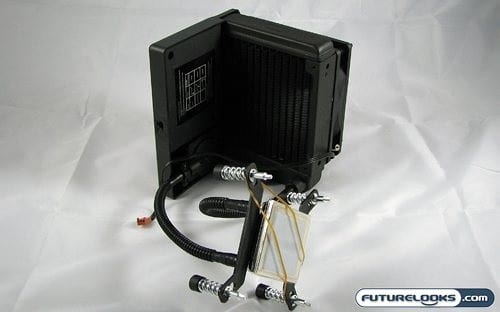
The Main Assembly
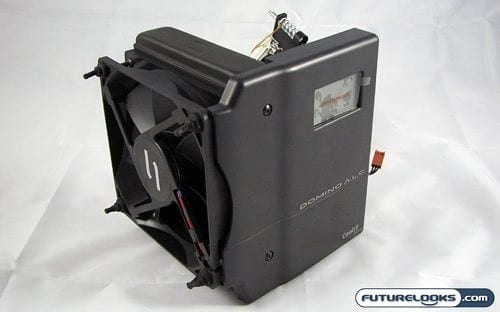
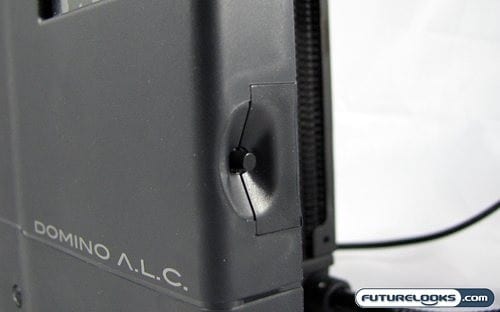
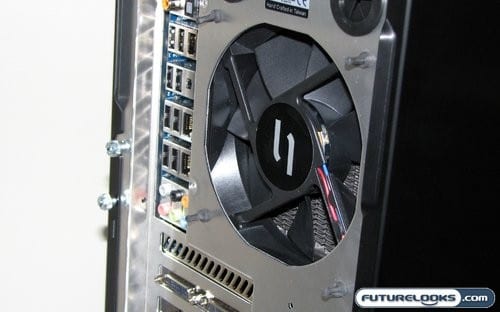
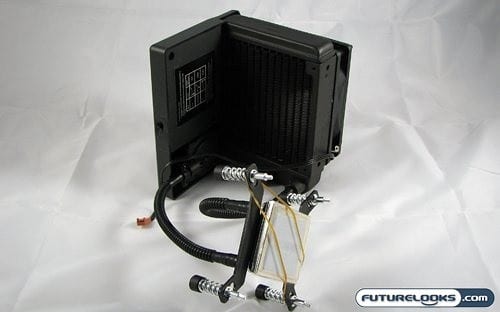
The main assembly of the CoolIT Domino is a fairly simple affair, especially when compared to some of CoolIT’s other coolers. This started in the design phase, as CoolIT laid the foundation for the Domino with the idea of a simple water cooler with a PCB for regulating fan speed. This morphed into what we see above. The main unit consists of a 120mm variable speed fan, radiator, and a housing that contains not only the aforementioned PCB, but also a status LCD and a switch along the leading edge of the housing to allow selection of three different thermal programs.
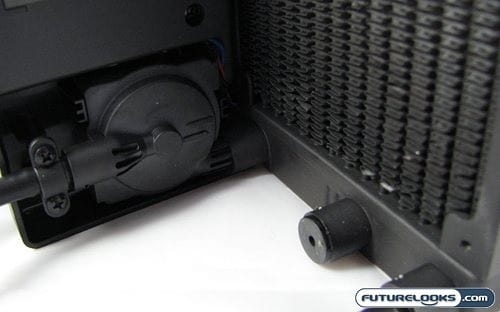
Moving around to the back, we see a few more of the components that make up the CoolIT Domino; specifically the CFF1 (Compact Form Factor Version 1) Pump, the radiator, and the warning buzzer. The selection and design of these components assist in driving down the space used by the Domino, and also address the advertised safety and reliability of this cooler. For reliability CoolIT went with a completely redesigned pump that used ceramic bearings, which can withstand fairly high temperatures. Then they went a little nuts, and decided to run the entire assembly through a shock and vibe test of up to 40G. I doubt we’d see many other coolers out there survive that. Should any component of the system fail, you’ll be politely but sternly informed by the very persistent buzzer installed below the rad.
Getting Rid of the Heat
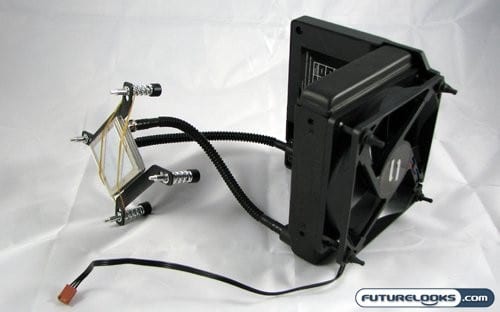
The system to get the from the CPU to the outside has about as much story behind it as the main assembly itself. As I had mentioned earlier, the radiator is a custom design that has been rethought from the ground up. CoolIT was apparently trying to keep the size of the radiator as small as possible to maximize compatibility with many cases, while still maximizing performance. Taking a look at the radiator fins, it would appear that they were still able to keep enough surface area to effectively cool the coolant.
To move the coolant from the main assembly the water block, CoolIT has employed a corrugated tubing that is said to reduce liquid loss through the material. They also leak test every unit before is leaves the factory. As for the coolant itself, I don’t think it can be quite defined as water. From the horses mouth itself, “[the] coolant is a 25% Propylene Glycol mixture with a very comprehensive anti-corrosion package to ensure there will never be any performance reduction due to build-up or inter-metallic reaction.”
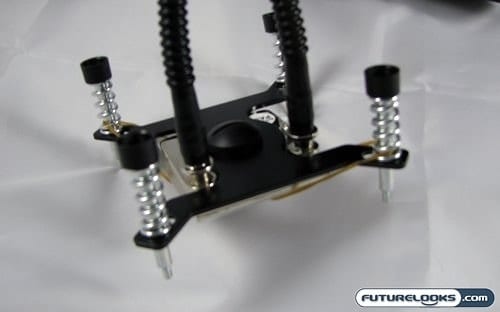
The water block itself is made to be as light as performance will allow, to reduce the amount of weight on the CPU and not exceed any of the tolerances set forth by Intel and AMD. Under the thermal interface material, the surface is a near mirror finish. With the addition of what CoolIT says is their best thermal interface material yet, this should make an excellent contact point between the CPU and block. The retention system further enforces this, and also makes for a safe and trouble free installation. There’s a couple of subtle features, one of which is those little black cups over the screws. They are there to prevent you from slipping with your screwdriver and damaging your precious motherboard. CoolIT has also made the mounting system spring-loaded, so as to prevent the block from applying too much pressure to the CPU socket.
Do all these extra features and attention to detail provide for a better installation experience? What about performance? Is it further enhanced? Well we’re about to find out by first looking at the accessories that come with the CoolIT Domino, and how everything is installed.
Included Accessories
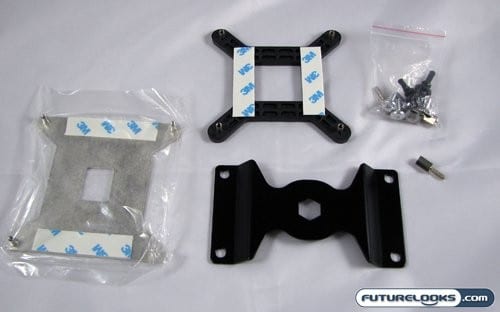
CoolIT has included a plethora of modern mounting brackets with the Domino. For the Intel camp, there’s a backplate for both Socket 775 and the newest Socket 1366 for the Core i7. Both these retention brackets have the dreaded mounting system known as double-sided tape. I would recommend against actually removing the covers and using the adhesive to stick these to the back of your mobo, as they can be horrendously difficult to remove should you need to. Rather it’s better to just place them in position, and use some electrical tape or something else that can’t harm your motherboard.
The baggie of screws and the H-shaped plate are meant for the AMD AM2/AM2+ users in the audience, as the Domino uses the existing AM2 backplate with the addition of some included stand-offs. The plate pictured replaces the existing mounting plate found on the water block.
Luckily all these installation options are covered in the Installation & User Guide. This little book is actually quite well written, being clear and concise with every step of installation. There’s even a step in the process reminding you to check your work before proceeding with power on the system. So how well did installation go? Let’s find out!
System Setup
To test the CoolIT Domino A.L.C. CPU Cooler, we installed it into the following test system. These are the components relevant to the performance of a CPU cooler.
- Intel Core 2 Quad Q6600 2.4GHz Quad Core CPU
- GIGABYTE GA-EP45-DS5 Energy Saver Motherboard
- Corsair Dominator DDR2 4GB PC2-8500 RAM Kit
- ZOTAC GeForce GTX 260 AMP! Edition Video Card
- Thermaltake Toughpower 1000W Power Supply
- Lian Li PC-A7010 All Aluminum Full Tower ATX Case
All in all, it’s a pretty standard configuration for most moderate systems that will see benefit from a product like the Domino. Our operating system of choice was of course, Windows Vista 64.
Installation
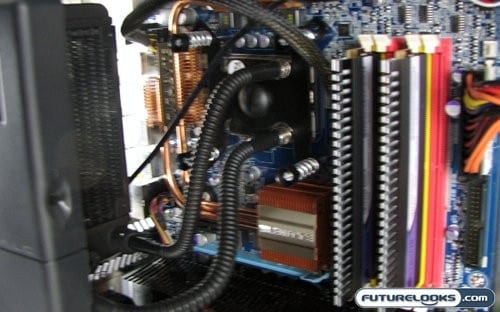
Installation of the CoolIT Domino was a fairly painless affair, thanks to the aforementioned user manual. In the simplest description, you basically install the appropriate hardware for your system platform, mount the CPU block, and then mount the radiator assembly. I didn’t encounter any issues with these steps. Thanks to the spring-mounted screws, mounting the CPU block was quite stress free. The way the springs are designed ensures that the block doesn’t place too much pressure on the CPU socket.

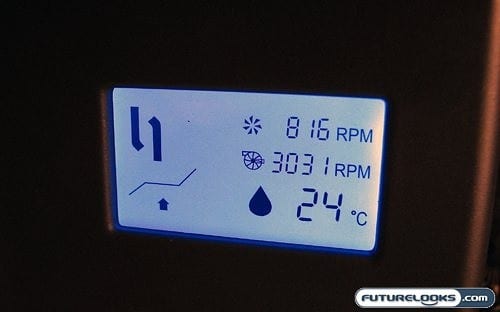
Now if you’re running a case that has a window installed, this is fairly similar to the view you will see. CoolIT designed the LCD, and the placement there of, with such a case in mind. It would have been nice to have a second LCD panel that could be mounted in a front drive by, so that those of use without case windows could see what’s going on.
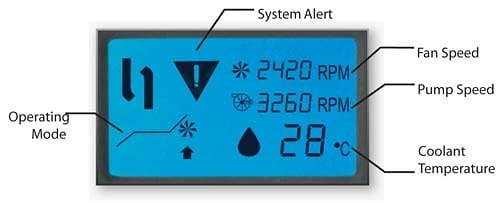

As for the information presented on the LCD, this is essentially what you get. This is more then just a simple LCD, as the PCB inside reports back all the things listed in real time. The operating mode will of course affect these numbers, and is changed by pressing the switch on the leading edge of the housing. This unfortunately requires the removal of your side panel, whether you have a window or not.
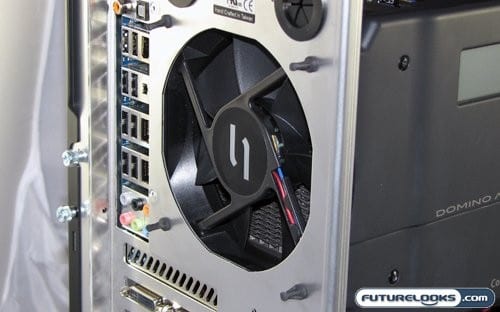
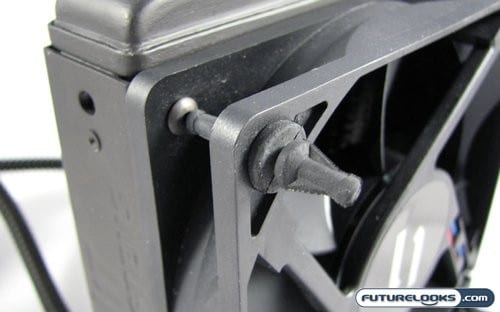
This is how the whole system is mounted. Rather than using screws, CoolIT went the quiet route and used vibration isolating plugs. These isolate the device from the case, reducing vibration transfer there by reducing noise. The only downside with this option is that if you have a high end case that uses proper chrome grills instead of pressed OEM metal grates, you end up with an unprotected fan. This is hardly the fault of CoolIT though, and it provides an easy way to test the fan stop alarm and make sure it’s working.
Testing the Domino A.L.C.
To test the CoolIT Domino A.L.C. CPU cooler, we ran through a couple of stress tests and measured the amount of noise generated and heat removed. To place stress on the CPU in short order, we used the program OCCT. This piece of software will place 100% load on multi-core processors with a great deal of ease, and can even add memory into the mix. It also plots temperature and voltage changes on a series of graphs. We pitted the Domino against the stock cooler that comes with our Intel processor.
Thermal Results
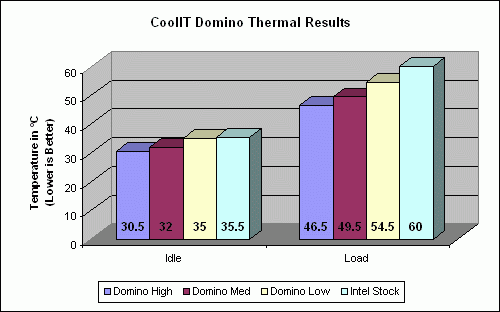
When it comes to coolers, the first and biggest thing that matters in most minds is exactly how cool the cooler can make their hardware go. I’m glad to report that even with the CoolIT Domino’s diminutive size, it managed to post some good numbers in the cooling department.
The high setting was of course the best performer in pure numbers, but was less then desirable as a full time setting. The acoustic results will show you what I mean. The low setting, on the other hand, was the opposite. The Domino set to low ran a little hotter then I would have liked, but it was remarkably quiet. Like many of these types of coolers that I’ve tested, the medium setting on the CoolIT Domino seems to be the best balance of performance.
Noise Levels
To test the acoustics of our test rig with the Domino installed, we placed a digital sound meter in the approximate position the average user would be sitting in relation to the computer. We then silenced the room and took a stable measurement of how much sound was being produced. This garnered some interesting results.
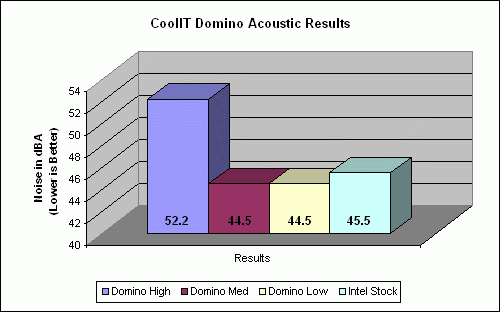
This first thing that should be noticeable is exactly why I don’t like the high setting on the CoolIT Domino. To put it simply and in subjective terms, the high setting sounds like a jet engine when compared to the lower settings. Both the sound produced by the medium and low settings gets lost in the overall drone of the case. However, when you have the CoolIT Domino set high, you know it’s set to high. The medium setting is definitely where it’s at, with a decent amount of performance for no more sound then what you’re going to get from the system anyhow.
Final Thoughts and Conclusion
CoolIT Systems has asserted with the release of the Domino the liquid cooling is now ready for the masses. People do more then just game with and overclock their systems. They are emailing and surfing the web and possibly even working. Why not have a system that can do all these things, do them quietly, and keep cool while doing them? So I have to ask, does the Domino live up to these ambitions?
The Domino is a solid product, and it more then backs up the aspirations of CoolIT as the cooler manufacturer for the people. The Domino provides a great starting place for getting one’s head around the idea of liquid cooling a computer. The performance is definitely there, beating out even some of the more robust air coolers. It’s also remarkably easy to install, and the need for maintenance is almost non-existent due to its pre-built nature.
There’s actually very few faults I can find with the CoolIT Domino. I do have a wish list of things that may be nice to add. That list includes loosing the double-sided tape on the backplates, and maybe including an AMD backplate since some of us still use AMD CPUs. I’d also like to see a different version of the housing with a front mountable LCD panel and mode switch. But I digress…
In the end, what we have with the CoolIT Domino A.L.C. CPU cooler is the kind of product any tech journalist likes. That’s the kind of product that does what it’s supposed to do, does it extremely well, and does it for a remarkably cheap price. I don’t want to sound like I’m gushing, but I enjoy being pleasantly surprised. This is easily one of the cheapest and biggest bang-for-the-buck water coolers you can find out there. Bravo to CoolIT for their efforts. They have indeed earned our praise, and our Editor’s Choice award.
Pros
- Very affordable water cooling
- Well though out and engineered
- Strong construction
- Quiet on Low and Medium settings
- Provides performance on par with some top notch air coolers
Cons
- No AMD backplate included
- Side panel needs to be removed to change modes
Overall Rating: 9.0/10.0


Discuss This Review in the Futurelooks Community Forums
CoolIT Domino A.L.C. CPU Cooler Photo Gallery