


I believe that the AMD APUs are the only choice for a single chip HTPC solution and I stand by that statement. The best possible option would be paired with an mini-ITX motherboard and a very small form factor case. Using the right cooling solution, you could build a very power HTPC that is no larger than a Nintendo Wii and just as quiet, allowing you to enjoy all your media in your living room. Today, we are going to see if the ASRock A75M-ITX motherboard at an MSRP of $89.99 is the board to fit that role. Let’s check it out!
Features and Specifications
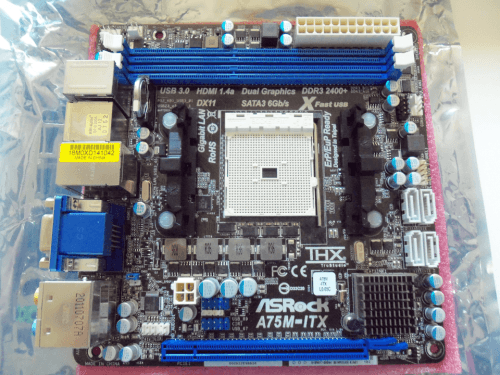
The core of the ASRock A75M-ITX is the same as other FM1 socket motherboards with the A75 Hudson D3 chipset. This includes native USB 3.0 support (up to 4 ports all found on the back IO panel), 5 SATA 3.0 (4 headers and 1 on back panel), FIS-based switching, AMD Radeon Dual Graphics, native CIR (Consumer IR) and native DDR3 support. ASRock states that this board will support RAM up to 2400 MHz in speed if stock performance is not enough. More on that in the coming pages.
The A75M-ITX has two full sized DDR3 slots, two USB 2.0 headers, CIR header, 3 fan headers (one 4-pin and two 3-pin), and 1 PIC-E 2.0 x16 slot. This is all natively support provided by the AMD A75 Hudson chipset. It’s clear that this board has a lot of features packed into a small space which is both good and bad.
The A75M-ITX uses ASRock’s Graphical UEFI BIOS and a large selection of software that is provided with this motherboard. This includes ASRock Extreme Tuning Utility, APP Charge, InstantBoot, Instant Flash, XFast USB, XFast LAN, ASRock On/Off Play, ASRock Magix Multimedia Suite, and comes with free trials of CyberLink MediaEspesso 6.5 and THX TrueStudio. The best part is that you’ll get all this for $89.99 or less at most retailers that are stocking ASRock boards. This number has been growing.
What’s in the Box?
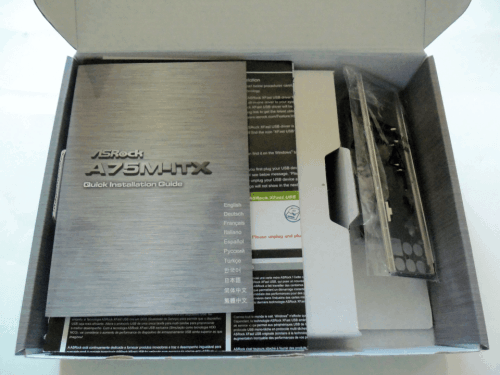
The box contains a very few physical pieces/compartments. Once opened, you will find the ASRock A75M-ITX motherboard, driver/software DVD, two SATA3 (6 Gb/s) cables, IO shield, and an audio crossover cable. The two SATA3 cables include one with two straight connects and one with a 90° connector. In addition to these items you will also find some folded papers that contain descriptions of the motherboard and its features. This keeps the price low and the value high. It’s worth mentioning that the quality of the documentation is also quite good now from ASRock, giving you all the information you need without a second translation.
Test System
In order to test the ASRock A75M-ITX motherboard, we have to build a system around it. Using many of the parts in our previous reviews of the FM1 platform, we’ve put together a somewhat standard setup to test boards based on this chipset.
- CPU: AMD A6-3650
- GPU: Gigabyte HD 6670 OC 1GB
- RAM: G.Skills Ripjaws 2133 MHz @ 1866 MHz 9-11-9-27
- HDD: Seagate Barracuda XT 2TB
- PSU: Antec HCP 850W
- Audio: Onboard Realtek ALC892
- OS: Windows 7 Ultimate 64-bit
- USB 2.0 Test: Corsair Flash Voyager 16 GB
- USB 3.0 Test: Samsung F3 1TB in a Rosewill 3.5” USB 3.0 Enclosure
Benchmarking Software
In order to test all the important functionality of this board, we’ll be employing the following software suites and programs.
- PCMark07
- 3DMark11
- Alien Vs. Predator benchmark
- Resident Evil 5 benchmark
- CrystalDiskMark 3.0.1
- OCCT
- FurMark Burn-in
- RightMark Audio Analyzer 6.2.3
System Build Notes and Software Bundle
There will be one very important fact that will come up over and over during any build using the ASRock A75M-ITX, or any other mini-ITX motherboard for that matter: It’s small. The overall layout can only described as the best we could do with the space that we have. The FM1 socket is surrounded by many things to keep in mind during your CPU cooler shopping.

Once you have selected a cooler that will fit the board without obstructing other components (or just used the stock cooler), I recommend installing it prior to install the board. I found the build to be much easier by simply installing the chip, RAM, CPU cooler, and front IO wires first. Once you have these wired up, clamped down, or otherwise tucked away, you can secure the motherboard into the case with four screws. If you are unable to do this due to the design of the case, you will most likely not have your PSU as close to the 24-pin power and CPU fan headers as I did.
When you have the A75M-ITX installed and the above components ready, move on to the USB and SATA connections. These are far enough away from the CPU cooler area to not give you many issues. Finally, finish your build by installing your expansion card in the PCI-e slot if needed. You may need to move the audio and USB wires around to give you the clearance for the card. These tips should give you a pain free installation.
Software Bundle Overview
The software bundled with ASRock motherboards is more than your standard fair of drivers and trial software. While you do have CyberLink MediaEspresso Trial and a trial anti-virus program, we are not going to be talking about them. You will also find THX TruStudio software which should simply not be installed. It does not do anything but switch from a speaker profile to a headphone profile. You can pay to get the full software package, but if you do not plan to do this immediately, do not install the THX TruStudio.
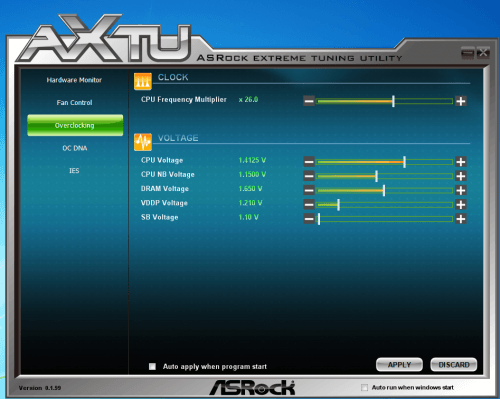

As with most motherboard manufacturers now, ASRock has their own overclocking utility you can use from within Windows 7 called AXTU (ASRock Extreme Tuning Utility). This tool allows direct access to several options and features in the UEFI BIOS. You can load a new BIOS profile, change voltages, alter the multipliers, and fan controls. You cannot however change the bus speed which is currently the only way to overclock an AMD APU. As such, I could use the software to control the fans and monitor the board, but could not use it to overclock the system.
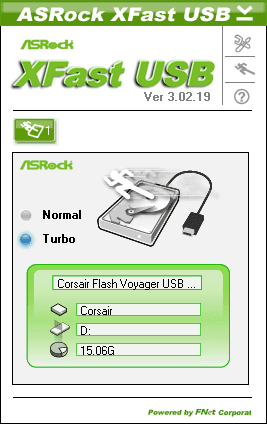
The next set of software you will find is the XFastUSB and XFastLAN. The former is set and forget software. Once you install it, all you can do is enable the feature. The XFastUSB is an advanced data stack and buffering software tool that replaces the normal USB 2.0 transfer buffer to ensures the highest speed. I will include XFastUSB results in my IO tests.
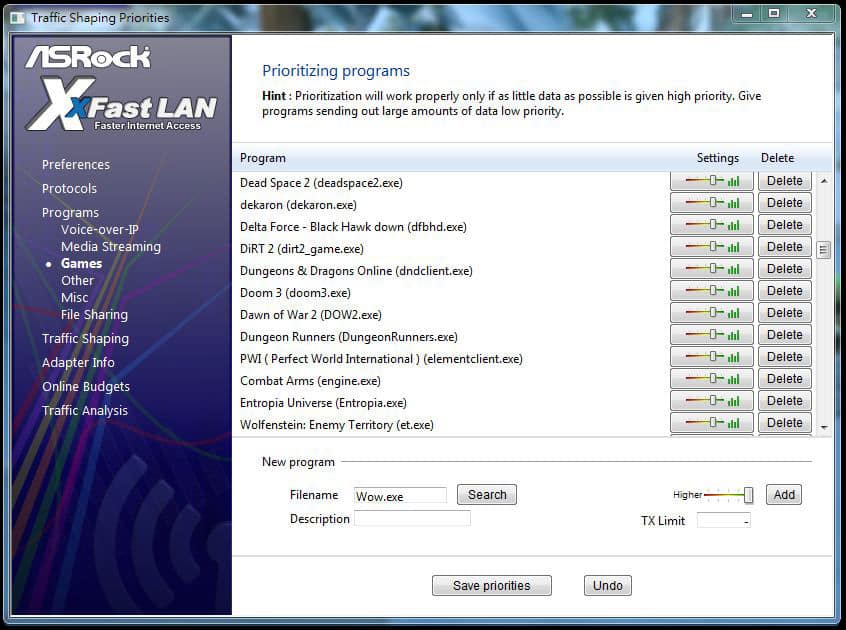
The XFastLAN Utility is something completely different. This is a full software suite of LAN options. It allows you to not only monitor traffic, but micro-manage bandwidth, traffic control, software bandwidth priority, and many other options. If you need to control your bandwidth, prioritize your VOIP, or limit the amount of bandwidth a torrent program has each day, XFastLAN has you covered. It’s similar to what the Killer NIC E2100 does, but at a non hardware accelerated level.
You will also find ASRock’s InstantBoot Utility. Like the XFastUSB, this too is set it and forget it software. The InstantBoot Utility claims it can reduce boot time to only 4 seconds with a standard HDD and it can do exactly this. This however is not practical as it simply alters the Windows definition of “Shut down” to a state similar to Suspend. The InstantBoot will keep all data related to software that starts with Windows in RAM, even when the system is powered down. Once you press the power button, this information is still in RAM and does not need to be loaded, drastically reducing boot time.
The former mode is called “Fast Mode” in the InstantBoot software. There is also a Regular Mode. This mode uses a software trick to convince Windows to shift into a standby mode during the initial boot to directly load a previous boot state into RAM as one large program. The result is once Windows 7 shows a desktop, all boot software is loaded near instantly saving around 8 to 10 seconds on boot time for me.
BIOS and Overclocking Notes
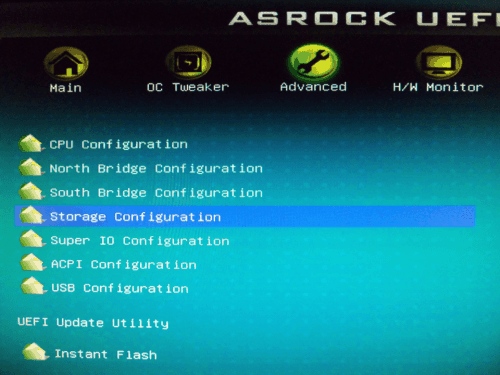
ASRock has completely moved to the UEFI BIOS system for all their motherboards and the A75M-ITX is no different. The UEFI BIOS is a great addition to this motherboard. Removing the old BIOS keyboard requirements means you could use this board as an HTPC with only a media remote.
The UEFI BIOS from ASRock is also very well laid out and easy to understand. I do have a small issue with several options being hidden by an “Auto” setting for a whole section. In the Overclocking section you often have to change a button from “Auto” to “Manual” to review several other sub-options. This can be a little confusing as you often don’t know how much control you have until you are actually changing something.
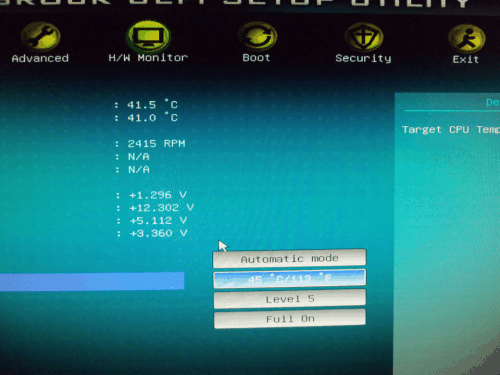
The fan controls are also a feature I enjoyed. It allowed me to set 9 different levels of default power to keep the fans from fluctuating when at idle. This control applies to all 3 fan headers on the board. Much like the AXTU, the UEFI BIOS is great, but not designed for this board.
Lets get right into what you really want to know about this board, does it overclock well? The simple answer is I don’t know. When I first attempted to overclock the ASRock A75M-ITX, I turned off the power throttling and AMD Cool-N-Quiet. I then restarted the system to ensure these features were off. I then set the bus to 105 MHz (100 MHz being default). I restarted the system and tested stability in Windows 7. I repeated this until I was up to 115 MHz and this is where the story goes all wrong.
As the system was stable at 115 MHz, I noticed the multiplier for several things had been changed to ensure stability much like the GIGABYTE GA-A75M-UD2H. As the system had effectively reset, I decided to go up to 120 MHz (3.12 GHz for the CPU) which is a speed I have done with this chip before. My system would not POST. I attempted to clear the CMOS and still could not get a POST screen. I then disconnected the motherboard completely and set the Clear CMOS jumper to sit overnight.
This is a common remedy known to correct stuck BIOS. After letting it sit overnight on clear, I moved the jumper back and rebuilt the system. This time I still did not receive a POST screen. ASRock was happy to send me a replacement board so I could get a second try at overclocking. This time I decided I would be happy with just the 115 MHz I got before. I rebuilt my test system with the new board and booted into windows to verify it worked at stock. After some software updates, I attempted the overclock again.
This time I started the same way I did before by first disabling at features that would power down the CPU and restarted. Once I was back in the BIOS I set the fan speed to my preference and set the memory multiplier from 8.00 to 9.33 (1600 MHz to 1866 MHz). I then restarted the system with no changes to voltage or bus speed, but the system would not POST. It was the same story as before. I tried several different fixes, but could not get the system to recover.
In a nutshell, this board will overclock memory just fine, but stay away from trying to overclock the APU. Let’s get cracking on the benchmarks to see what else we can find out.
Total System Performance (PCMark07)
This is a total system benchmark to gauge how well the PC as a whole. The PCMark07 software runs a battery of 21 different test three times to ensure the most accurate results.
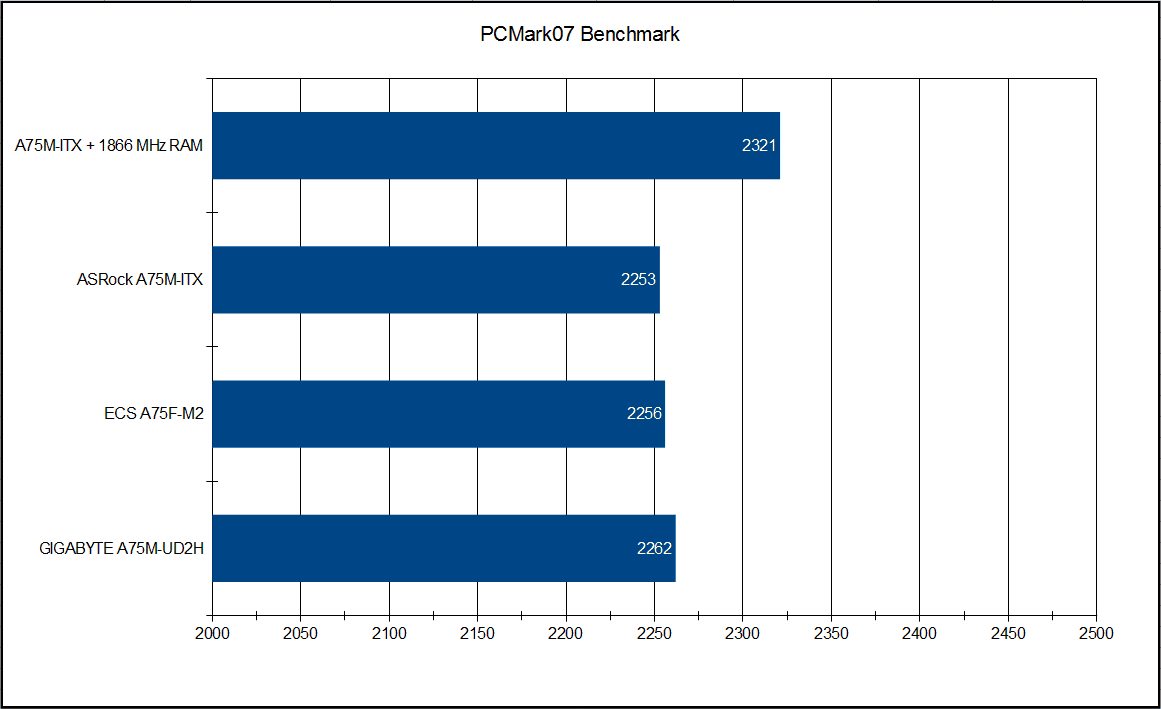
The clear winner here is simply the use of 1866 MHz RAM with your APU. The ASRock A75M-ITX does come in behind both the ECS A75F-M2 and the GIGABYTE A75M-UD2H but only by 3 and 9 points respectively. The realistic different is too minor to notice. The 68 point boost in performance from using the faster RAM can be noticable in memory intensive tasks.
SATA 3.0 (6 Gb/s) I/O Performance (CrystalDiskMark)
This test is very straight forward. CrystalDiskMark generates files of various sizes using random data and moves that data around to test the HDD performance. As I am comparing three systems where only the motherboard varies.
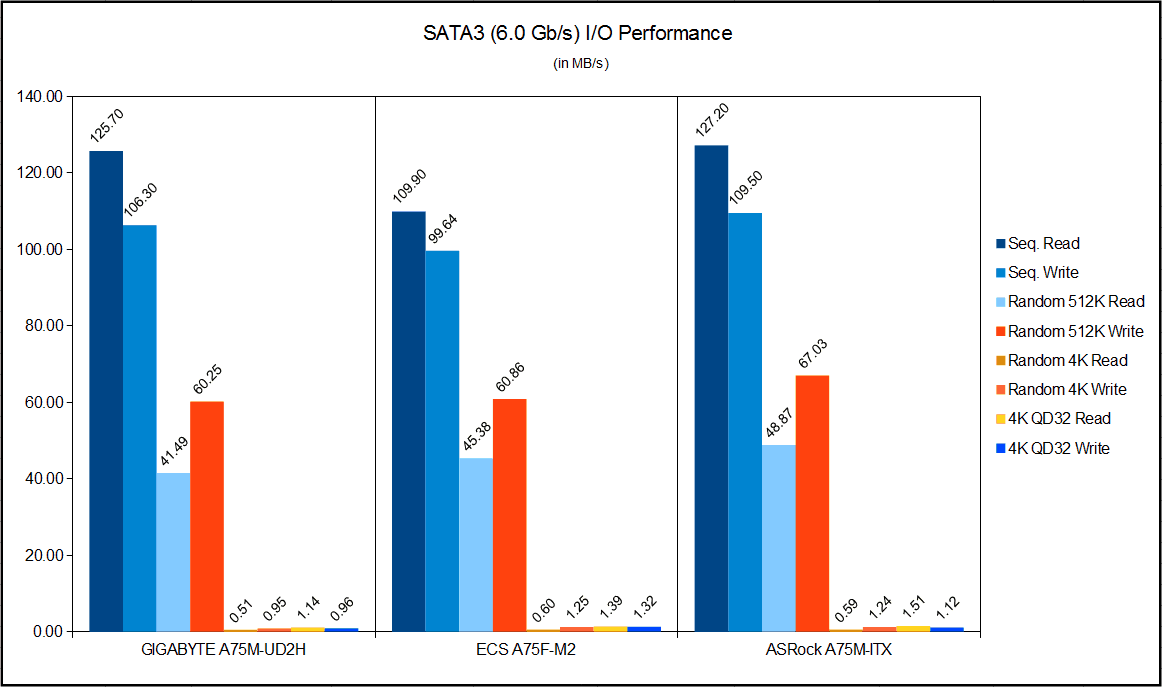
These results are quiet interesting. The ASRock A75M-ITX has a higher performance in Sequential reads and writes as well as Random 512k reads and writes. The GIGABYTE A75M-UD2H then falls to last place for all four 4k tests with the ECS A75F and ASRock A75M being virtual tied in random 4k tests and only a 0.2 MB/s difference in QD32 tests.
USB 2.0 I/O Performance (CrystalDiskMark)
I also used the CrystalDiskMark 3.0.1 software to test the USB 2.0 performance as well. This is no different than the previous tests except a USB thumb drive was the target test drive. I also included the results of enabling the XFastUSB Utility to see if it does provide any performance improvement.
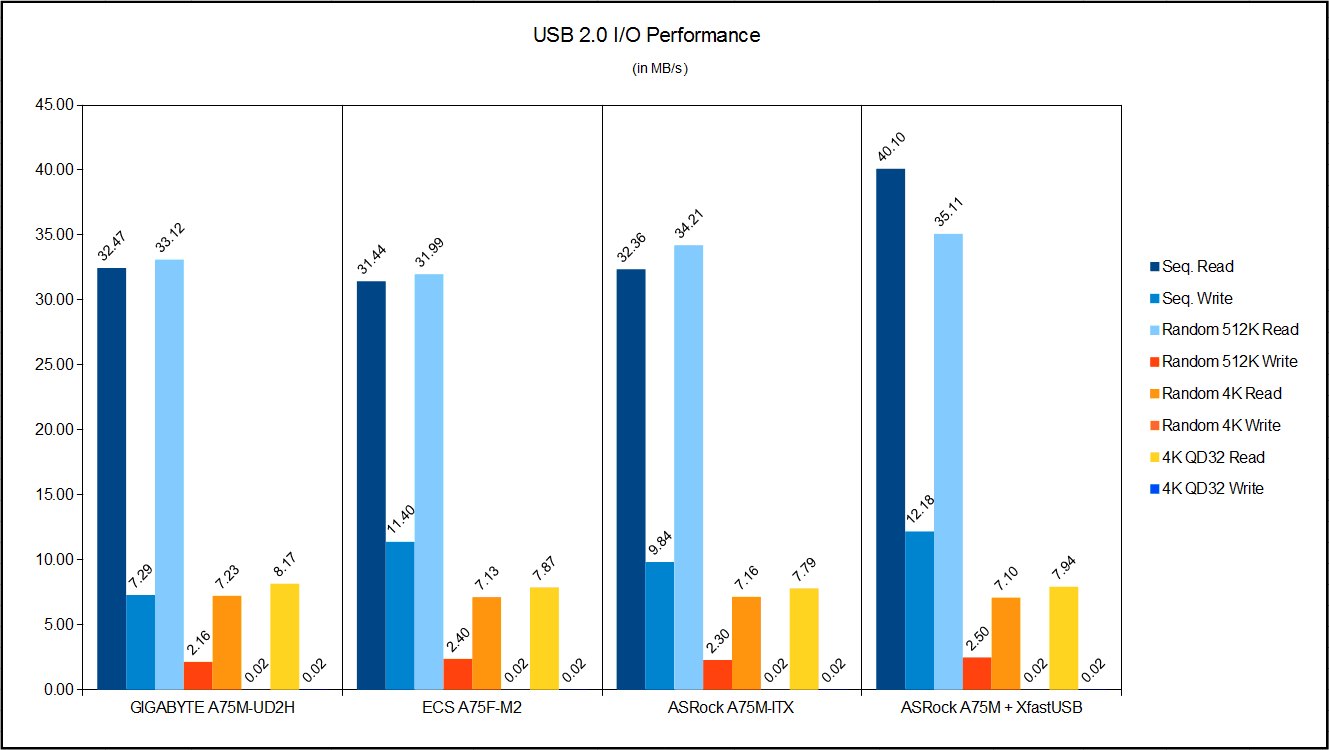
All results for the motherboard are the same for standard USB 2.0 testing with only up to a 1 MB/s difference. The only exception is the ECS A75F-M2 having a 3.11 MB/s advantage in Sequential Write over the GIGABYTE A75M-UD2H. The XFastUSB does provide a distinct increase in performance across the board except for 4k writes which seems to be limited to 0.02 MB/s for the device. The biggest gain is a near 8 MB/s gain sequential reads over all other results.
USB 3.0 I/O Performance (CrystalDiskMark)
The final set of tests for CrystalDiskMark is with the Rosewill enclosure and my Samsung F3 drive. This drive is much older and a little slower than the Seagate Barracuda used for the test system’s primary drive. The focus of this test is mainly to ensure the USB 3.0 is not be limited by the board and capable of using the 3.5″ HDD at its full speed.
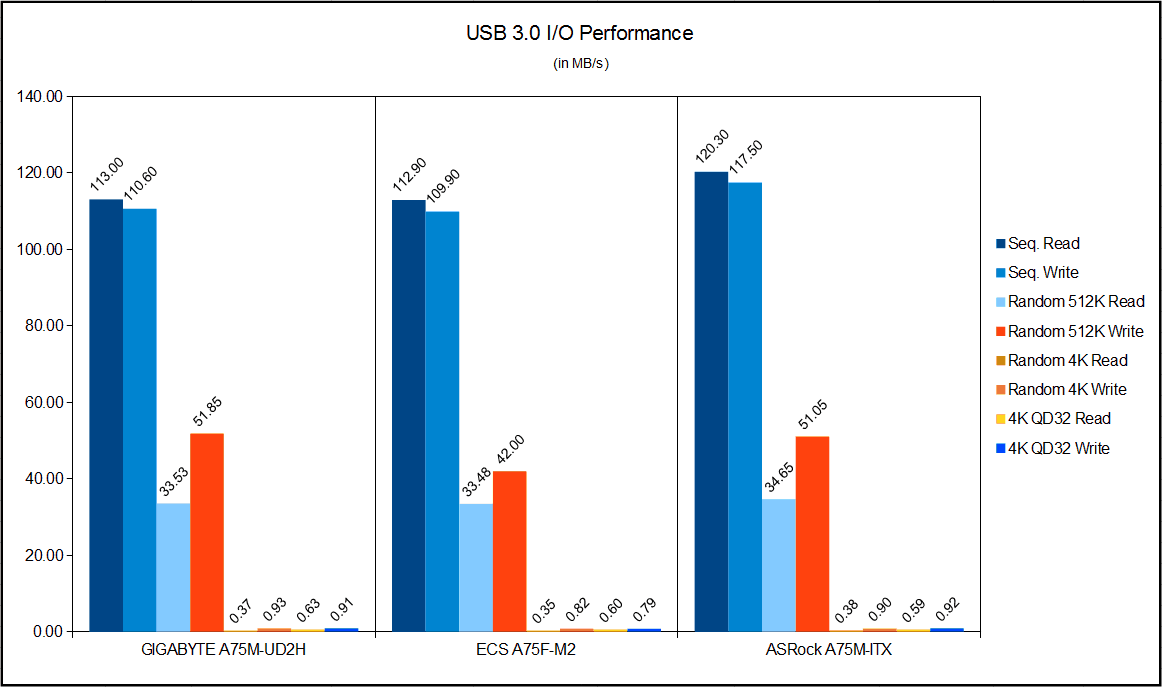
These results are just like the SATA3 results with the ASRock A75M-ITX maintaining its I/O advantage. This is good as it proves the implementation of the I/O is better than the other boards in this comparison and the previous results were not a fluke.
Synthetic Graphical Performance (3DMark11)
This test will focus on the gaming potential of the motherboard using a system of test to stress different aspects of a typical game. 3DMark11 then combines these individual tests in to one stress test to see how well the GPU can do under extreme load. Once again note the only differences in these systems were the motherboards being used.
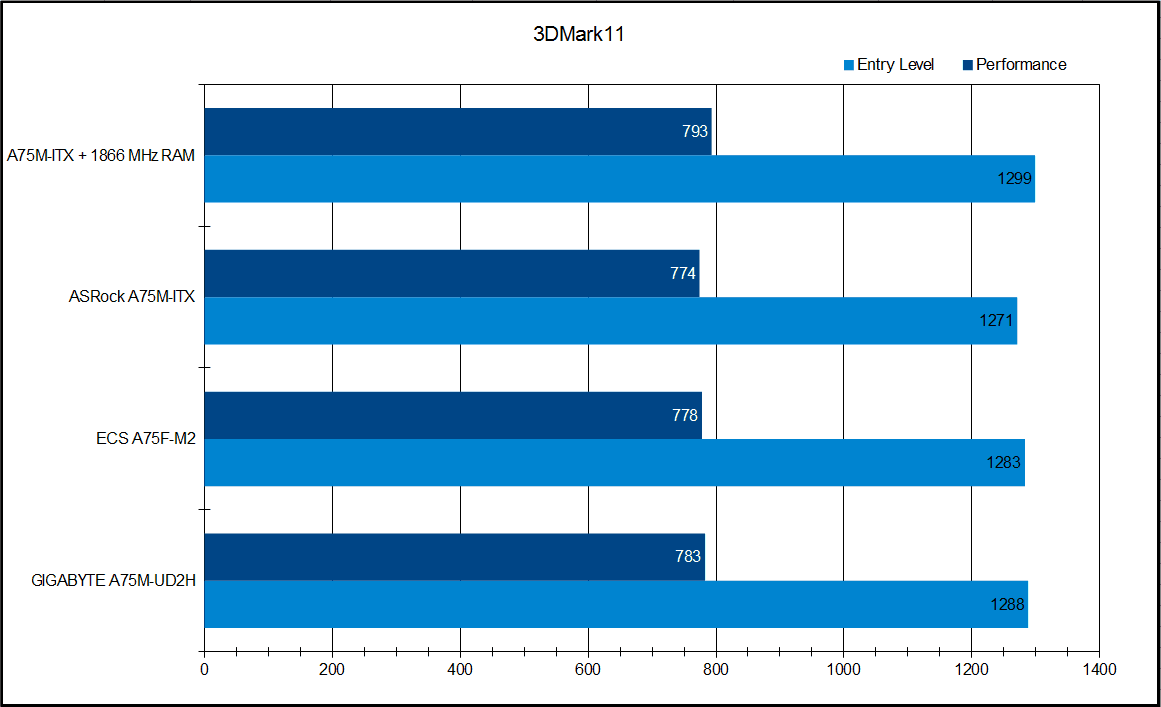
As with the PCMark07 test, the ASRock falls into last place by a single digits. Once again the switch to 1866 MHz RAM does provide slight improves in performance in both tests.
Real World Graphical Performance
Now that we have an idea of what to expect from a game, lets see of 3DMark11 results were accurate. I tested all three systems using default settings for Resident Evil 5 and Alien Vs. Predator with the resolution set to 1920 x 1080 (the most common resolution among PC gamers). Please note these settings were nearly maxed out and you can get better results in these titles with lower graphical settings.
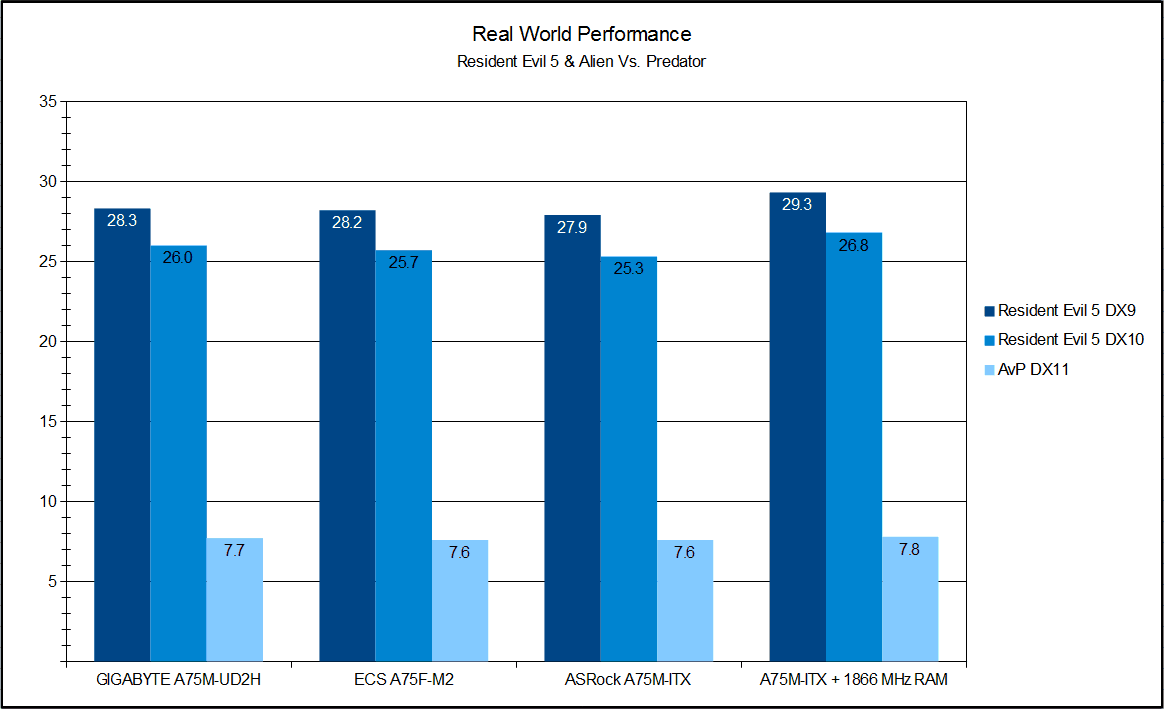
This time the results show the difference in performance is not even a full FPS between these motherboards. Using the 1866 MHz RAM was enough to put the ASRock in the lead, but by small margin. The difference in performance may seem small, but lower the graphical settings will widen the gaps seen here.
Audio Performance (RightMark Audio Analyzer)
These test were done with an audio crossover cable linked from the primary speaker output to the mic input jack. In the near future will be altering my methodology on how I conduct this test, but this time I wanted to ensure the tests were all identical.
![]()

The A75M-ITX does a good job overall in audio performance. It does seem to struggle controlling noise and distortion, but makes up for it by producing very little noise in the first place. It also has the best dynamic audio range which is to be expect considering the Realtek chip on the ASRock is a ALC892 and the other two boards are using an ALC889.
Power Consumption
The power consumption test were done using a watt meter at the power socket for the entire system power draw. I then used the now tested results of the Antec 850 HCP to get closer to the power draw of the PC and not the amount of energy pulled by the PSU.
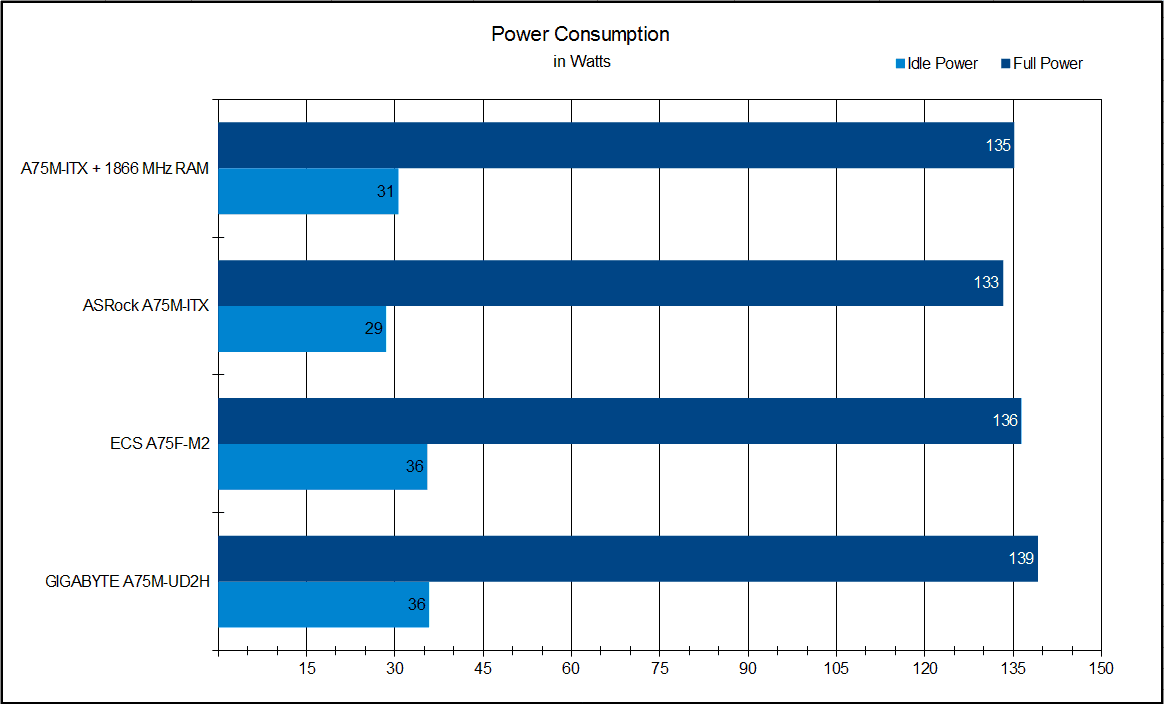
As expected, the mini-ITX sized ASRock A75M-ITX uses the least power at idle by 7 watts. The full power draw is also lower by 3 to 6 watts. The use of 1866 MHz RAM speed does bring the power up by 2 watts at both idle and full load.
Final Thoughts

Let me start off by saying I think the ASRock A75M-ITX is a great choice for HTPC builds. The only real draw back to using this board for such would be the lack of on-board WiFi, but this is easily remedied with a simple USB low profile WiFi Adapter. More adventurous users may even choose to adapt the internal headers for both Bluetooth and Wi-Fi if they wish. The board even has a CIR header for HTPC cases with built-in IR sensors.
The only time I found myself disappointed was with the THX TruStudio Software and overclocking. The THX software can simply never be installed as the Realtek audio control panel provides more than enough audio features. Speaking of software, I really wish that ASRock would discontinue including trial ware. If we wanted trial ware, we would buy our systems, not build them ourselves.
My issues with overclocking would only affect those looking to use the A75M-ITX for a desktop PC, and you shouldn’t really be using an ITX board for a PC build unless you have limitations on system size. To be blunt, overclocking seems to be too hazardous on this motherboard to the point that we think ASRock should put a warning label on it when going past the 110MHz mark on the bus.
The MSRP of $89.99 puts the ASRock A75M-ITX in the company of some great motherboards. To its advantage, ASRock provides one of the most useful software bundles on the market covering all aspects of using your computer. This board is clearly designed to be in an small form HTPC attached to an LCD TV and that environment is where it exceeds expectations. But overall, it loses points by not being as well rounded as the other boards and its inability to handle overclocking may point to some potential durability issues in harsher environments where a board like this may potential be used, where space is a premium and so is ventilation.
Pros:
- Mini-ITX form factor makes it fit nearly anywhere
- 3 fan headers for better cooling control
- Great Collection of Included Software
- Graphical UEFI BIOS Easy to Use
Cons:
- Overclocking is a bad idea on this board
- Does not include HDMI to DVI adapter
- Motherboard Layout can be Difficult to Work with
- Trial ware should never be bundled with DIY products
Overall Score: 7.0 / 10.0
Help Us Improve Our Reviews By Leaving a Comment Below