

Attractive full tower enclosures are among the more popular choices of modders due to their size and versatility. You can add more custom (or larger all in one systems like the Thermaltake Water 3.0 Ultimate) liquid cooling loops, utilize larger radiator configurations, and add better looking modified components. Full towers with a complete or wider range of features like tool-less or removable bays, cut outs, grommet lined machining, and painted interiors are among the most selected for complex builds. And it looks like Thermaltake has a strong contender in this space, and they call it, the Urban T81!
Thermaltake Urban T81 – Features and Specifications
Our first look at the Thermaltake Urban T81 came by way of our CES 2014 coverage. It was the first time we saw this new industrial design from the company, superior PC DIY functionality, and a much more “grown up” look, with fewer LED and sculpted plastic panels. The Urban series is all business and performance.
Here is the quick break down list of everything you will get inside and outside of the Urban T81…
- Two front 120mm intake Thermaltake fans (included)
- Top 200mm 4pin cooling fan (included)
- Rear 120mm
- Two front removable vented doors
- Front and bottom case filters
- Designed for custom and all in one liquid cooling systems
- Front space for a dual 120mm radiator
- Top space for a up to triple 120mm or 140mm radiators
- All storage cages are removable
- Wire management space and machining
- Tooless hard drive and ROM bays
- Large clean window panel
- Rear tubing ports or external loops
- Removable PSU plate for installation through the back
- SECC light weight steel
- Removable top mesh panel cover for optimal air flow
- Dual door panel design
- PCI screw cover plate
The fans are rated to 1200 RPMs moving about 80 CFM each. Properly configured, the Thermaltake Urban T81 can cool very large systems including those with large power hungry video cards. Naturally, a wind tunnel is best for cooling any system.
How much will the full tower enclosure cost you? Currently, the Urban T81 can be purchased for about $165 US from the more popular online retailers.
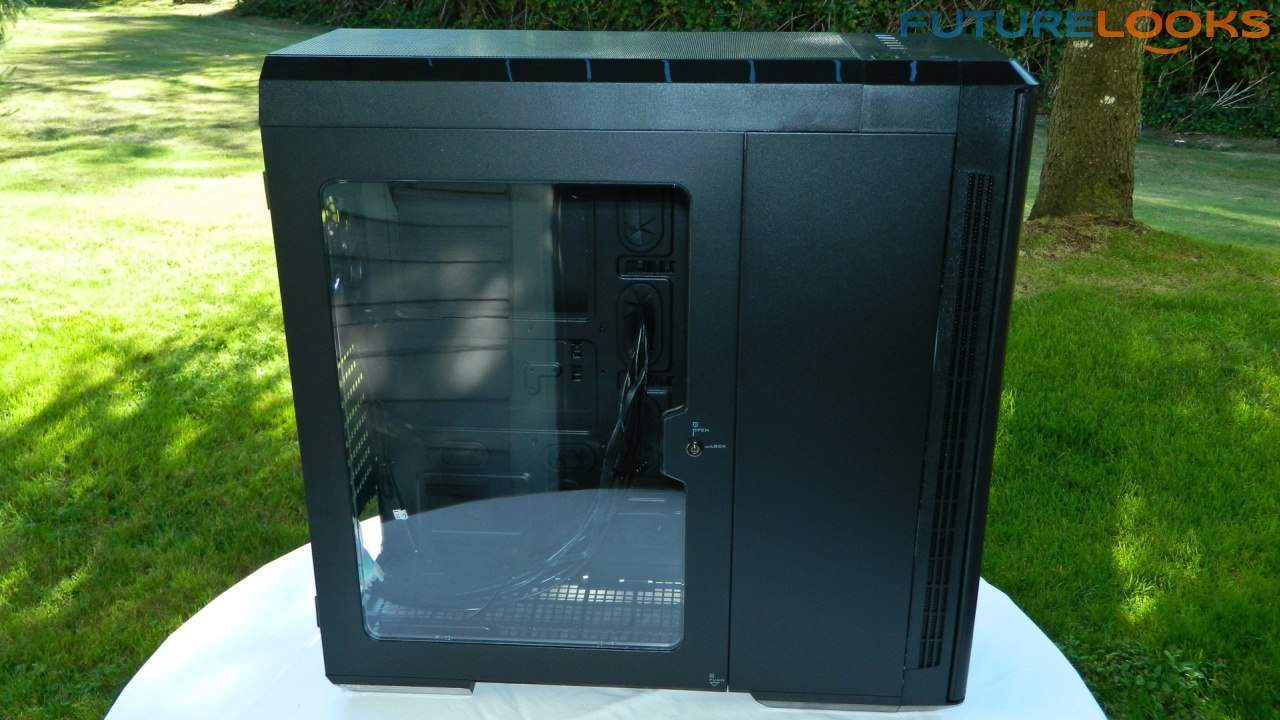
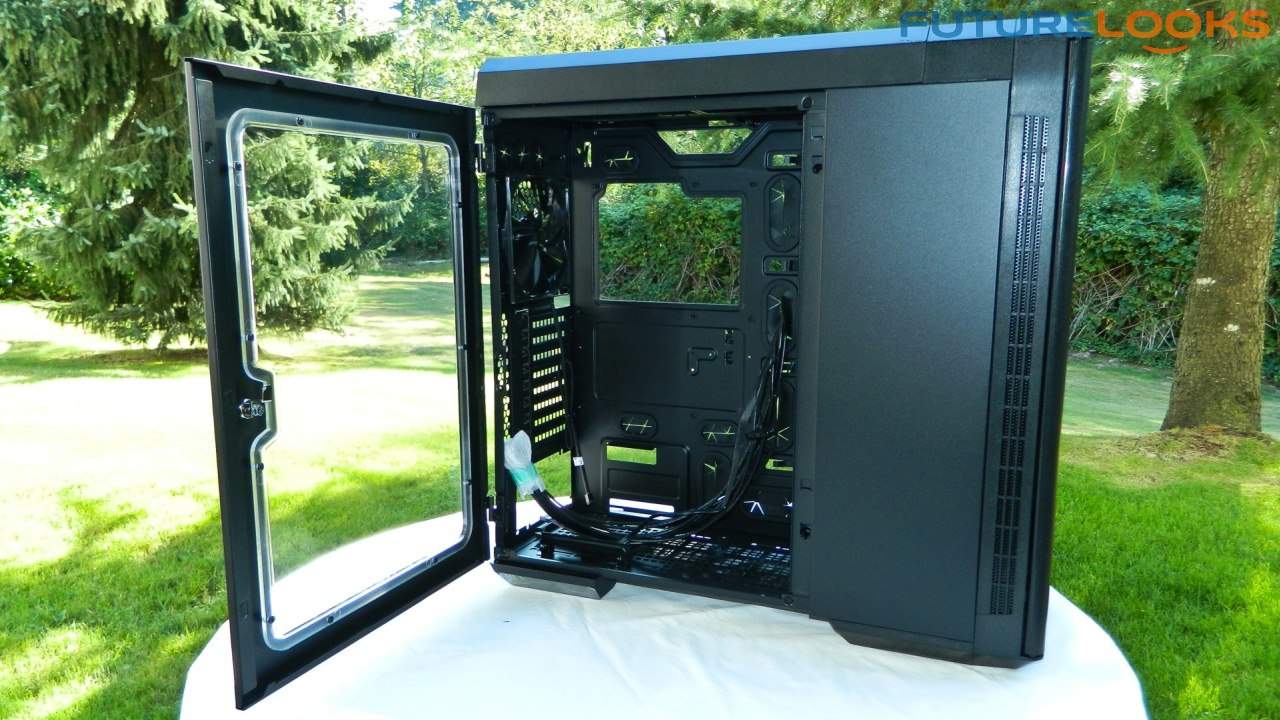
Thermaltake Urban T81 Exterior
Starting from the bezel, the front door sports a gun metal finish. It’s self closing which is kind of a nice touch. The door as well as the enclosure all around is very light weight. Behind the door are single 5.25″ and 3.5″ tab locked bay covers. There’s no frame that has to be removed inside so just add your drives and tooless lock them in place. Below these are two removable front fan filters with intake fans behind them. This makes them very easy to keep clean.
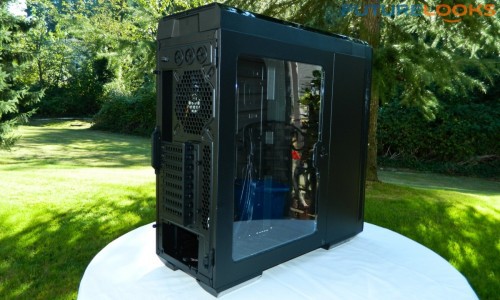

The side panels are very clean and warp free. The dual window and drive bay doors are very light weight. The acrylic window is actually quite thin as well. The joints as well as the corners seem to meet up pretty well which enhances that look for people with OCD (like myself). While it’s nice that the doors don’t add pounds to the total weight, the window door is quite flexible, and might make some users nervous. Particularly if you like to pull it on and off to tweak and change components.
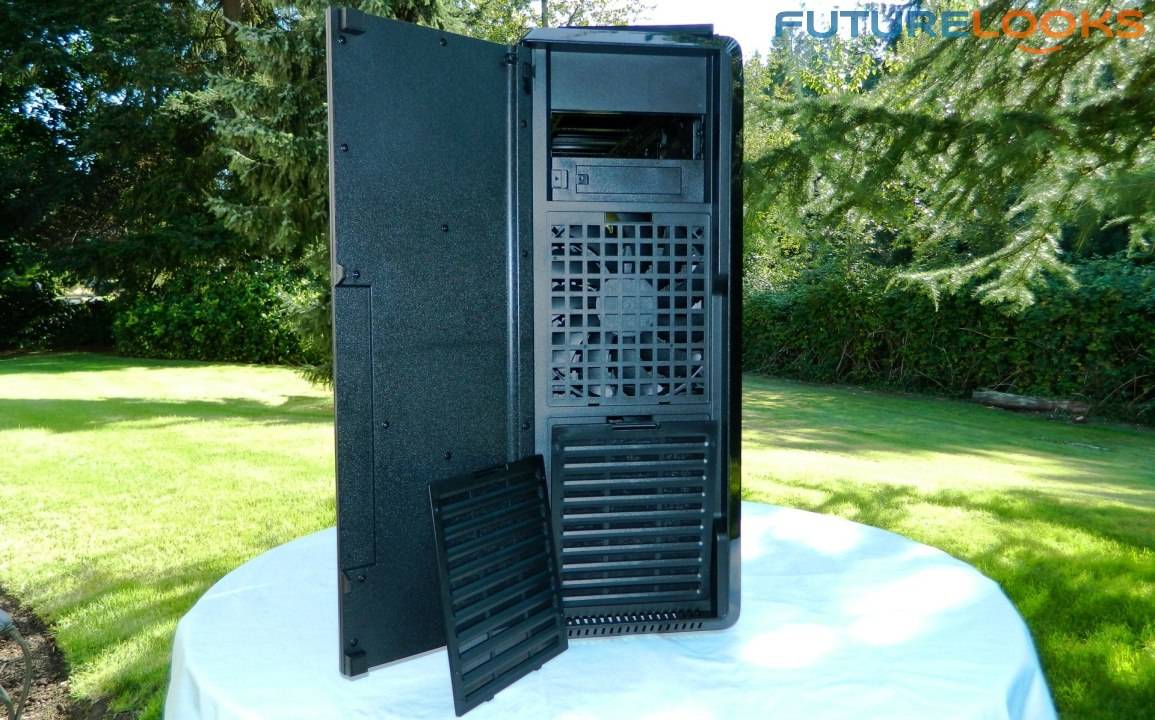
The back of the chassis is literally the spine of the enclosure. Users will find tube ports and a cap on the 8 PCI slots to help keep things secure. The PSU bay is removable. Simply loosen four lock washer thumb screws and the plate comes off. A bottom removable fan filter extends almost the entire length of the chassis which will keep dust from getting inhaled by the PSU fan. It can be cleaned quite easily.
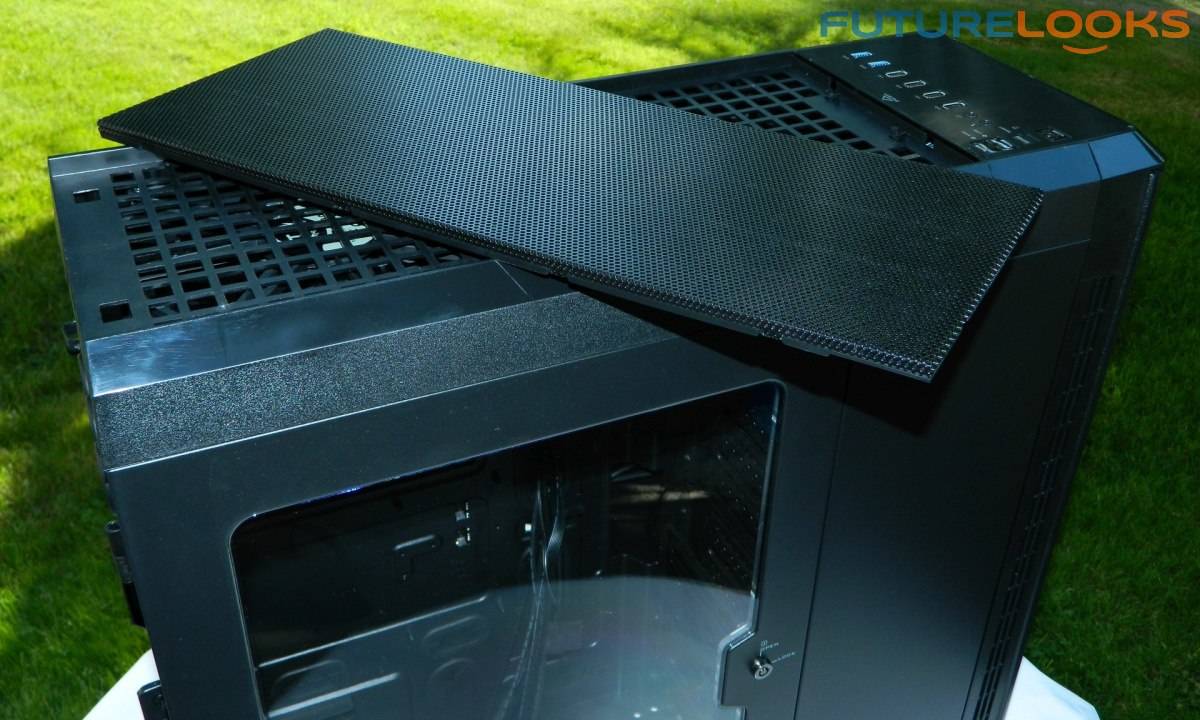
The top panel is secured by four attachment points that are part of the frame. The mesh is removable mainly for cleaning, but you can’t access any of the frame easily for scrubbing. To do that, you’ll need to pull on the top panel which takes everything off. This is how you’ll install radiators, fans, or whatever custom mod you have in mind.
Let’s move on to a look at the interior of the Thermaltake Urban T81!
Thermaltake Urban T81 Interior
Two lock washer thumb screws secure the left panel. Behind the motherboard tray is plenty of space for routing wires from the PSU or plugging in whatever custom cooling fan users may add. The fan hub is securely fastened. Users will use this side to access or install hard drives or SSDs in the tool-less bays. An SSD or two can also be installed on a vertical panel next to the bottom hard drive bay, facing the motherboard.


Moving to the right side via the acrylic door, users are greeted by order. We can see the rubber lined motherboard cut outs. The CPU cut out is very large which is perfect for those uber huge air coolers that have wide standing back plates. Any cut outs without rubber edge liners have very well machined bent lips. There isn’t one sharp edge anywhere!
Ultimate Drive Bay Customization
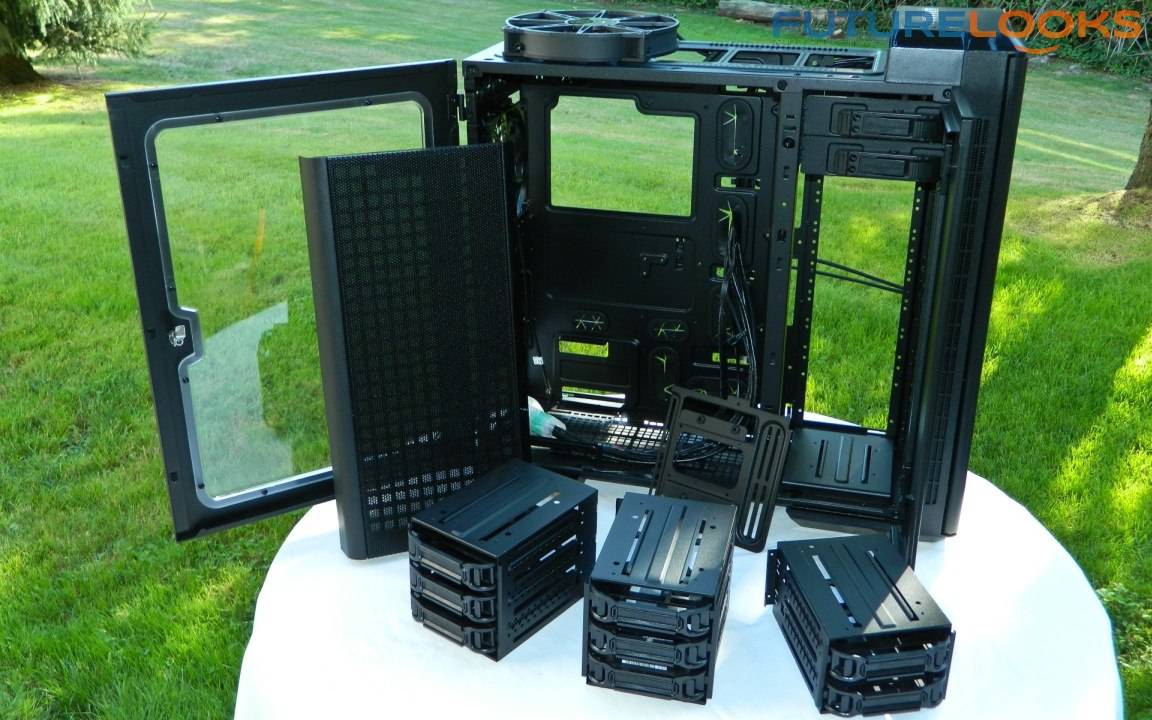
The hard drive bays are just about as modular as it gets. Even the vertical SSD slider is removable, which frees up a great deal of space for more creative builds, or at the very least, more options for cable management. As mentioned, the drive bays are semi-tool-less, meaning, that two clips lock them in place, but you still require screws mounted through rubber grommets to support hard drives. SSDs mount with four screws a piece, using the holes on the bottom of the drives.
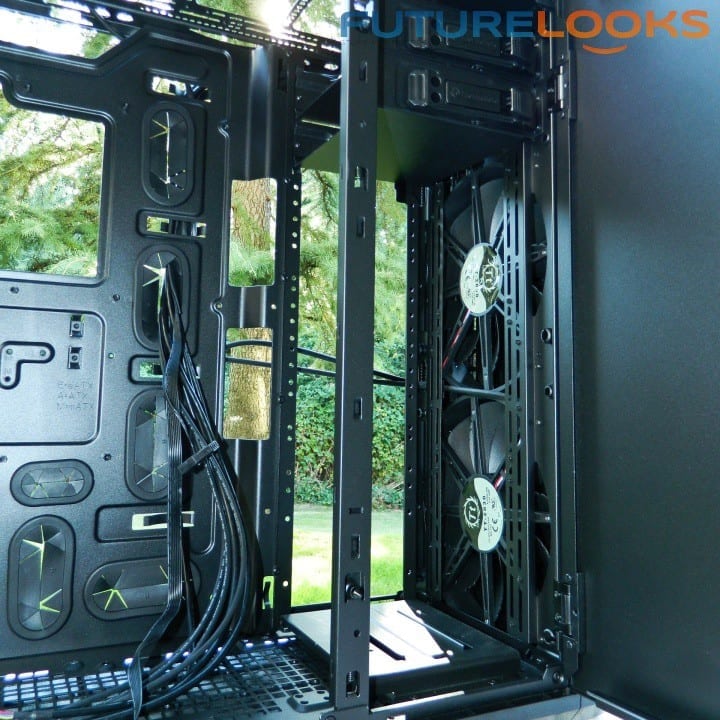
If you remove all of the cages, there is quite a bit of extra space for liquid cooling, or for inserting the most powerful graphics cards without interference. There is enough room for another triple radiator added to the front chassis, with a little patience, thanks to plenty of screw points. Just pull the two front cooling fans and replace them with two or three smaller fans. It’s a case that’s truly built for large water cooling projects.
Unfortunately, any elite custom items you install in that space won’t be seen unless you open the side door. Or, if you’re adventurous, you can make some “modifications” on your own. Hopefully we get a chance to push this functionality in an upcoming article.
Test System Installation Specs

Typically, we use a be quiet! Dark Rock Pro 850W 80Plus Gold power supply for our power source. We’ve found the units to be very resilient even against some of the lab accidents – which are few (knock on wood). However, for the enclosure evaluation, Thermaltake sent us their Toughpower TP-1200AH series 80Plus Gold power supply to show off and push around.
Here is a list of the other components used to heat up this system and check for PC DIY friendliness…
- Processor: Intel Core i7-5960X Haswell-E
- Motherboard: GIGABYTE GA-X99-UD4
- Graphics: NVIDIA GeForce GTX 780 3GB
- Storage 1: Kingston HyperX 3K 240GB SSD
- Storage 2: Western Digital 2TB Caviar Black Hard Drive
- Power: Thermaltake Toughpower 1200W 80Plus Gold
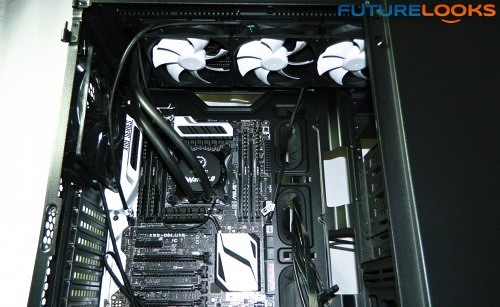
- CPU Cooling 1: Thermaltake Water 3.0 Ultimate
- CPU Cooling 2: be quiet! Darkrock Pro 3
- Operating System: Windows 7 Pro (patched)
- Monitoring Software: GIGABYTE Easy Tune
This test system is a good representation of what the enclosure is meant to support. Granted, we could use a quad-core system but we wanted to put something inside that would tax the enclosure’s features and function. Let’s get it built and see if any issues came up!
Grading Installation
Like any other component, we take our enclosure tests seriously because no one should buy one only to have their system overheat. The enclosure should do well to support the components as well as keep them quite cool. And, the enclosure should present a good end user installation experience. That’s all they really should do unless of course the enclosure says “Will Attract Girls to Your System” in which case it better. In any case, here’s what we noted.

The external USB and audio ports worked perfectly without flexing or failing to operate. The reset and power buttons are extremely quiet feeling, almost digital rather than mechanical, which is a nice quality touch. Installing the motherboard, power supply, graphics, peripherals, and storage went smoothly. Wiring behind the motherboard is easy given the generous space and cable tie points behind the tray. The installation guide will help you along if you can’t figure something out.
While the 5.25″ bays are tool-less, the HDD drive trays are some what flexible for installing the hard drive centering on the grommets. The accessories includes the proper screws for mounting your hard drive to the HDD tray. Re-inserting the tray is as easy as listening for two clicks. The tray’s clipping method isn’t always the best for system integrators as they have good reason to be paranoid, given today’s shipping standards. However, it will hold your drives securely, even if you move the system around a lot.
Finally, it’s a bit unfeasible to install liquid cooling in the front if you need quite a bit of storage. The best thing to do is leave the top HDD bay in place and opt for a dual radiator. The top of the chassis does support the Thermaltake Water 3.0 Ultimate perfectly, allowing it to be mounted forward or to the rear more.
Ultimately, we want to see if the enclosure helps to keep the system cool. Let’s find out!
Urban T81 Thermal Performance
In the Thermaltake Urban T81, in stock configuration, using the be quiet! Dark Rock Pro 3 (DRP3) cooler, the CPU received the cool air it needed. The rest of the system was somewhat audible (25dB) when leaning close. The DRP3 is pretty quiet by default, but the RPMs did kick up just a bit in PWM mode. The video card was the loudest component (as is the case in most situations), but it didn’t reach its upper maximum operating temp, and was mostly well controlled.
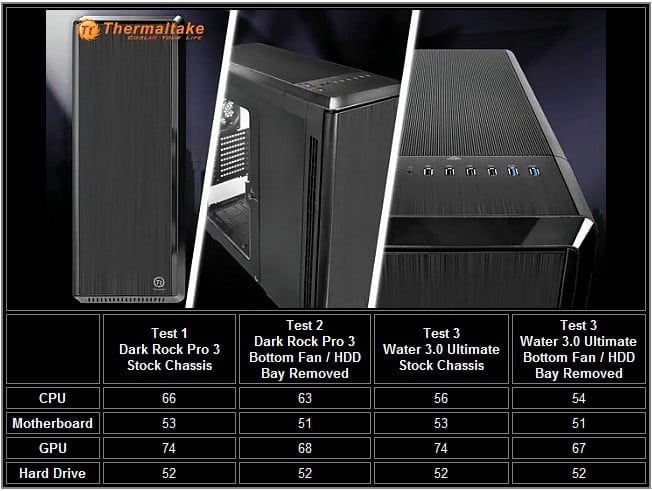
We think the reason the GPUs couldn’t get a bit cooler, is because the hard drive bays blocked some needed cool air from the front intake fans, which was almost immediately pulled to the top by the large 200mm fan. Increasing the front fan RPMs helped a little, but the best results came from adding a bottom 120mm fan, or removing the bottom hard drive bay, allowing air to get into the case from the front. Doing so, allowed cooler air to reach farther back in to the chassis, which quieted down the video card, and assisted the CPU cooler better.
Switching to the Water 3.0 Ultimate All in One Water Cooler, the CPU was quite cool, but the video card repeated the previous results (yet still within operating range), due to lower air flow in the stock configuration of the case. Again, adding the bottom 120mm fan or removing the bottom HDD bay made the difference. In this configuration, the system is impressively silent unable, to be detected by the sound meter or the ears. The vibration is the only thing that could be felt, touching the enclosure.
There is one configuration we would like to point out. The SSD plate between the two bottom hard drive bays is there for showing off your SSD gear, but it blocks air. To get around that barrier, simply install a bottom 120mm fan and plug it in to the motherboard for control, or through the rear fan hub. In any of these instances, that may be your best option for making sure cool air hits the system directly.
Final Thoughts

When it comes to evaluating the Thermaltake Urban T81, we consider features, quality, and the user experience when building. And of course, pricing is also a factor.
In terms of features, the Thermaltake Urban T81 offers all of the features most important to enthusiasts, which include complete support for any all-in-one or custom liquid cooling systems, cable management for the most serious OCD user, fully modular hard drive bays, and an optimal amount of system cooling, which can be motivated still, with the addition of additional fans. However, the Urban T81 misses on one thing, which is the lack of completely tool-less hard drive trays. On the one hand, it’s a breeze to use tool-less, and this is preferred by most users. On the other hand though, if the system was to ship, or be moved, the “hybrid” approach isn’t a bad way to go.
The Thermaltake Urban T81 chassis quality is among the highest ever evaluated. The edges are all very well machined. Every edge is buffed and rolled to create a lip. All the holds are rubber lined even though they didn’t need it. Even, the rear PCI covers and bracket are well machined. It’s also nice to see the fan hub is very well secured so that it doesn’t pull loose. However, the window door is just a bit too flimsy, but it is a rather large window. Despite this issue, it doesn’t feel like it will break off anytime soon, but should be protected if shipped with a system inside.
Overall, our system building experience was nothing short of great, and we can see users of all levels, enjoying themselves, with the great documentation, and user friendly assembly features. There’s plenty of room to make any system tidy.
Currently, the Thermaltake Urban T81 costs $165 US, which isn’t bad at all given the number a features and the overall quality. Calculating the features, quality, user experience, and price together, the Urban T81 is the amongst the most perfect, liquid cooling ready, full tower enclosures on the market. And we tend to agree, with an enthusiastic, Editors’ Choice Award.
Pros
- Truly modular hard drive bays
- High quality machining
- Fully supports all-in-one and custom liquid cooling systems
- Fits up to two triple fan radiators
- Includes the right amount of cooling fans
- Wire management coupled with 10-channel fan hub
- Dual hinged doors with lock
- Filters and vents are all removable
- Good price for the features and quality
Cons
- Window door a little flimsy
Overall Rating: 9.25 / 10.0


Help Us Improve Our Reviews By Leaving a Comment Below!