
- Small Footprint
- Easy to Setup and Use
- Tons of Application Usages
- Cost is without Drives
- Maximum of 6 GB Memory
Are you looking for a storage solution that is easy to set up and use? Whether or not you are a home user or a small business owner, Synology offers many networked-based storage solutions to suit one’s needs. Synology also keeps their products up-to-date semi-annually, so it is nice to see what sort of upgrades happen between each new model. Even though 2020 has not been as great a year for people worldwide due to the COVID pandemic, products are still being manufactured and updated. Synology has been one of those manufacturers who keep their products fresh.
Here at Futurelooks, we have looked at many Synology products from their entry-level NAS products to their Wi-Fi networking offerings and have always enjoyed reviewing them and testing out their newest hardware. Synology offers Network Attached Storage solutions, more commonly known as NAS. As Synology calls them, these NAS units, or DiskStations, are small, stand-alone servers designed to store terabytes of information for you in an easy-to-use way. You can use them strictly for data storage that you can access with the variety of devices on your home or small-business network, or you can utilize their ability to run additional software applications that expand their usefulness and robustness.
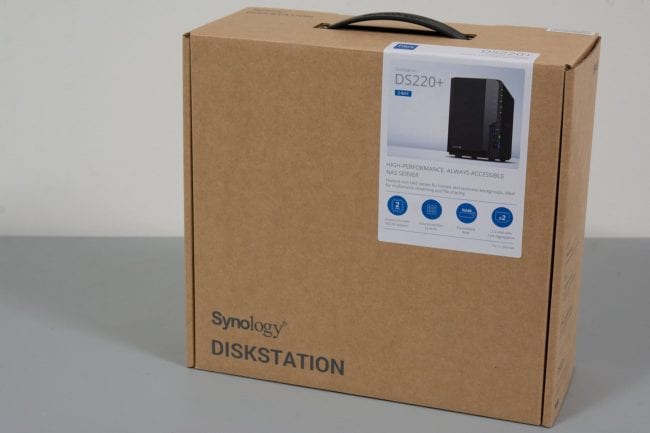
DiskStation DS220+
Perhaps you are a home user who needs to offload thousands of photos from your computer but still want to access them without the fear of data corruption easily. Perhaps your data storage needs have increased, you would like to offer the family some way of backing up their connected devices or stream movies from a central place in your home. The DiskStation DS220+ does that and more.
Features and Specifications

The Synology DS220+ is the update to the previous Synology DS218 (both the DS218 and DS218Play). The DS220+ has an Intel Celeron based CPU with both higher clock speed and higher burst speed, as well as and improved encryptions engine. Even though the DS220+ only comes with 2GB DDR4 memory, unlike the previous models, it is upgraded to a total of 6GB (room for a 4GB DDR4 stick).
- Intel Celeron J4025 dual-core CPU at 2.0 GHz (burst to 2.9GHz)
- Hardware Encryption (AES-NI)
- 2 GB DDR4 (expandable to 6 GB)
- 2 Drive bays capable of up to 108 TB
- 2x Gigabit Ethernet (Link Aggregation and Failover Support)
- 2x USB 3.0 Ports
You can read the full specification list here
What’s in the Box?
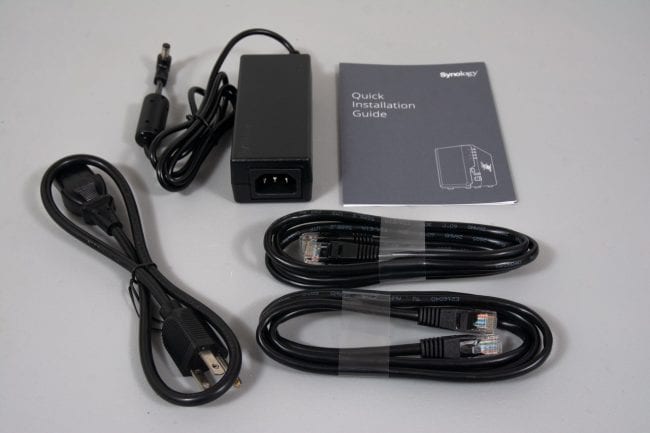
The great thing about these NAS devices from Synology is that they do not need to put many extras in the box. When you open up the box, the following items are available:
- 1x Synology DiskStation DS220+
- 1x AC Power Adapter and AC Cord
- 2x RJ-45 Ethernet Cables
- 1x Quick Installation Guide
Now, depending on placement for your DiskStation, the included Ethernet cables are pretty short on length, so if this is your first time using a Synology NAS, you may need longer cables. But your mileage will vary, of course.
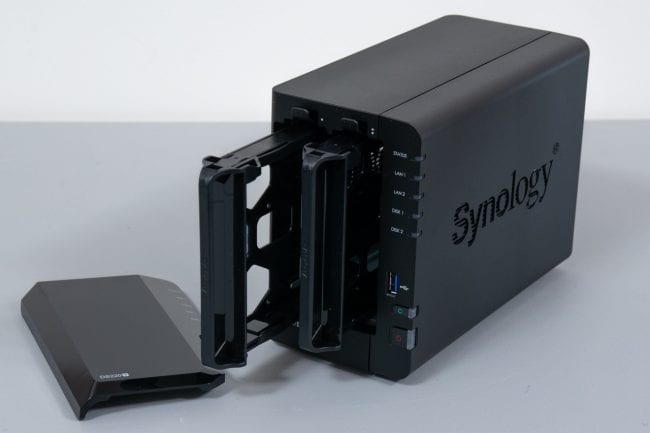
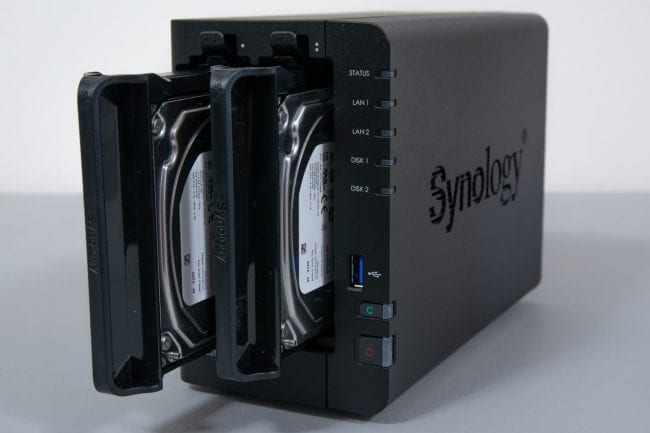
The DS220+ is also tool-less in design, meaning you do not need to use a screwdriver or search for dropped screws. The hard drive trays come pre-installed in the enclosure itself, and all you need to do is slide the trays out, pop the drives in, and then slide the trays back in.
Special Thanks to Seagate!
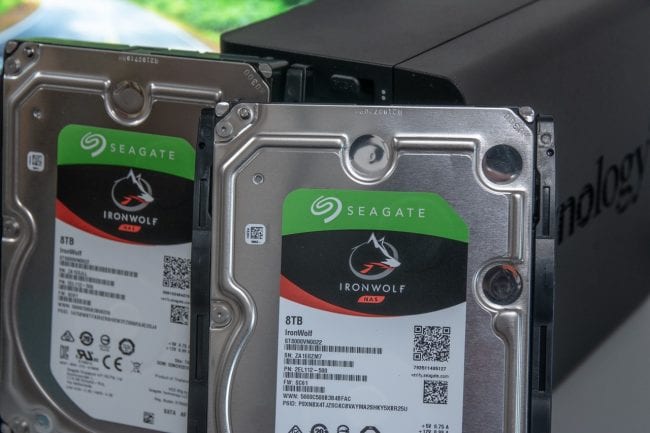
We cannot forget to thank Seagate for supplying the two 8 TB IronWolf NAS drives as well. If you want quality and reliability, we recommend checking out the IronWolf series of mechanical hard drives for your next NAS. IronWolf is designed for high workload rates of a high-data network within a multi-bay NAS environment. Their capacities range from 1 TB up to 12 TB for a single drive. The IronWolf Pro and EXOs have a maximum capacity of 18 TB per drive. Imagine all the data you could store with a Synology DiskStation with IronWolf and IronWolf Pro hard drives!
First Impressions
Once you open up the box and pull out the Synology DS220+, you will notice it follows the same look and feels that other Synology DiskStation units have.
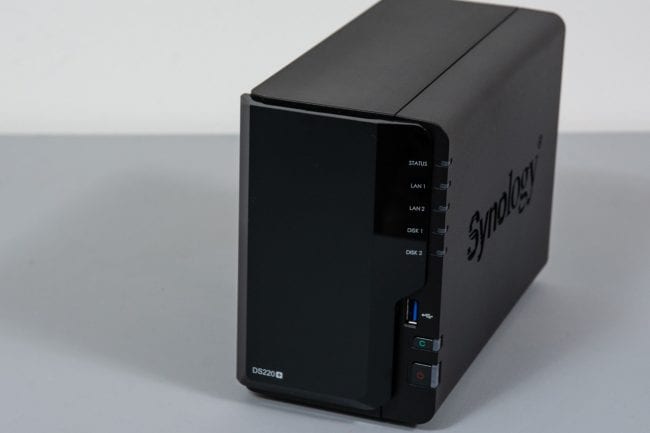
The Synology DS220+ is a 2-bay NAS with the same look and feel as Synology’s other 2-bay NAS models, such as the DS218+ and even back to the DS216+. The external casing is a hard textured plastic shell with the Synology name shaped as air vents on either side.
The front of the DS220+ has an easily removable glossy faceplate that you can pop on and off to access the two drives and the additional memory slot easily. There is no drive locking mechanism, as seen in Synology units with four or more bays.

When you have the cover off, you can see the single empty memory slot. This slot will accept a 4 GB DDR4 memory module (for a total of 6GB system memory). It is also nice that this additional slot is easily accessible, so adding another memory module doesn’t require any dismantling of additional components. Just pop in that second memory module, and away you go!
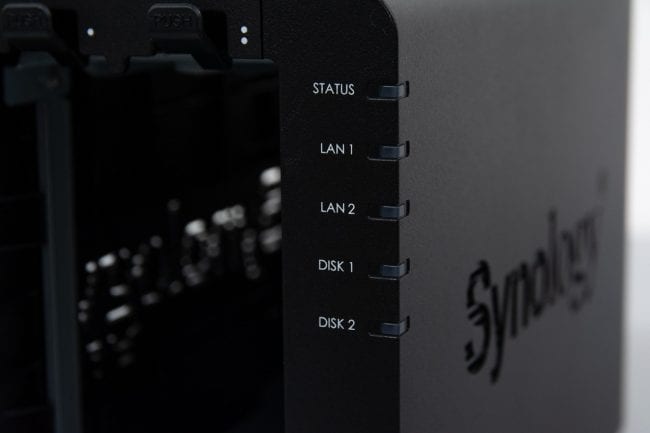
Also, along the front of the Synology DS220+ are the Status LEDs. These LEDs are relatively self-explanatory, but they are Status, LAN 1 and LAN 2 activity, Disk 1 and Disk 2 activity. You can quickly glance over to the unit and can tell if everything is working correctly or if something needs your attention.
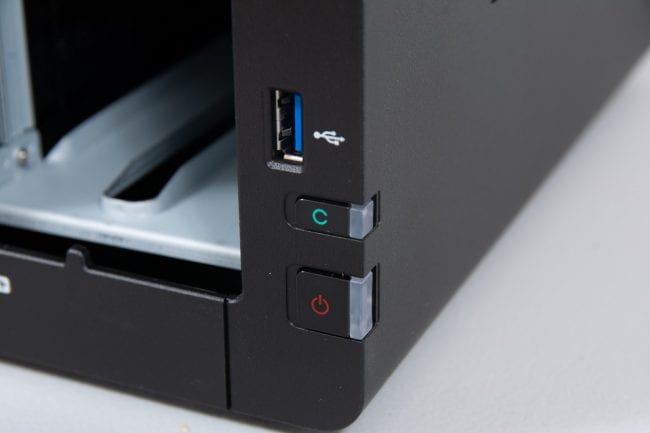
Below the Status LEDs are the USB 3.0 port, Copy Button and Power Button. The front-access USB port is great for copying files off of a digital camera or USB flash stick. You plug your device in and press the Copy button then the files are transferred to the storage easily.
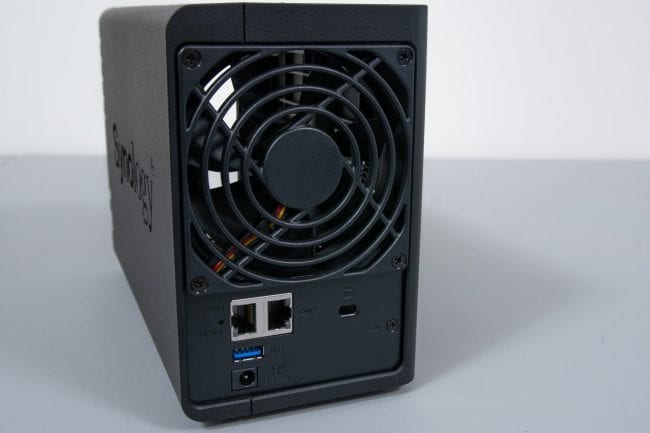
On the backside of the Synology DS220+, you will see the 92mm rear exhaust fan, the two Gigabit Ethernet ports, the second USB 3.0 port, power port and Kensington Security Lock slot.
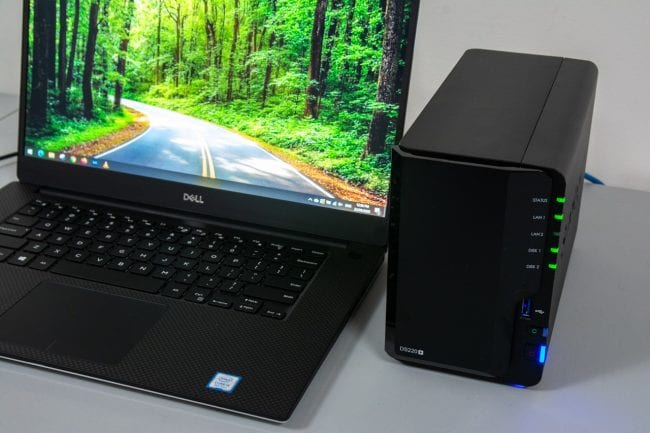
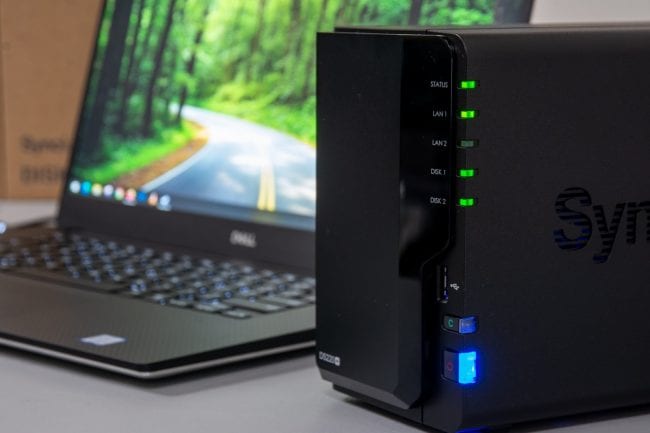
The design of the Synology DS220+ is relatively compact, as you can see in the above photo. Here the DS220+ sits next to a 15-inch Dell XPS laptop, and the footprint of the DS2200+ only takes up 6.5 x 4.25 inches (165mm x 108mm) of desk space, which means it can fit almost anywhere without taking up much room. You can leave it on your desk or move it to a shelf out of the way.
Setting up the DS220+
Setting up a Synology DiskStation is one of the easiest experiences I have had with any NAS equipment I have used, and they purposely make it easy for you. When you purchase a Synology DiskStation, such as the DS220+, you will need to buy two hard drives as the DiskStations come empty. In the case of this review, we will have the two 8 TB Seagate IronWolf NAS drives to use.
After unboxing the DS220+ and placing it in a location that the DiskStation can easily access my local network, it was time to install the hard drives themselves; this is a toolless operation. That’s right; you do not need a screwdriver or anything to do this. You remove the front faceplates and pop out the drive trays. There are left and rights rails on the drive trays you pop out before you pop in your hard drives. These rails hold the drive to the tray.
Once you slide the drives in and replace the faceplate, it is time to power up the DS220+ and start the software install and setup process.
Find Your Synology
Once the DiskStation has powered up, setting up is a quick and easy process. You load up your favourite web browser and point it to http://find.synology.com to send a request locally on your network for any Synology products that are present and listening.

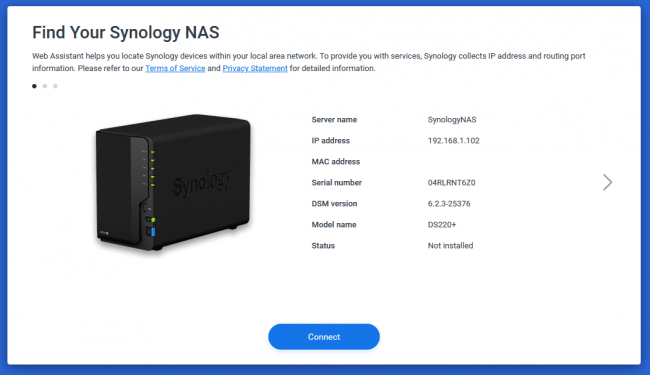
If you have plugged your DS220+ into your network, it will show up, among other Synology devices you may have.

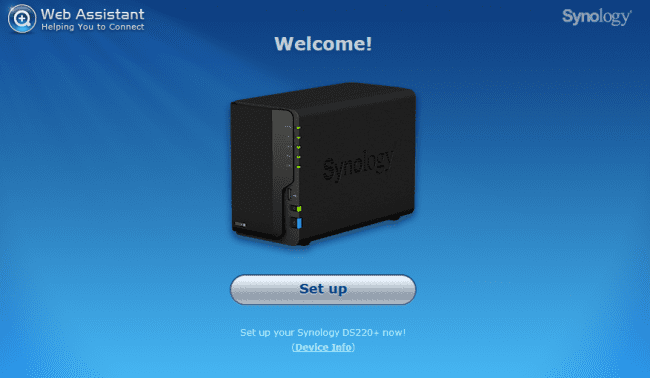
When you click on setup, chances are you will want to do the basic option, which includes downloading the latest DiskStation Manager (DSM) software.


The page will ask you to create an Admin account, and at this point, you can also create a new Synology account or log in to an existing Synology Account. The Synology account can be used for their Connect+ service to access your NAS remotely without the need for setting up Port Forwarding on your router.


Set up is all complete! Well, not really. DSM has been installed and is running, but you will still need to create a new volume share if you want to do anything with it. When you have not yet set up a volume share, the Status LED on the front of the DiskStation will flash Orange, like it did in my case.

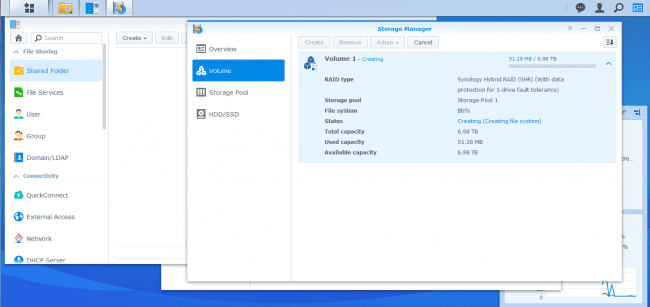
For those who are new to the world of NAS and want something that is just ready to go for the basic needs, then you can set up a new volume with Synology Hybrid RAID (SHR) with a Btrfs File System. The SHR option will allow you to quickly grow your storage pool as your data needs increase over time. It will also help with data failure, but let us hope that never happens. So as you can see from the above screenshot, the two 8 TB drives become essential one single drive with a “backup” in case of failure.
The setup is now complete!
Usage and Performance
Okay, so the DS220+ is set up and ready to go. Now, what do you do with it? At this point, your mileage will vary when it comes to what you want to do with your new DS220+. Synology’s DiskStation Manager or DSM has many applications you can install depending on what you want to do. Some of the applications you can install are:
- Moments – A photo storage solution that will backup your smartphone images. It allows you to access them and share them easily with other people, too.
- Video Station – Think of it like Plex but done by Synology.
- Note Station – Create notes online and share them amongst your devices on the network
- Photo Station – Backup and Store photos – Offers an online gallery that pairs up with the DS Photo Smartphone App.
- Surveillance Station – Link Security Cameras into one central location and have their video feeds recorded.
- VPN Server – Virtual Private Network endpoint for all your encrypted data needs
- Plex – The popular streaming service – Stream TV shows and Movies locally to devices in your home
And many, many more!
Network Performance of the DS220+
The Synology DS220+ does offer Link Aggregation. That means you can utilize both Ethernet ports on the back to nearly double the bandwidth available for transferring data to and from it. You won’t necessarily obtain 2 Gbps with dual network cards, but you will get an increase in speeds if you are transferring multiple files simultaneously. Though the average home user and even small business probably will not have the network infrastructure to support running 2 Ethernet cables for a single connection. You could add multiple network cards to your computer, enable it, or purchase a network switch that offers Link Aggregation. The testing was done with a single Ethernet connection over a Gigabit network.

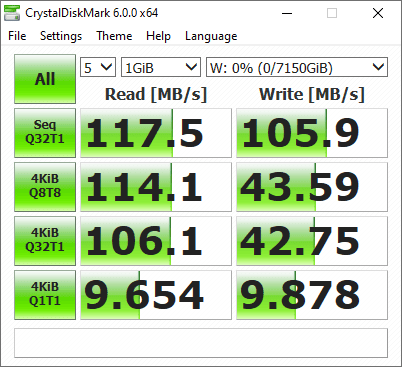
When you talk about an Ethernet network, we use a Gigabit network in our review, which you can theoretically reach speeds of up to 1 Gbps or 125 MBps. From the above screenshot from Crystal Disk Mark, we can see that we can obtain roughly 117.5 Mbps read with a 105.9 MBps write. So this tells us that we are reaching the speeds of what is supported by our local network. Various other factors can also affect the outcome of the read/write tests, such as drive speed, data bus speeds and more. The numbers were within reason, with multiple tests being executed.
Final Thoughts
When it comes to our connected devices, we want an easy way to back up important data. For example, my wife and I take hundreds of photos with our smartphones, and the loss of any of these photos would be a huge travesty. The Synology DS220+ can be utilized to help ensure that those precious memories are preserved over time. I have the DS220+ set up with the Synology app DS Photo. I also have DS Photo configured so that when my phone or my wife’s phone enters our Wi-Fi network, they will automatically upload new photos to the DS220+. We can safely delete the photos we no longer want to store on our phones, but we can access older photos easily through the DS Photo app as well. I know many people who store their photos on their phones for years, many, many years. With the DS220+, you can offload some of those images you no longer look at and then easily access them at a later date still if you so desire.
Aside from the storage of personal photos, I also store my photography clients’ photos that I want to access outside of our network, like when I show clients previews of the images I’ve created with them. With the DS220+ connected to Synology’s QuickConnect service, I can easily access images and files without worrying about firewall settings on my router at home. I don’t need to remember my home network’s public IP address or anything. Synology’s QuickConnect handless that for me!
Small businesses can easily take advantage of the Synology DS220+ for its easy-to-setup experience, minimal footprint and the ability to allow multiple-users access to files and folders in a single central location. The Synology DS220+ will also grow as your data needs grow. If you start with a couple of terabytes of storage and find you are running low on room, you can begin swapping hard drives out for larger capacities ones. Though, if your small business requires more redundancy or more storage capacity, then looking at a Synology DiskStation that can have the optional expansion module, such as the DS920+, would be the way to go.
I have always enjoyed how easy it is to set up and deploy a Synology DiskStation NAS device like the DS220+; they make it easy. Those who may not be very tech-savvy will find that setting up a DiskStation is pretty quick and painless. That is not saying a Synology DiskStaton is not meant for IT professionals either; the smaller footprint and all-in-one design can be easily deployed in a larger business environment. Those with even greater data storage needs can also utilize Synology’s rack-mounted RS Series.
Now, some people out there might throw stones at the fact that the DS220+ does not come with features such as 10 Gigabit LAN ports or a PCIe expansion slot for future-proofing. Some people may also say that the maximum 6 GB of RAM is a bit stingy (it comes with 2GB pre-installed, the extra 4GB is optional), but as more of an entry-level NAS product, I think the Synology DS220+ is excellent!
If you are looking for an easy-to-use, data-storage solution that not only grows with you but does not take up much space, I would recommend checking out the DS220+ as a great place to start!