
NZXT has come a long way in a short time. They started simply, with a flashy entrance into the case market in the form of the Guardian. Now they have a full stable of wonderfully designed cases, and aren’t showing any signs of slowing down. Their latest release, the Tempest, has garnered a lot of attention. We’re going to take a look at it, and see how well it stacks up in the abundant performance case market.


The Tempest is classified as a mid-tower case, and has most of the accoutrements you would expect. There’s a whole host of mounts for hard drives, a few 5.25″ bays, and the PSU is mounted at the bottom to promote good airflow and cooling. In fact, NZXT boldly claims that the Tempest is the “Airflow King”. Taking a quick look at some of the features this case sports, it’s not hard to see how well that claim is backed up. For a full run-down, check out the product home page.
- 2 x 120mm fan intake
- 1 x 120mm fan exhaust
- 1 x 120mm fan side-intake
- 2 x 140mm fan top-mount exhaust
- 3 x External 5.25″ drive bays
- 8 x Internal 3.5″ drive bays
- Steel Construction
- Extended ATX Support
Like I said, it’s got the fan power to make that air flow. But is it King? Let’s keep on reading to find out…
The last two points on that list are of particular interest. Yes this case is made of steel, which may seem silly in this age of plenty for aluminum enclosures. But with that in mind I point out that the chief competitors of the Tempest, like the Antec P182, are also constructed of steel. This keeps costs down, and durability up. It may add weight, but that’s something we’ll have to check into when testing. As for the EATX support, that simply needs to be tested to see if it is indeed true.
When it comes to pricing, I can already give the NZXT Tempest points in this review. The case is of a unique design, with purportedly excellent airflow. On the street, this case comes in at just south of $100 USD. That’s lower than the current pricing of the afore mentioned Antec case. With that in mind, we need to see if you get what you pay for, or if the Tempest is a great price for the performance. But first a quick showcase of what else comes with the NZXT Tempest.
What’s in the Box?
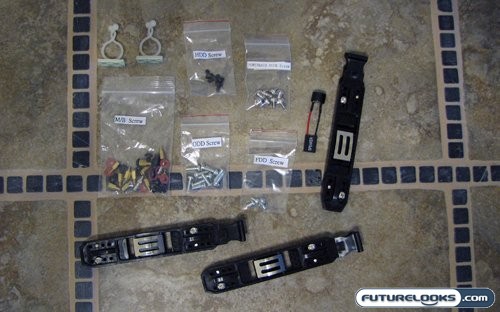
In addition to the case itself, NZXT includes all the required accessories to setup the Tempest in full. First are foremost is the huge collection of screws included, and they come in sets in their own labeled bags. In addition to that there’s a set of 6 mounting rails, which are required for mounting 5.25″ drives in the middle set of front bays. Finally there are a couple adhesive cable ties to aid in cable management, and a PC speaker attachment should your motherboard need one.
Not shown is the manual, and a black plastic 3.5″ to 5.25″ drive bay adapter. The drive adapter is of course if you want to install something like an internal media card reader or *gasp* a floppy drive. As for the manual, it only comes in English. However it’s fairly concise, and manages to cover most aspects of setup within 16 pages.
Real-Time Price and Stock Check – Check For More Products
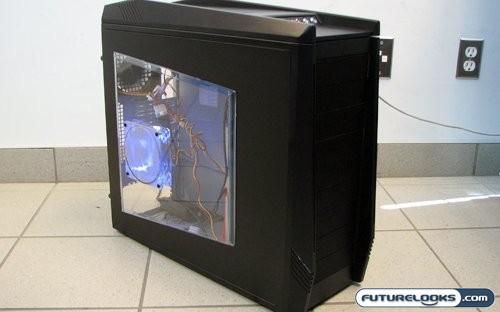
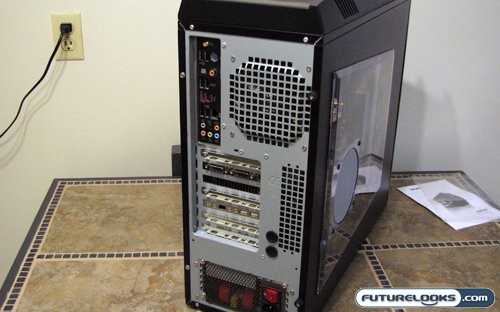
The Exterior
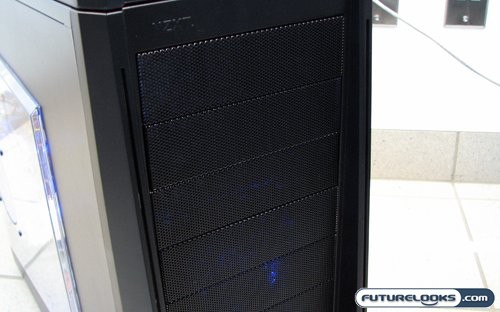
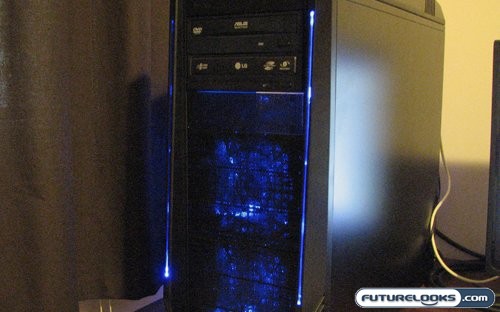
We’re going to cut right to the chase with the looks of the NZXT Tempest. The exterior is a rather interesting design. On the front you have the potential for nine 5.25″ drive bays. The top three bays are meant specifically for optical drives and other peripherals. The bottom six can take drives, but come pre-installed with a set of fans.
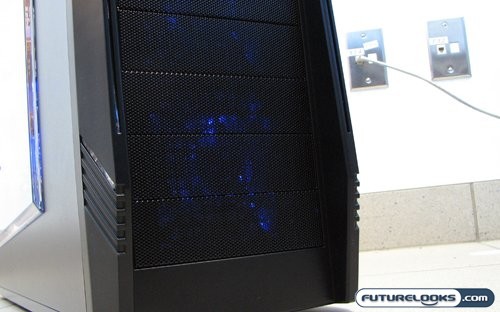
Two fans to be exact. The installed fans are of the 120mm variety, and are illuminated with blue LEDs. The drive bay covers themselves are perforated for maximum airflow. One would think this would lead to a great deal of dust, but all the drive bay covers have foam dust filters on them to prevent such a thing.
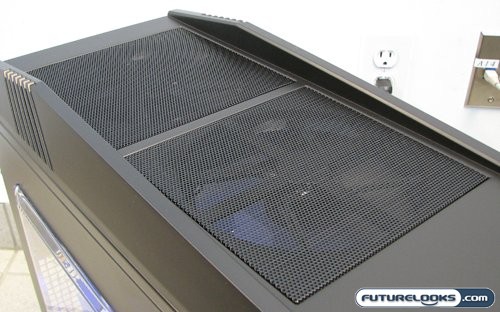
The top of the Tempest matches the two front mounted 120mm intakes with two 140mm exhaust fans. These two fans actually reside directly above the CPU, which should aide in clearing the hot air generated by that component. They don’t have any dust filters, but being for exhaust they don’t really need them.
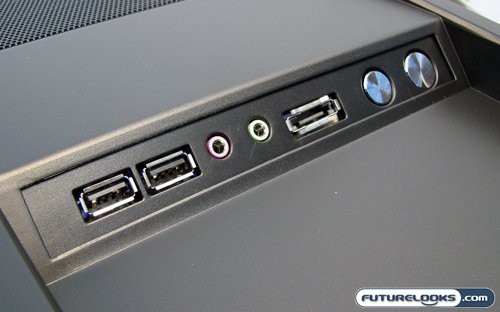
Directly in front of the 140mm fans is the cluster of front controls and connectors. NZXT decided to place them on the top of the Tempest rather than on the front. I’m guess the thinking behind this is that most people place their rigs on the floor, which makes this position quite convenient. As for which connectors are offered, from right to left you have USB, Audio, eSATA, reset button, and power button. The eSATA connector basically just adapts a regular SATA port, and comes with a cable you connect to a free port on your motherboard.
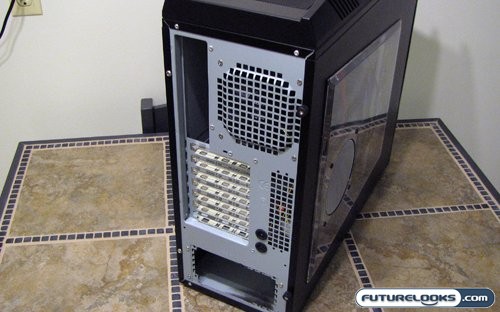
Turning to the rear of the case, we see that the configuration is once again quite similar to the Antec P182. The power supply is mounted in the bottom of the case, and the motherboard and expansion cards are mounted in the top. There’s a 120mm fan on the back for additional exhaust of warm air, and it’s complimented by a 120mm blue LED fan mounted on the side for intake.
Near the bottom there’s a couple of rubber lined holes. These are for those who wish to use water cooling and need to mount an external radiator. Unfortunately this is where the Tempest differs from the Antec P182, as these holes are incredibly small and would only be able to accommodate tubing with an OD of 5/8″ (3/8″ ID) or smaller. That leaves a lot of us that like to use 3/4″ OD (1/2″ ID) tubing out in the cold.
Real-Time Price and Stock Check – Check For More Products
The Interior
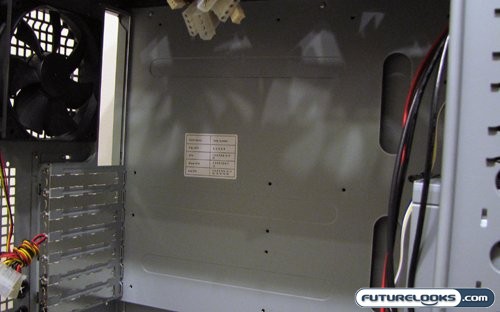
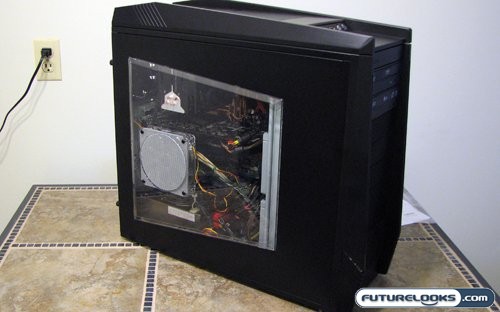
The interior of the NZXT Tempest is quite roomy, and fairly easy to access. The side left side panel is removed by simply undoing two thumbscrews and swinging the panel open and out of the way. Since this is the most opened panel, this makes sense. As for the right panel, which resides behind the motherboard, you’ll need a screwdriver to undo the two screws holding it on. As for actually mounting a motherboard, NZXT claims that the Tempest will hold an Extended ATX (EATX) motherboard. The configuration of mounting holes does support this, however such things can be precarious in a mid-tower case.
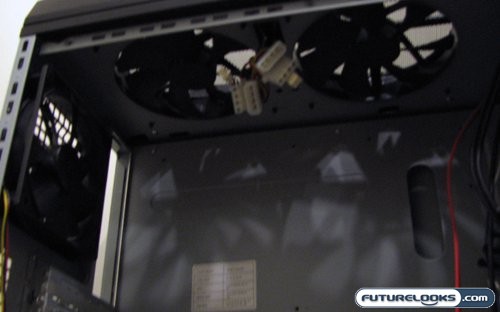
At the top of the Tempest we can get a good look at the other side of the two 140mm exhaust fans. As I had mentioned earlier, both these fans excel at pulling hot air away from the CPU and upper components. However, the interior also has mounting holes for a dual-120mm radiator. NZXT has essentially made this case water-cooling ready.

NZXT has also made the interior of the Tempest completely open. The means nothing is blocking airflow to the power supply, should it have a fan on the bottom. Though the PSU mount does block the fan, NZXT has setup the mounting bracket so you can flip your power supply around and have the fan point up.
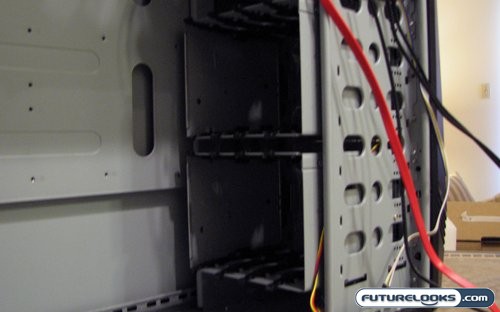
When it comes to installing hard drives in the NZXT Tempest, you’ll want for nothing. NZXT has configured their case to hold up to eight 3.5″ hard drives, and each drive will be amply cooled by the front 120mm fans. The drives themselves are mounted using rails, and the bays they are mounted into are removable. This is useful because it appears that the bays have the possibility to block small portions of an EATX motherboard. This could cause cabling issues, should any connectors be placed at the edge of your EATX board.
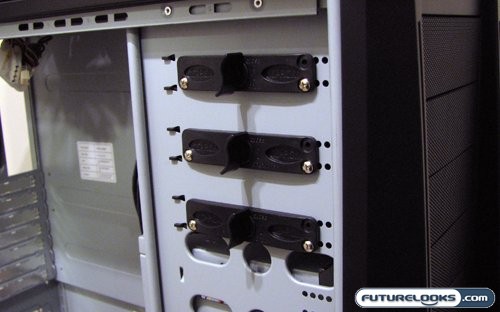
As for installing any additional drives, if you are installing them in the top three bays they are quite easy to install. All you do is twist the lock on these brackets, remove the bracket, slide the drive in, and replace and lock down the bracket. Should you wish to further secure the installed drive, NZXT provides some long drive screws in the clearly marked “ODD Screws” bag.
Real-Time Price and Stock Check – Check For More Products
Installation and Fit
To test the NZXT Tempest, I installed my main test rig and ran a series of tests on it. The specification for the test rig are as follows.
- AMD Phenom 9600 Black Edition 2.3GHz Quad Core CPU
- Asus M3A32-MVP Deluxe/WiFi-AP 790FX Motherboard
- OCZ Platinum XTC REV.2 PC2-6400 2GB 2X1GB DDR2-800 Memory Kit
- Foxconn 9800GTX-512N Extreme OC Video Card
- Western Digital 640GB Caviar SE16 7200rpm SATA2 Hard Drive
- Cooler Master Hyper 212 CPU Cooler
- Thermaltake Toughpower 1000W Power Supply
This setup should hopefully provide the heat and noise we need to make sure this case is truly living up to its “Airflow King” status.
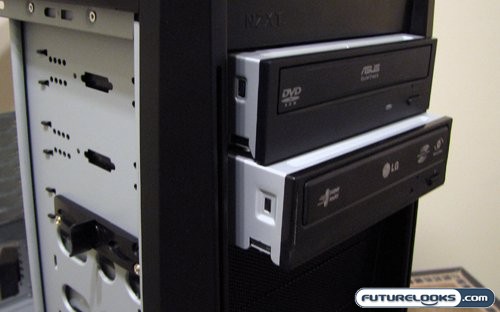
The first thing I installed in the NZXT Tempest was the optical drives. These were the easiest to install, as all that was required was to undo the brackets, slide the drive in, and lock the brackets back down. Since these are optical drives, and will contain plastic discs that will be spun at a high speed, vibration noise was a concern. I used the included screws to further secure the drive. All that was required was one screw on the right. Once installed, everything was solid.

The openness of the Tempest made installation of the power supply very easy. As I noted earlier, the bracket that holds up the power supply does block a power supply’s lower fan. So I just flipped the power supply over to aide further in cooling the system.
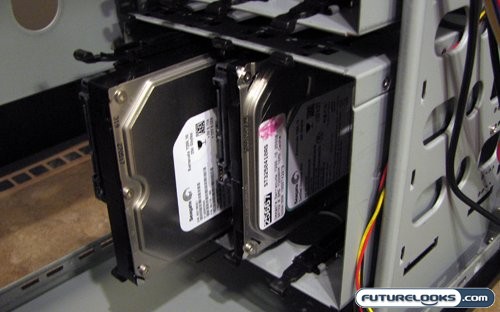
Hard drive installation did take a little bit of finagling, as the rails don’t snap into the side of the drives. They’re more of a loose fit, and you need to hold them on to slide the drives in. There isn’t much space between drives, and with a full compliment it may impede airflow and cause extra noise. Once all the easy stuff is out of the way, it’s time to install the major components and cable everything. This is where I found that things got a little interesting.
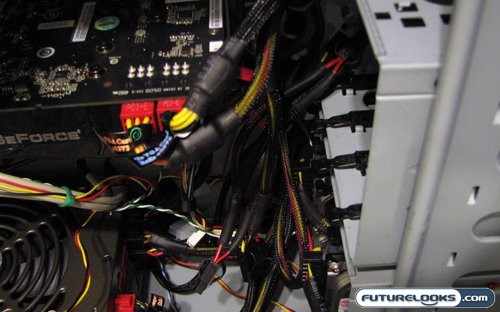
There were no clearance issues. The length of the case made it so the video card fit with the hard drives, and the optical drives were far enough away from the RAM. The part that made things interesting was cabling. NZXT notes that the Tempest has holes cut to aide in routing cables from the bottom to the top with ease. Though this is true, and the holes did come in handy, I was unable to use them to route some of the biggest cables.
The reason for this is that there’s a lip that goes from the back of the motherboard tray to the side panel, and it runs almost the entire length of the Tempest. There’s no break in it where you can squeeze cables through. This means that all the power supply cables ended up being routed through the main chamber of the case.
Real-Time Price and Stock Check – Check For More Products
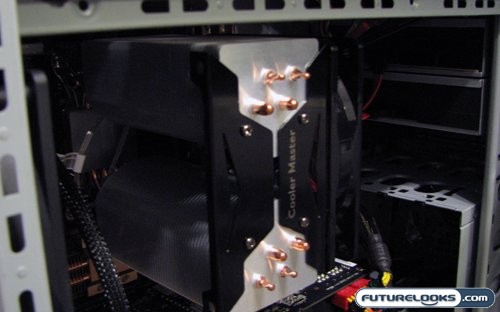
The only other issue I encountered in installation was one that is common with all cases of this configuration; if the power supply is install in the lower part of the case you better hope you have some extra length on the main line going to 24-pin and 8-pin sockets. Other than that, the area around the CPU was kept clutter free, and I’m sure that aided in what you’ll see were some interesting cooling results.
Testing
Once everything was installed into the computer, it was time to take a step back and admire our handiwork. The NZXT Tempest does look the part, with it’s blue LEDs and monolithic black front bezel. But we can’t navel gaze all day. Some testing needs to be done to see if this case is more then just another pretty face.
For testing we focused exclusively on thermal performance and noise pollution. Thermal testing was performed using SiSoftware Sandra and AMD Overdrive, with the former used to push the system to full performance and the latter used to monitor system status. The system was left idling for 30 minutes to let temperatures and activity stabilize. Once that was over, temperatures were taken and Sandra was used to push the CPU to 100% and place stress on the RAM. After 60 minutes of this, the temperatures were taken again. Here are the results.
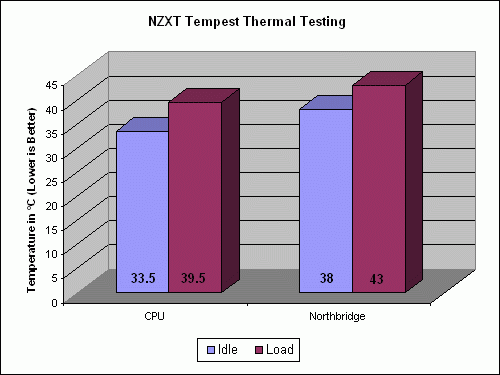

I still had the Arctic Silver 5 installed from our test of the Gelid GC1 thermal compound, which was performed in the Antec P182. It’s interesting to note that the CPU temperatures shown here are extremely close to those posted in that thermal compound review. Ambient temperature wasn’t an issue, as I made sure my office was as cold as it was they day that review was done. It would seem that the NZXT Tempest and the Antec P182 have very similar thermal profiles. This means that it’s going to come down to how loud this case is in comparison.
When it came to noise testing, our methods were much more simple. Noise testing was performed using a DB Meter pointed at the case in three different locations. The directional microphone was aimed on centre, and was perched on a tripod 6 inches away from each target. The room was brought to a silence, and the DB Meter was given a minute to stabilize. This was repeated for each test location.
- Left Panel (Window): 47.2 dBA
- Right Panel: 46.8 dBA
- Rear: 48.8 dBA
The NZXT Tempest isn’t much louder then the Antec P182, and comes in at a similar noise rating to most other cases in it’s class. When listened to subjectively, I did find a more noticeable drone from having all the fans spinning at full speed. I would probably utilize the 3-pin connector each fan has, and connect certain ones to the motherboard so they could be thermally controlled and reduce noise. With all this in mind, it’s safe to say that the NZXT Tempest takes care of business when it comes to thermals, but still needs to quiet down some of its fans.
Real-Time Price and Stock Check – Check For More Products
Final Thoughts and Conclusion
The NZXT Tempest Midtower Case is definitely one nice looking case. This is something that NZXT tends to excel at. Whether you are looking for an enclosure to make your computer look something out of a mecha anime series, or something that looks good in an office environment, Johnny and the guys at NZXT have your aesthetic desires covered. And that’s the main issue with case reviews; the looks are completely subjective. All you are left with is the numbers. So where does that leave the NZXT Tempest?
When we look at the thermal and noise level number posted in our tests, I would say the NZXT Tempest is sitting in a pretty nice position. Though it’s not quite as good a performer as the last case I reviewed – the Antec P182 – it’s close enough. When you factor in the price difference, the Tempest becomes that much more attractive.
Though it can be subjective, there are still some objective areas of the case design that are both praise worthy and worrisome. Placing the front panel on top rather than upfront is quite convenient for those of us that place our systems on the floor. The forethought put into making this case water cooling ready is also much appreciated. But as I alluded to, the Tempest isn’t without it’s faults.
The big issue I have with this case is it’s cable management. The rear of the motherboard tray needs to be opened up more to allow thicker cables to flow from bottom to top out of sight. The noise levels are a also a little higher than I would have liked, but they aren’t horrible. NZXT does concentrate on gaming cases and a little extra noise is to be expected, but less noise is very welcome.
In the end, the NZXT Tempest is a good value. It offers many of the features found on higher priced cases, is sturdy, and easy to work with. I would recommend this to any power user on a budget, looking for an inexpensive case that looks awesome enough to house all of their components.
Pros
- Great looks and good durability
- Top notch airflow
- Decent noise levels
- Water-cooling ready
- Excellent value for the price
Cons
- A little loud
- Some fit issues with EATX boards
- Mediocre cable management
Overall Rating: 8.5/10.


Discuss This Review in the Futurelooks Community Forums
Real-Time Price and Stock Check – Check For More Products