
A few weeks ago, we looked at ECS Elitegroup’s high-end enthusiast entry, the 680i powered ECS PN2 SLI2+. That board represented the company’s “EXTREME” side. Now we come down for a landing and check out something a just a little more modest.

Just as there are extreme users to cater towards, there are also the mainstream users that form the bulk of the market. So today, we are looking at ECS’s NF650iSLIT-A motherboard for Intel processors, and why it might just be the motherboard for casual users that want performance without the massive tweaks afforded by its bigger brother.
Inside the Box
The box itself gives off an air of minimalism and that is easily reflected in the items included within. ECS has also gone to a brand new graphically simplified box that clearly indicates the main selling features of the product. Inside, we’ve got:
- 1x SATA cable,
- 1x EIDE, 1x floppy
- 1x 3′ RJ45 cable (CAT5E)
- 1x rear panel plate
- 1x SLI connector, 1x card support bracket
- manual, installation CD, and a quick-installation guide for new users
.JPG)

.JPG)

The Bare Necessities! 😉
We’ve been somewhat spoiled by the full meal deal spread of goodies offered in their “EXTREME” series of motherboards. This board hits a pricepoint by packing in fewer extras that end up in the spare parts bin
anyway.
Specifications
The NF650iSLIT-A makes use of the nForce 650i chipset from nVidia, which is essentially a cut-down version of the flagship, 680i. Here are the specs:
CPU
- LGA775 socket for Intel® Core 2 Quadro/Core™2 Extreme /
- Core™2 Duo /Pentium D / Pentium 4 /Celeron D Processors
- FSB 1333(Core 2 Duo 1333)/1066/800/533 MHz
CHIPSET
- NVIDIA nFORCE 650i SLI
- North Bridge:C55
- South Bridge:MCP51
MEMORY
- Dual-channel DDR2 memory architecture
- 4 x 240-pin DDR2 DIMM socket support up to 8 GB
- Support DDR2 800/667/533/400 DDR2 SDRAM
EXPANSION SLOT
- 2 x PCI Express x16 slot (SLI mode: 8X, 8X)
- 2 x PCI Express x1 slots
- 3 x PCI slots
STORAGE
- Support by MCP51
- 4 x Ultra DMA133/100/66/33 devices
- 4 x Serial ATAII 3.0Gb/s devices
- NVIDIA MediaShield™ RAID supports RAID 0, 1, 0+1, 5 and JBOD
AUDIO
- Realtek ALC883 support Intel 8-ch HD Audio
- Compliant with HD specification
LAN
- Marvell 88E1116 Gigabit Fast Ethernet PHY
INTERNAL I/O CONNECTORS & HEADERS
- 1 x 24-pin ATX Power Supply connector
- 1 x Auxiliary 4-pin ATX 12V connector
- 1 x Auxiliary 4-pin +12V connector (Molex)
- 1 x FDD connector
- 2 x IDE connector
- 3 x Serial ATA connectors
- 1 x SPDIF out header
- 2 x USB 2.0 headers support additional 4 USB Ports
- 1 x Front panel audio header
- CPUFAN/NBFAN/SYSFAN/CASEFAN connectors
SYSTEM BIOS
- Award BIOS with 4Mb Flash ROM
- Supports Plug and Play 1.0A, APM 1.2, Multi Boot, DMI
- Supports ACPI revision 2.0 specification
FORM FACTOR
- ATX Size 305mm*244mm
REAR PANEL I/O


- 1 x PS/2 keyboard & PS/2 mouse connectors
- 4 x USB ports
- 1 x RJ45 LAN connector
- 1 x Audio jack( 6 ports)
- 1 x serial port (COM1)
- 2 x SPDIF out connectors (optical & coaxial)
Although the NF650iSLIT-A is supposed to be cut down, yet it still carries quite a bit of punch in the features department.
A Look at the Board…


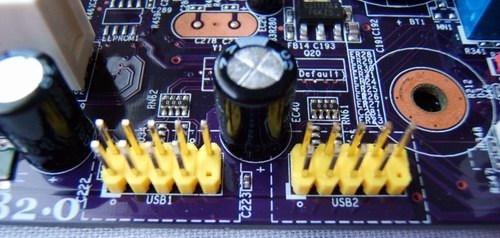
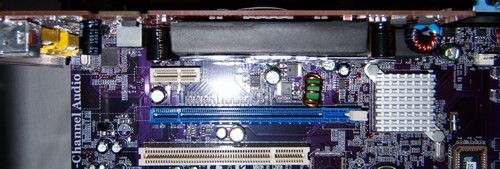
At first glance, the board layout does not seem particularly cramped with the four SATA connectors well spaced near the BIOS chip and the relatively low-lying northbridge and southbridge heatsinks. The colour coded headers and slots once more make their return, as expected from ECS, making it that much easier to quickly spot particular items and match them with their counterparts in the manual.


Lots of space for the smallest connectors…

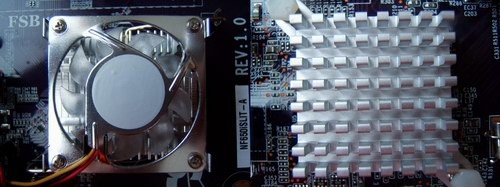

Northbridge and Southbridge Coolers
Overall, the layout gets the nod and with apparently lots of space to work in, let’s see if it carries through into the setup and installation.
Installation and Setup
During the installation, we found that the placement of a couple items were rather dubious. For example, the audio header is at the bottom left corner, the farthest reach for any audio cable length for a PC enclosure. On one hand, there won’t be much slack, but on the other hand, it may not even reach at all on bigger cases. How about moving it a bit closer?
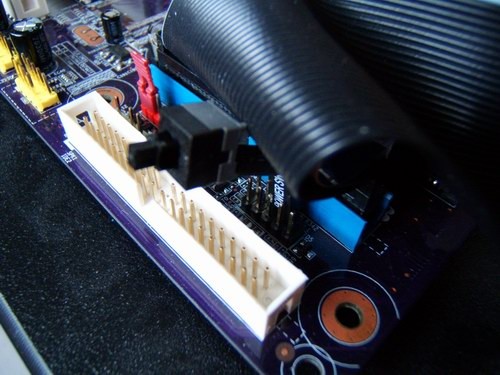
IDE Cable vs. BenchTop Power Button: Ouch!
Also, the IDE headers are placed quite near the CMOS’s clearing pins and the system header; once the large and wide IDE cable is inserted, there is little breathing room to manipulate the system header.
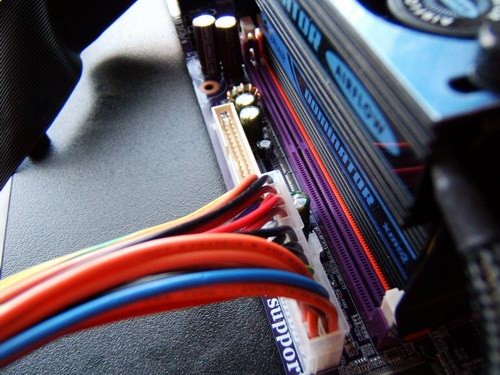
Also, by the RAM, the 24-pin ATX header seemed a little too close for comfort due to the normally inflexible girth of the system power connector. The inclusion of the floppy disk header in the vicinity makes it even more cramped should one still require it.

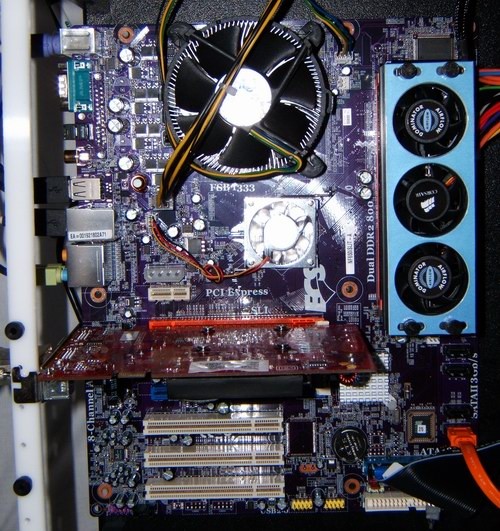
Good enough for single slot graphics cards…
The spacing between the two PCI Express x16 slots appeared to be equally as mainstream as the board in that two typical high end dual-slot-sized video cards would only just fit with little air circulation between two cards. As we saw with the 680i motherboard, ample space was given between each of the three x16 slots to allow for a modest amount of room for the fan to grab air to be blown out of the system.
![]()
Cuttin’ it a lil’ close eh?
One other concern of mine is that there is a row of capacitors extremely close to the CPU socket. Although it was not a problem for the stock CPU cooler, it barely made just enough clearance to keep our stock INTEL heatsink from ramming into them. This should not be a problem for taller heatsinks that incorporate heatpipes and start getting ginormous a little higher up.
BIOS
Just as the 650i is a cut-down version of the 680i, so too are the BIOS options. Gone are the SLI Memory support and overclocking profiles. Most of the important options do remain, although a couple of the more advanced options controlling the northbridge and southbridge voltages as seen in the 680i motherboard are simply gone.
.JPG)

.JPG)

I’ve normally found that enabling these causes more problems with stability…
.JPG)

.JPG)

Trying out some settings…
.JPG)

Experts Only!
The voltage options are not as robust for the memory or CPU as might be expected for a mainstream performer. The CPU voltages can be changed between 0.85V and 1.6V in 0.625V steps. The CPU FSB voltage may also be changed between 1.20V and 1.40V, and the nForce SPP between 1.20V and 1.50V in 0.05V steps. For Intel Core 2 chips, this may not be a significant issue for overclocking as they are fairly forgiving (as you will see later). However, the RAM voltage has been given the axe from the 680i’s 2.5V maximum to the 650i’s 2.2V maximum. As a result one would not be able to push the RAM speed to any great extent or with reasonable expectations for stability.
Overclocking
Knowing how our test-box CPU behaves, it was not too difficult to discover how simple it was to achieve a stable operation. As in the 680i review, I was able to overclock the CPU to 1333Mhz FSB @ 1.425V (note: the actual clock rate is 333Mhz, but the Intel FSB is “quad-pumped”) after disabling the spread spectrums.
The memory on the other hand was not going to be pushed far; our set of dominator 1142Mhz RAM sticks are actually able to be run in synchronous operation at 1333Mhz FSB, but that setting requires ~2.5V. Unfortunately for us, the system would run into memory errors when we tried to run the RAM at 1333Mhz (remember, that’s two times 667Mhz because it’s Double Data Rate RAM). Even lowering the RAM speed to 1142Mhz, the BIOS would only recognize 1110Mhz, and the system still would have trouble.
It seems the motherboard is not able to accurately attune to the frequency that one might desire (such as the rather odd 1142Mhz). However, it did just fine adhering to common frequencies (multiples of 100/133/166); I eventually found a nice stable operation at 1066Mhz memory speed @ 2.2V.
Note: Synchronous operation means that the quad-pumped CPU FSB is equal in frequency to the “doubled” frequency rate of the RAM. Although DDR2 RAM is marketed as the doubled or effective frequency, the BIOS options for the RAM are in terms of the true frequency. So for example, one might set 1333MHz as the CPU FSB. To be in synchronous operation with the RAM, the RAM frequency is entered as 667MHz instead of 1333MHz.
Asynchronous operation, while flexible, is not always ideal due to the communication between CPU and RAM. In this case, the motherboard has to use a CPU:RAM frequency divider to ensure proper operations. So, say that one runs the CPU FSB at 1333Mhz, but the RAM runs effectively at 1066Mhz. There is an exact 5:4 divider to make things operate relatively smoothly. But because the dividers are fixed, having strange FSB or RAM frequencies can be detrimental or ineffectual to performance even if running at higher frequencies; chances are your overall system performance won’t be enhanced much.
System Setup
We used the following hardware to power our test system:
- Intel Core 2 Duo E4300 1.80 GHz – (Compare Prices)
- CORSAIR Dominator TWIN2X2048-9136C5D 2 GB Kit – (Provided by CORSAIR)
- MSI NX7600GS 256MB PCI-E DDR2 Video Card – (Provided by MSI)
- Western Digital RaptorX 150GB SATA Hard Drive – (Reviewed Here)
- LiteOn DVD ROM Drive – (Provided by Geeks.com)
- iStarUSA 750PD-2 750W Power Supply – (Reviewed Here)
- Lacie 80GB USB2.0 Extrenal Hard Drive – (Compare Prices)
Our operating system of choice was the solid Windows XP Pro. All components were assembled onto the truly awesome HighSpeedPC Top Deck Tech Station.
Test Setup and Results
The overclocked conditions set the CPU to 3.0Ghz (9x333Mhz) with a CPU voltage of 1.425V. As you know by now, the RAM was set to 1066Mhz (2x 533MHz) with a voltage of 2.2V (1333MHz FSB/1066MHz RAM). The stock FSB/RAM settings are set for synchronous operation (800FSB/DDR2 800).
SiSoft Sandra
|
CPU Arithmetic |
Stock |
Overclocked |
| Dhrystone ALU (MIPS) |
16449 |
27481 |
| Whetstone iSSE3 (MFLOPS) |
11415 |
19040 |
|
CPU Multimedia |
Stock |
Overclocked |
| Int x8 iSSE (it/s) |
98440 |
165225 |
| FP x4 iSSE2 (it/s) |
53484 |
89220 |
|
Memory Bandwidth |
Stock |
Overclocked |
| Int Buffered iSSE2 (MB/s) |
4468 |
5401 |
| Float Buffered iSSE2 (MB/s) |
4457 |
5402 |
RMAA
| Frequency Response (40Hz-15kHz) dB |
+0.20,-0.26 |
Good |
| Noise level dBA |
-73.5 |
Average |
| Dynamic Range dBA |
73.1 |
Average |
| THD % |
0.013 |
Good |
| IMD + Noise % |
0.072 |
Good |
| stereo crosstalk dB |
-66.2 |
Good |
| IMD @ 10kHz % |
0.074 |
Good |
HD Tach
|
Burst Speed (MB/s) |
Avg. Read Speed (MB/s) |
Seek Time (ms) |
|
| RaptorX |
135.0 |
77.0 |
8.1 |
| Lacie HDD |
36.0 |
26.8 |
17.9 |
All around, the performance for the stock settings are pretty much on par with other boards we have tested in the past. Analog audio quality does take a slight hit compared to the higher end 680i, but it is usually recommended to acquire a dedicated sound board for gaming or for snobby audiophiles that don’t dig any background noise. That said, the quality of the digital connections did not introduce any noticeable problems during our DVD playback runs, so it should be adequate for an HTPC with the right video card and maybe one of those cool HD-DVD or Blu-ray drives.
Conclusion
ECS has introduced a fairly good mainstream motherboard that should cater to the casual user who might want to dabble in overclocking, but not into the fantasy regions of Extreme(ly expensive!) high performance. The option of utilizing dual nVidia GPUs for SLI performance is always welcome, but more importantly the ease at which one can change a lowly, tearful 1.8GHz Core 2 Duo into a screaming 3.0GHz hottie should be enough to attract anyone’s attention. However, the NF650iSLIT-A is not without its problems, be it in the physical or the digital world.

In the physical world, the installation of computer components can be a bit troublesome as the spacing of certain components turns out not to be particularly ideal when the cables and devices start appearing. Even with the barest of items to plug into the motherboard, there are spacing issues waiting to occur beside the ATX 24-pin header and also by the IDE and front-panel system headers. Also, it was readily apparent that pairing up two giant video cards would not be the best idea for cooling. In the digital world, we saw that the more “hard core” BIOS options were removed and that the voltage settings were somewhat limited, particularly for the memory.
However, taking a step back, these “issues” are really the considerations of a demanding individual (me!) thinking about putting high-performance and high-cost hardware into a mainstream motherboard. The SLI spacing issue wouldn’t be much of a problem if one pair of mainstream, single-slot GPUs were paired together, and the memory voltage is only an issue if you happen to have the memory that costs hundreds and hundreds of dollars. The point is that this is not the motherboard for a person with otherwise high-performance hardware.
For those looking for an affordable motherboard with solid performance and moderate and easy overclocking, the ECS NF650iSLIT-A is just the board to consider instead of something more luxurious that just demands more costly hardware by nature. It’s a great value.
Pros
- Able to do some Awesome CPU overclocking (1.8GHz to 3.0GHz right off the bat? Come on!)
- Affordable price for the minimalist (who uses all the extras anyways? Not everybody…)
- SLI option to expand upon middle-range GPUs (buy a second mid-range performer later down the road)
- Solid stock performance and stability (great stuff for the casual user)
Cons
- Some tight spacing during installation
- Why is the front panel header in between the IDE headers?
- Why is the audio header at the bottom left and barely reachable?
Overall Rating: 8.5 / 10.0


Discuss This Article in the Futurelooks Community Forums