

Over the last three years, ASUS motherboards have offered standard physical features across the entire range of boards on top of consistency in stock performance. This has created a very favorable performance experience all around thanks to things like polished features and a robust BIOS. Today we`re going to take a close look at the ASUS P9X79 Deluxe motherboard to determine if that high end consistency continues in to Intel`s X79 chipset. The changes in the Sandy Bridge-E processor alone have added a few variables, but factor in some ASUS engineering and this motherboard could be a champion.
Features and Specifications

There are a few familiar features that return to the entire array of ASUS motherboards. You’ll find that there is a mainstream segment and the ROG (Republic of Gamers) segment. Still, they all share a base set of features like the ASUS software suite, MemOK!, TPU, EPU and overclocking. However, ROG boards still continue to be the flagship series of choice if you’re a hardcore overclocking enthusiast. Some of the mainstream boards also support SSD Caching via an extra ASMedia SATA3 controller which is a very cost affective way of boosting overall system performance. Have a look at the quick reference table to break down the mainstream series further. (Click to Expand)
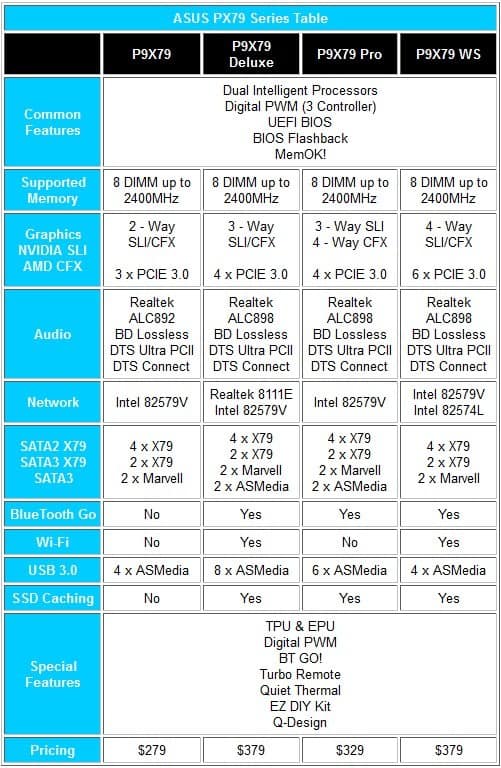
One of the engineering features that continues to set ASUS boards apart from competitors is their unique digital power management which has not only produced strong stock performance but also excellent overclocking performance. While industry players all use their own designs, ASUS’ design has continued to mature and gives them an edge especially in regards to the X79 platform CPU and memory voltage controllers. We’ll see if it measures up during testing of course.
Price wise, you can see that the differences in features also reflects a different in price for each board. The workstation and deluxe boards are so similar, the pricing is the same. Their purposes of course are quite different. The workstation limits the type of expansion cards to PCI Express 3.0 only and contains validation for more controller cards and peripherals. The deluxe offers the smaller PCI Gen1 slots needed by many consumer oriented products like sound cards or performance gaming NICs. The ROG series is of course in a a whole different category and start at prices about $70 US more than the rest of the line.
What’s in the Box?

The P9X79 Deluxe comes with an accessories bundle reminiscent of the X58 platform. However, there are a couple extras like the Wi-Fi antennae and the black matching IO shield which looks better on pimped out computer cases. There’s also the Bluetooth GO!/Wi-Fi module which plugs in on the back of the board.
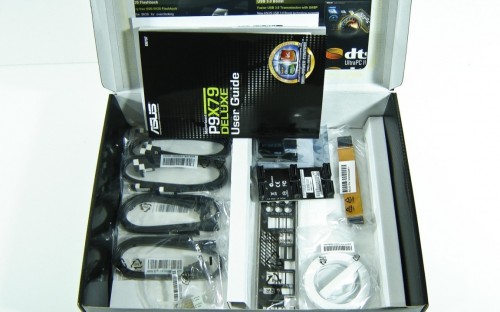

The bundle also includes eight black SATA cables which work for both SATAII and SATAIII storage devices. In support of the 3-way NVidia SLI and AMD CrossfireX, there is a 3-way PCB and 2-way flexible PCI bridge in the box. Detailed manuals and a driver disc round off the kit for getting set up. Keep in mind there are more updated drivers available at the ASUS website but the driver disc will give you enough functionality to get on the web to download them.
A Look at the New Theme

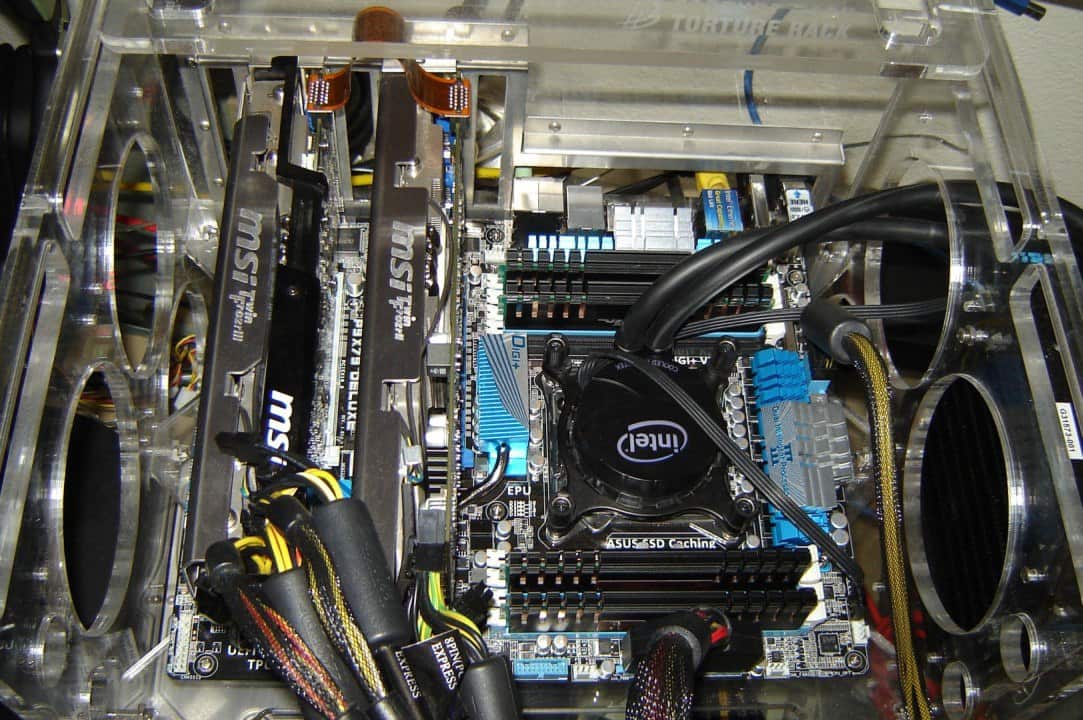
The ASUS X79 board design gets a new set of colors which follow right to the heat sinks. The heat sinks are a slightly lighter color blue than the usual deep Intel blue color. It’s mated with silver aluminum accents to help it stand out.
The X79 layout is quite different than previous generations as well. All of the usual fan headers, USB headers, power sockets, SATA ports, switches, power/reset buttons and front panel headers are all arranged on the outside of the board. This makes sure none of your expansion cards and other components aren’t hampered by wiring and vice versa.
It’s also worth noting that the two white PCI Express 3.0 slots give users the option of spacing a second video card a little farther apart for better air flow. However, if you’re planning on running three video cards, they’ll have to go back to close proximity when installed. This is one of the reasons why we see nVIDIA and AMD partners offering more video cards with better cooling solutions out of the box. The close proximity of triple or quad cards will easily increase temperatures.
Let’s get the board setup and we’ll have a look at some overclocking and then dive right into the benchmarks!
Test System Configuration
We’re going to keep the setup as similar as possible to the Intel X79 and Sandy Bridge-E configuration we worked with in our launch article. Our CPU cooling solution is still the Intel Asetek liquid cooler and Noctua NH-D14 and C14 coolers. For stock testing, the system used the Asetek cooler. Since the Asetek cooler isn’t meant for extreme overclocking, I switched over to the C14 monster which blows air down on to the system. Thank goodness for low profile HyperX Genesis memory modules. Anything with taller heat spreaders is a problem with the quad channel memory configuration.
- Processor: Intel Core i7-3960X Sandy Bridge-E
- Motherboard 1: ASUS P9X79 Deluxe (as tested)
- Motherboard 2: Intel DX79SI Extreme
- Motherboard 3: GIGABYTE G1 Assassin 2
- Memory Stock: Kingston HyperX 1600MHz 16GB Quad Channel DDR3
- Memory OC: Kingston HyperX 2400MHz 8GB Quad Channel DDR3
- Graphics: MSI GTX 560 Ti TwinFrozrII SLI (NVIDIA 285.62 Drivers)
- Power Supply: Antec TPQ-1200 Quattro
- CPU Cooling 1: Intel Asetek LCS (stock tests)
- CPU Cooling 2: Noctua NH-C14 (overclocking tests)
- Storage 1: Kingston HyperX 120GB SSD (SATAIII)
- OS: Windows 7 Pro 64-bit
- Network: DLink DIR-615 LAN/Wi-Fi Router (25 feet away) and DLink DGS-2205 GIGABIT Switch.
- Monitor: LG W2600H @ 1920 x 1200
I didn’t use any regular platter based HDDs in testing other than to confirm they work fine. Why? Because platter drives are a system bottleneck whereas SSDs are quickly becoming the standard. Plus, there have been recent 20nm NAND advancements that basically ensure much larger capacities next year at a better price. The benchmarks also include SLI results only since these are platforms tuned specifically for high performance users.
Overclocking the ASUS P9X79 Deluxe Motherboard
There are two routes in which one can overclock their P9X79 Deluxe: ASUS software suite and BIOS. The software suite is very easy to setup which doesn’t take much time to figure out at all. You can choose your own settings or have it figure it all out and do the work for you. Our sample Deluxe was able to push any of the CPUs in my possession to 4.5GHz with very minimal fuss using only automated tuning and BIOS options.
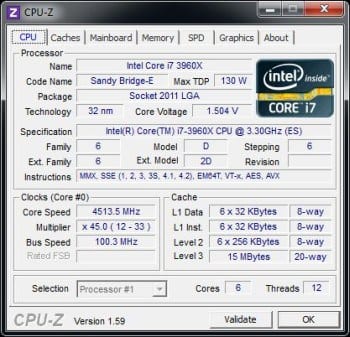
The X79 ASUS BIOS is one of the smoothest to manage offering, offering both EZ and Advanced modes. EZ mode settings give you Power Saving for green operation, Normal for regular use and Optimal for aggressive performance. Advanced mode offers OC Tuner which automatically overclocks and tests the system’s stability for you. OC Tuner is slightly more conservative than manual tuning. Manual tuning gave me higher results achieving 4.75GHz by adding Offset Voltage to total 1.5 to 1.51 volts. Your CPU and cooling may vary your results.
Keep in mind that overclocking a Core i7-3930K or i7-3960X requires a very good CPU cooler. The Asetek cooler does its best work if the room temperature is always cool. Otherwise, you’ll see CPU temps climb with the ambient temps. A high performance Noctua, NZXT, Prolimatech or Thermalright CPU cooler will do better.
Benchmark Suite Notes
The software test suite includes PCMark7, CineBench R11.5, SANDRA Mathematical & Multimedia, 3DMark11, Unigine Heaven Demo 2.5, Metro 2033, Batman Arkham Asylum and City, RightMarkAudio, CrystalDiskMark, Network and Power Consumption. The final notes include motherboard quality where I look for things like crooked, scratched or low quality components. Your hard earned money should be rewarded with a quiet, stable, responsive product.
PCMark7
PCMark7 utilizes 7 different productivity benchmarks to get an overall system score. It breaks scores down in to individual categories which you can read up really quick on Futuremark’s PCMark7 page. Trial demos give you just an overall score, but it’s good enough for comparison. Keep in mind that we’re running the OS on an SSD which greatly improves the scores.

What you see here is that the Deluxe has an aggressive subsystem which improves system performance almost across all the categories. In other words, BIOS tuning gives the platform a strong set of wings making it very fast and efficient. If you’re a professional user, this means more can get done quicker.
3DMark11 – Performance Setting
I used performance settings so that you can give the trial download a run in case you wanted to compare your results. You’ll get an idea of where your system’s current graphics capabilities are on the food chain.
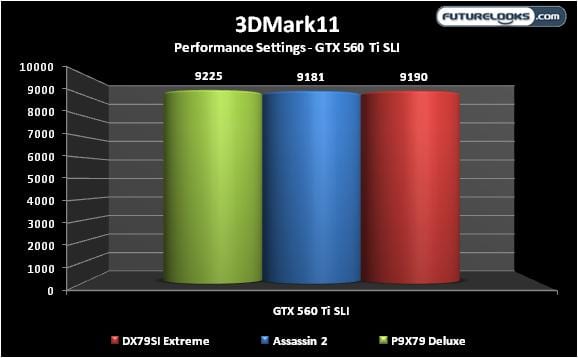
These scores aren’t miles apart but it’s clear which board likes the two GTX 560 Ti video cards. This time around the video drivers were left to default installation meaning application controlled. Keep an eye on the SLI setting as it sometimes magically disables itself in some circumstances.
Cinebench R11.5 – Multi & Single Core Tests
This benchmark renders a very large file picture using raw CPU power measuring single core and multi-core performance. Frequencies heavily influence the overall score. Naturally, the higher the score, the better.
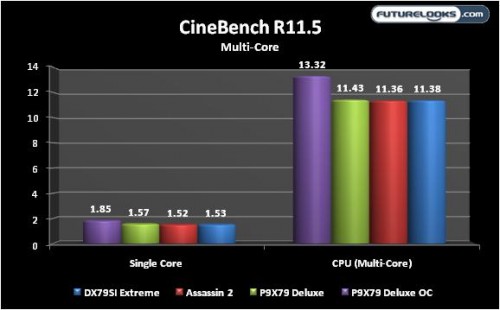

The Deluxe is again the clear winner. Since these are indicative of each motherboard’s optimal BIOS settings, it’s the Deluxe’s more aggressive CPU Turbo tuning that keeps it lean and mean. Factor in their cleaner transient response they’re known for and it continues to do very well even overclocked.
Let’s dive into a few more synthetic benchmarks and start hitting some games to see how it does.
SANDRA CPU Math & Multmedia
This benchmark software can actually reveal some of the refinements that we can’t visibly see when it comes to CPU tuning. A platform’s fine CPU tuning heavily influence the scores. CPU thermal monitoring was disabled as well. Let’s see how it does against the DX79SI and X79 based Assassin 2.
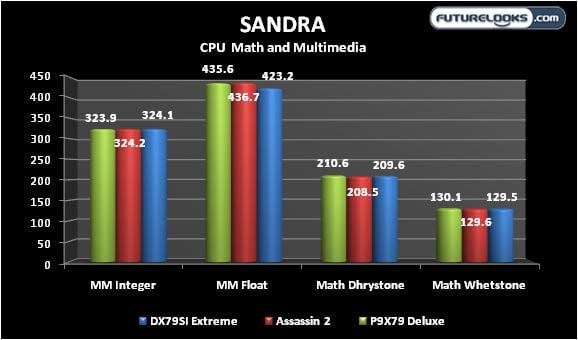
The point spread is pretty close. It may not look like much but think back to our Intel Core i7-3960X Sandy Bridge-E article and you’ll see these are smoking scores compared to previous generation processors.
7Zip (Data Compression)
This program has a built in benchmark that measures the system’s zipping capability. Frequencies and memory timings which are usually tuned in the BIOS affect the benchmark. For example, a Core i7-975/X58 system scores about 22,000 in the test. Have a look at the Core i7-3960X/ASUS P9X79 Deluxe in action.
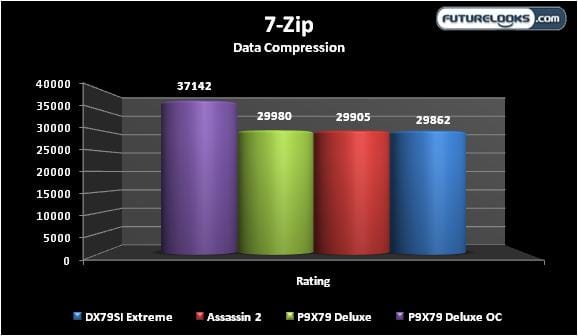
I know most of you won’t be overclocking your system to do any hardcore compressing. But, you at least get an idea here at just how nimble the P9X79 Deluxe is at both stock and overclocked frequencies. Again, the BIOS tweaks are evident with the Deluxe leading by a bit.
GraySky H.264 Benchmark 4.0
This a very easy benchmark to set up that tests your CPU (and system) transcoding abilities. Below are the average frame rates from each pass.
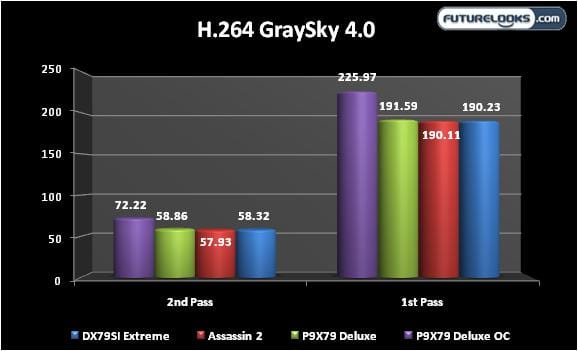
This benchmark loves the cores and Hyperthreads. All of the platforms are close with most of the difference coming from BIOS tuning. ASUS has always offered more aggressive CPU Turbo which seems to help just a bit more here.
Unigine Heaven 2.5 Demo
Moving to some 3D graphical testing, Unigine has a DX11 setting that can make any video card work hard even in SLI. Two different test settings were selected to see how well each system handles the intensive benchmark.
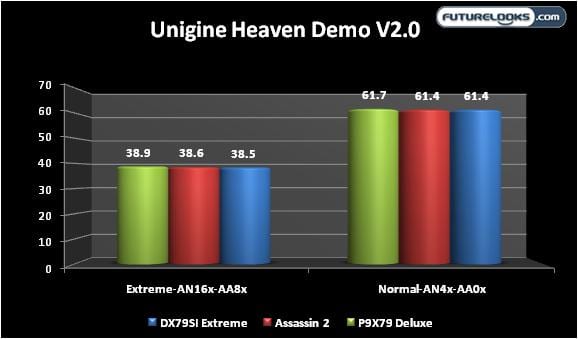
The frame rate averages were very close. The video cards are obviously maximizing their PCIE butts off. Any one of these boards would make a formidable platform for multiple graphics cards.
Metro 2033 – DirectX 11 Max Settings
Metro 2033 is one of the toughest DirectX11 games for any gaming system to handle. It’ll bring just about every current NVIDIA and AMD video card to its knees especially at 1080p or higher resolutions. This time multi-sampling AA was tested at normal and the max 4x setting.

I’m happy to see the latest NVIDIA drivers give these cards some teeth. The group was close at max 4x settings again due to the maxed out PCIE cards. At slightly lesser settings, the Deluxe seems to have just a little more frequency to feed the SLI cards. We’ll take what we can get!
Batman: Arkham City
Now that the game world is well on the path to DX11 righteousness, I thought it prudent to test at least one excellent new title, Batman Arkham City. Again, medium 16XAA and maxed out settings were used to see if there are any gaming performance differences between the boards.
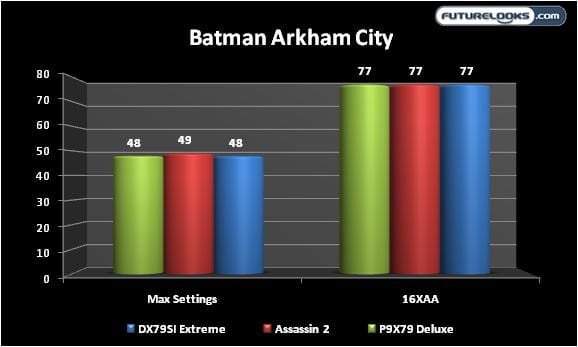
Well, I wasn’t expecting much of a difference. All three platforms make excellent use of the GTX 560 TI SLI performance. If you’re using other cards in SLI or CrossfireX, you can expect them to do just as well.
RightMarkAudio – Good or Bad Audio?
RMAA is a handy tool for revealing the quality of most any audio card or integrated audio processor. It was the Realtek ALC898 audio processor integrated in to the Deluxe that were putting to the test. Let’s take a look at the 24/192Hz results.
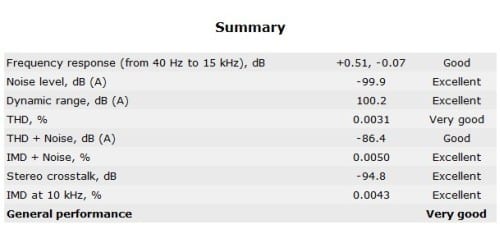
Wow! Typically, we don’t see results this good. Two things helped produce this result: Implementation and audio software. ASUS obviously implemented the Realtek ALC898 audio codec (chip) in such a way so that there’s little noise. The software tuning also unlocks some of the audio processor’s potential.
What this means is that you can expect relatively lively audio response for games and some clarity for media or music. I have some Klipsch 5.1 speakers and a high end 150 ohm headset that didn’t really help locate any obtrusive noise. They definitely caught plenty of various frequencies when jamming to some music.
Now that we’ve got the majority of benchmarks with a quick check up of the audio quality, let’s have a look at a few other things that set these boards apart and then take it home!
Input/Output Performance – Crystal Disk Mark
One of the things I didn’t completely cover in the Intel Sandy Bridge-E X79 launch article was a detailed look at input/output performance. If you’ve seen one USB or SATA, you’ve seen them all right? Well, that’s not the case this time around. The X58 and Z68 platforms use different ASMedia, NEC and/or Marvell controllers. The Assassin 2 uses an updated Marvell 9128 SATA3 and Fresco USB 3.0 controller. The P9X79 Deluxe uses Marvell 9128 SATA3 and ASMedia ASM1061 controllers. Here are the interesting results.
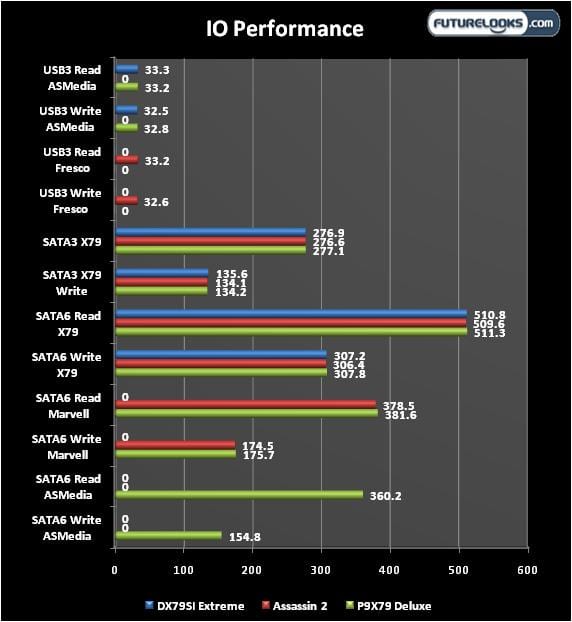
As you can see, while all three boards utilize the X79 chipset for SATA3 and SATA6 performance, they each utilize different USB 3.0 and secondary SATA3 controllers. It looks a little crazy, but you can see that they’re all pretty close this time around. However, the P9X79 Deluxe has one more ASMedia SATA6 controller meant to support SSD Caching which none of the other boards offer.
That said, the P9X79 Deluxe SSD Caching is right in line with the Z68 platform’s ability to cache. While not quite as fast as using a regular SSD for running your operating system, it’s a nice overall boost. If you’re curious about the Z68 results, you can check them out here.
Integrated Network Examined
The P9X79 utilizes two different GIGALAN controllers. One is a Realtek 8111E which is a very common integrated controller used by all the board vendors at some point. The other is an Intel 82759V LAN Pro which made its appearance with Z68. There is also a Bluetooth V3.0 module with built-in Atheros AR9002WB-1NG wireless N Wi-Fi.
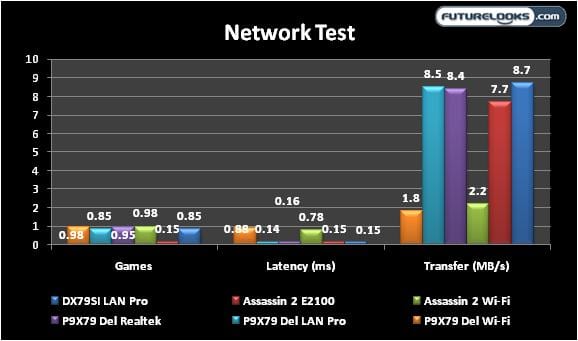
As you can see, the Realtek and Intel LAN controllers offer similar network bandwidth and latencies. This isn’t typical but may be indicative of the Deluxe’s better controller implementation. Naturally, the Atheros Wi-Fi transmits slower bandwidth mainly because it only has a single antenna versus the Assassin 2 which as two. If you want lower latencies, stick with either of the LAN ports.
I did notice that the single antenna easily loss signal if it was set behind anything like the monitor or case. That impacts the bandwidth. If the module had two antennas, it would be less of an issue. Also, the connector is only a push pin of sorts. A ring nut connection is always the best route. Still, the results are pretty good for a more cost conscious solution.
Power Consumption and Quality Control
The system was left to sit idle and run full load for 3 hours each. The wattage was recorded at 30 minute intervals to get the average. Keep in mind that you may see much lower power consumption depending on the components used in your system.
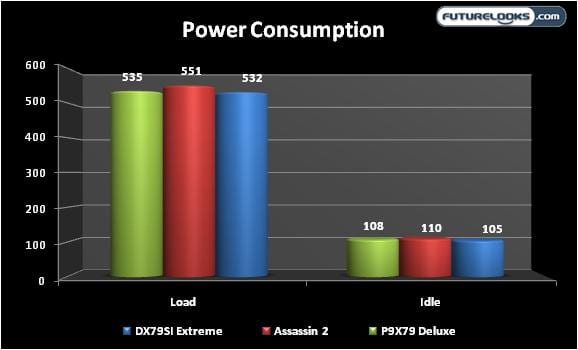
Power consumption is similar between the motherboards. The P9X79 Deluxe consumes just a little more at idle and load compared to the DX79SI Extreme which is to be expected with the few extra features. The Assassin 2 consumes the most mainly due to its high end integrated features. I highly doubt anyone will be put off by any of the consumption numbers but it’s nice to show the implementation quality at work.
Speaking of quality, working with the Deluxe revealed it to be an extremely well made board. I couldn’t detect any EMF, crooked components or any other odd noises under detailed scrutiny. Even the Wi-Fi antennae wire is long enough that it can sit on top of your tall computer tower case. Overall, the P9X79 Deluxe is a high quality motherboard.
Final Thoughts

The question posed at the start was whether or not ASUS could continue their impressive enthusiast experience and consistency. The answer is a resounding affirmative. Starting with the design and quality, in my humble opinion, it’s much more organized compared to the P6-X58 series but not quite as aggressive as the P8-Z68 series. Still, the design improvements are very welcomed especially when it comes to having all your DIMM slots on hand for future use. Speaking of DIMM slots you do get eight to work with which is four more than you get with other boards out there in this price range or above.
When it comes to performance, the P9X79 Deluxe is a surprisingly robust platform. Performance is quite comparable compared to its siblings and occasionally steps up just a bit more consistently when overclocking. The ASUS BIOS is a very clean, detailed work of art which enthusiasts will appreciate. The engineers really hit a home run in that respect. Not only is the board a well designed performer, it’s also the most aggressive platform tested thus far, powered by the INTEL X79 chipset.
As for pricing, the P9X79 Deluxe will set you back about $379 US. That price is quite relative to all of the extra features like maximum memory DIMM support, SSD Caching, Bluetooth/Wi-Fi module, dual GIGABIT networking, extra USB 3.0/SATA3, 3-way PCIE expansion and of course capable overclocking. It`s also a very attractive board. In my humble opinion, this is the current high performance standard to beat.
Pros
- 3-Way NVIDIA SLI/AMD CrossfireX PCIE 3.0 expansion
- Impressive design and quality
- Aggressive overclocking support
- Polished, extensive BIOS
- Bluetooth and Wi-Fi connectivity
- SSD Caching for those still on platter drives
- Solid like a diamond
Cons
- Single Wi-Fi antenna with simple connector
Overall Rating: 9.0 / 10.0


Help Us Improve Our Reviews By Leaving a Comment Below!