
Antec’s Performance One series of cases have been the recipients of much praise from the industry, with some going so far as to claim they are the de facto standard for inexpensive feature rich performance computer cases. We’re going to test that claim with the most recent addition to the Performance One line, the P182 Advanced Super Midtower.

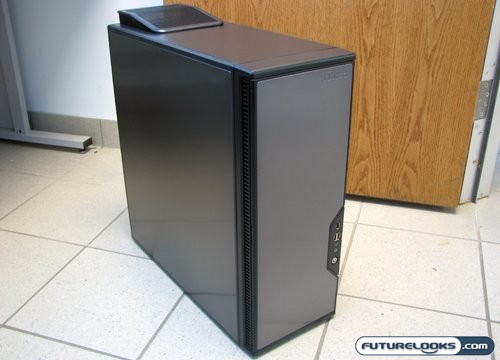
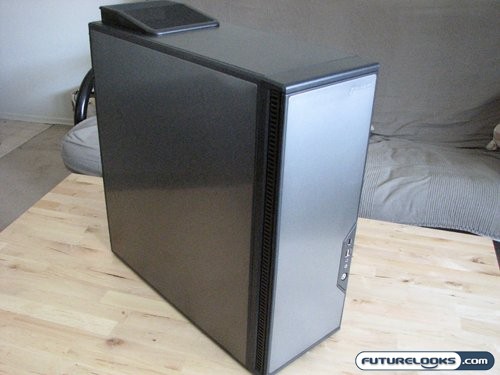
The P182 midtower is minor update over the P180 (reviewed here), changing the colour of the case and tweaking a few of it’s features. The colour has been changed to a striking gun metal black with a semi-reflective surface, rather than a silver or black surface that emulates brushed aluminum (as seen on the original P180).
Antec really wanted to make sure the finish on the P182 survived shipping, as was evident by the way the case was packaged. Rather than just bagging it and sticking some Styrofoam on either end, they applied protective film and encased the midsection in a protective cardboard sleeve. This is just one example of Antec’s attention to detail; something that almost always translates into the design of their cases. Here’s a quick rundown of the specifications for the P182. A full specification chart can be seen on the P182 product page.
- Dual chambers structure
- Special three-layer side panels and front door (aluminum, plastic, aluminum)
- 11 Drive Bays (External 4 x 5.25"; 1 x 3.5" / Internal 6 x 3.5" for HDD)
- 7 Expansion Slots
- Support for 5 120mm fans (3 120mm TriCool fans included)
- External three speed fan control
- Up to Standard ATX Motherboard (12" x 9.6")
- Double hinge door designed to open up to 270º
- Rear rubber grommeted ports for liquids cooling pipes
- Front-mounted USB, FireWire, and Audio ports
- Cable organizers behind motherboard tray
- Dimensions 21.3" (H) x 8.1" (W) x 19.9" (D)
- Net Weight 30.9lbs

With this case only supporting a standard ATX motherboard, I’m curious as to how it’ll take a GeForce 8800GTX or a Radeon HD 3870×2, especially with two hard drives occupying the middle drive rack. However I’m getting ahead of myself with such questions. Initially the specs look very promising. The case is made to be quiet with the use of 120mm fans throughout. This was further verified with a simple knock on the triple layer side panels, which resulted in a dull thud. Since we’ll be installing a former gaming rig that is constructed of multiple heat generating components (think SLI, expensive dual core proc, etc), we’ll really get to test not only the quietness of the case but the thermals.
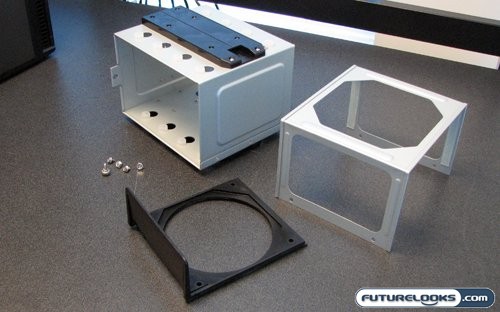
What’s In The Box?
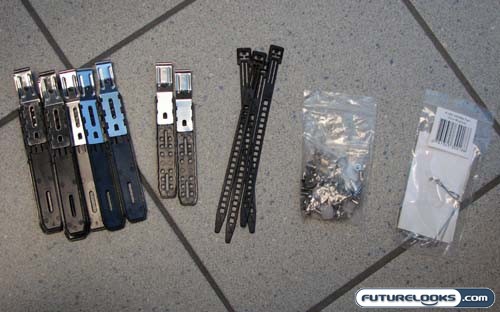
Antec includes a very thorough collection of knick-knacks and accessories with the P182. This includes the following:
- Motherboard standoff and miscellaneous screws
- Rails for both 5.25" and 3.5" drivers
- Reusable cable ties
- Spring clips to mount additional fans internally
- Instructions and disclaimer (not shown)
The manual comes in six languages, and is surprisingly thin for such an international document. Skimming through it, I found that there are one or two paragraphs dedicated to each of the processes unique to this case. Those who need a full start to finish walkthrough on assembling a PC might want to turn to Google. Clearly, this case was designed for the picky enthusiast who knows what they are doing.
Real-Time Price and Stock Check – Shop Like a PRO!
Visual Inspection
With manual in hand it’s time to take a closer look at this case, and eventually install one of my high end rigs into it. The first thing I did notice, while moving this case for in moment infront of the camera, is that for a steel case, it’s rather heavy. Steel cases aren’t known for being light to begin with, but at 30lbs, this case weighs almost as much as some full systems. This is probably due to the plastic and sound dampening used in the construction of the case. Those are liable to add a good amount of heft.
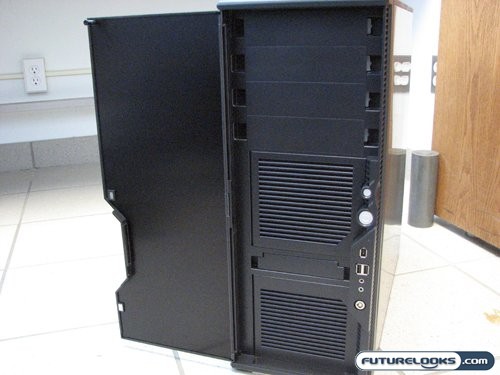

Behind the front door you can see the four 5.25" and one 3.5" external drive bays. The front door itself is stated to open a full 270 degrees, making it very easy to access the drives and front fans. The reason I only have it open to 180 degrees here is simple, and is stated in Antec’s FAQ on the P182. Basically, when the case is brand new, the plastic is a bit stiff, and needs to be gently worked in to allow the door to freely open the full 270 degrees. This feature is also handy for more clumsy individuals who tend to break doors, bending them the wrong way.
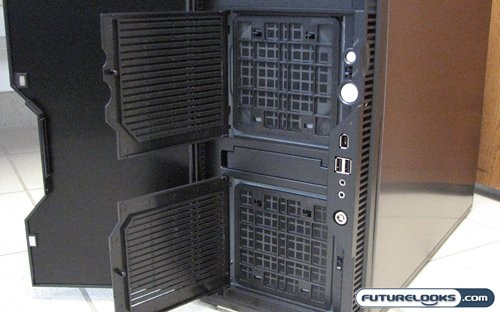
Behind the magnetic front door is two more spring-clip fan doors that allow you to access the washable fan filters. Once your fans get gunked up, you can remove these filters, wash them with warm water, and replace them. Next to the fan grates is the connection block, which sports the external USB, FireWire, and Audio ports. These are accessible even if the main door is closed. It isn’t the same case for the power and reset buttons, as they are behind the door when it’s closed. This adds a slight measure of security should your system be in a public location.
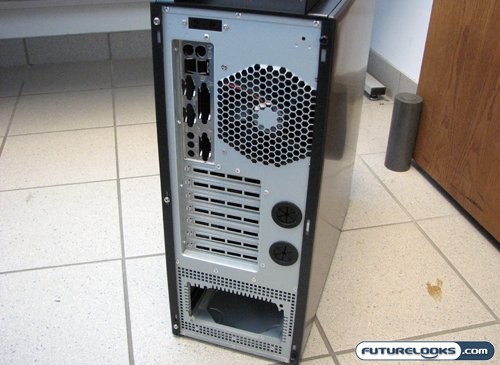

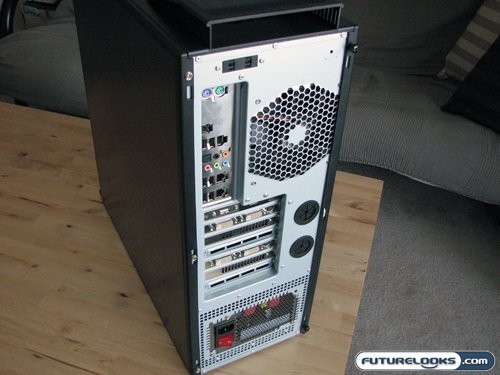
Turning around to the rear of the case, we get to see how the dual chamber design is implemented. The power supply and hard drives are in the lower part of the case, and the other major components are in the upper part of the case. There are also some additional features seen here that aren’t present on very many other cases, even those found in the high end of the market.
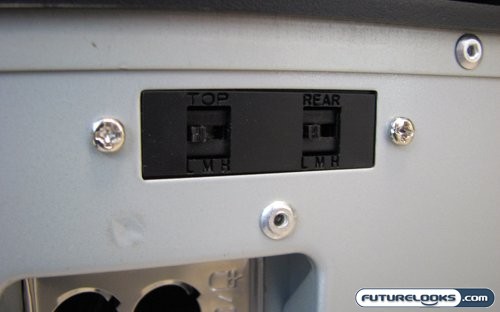
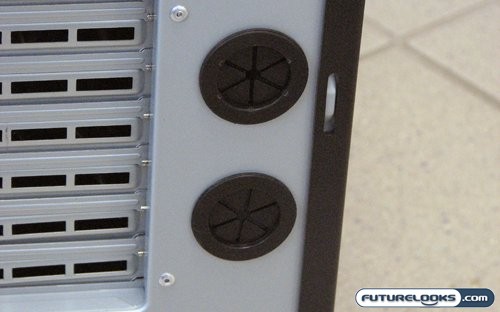
The first of these two features is appropriately located at the top of the P182, directly above the motherboard I/O shield. It’s a couple of three speed fan controllers; one for each of the two 120mm TriCool fans installed on the top and rear of the case. The second added feature is the rubber grommeted ports on the rear. The intent behind these ports is so you can mount external liquid-cooling hardware with ease, and route the hose safely through the rear of the case.
Real-Time Price and Stock Check – Shop Like a PRO!
A Look Inside
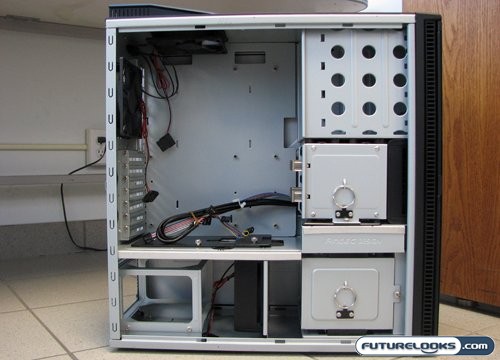
Getting into the P182 is fairly easy. The left side panel, which is of course the one that will be opened the most, can be removed by simply undoing two thumbscrews. The right panel is held in place by three standard case screws, and requires a screwdriver to be removed. As mentioned before, the panels don’t transmit vibrations (knocking on them simply produces a thud). This is due to a triple layer design of metal, sound dampening, and metal again. The one thing that isn’t removable in the P182 is the motherboard tray. Although a removable motherboard tray can be convenient, the P182 is roomy enough to render it unnecessary for most ATX motherboards. Extended ATX motherboards need not apply here.
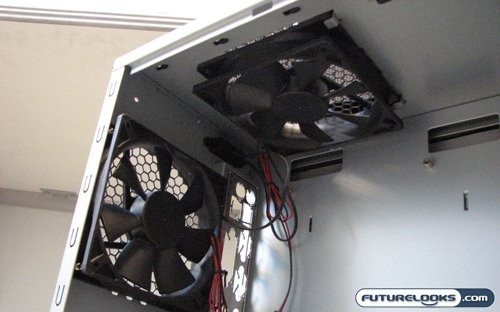
The Antec Tricool fans located at the top and back of the case provide most of the cooling for the top chamber of the case, as well as exhaust most of the heat radiated from the CPU. These are controlled by the afore mentioned three speed fan controller, located directly above the rear ports. The lower speed is whisper quiet, while medium is slightly louder, and high sounding like…some rather loud fans.
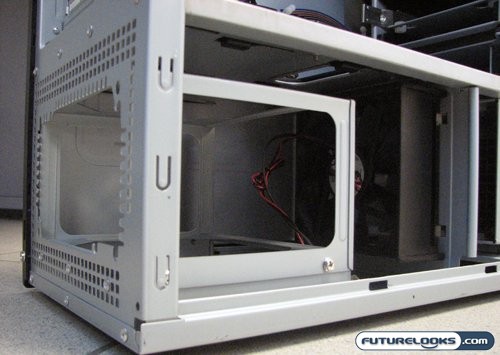

The lower chamber is cooled by a single 120mm Antec Tricool fan, which pulls air from front to back in the same fashion as a wind tunnel. The airflow created by this fan will also cool the lower hard drive rack, and provide fresh air to the power supply. Now this is a Tricool fan, and as such has a three speed controller of it’s own wired in line with the power cable. Unfortunately this means you need to open the case the set this fan. With this fan it’s best to find the sweet spot for noise vs. performance, set it, and forget about it.

Both hard drive racks in the P182 are easily removable. You need only remove a single thumbscrew and slide them out the side of the case. Removal of the upper rack gives you access to the upper 120mm fan holder, which when installed provides cool fresh air for the upper chamber in general and the video card in specific. This rack may also need to be removed to accommodate extremely long video cards. Removal of the lower rack reveals nothing much at all. There isn’t a fan holder behind the lower fan filter, making the only fan in the lower chamber the one between the power supply and the hard drive rack. With the cable management system Antec setup in the P182, this area is clearly for hard drives only (and any stray cables you may need to shove in there).
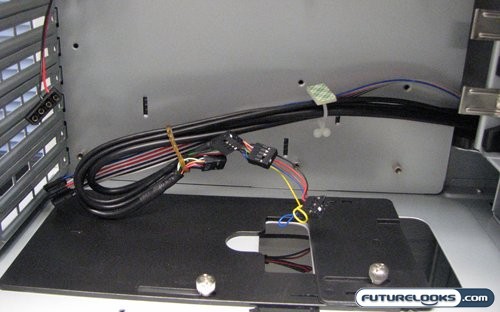
To maintain separation between the upper and lower chambers, Antec uses the plastic panel to allow only the exact amount of room you need for your cables. The plates are easily adjustable, and though not conveyed in the picture, an ample amount of cable pass-through room can be created. The only installation issue one may have is if they try to install any water cooling components in the lower chamber, which is exacerbated by the plates being irremovable. However that won’t be very common, as the lower chamber lacks an appropriate fan holder to bolt on a radiator, or flat surface to mount a pump. Antec also includes cable clips and reusable zip ties to hold cables in place, and has added some slots between chambers on the back of the motherboard tray to route cables, keeping cable clutter to a minimum.
Real-Time Price and Stock Check – Shop Like a PRO!
Test System
I thought the best way to give the Antec P182 Mid Tower a complete workout was to install my other test rig. This rig was, at one time, a top of the line gaming rig, and includes the following components:
- AMD Athlon 64 FX-62 2.8GHZ Processor
- Cooler Master Hyper 212 CPU Cooler
- Foxconn C51XEM2AA-8EKRS2H NVIDIA nForce 590 SLI Motherboard
- eVGA GeForce 7900 GTX 512MB PCIe Video Card (x2 in SLI)
- OCZ Platinum XTC REV.2 PC2-6400 2GB 2X1GB DDR2-800 Memory Kit
- Seagate Barracuda 400GB 7200.10 16MB SATA2 Hard Drive (x2 in RAID0)
- Thermaltake Toughpower 1000W CrossFire Power Supply
The rest of the case was left stock, as Antec provides three Tricool fans with the case. Before I could get to installing the guts, I had to install drives first.
Component Installation

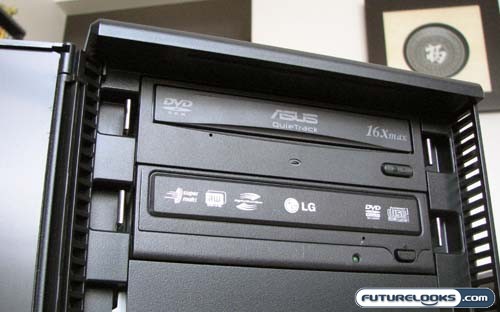
First on the list of parts to install was the drives. Antec uses a rail mount system for all external drives in the system. Unlike some cases, sliding the drives into the Antec P182 does not require removal of the front bezel. Once the rails are screwed into place, the drive is slid in and secured without the need for any tools. To make sure your drives sit flush there are several mounting holes on each rail, though drives with strange offsets might still stick out or sink in.

Antec also provides a single external 3.5" bay between the upper and lower 120mm fan. This is handy for those unfortunate enough to still need a floppy drive for their system. Should you be lucky enough to have moved beyond the little floppy, the bay is also great for a media card reader.
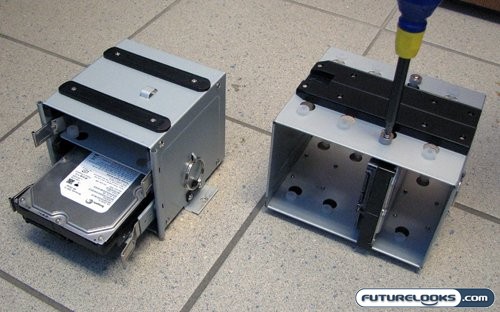
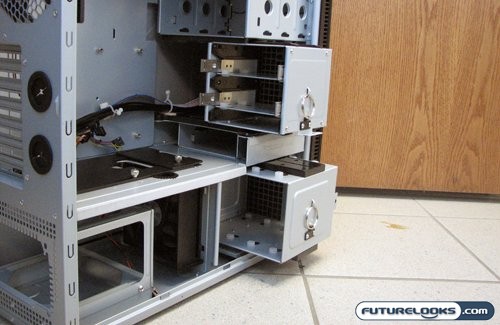
Continuing with drive installation, we move to installing hard drives into the upper and lower racks. The mounting holes on both racks have some very thick silicone washers, which are intended to completely eliminate any vibration noise from the hard drives. In the lower rack the drives are installed vertically, allowing installation of up to four drives. The upper rack only has room for two more drives, both mounted horizontally on removable trays.
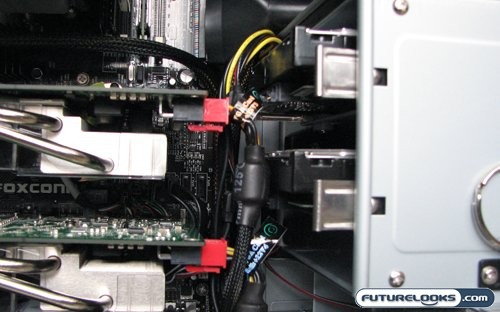
All the drives were installed without issue. Once that was completed, I proceeded to install the internal components and run all the cabling. This is where things really started happening.
Real-Time Price and Stock Check – Shop Like a PRO!
The Fit
At the beginning I had some concerns as to how certain components would fit in the Antec P182 Mid Tower. As noted in our review of the CPU Cooler, the unit is fairly large. I was also concerned about how large video cards would fit should one use the upper hard drive rack for it’s intended purpose.

My first concern was laid to rest upon laying the motherboard into the case. The CPU cooler had plenty of room around it to clear various components. The top of the cooler barely cleared the inside of the side panel, only missing it by 1mm or so. This was good news, because the two 120mm fans were in a great position relative to the heat sink to provide good airflow and keep the CPU very cool.
Next on the "will it fit" checklist was the video cards. Now I wasn’t using video cards that were any where near the length of a GeForce 8800 Ultra or a Radeon HD 3870 x2, but I was using two rather large GeForce 7900 GTX based cards. This at least gave me a reference point. It did take a little “finaggling” to get the 7900 GTX cards into their respective slots. Once installed, there was a gap of 4cm between the back of the cards and the hard drives. This may sound like a perfect fit, as the length difference between the 7900 GTX and afore mentioned GeForce 8800 Ultra or Radeon HD 3870 x2 is about 4cm. You still need to take into account the cabling for the hard drives. I can say with a fair degree of certainty that to use the high end cards I mentioned, you would need to install the hard drives in the lower rack, or use special SATA cables that bend at 90 degrees. With the power supply needs these cards have, you might also find that difficult; here’s why…
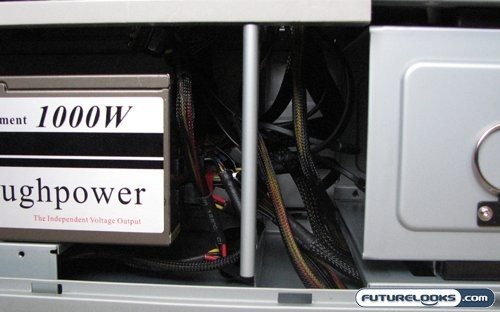
Many high end rigs require hefty power supplies, not unlike the 1000W monster we have in our test rig. The size, heft, and amount of electronics needed to generate 1000W of power makes for a long power supply. In the case of our test system it rendered us unable to install the middle 120mm fan at the least, and the hard drives at the most, in the lower chamber. In fact, I took a picture of the hardware I needed to either remove temporarily or entirely to allow for the 1000W power supply.
I had to remove the lower hard drive rack, the lower fan holder, and the cage that goes over the power supply. In the end I was able to reinstall the hard drive rack, and had I planned for it I should have been able to install the cage over the power supply. I could have most likely installed the hard drives in the lower rack as well, and routed the extra cables on either side of them. The only problem with that is the inability to install the lower fan, leaving the power supply to provide cooling for the entire lower chamber.
Now in the end, your mileage may vary based on components and planning. I’m only noting this as a warning to know what components you are installing, and plan ahead so they all fit.
Real-Time Price and Stock Check – Shop Like a PRO!
The Finish
Once all the components were crammed in and the cables were run in the cleanest fashion possible, we were able to step back and take a look at the finished product.
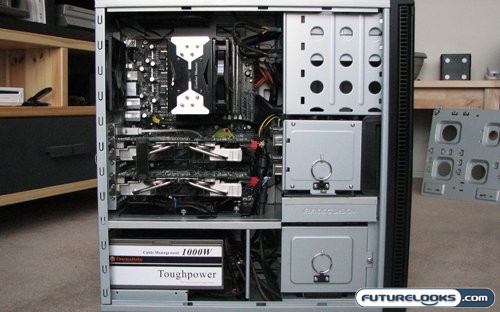
Admittedly, my test system did fit well into the Antec P182, and looked great from front to back. Thanks to Antec’s well though out cable management tools, the motherboard was fully visible and airflow was unobstructed. I’ve tried setting up this type of cable management myself using an array of zip ties, and could never come close to this kind of cleanliness. Now I can’t wait to fire my rig up, test out the thermals, and put the P182’s claims of quietness to the test.
Test Setup
For this test rig, all testing was done under Windows XP. Idle conditions were established by letting the system run for 30 minutes to make sure the system was truly idle, and to let temperatures stabilize. Since Antec has included Tricool fans in the P182, each test was run on each of the three fan speeds. Noise levels were tested with a dB meter directed at each side panel, positioned 6 inches away.
For thermal testing, SiSoftware Sandra was installed. Among other features, this program includes a suite of burn in tools to test a system to the limits. We used tests that drove CPU usage to a constant 100% and placed stress on the RAM. This should generate a fair degree of heat, and really pose a cooling challenge.
Noise Levels
Today noise seems to be more important than cooling performance for the average user. As long as the computer doesn’t overheat and is quiet, everybody is happy. With that in mind it’s only fitting that we first take a look at the aural performance of the P182 Mid Tower. As noted, we tested the noise levels for each fan speed available on the Antec Tricool fans. The environment in which we tested had all external noise reduced to silence; I even had to turn off my current horribly loud rig. Here’s the numbers posted by our sound meter:
- Low Speed: 42.6 dBA
- Medium Speed: 44.5 dBA
- High Speed: 48.3 dBA
When it came to more subjective tests, the medium speed setting seemed to be the sweet spot for noise. Low speed was whisper quiet and high speed moved enough air to be quite audible. My ears loved the low speed, and really liked the medium speed. Hopefully my ears and our thermal numbers agree.
Temperature Levels
I may have fibbed a little. The temperature of your equipment is still very important. If an enclosure can’t keep control of its thermal properties, the result will be a very quiet system…because it will be dead from thermal failure. When it comes to thermal management, the Antec P182 doesn’t fail to perform, even in an environment as brutal as my home office. We tested the CPU and system temperature under idle and full load, and each test was repeated for the three fan speeds available from the Antec 120mm Tricool fans included with the case. The ambient temperature of the room was 25°C, which is rather warm. Even under that amount of stress the P182 performed admirably.
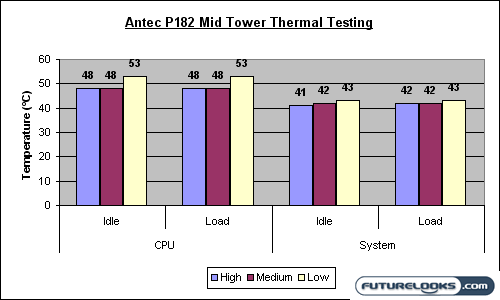

Once the dust settled on our benchmarks, the middle fan speed once again proved to be the sweet spot for cooling. Overall the system temperature jumped 16°C above the ambient temperature of the room, but they were stable. The P182 managed to keep the thermals consistent, and prevent any wild spikes in temperature. When you break it down to each speed setting, the high speed setting didn’t make much of a difference for the amount of noise it generated. The temperature of the CPU was kept stable from idle to load, and the system temperature only varied by a difference of one degree between the former and the latter. The low setting was whisper quiet, but the increase in temperature on the CPU was less than desirable.
In our tests the medium fan setting is where it’s at. The temperatures under idle and load for both the CPU and system didn’t vary too much from high speed, and subjectively the noise levels were still almost as quiet as the low speed setting. You mileage may vary of course, based on components used, the configuration of those components, and your chosen fan locations. The speed of each fan can be set independently, which will also positively and negatively affect you temperatures. That being said, I think it’s safe to say that the Antec P182 mid tower meets expectations for noise and thermal management.
Real-Time Price and Stock Check – Shop Like a PRO!
Conclusion
The Antec P182 Advanced Super Mid Tower case may be looked at by many as simply an update to the venerable P180. That doesn’t take anything away from the fact that the P182 is still a very good enclosure with some much needed updates from its ground breaking predecessor. On the outside, the two tone colour scheme Antec chose looks much more striking than the stark silver and black of the original P180. This package isn’t all looks though; it has personality to. The interior of the P182 is practical and well engineered, allowing it to fit a wide range of system configurations.
When it comes to performance, the P182 lives up to the expectations put forth by Antec at the outset of this review. The case is very quiet, and only in extreme performance situations will you notice that your computer is turned on. Luckily, the computer will stay on in those extreme performance situations as the P182 has a good handle on thermals.
There were only a two issues indentified with this case. First and foremost is that while this case is roomy, it isn’t huge. With some planning and forethought you should be able to fit most configurations inside, but of course your mileage may vary. The second is a minor gripe; even for a steel case, the P182 is rather heavy. Installation of all my components only made this worse. I wouldn’t take it to a LAN Party that’s for sure.
Front to back, the Antec P182 is an excellent enclosure. It is everything one expects from Antec; by listening to its customers they have succeeded in trying evolve and perfect a popular design.
The MSRP of the Antec P182 is $169, but I’ve seen street prices as low as $100. When you take into account the looks, noise levels, and thermal management, you come to realize that this is an awesome price. If you are looking for a large mid tower to hold a performance rig, look no further than the Antec P182.
The Good
- Good looks
- Low noise
- Excellent thermal performance with fully adjustable fans
- Well thought out cable management
- Excellent price
The Bad
- Hefty, hefty, hefty
- Might not fit all configurations
Overall Rating: 9.0 / 10.0


Discuss This Review in the Futurelooks Community Forums
Real-Time Price and Stock Check – Shop Like a PRO!