

With the new season starting it is time for some houskeeping which includes giving my computer a cleaning and maybe a new and unique case with perhaps a new feature or two that my previous cases didn’t have. I normally try to look for a design that not only shows off the insides of my computer, but also gives that “Wow” look from passerbys. Recently, I received a new case to review from a company called Sunbeamtech. This new case known as the Tuniq 3 has elements of uniquness, style, and a bit of that “Wow” factor and more.
The main feature that is unique to the Tuniq 3 is the Core-Fan Bracket, a unique internal air traffic controller that allows direct cooling of different areas of the case. In addition, the case sports clean and a rather slick styling. Another feature that the Tuniq 3 seems to boast is the blingy lighting factor. It features fans with LEDs to help illuminate the insides while 2 CCFL (cold-cathode florescent lights) help light up the base around the case giving it a sort of floating effect. But will the execution of these features really allow the Tuniq 3 to stand out? I guess we’ll find out.
Specifications
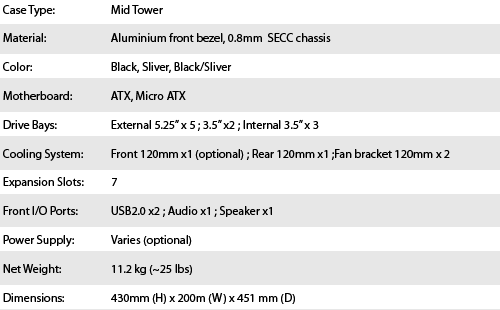

Features
The Tuniq 3 from Sunbeamtech definitely isn’t shy in boasting an array of added features which people tend to look at when purchasing a new computer case. With easy access I/O Ports, lighting for inside and outside of the case, customizable internal cooling and more, this case is already fairly featured packed:
- USB & Audio Ports on side of front panel
- Adjustable 3D Core-Fan Bracket
- Ultra Silent, 1000 RPM 16dB Fans (x3)
- CCFL Case Feet
- Aluminum Front Panel
- Tool Free Installation
- Acrylic side Window (optional)
I am looking forward to seeing how the features of the Tuniq 3 case hold up to my reviewing eyes and if the Tuniq 3 will be a keeper for the long term.
Case Exterior

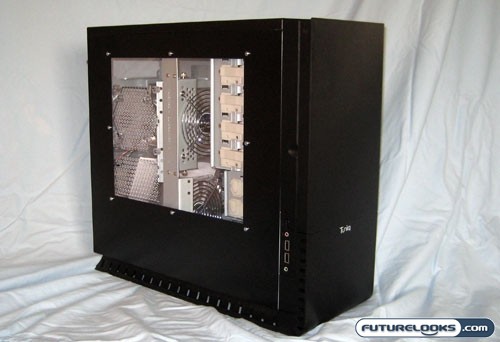
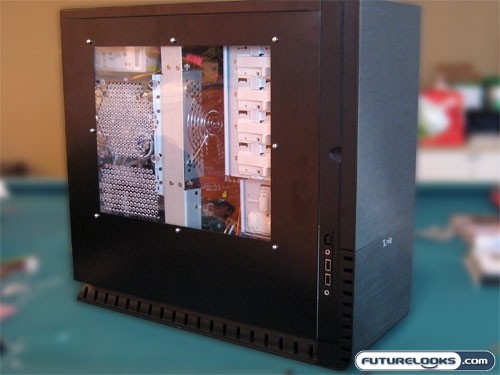
The Tuniq 3 is primarily made out of steel and seems to have a hefty weight to it (approximately 25 lbs) which to date is probably one of the heaviest cases I have come across for a mid-sized tower. The colour schemes that are available for the Tuniq 3 are black (as tested), silver and a black/sliver. This particular case also came with an acrylic side window which is normally an option. The acrylic window is vented for the CPU and video card area. I always thought this took away from the overall look of the window but does play its part in cooling which is very important for the health of your components inside.
Real-Time Price and Stock check – Check More Products
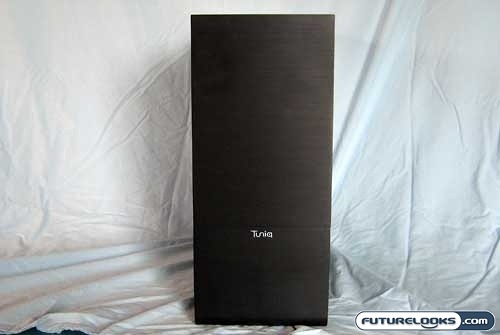

The front face or panel is made up of brushed black aluminum and clear of any obstructions such as buttons, switches or LEDs. The only item present on the front panel is the Tuniq logo which does not hinder the look of the front panel, but rather, gives it a bit of class.
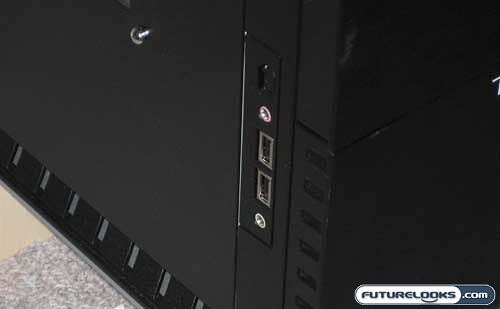

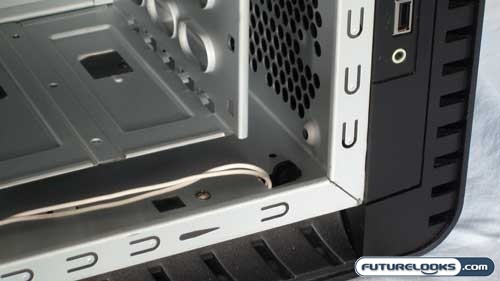
Along the side of the front panel are the USB and Audio ports. These ports allow you to keep the front panel door closed when you need to plug in your external devices. There is also a knock out for a Firewire port which is optional and did not come with this particular case. Who uses Firewire nowadays anyway, while at the same time, why don’t you just include it because every case on the market comes with it standard?
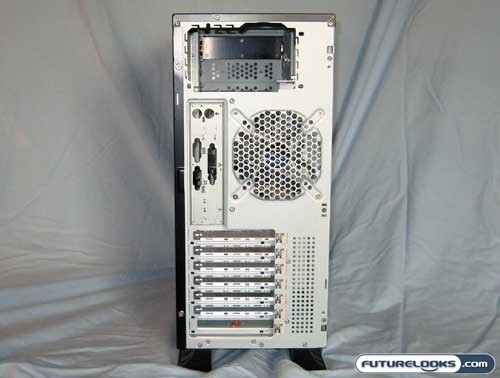

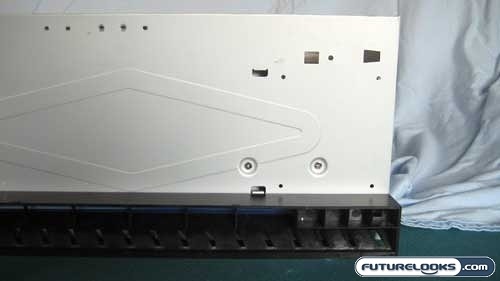
The rear of the case is fairly typical of ones I have used or reviewed in the past and allows for a 120mm exhaust fan with the typical spot to place the power supply at the top. One thing in this case that is a pre-installed is a switch located in the bottom bracket allowing for activation of the CCFL bulbs that are under the feet of the case.
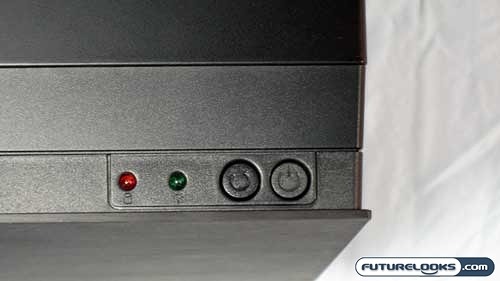

The power and reset switches are located at the top of the front panel as are the power and activity LEDs. All of these are set flush with the panel giving it a clean look and can prevent accidental pushes.


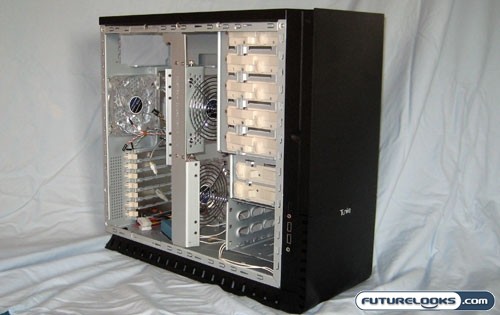
Opening the door reveals the five 5.25” drive bays as well as two 3.5” bays. The door swings open to about 135 degrees which allows easy access to any optical drives you may have installed. You can also remove the back panel of the door to reveal the wiring channel of the case which routes the power and reset buttons to the motherboard.
Real-Time Price and Stock check – Check More Products


You may notice that at the bottom corner of the door, you can see the wiring entering the case. This is a pinch area and it looks like the case I received had wires that might have already been pinched. Running a wire sheath could easily improve this potential problem area. The door also makes use of magnets along its frame to ensure it stays closed.
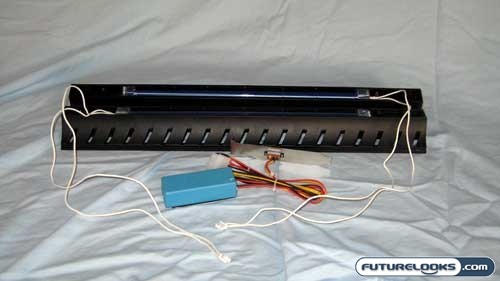
A feature that is pretty unique to the Tuniq 3 case is that it has two blue cold cathode lights (CCFLs) in the feet. The feet are slotted along the length of the base of the case which of course would allow the light to shine through on either side and adds about an inch in height to the overall height of the case.
Interior
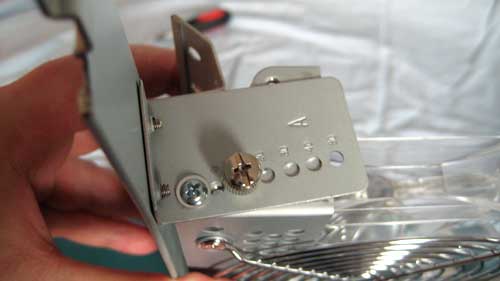
Included on the inside of the case is the box of goodies. The goodies are the typical hardware mounting items such as screws, motherboard standoffs and the tool-less drive rails. The manual that is included is a bit different than other case manuals I have seen; it shows the various configurations for the Core-Fan Bracket and how to set them up in great detail. Since the Core-Fan Bracket is a unique selling feature of this case, I would expect no less.


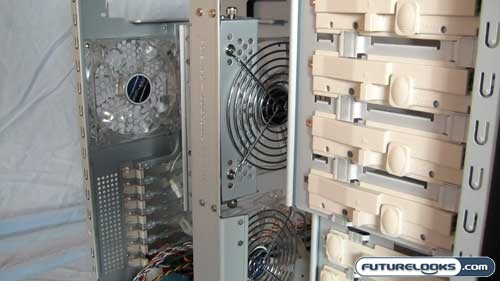
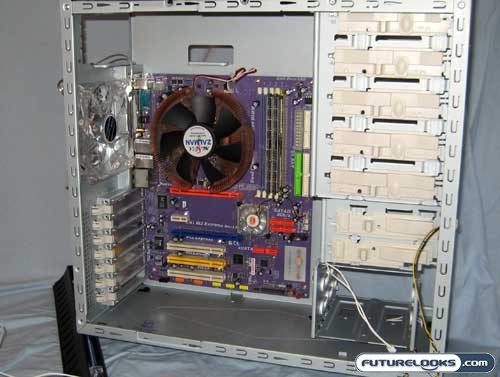
You can see immediately that the main focus of this case is the Core-Fan bracket. This bracket is mounted on a steel girder and includes two 120mm fans. My first thought was if my components will fit properly with this Core-Fan bracket installed. This Core-Fan bracket also allows you to execute some customization in placing the two 120mm fans which will help with different hardware configurations.
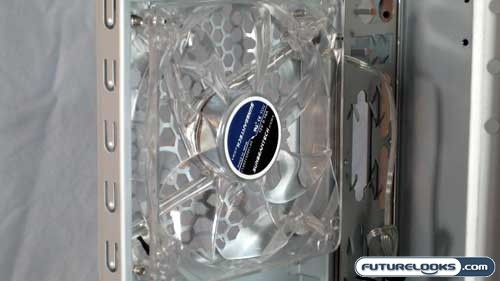
The other 120mm fan that is included is for the rear of the case to exhaust the air. Each of the included 120mm fans come with the basic 3-pin connector with Molex adapters as well as blue LEDs. I am curious to see how much noise these three 120mm case fans produce, though at 1,000 RPM I am hoping they are not too loud but will still provide decent air movement. Below the exhaust fan are 7 slots for your various internal expansion cards.
Being a tool-less design, the Tuniq 3 allows you to put away your screw driver (for the time being). One of the 7 slots is already taken up for the light switch that turns on cold-cathode lights. It’s placed in the bottom most slot so it’s fairly out of the way. It also has an attached inverter that you can install pretty much anywhere due to the good length of power cable that is included. If you are worried about how to attach the inverter so it does not slide around, do not fret as a strip of Velcro is included.
Real-Time Price and Stock check – Check More Products
Even MORE Fans!
At the front of the case behind the removable hard drive bay is a spot for another 120mm fan, which is not included and looks like it can be a bit of a pain to get into place anyway.
When you move up to the drive bays they are also of the tool-less variety. They slide and lock into place once you have properly positioned your drive. For those nervous about these tool-less locks you can still secure your devices with screws if you wish.
Installation and Setup
Now it is time for the fun part: Installation of the computer guts. The one thing I noticed right way was that I would need to remove the Core-Fan bracket in order to get my motherboard into position. There was one catch though; in order to remove the Core-Fan bracket it would require me to get out the screw driver to remove the two bottom screws that hold the bracket to the rest of the case. So much for tool-free!
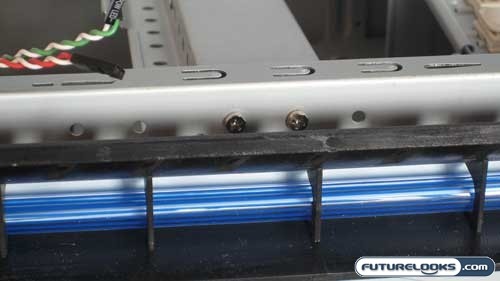
Do you see something that might make it a bit difficult to remove? The cold-cathode light is in the way when you go to remove the screws. In order to remove the cold-cathode light from the case you need to remove two other screws the hold the feet and then slide the foot forward and out. These are placed inside the case.
Be careful not to snag the light’s wire as the edge of the hole will strip of the outer cable and that could cause a short in the light’s wiring. This is a bad thing so we recommend you not do that.
You can also remove the hard drive bay by removing the four screws that hold it to the case. There are two screws located on the underside of the case and two more screws located on the motherboard tray. Once these four screws are removed the hard drive bay can slide out towards you easily. I would see the only need to do this when you are installing a 120mm air intake fan.
In order for me to remove the back foot of the case, the hard drive bay did need to be removed and required the use of a Stubby screw driver. This was needed to get at the screw the held the front of the foot to the bottom of the case. If you do not have a Stubby screwdriver you may find it difficult to remove this particular screw.
Prior to installation of the motherboard you should ensure it is clean and dust free unlike the photo above. This is just good housekeeping, but it’s your case. You do what you want.
Real-Time Price and Stock check – Check More Products

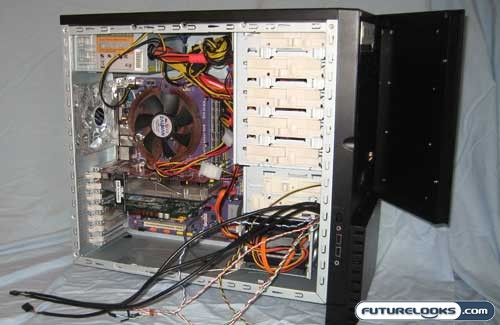
After I removed as many in-the-way parts as I could which included the two bottom feet (so the case could stand properly without wobbling), hard drive bay, front panel and side panels, installation of the motherboard was fairly straight-forward. After ensuring I placed the standoffs in the correct location for my motherboard type, I just screwed it down and it was good to go. I reinstalled the hard drive bay and one of the bottom feet only to notice that the case would not stand up by itself. If I had the front panel on this would not have been a problem but since I removed the front panel I had to prop the case with the other foot temporarily. Though I normally do not work on a case standing up like this, it made it easier for taking pictures.

One I installed all the components into their respective spots I took notice of how cramped it looked in there. I started to wonder if the Core-Fan bracket was going to fit properly especially since my MSI 7600 GT video card was slightly longer than the eVGA 7600 GT card below it. The case was also very messy with its wires all over the place and not many places to hide them.

At this time I also tried to close the front panel and found that it would not close properly. Even though the inside of the front panel is recessed a bit it would not fully close. I found that the culprit was the front bezel of the LG DVD Burner I had installed. It would not sit back far enough to be flush with the rest of the case. So what did I do? I went out and bought a new LG SATA DVD burner which fits perfect in the 5.25” bay and allows the door to close properly. Your experience here may differ depending on the front bezel of your optical drives. The insert for the 5.25” bay has an inner bezel which stops the drive from being moved back flush. If you do not want to keep trying drives until they fit, you could probably file down the inner lip of the 5.25” bay panel flush but that is up to you.
Now that all the components were in and the door could close I could look at installing the Core-Fan bracket. Again, I was a bit worried that it might not fit with the current configuration I had.

The Core-Fan bracket is a pretty interesting and unique feature to the Tuniq 3 case and allows for a bit of customization. The manual shows various configurations for the two 120mm fans and I found that the default one (the two fans together, one above the other) would not work as the lower fan was getting in the way of my SATA connections. I choose to place one fan over the CPU and suck air in while the other fan moved air front to back. For me to do this I had to remove the fan grill and reposition the fan so that it brings air into the case over the CPU’s heatsink.
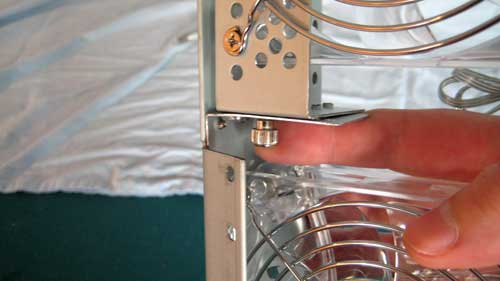
I also had to fiddle around with changing the angle (0 to 50 degrees) of the top fan but found it quite hard to do with my fingers, especially for the lower thumbscrew. It’s as if it was built for smaller Asian hands or something…
Real-Time Price and Stock check – Check More Products
I also could not get the fan to sit at 0 degrees; 10 degrees was the closest I could get it to move to and still be able to screw in the thumbscrew.

This position allows the top fan to move air from the front of the case over the memory and CPU to the back of the case towards the exhaust fan. That was a LOT of work though, but it is done and I shouldn’t have to change this unless I change my components.
After I got the Core-Fan bracket inserted to where it would fit I plugged the two 3-pin connectors to the motherboard and put the rest of the case together then powered it up. It would not power up fully. It would power up, the fans would spin up, the hard drive briefly spun up and then it would turn off. I was beginning to worry that somehow I managed to fry my motherboard (22 years and so far no computer deaths from my playing directly with a motherboard). I looked over the motherboard and could not see any issues. This was starting to trouble me.
I checked to ensure the pins were in the proper header locations for the front panel switches. I looked around and with the front door of the panel open I noticed that the power switch wires were crimped pretty badly. In fact, the aluminum (yes they do not use copper wiring) was starting to show through. This must have happened from the door pinching and/or the cable being pulled across an edge of the steel case. Either way this was hampering my ability to successfully power up my computer and frustrated me further. My fix was not pretty and not totally perfect but I switched the power switch for the reset switch. The computer turns on and powers up now but the reset switch is more of momentary toggle switch so it can be a bit quirky when turning on the computer.


Once the computer powered up, the fans spun up and lights glowed and all was good! Well perhaps except for the messiness of my cables inside the case.


I managed to find some zap straps and cleaned up the case as best I could considering there are not many places to hide the large amounts of cable I have currently in the machine. Also switching from an IDE DVD Burner to a SATA based burner helped allow me to clean up the cables further as SATA cables are much thinner than IDE cables.
Real-Time Price and Stock check – Check More Products
Performance
For testing the performance of the Tuniq 3 case I moved all the components from my previous case into this one. The manifest includes:
- AMD AM2 X2 3800+
- Zalman CNPS7700-Cu CPU Cooler
- EliteGroup KN1SLI Motherboard
- MSI 7600 GT Video Card
- eVGA 7600 GT Video Card
- Samsung 200 GB SATA 7200 RPM Hard Drive
- LG DVD Writer
- Antec TP_II550 True Power 550W Power Supply
Although not an extremely high performance system, it’s definitely representative of they layman’s system. The use of the two video cards in SLI mode should create a bit of extra heat which the Tuniq 3 will hopefully be up for the challenge of cooling off.
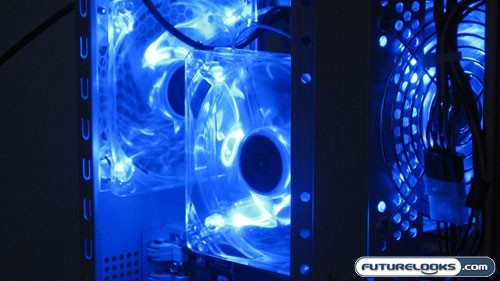
Once my computer was powered up and the fans started whirling away with their blue glow I thought it looked pretty cool and didn’t actualy sound too noisy at all. The majority of the noise in this particular setup does not come from the three 120mm case fans that the Tuniq is supplied with but rather the Zalman CPU Heatsink and the Antec TruePower PSU. The two 7600GT’s use fairly silent cooling mechanisms making them unnoticeable.
Noise Level
One thing I am getting a bit more into is trying to keep my machines as quiet as possible. Granted I currently do not have a spare room for my 3 computers so when I received the Tuniq3 case I was a bit worried about what sort of noise three 120mm fans would produce. I turned off all external noises such as other computers, music and fans in the room so that I could get noise level reading prior to turning on the computer. Once I took my everything-off reading I then powered up the computer with all three 120mm fans spinning in addition to the other two 120mm fans that are part of the setup. The results as as follows:
- Initial Noise Level with everything turned off: 47.4 dB
- Machine fully running including the three 120mm fans: 51.3 dB
The results show that with all five (yes…five…) 120mm fans running, the ambient noise increases by almost 4 dB which to me is acceptable for one machine. The three 120mm fans that come with the Tuniq 3 case run at a slow speed of 1,000 RPM whereas the other two 120mm fans I have in the case both run at 5,000 RPM and unfortunately, those I can not change the speed of to match that of the other Tuniq units.
Temperature Levels
One important aspect of a computer enclosure is to ensure that the components within are kept at a temperature that allows the components to perform at an optimal level. You would not want to be able to cook an egg on your video card right? Let’s see how well the Tuniq 3 with its three 120mm fans stand up to keeping my computer cool in an ambient room temperature of 23°C.
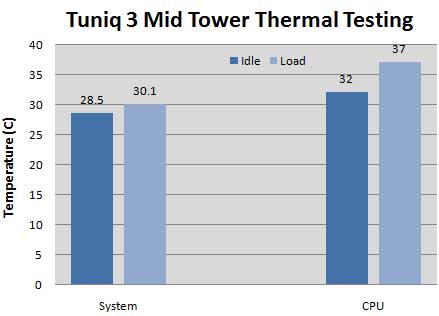

In order to establish idle temperature, I freshly booted up the computer and ran it for thirty minutes. After I was content with the results, I fired up Assassin’s Creed in order to get a load on the CPU to increase the overall temperature. While playing Assassin’s Creed I noticed that the system temperature only rose about 2°C while the average temperature of my CPU’s cores rose roughly 5°C. I played for a little while more and the temperatures did not seem to fluctuate more than 0.1°C which I would say is a pretty decent cooling job. So without a large fluctuation in overall temperature I would be content in saying that the three 120mm fans that this Tuniq 3 case provides does a pretty good job in keeping the temperature in check.
Real-Time Price and Stock check – Check More Products
Final Thoughts
The Tuniq 3 Mid-Tower case is overall, a nice functional case. The black brush aluminum front panel is elegant and free of any oddities that might make your friends chuckle at you if they come over to borrow it. The multiple configurations of the Core Fan-Bracket allows you to create a more customized cooling system by allowing you better control over airflow through and over your internal components.

While your mileage may vary I did come across a few issues while setting up my computer with the Tuniq 3. The first thing was that in order to install a motherboard I did have to remove the Core-Fan bracket which I found out was not an easy task. You disassemble quite a bit of the case to successfully configure and then reinstall it. The second issue I encountered (and again your experience may vary) is that my previous IDE LG DVD burner stuck out of the front bezel just enough to stop the front door from closing fully. This was an annoyance and since I did not want to have to modify the plastic insert that fits around the drive, I went out and bought myself a new SATA LG DVD burner that fit.
Last but not least the case that I received had it’s power switch cable (the one from the motherboard to the switch) malfunction due to the outer sheath being stripped, exposing the aluminum wire. This caused the computer to start up improperly and shut itself off. To fix this I used the reset switch cable instead and now I am able to power up the computer, but it can be a bit quirky. This is clearly a quality issue that needs to be addressed as carting cases back and forth from the computer store can clearly be a pain. It’s an even bigger pain if you had this shipped to you via mail order and now had to pay for return shipping. This could be solved with some sheathing similar to the type on most higher end power supplies to protect the cable.
The overall design of Tuniq 3 case is innovative but does display a good deal of thought. The addition of the feet with blue cold cathode lights is nice eye candy especially in a dim to darkly lit room, as are the blue LEDs that are set in two of the three 120mm Fans. The Core-Fan bracket can be a bit troublesome to work with but produces enough air movement to keep the guts of your computer cool even under full load without increasing the noise factor. With the Core-Fan bracket and all the components installed the case was fairly heavy; at about 32 lbs after all items installed. I would not want to lug this around if I were to attend any LAN parties
If Sunbeamtech does come out with a new Tuniq series case I would like to see perhaps a different way of mounting the fans so that I would not have to dismantle most of the case just to get the motherboard in. Perhaps make use of a removable motherboard tray that slides out from the back. Then I would only need to worry about the length of the video cards fitting properly. The other issue is quality assurance and a stripped power cable is no laughing matter especially since it isn’t an obvious problem to troubleshoot. I would have to call this case an innovative concept with a need for improvement in quality and execution. I hope Sunbeamtech steps up to the challenge for the next round.
Pros
- A classy and timeless looking exterior
- Clean front panel hides external drive bays
- Multiple configurations for 120mm Core-Fan placement
Cons
- Heavy
- Impractical placement of various mounting screws
- Need to remove multiple components for motherboard installation
- Might not work with some front device bezels (door might not close properly)
- Quality issues with stripped cables
Overall Rating: 6.5 / 10.0
Discuss This Review in the Futurelooks Community Forums
Real-Time Price and Stock check – Check More Products