Touch Controls or Remote Control: Your Choice
Who needs clunky physical buttons? They just take away from the slick appearance of a sleek device like the Kaleido R7. Rather than place physical buttons along the side or the top, IPEVO has placed a series of touch-sensitive controls along the front of the base. This makes them very easy to access and they still maintain the clean aesthetic.
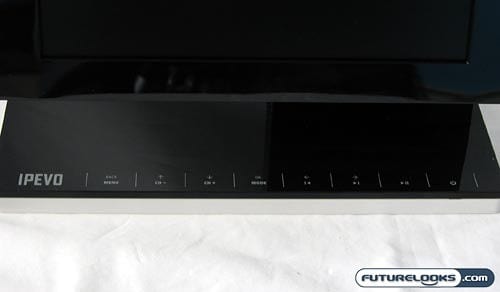
While I’m not usually a big fan of touch-sensitive controls, I found that the ones on the IPEVO Kaleido R7 were remarkably responsive. The only physical button is a power switch on the right side of the base. Using the touch controls was an easy and enjoyable experience.
If you’d prefer to keep your distance, IPEVO has also bundled a small remote control. The remote isn’t anything too special. It’s your typical credit card-thin remote with “bubble-like” buttons on top that mirror the touch controls on the frame.
Setting Up the Connection
While you could certainly use this digital picture frame like how you would every other digital picture frame, you would be missing out on most of the fun by doing so. Yes, the Kaleido R7 comes with an SD card slot where you can easily load up an abundance of family photos. Yes, there is also an available USB port where flash drives can provide hours of picture-watching entertainment. But these aren’t why you’d want to pay the premium on a fancier frame like this.
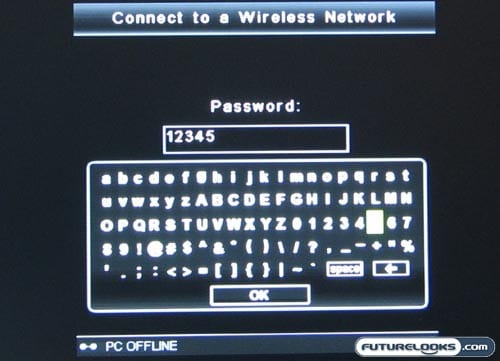
The IPEVO Kaleido R7 is equipped with a Wi-Fi connection and the on-screen user interface is incredibly polished and easy to use. The first time you turn it on, it will walk you through the wizard for connecting to your home’s Wi-Fi hotspot and the pairing with your computer. I’ll get to the latter half in just a second.
The process is quite simple, starting with picking your SSID from the list (or entering your hidden one). However, entering your network key can be quite a pain, since there is no available keyboard. You are stuck using the arrow keys to navigate through the on-screen keyboard. Thankfully, you only have to do this once.
And on the PC Side of Software
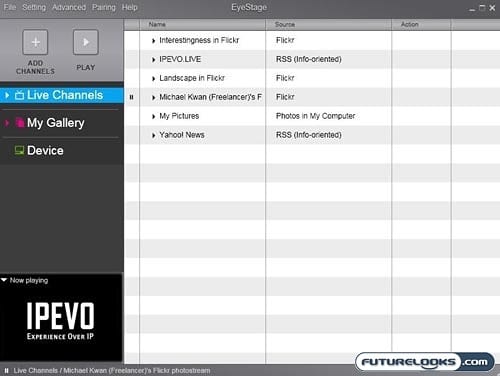
To get the full functionality out of the IPEVO Kaleido R7, you also need to install the provided EyeStage software on your home computer. It is from here that you are able to manage your galleries and what IPEVO calls live channels. The software installation wizard walks you through the entire process and the relatively simple GUI is easy to follow.
From here, you need to pair your PC with your frame. You initiate the pairing process on the frame to make it “discoverable” on the network. Then, from the PC side, you hit the same pairing process until it “finds” the frame. After they are paired, content can easily be shared over the Wi-Fi network. Your digital frame has access to your “My Pictures” folder, for example. No need to physically transfer any media.