Test System System

I’m keeping everything identical from the Z87 round up except for the board of course. The latest BIOS ensures everything is comparable so we made sure to update every board used. I used all the memory kits collected to date to look for any platform anomalies or incompatibilities. Just make sure you purchase a good quality kit from a reputable manufacturer and you should be fine.
Here’s the list of parts:
- Processor: Intel Core i7-4770K Haswell
- Motherboard Set: From Z87 round up
- Motherboard as tested: GIGABYTE GA-Z87X-UD7 OC Force
- Memory: Kingston HyperX Predator 1866MHz 8GB DDR3
- Graphics: GIGABYTE GTX 770 2GB OC
- Storage: Kingston HyperX 3K 240GB SSD
- Power: Rosewill Tachyon 1000 Watt Platinum
- Power 2 (EMI and EMF Tests): Rosewill SilentNight 500 Watt
- OS: Windows 7 Pro
- CPU Cooling: Thermaltake Water 2.0 Extreme
- Case: Epic Case Designs Tech Station
Since you’re no doubt curious what memory kits I have collected, it consists of ADATA V2.0 Gamer 2400MHz, Corsair Dominator Platinum 2666 and 2800MHz, Kingston HyperX (1600, 2133, 2400MHz) Genesis, HyperX 1866MHz Predator, and HyperX 2133MHz Beast memory, and Patriot Memory (1600, 1866, 2133MHz) Viper III, and Intel Extreme Masters DDR3 memory kits.
Now let’s put everything together.
Installation and Set Up Experience
The physical installation was as easy as any DIY user would expect. All the test peripherals installed in each expansion or DIMM slot worked quite well out of the box. I used ten different varying brands of DDR3 as listed above, with speeds ranging from 1600 to 2800MHz without issue. Most of the real work happens during the software and driver set up.
As mentioned in the app section, GIGABYTE includes a software driver DVD which takes care of the bulk of all the applications. However, if you lose the DVD, you’ll have to download everything individually. GIGABYTE doesn’t currently have a complete suite bundle like ASUS AI Suite II, which takes the guess work out of installation.
One thing that may confuse users is that you must have the App Center installed before installing each program. Otherwise, users will execute the individual app and nothing seems to happen. So make sure to install the main App Center first and then download the newer software to avoid confusion.
Overclocking Results – Cooking Silicone!
Overclocking my ES and retail sample Haswell processors had mixed yet positive results both manually as well as through Easy Tune. Memory overclocking ran great up to 2800MHz (currently the fastest kit in the lab). Memory bandwidth scaled from roughly 19GB/s to 29GB/s. The board also worked well with all the certified XMP memory in the lab. The Performance tab’s “Performance Upgrade” setting range 20% (4.3GHz) to 100% (4.7GHz) in CPU frequency increase. These presets worked perfectly up to 4.7GHz. Easy Tune and surprised me even further by matching the UEFI BIOS presets.
Manual overclocking proved that the boards can go well beyond except when voltage is set near 1.4 volts, and when used, CPU temps quickly reach more than 90 C. There just isn’t enough hea transfer going on underneath even top end CPU air coolers. Obviously, more extreme methods are available if you’re up to it.
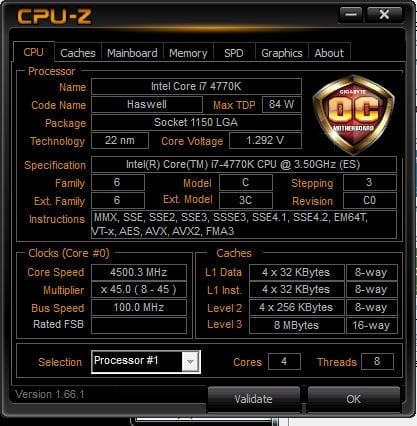
One particularly great capability of the OC and OC Force motherboards is that both manage CPU VREG power more efficiently compared to manual tuning especially when using the BIOS or Easy Tune overclocking presets. For example, when using the 4.5GHz (60% Upgrade) setting, the board commanded a maximum of 1.29 volts. In fact, the board also commanded the higher auto overclock settings with less voltage than manual tuning. This is a great unspoken feature of the GIGABYTE GA-Z87X-OC Force motherboard.
Reviews often talk a lot about overclocking capability. But the question is, does that equate to any tangible benefits? Let’s investigate with our serious of benchmarks!