The Hyper N620 Walks the Runway
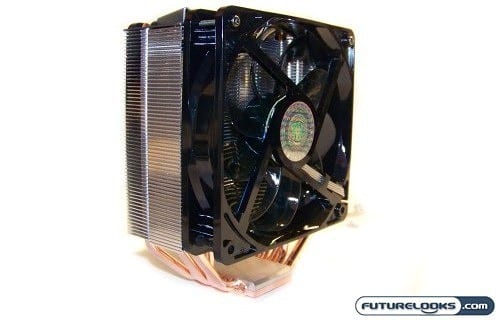
One of the first things I noticed when pulling the Hyper N620 out of the box was the fact that the 120mm fans were already premounted. That should save you some installation time, though it’s never hard mounting a fan in first place. After plugging in the fan header, I realized that these are low (MCD) LEDs which means they won’t be too bright. The fan blades are designed to help reflect the LED light which makes the cooler that much more noticeable.
The aluminum fins are quite clean and also sport a nice finish. You’ll find them to be perfectly spaced on both sides as well. Attention to this kind of detail shows the capable level of quality you can expect from Cooler Master.

The cooling performance comes from the copper base and heat pipes that run the length of the CPU cooler. It’s the connection between the cooling plate and pipes inside the base that will ultimately affect performance. The copper based is polished to a mirror finish and is the best way to ensure that there is optimal heat transference occurring between CPU and heatsink. Again, Cooler Master has given us the tube and has asked us to apply it. This is not such a bad thing as typically, manufacturers put WAY too much past on which not only creates a mess, but isn’t ideal for the best possible transfer. As we all know, a little bit goes a long way.
Our Test System Setup
In order to allow you to reproduce and compare your results to ours, we’ve listed out our test system components. These components represent a fairly high end system that is capable of producing enough heat to stress the Hyper N620 CPU Cooler.
Parts include:
- Intel Core i7 975 Extreme Edition Processor
- ASRock X58 Extreme Motherboard
- 12GB Kingston HyperX 1600 MHz Triple Channel
- ZOTAC GeForce GTX 295 Video Card
- Kingwin 1000 Watt Mach-I Power Supply
Our operating system of choice was Windows Vista 64 bit to support the massive amount of RAM in our test system.
Installation Notes
With the instructions in hand, most any novice can figure out how to install this cooler. It also helps that Cooler Master creates their documentation in several dialects and uses many pictures to tell the story. The mounting hardware is pretty well marked as to the application for which it’s intended. Four bracket screws, four mounting screws, a motherboard back plate, and four bolts are all it takes for LGA 1366 installations.
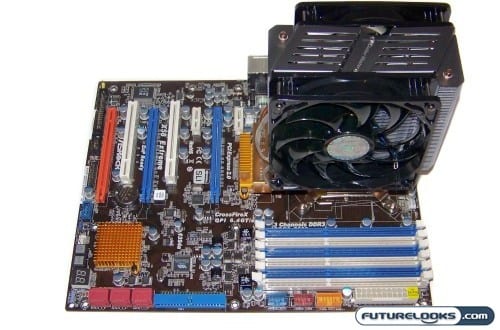
Once installed, you can see that the Hyper N620 isn’t any bigger than any other tower cooler available. The two fans increase its thickness which you’ll want to make a mental note of as you observe your motherboard. If you take off one of the fans, it’s even thinner. Realistically, you’d probably lose 1 to 2 degrees cooling performance max. The second fan’s purpose seems to just ensure air gets pulled through the cooler.
The only real concern to watch out for is the placement of your motherboard’s memory sockets. Some boards, like the EVGA X58 Classified, have memory sockets that are a bit too close to the CPU socket for really large CPU coolers. Otherwise, it worked just fine for the test board even with its large chipset heat pipe cooling.