Installation Notes
The mounting system can be quite tedious requiring some patience and dexterity for LGA 1155/1156 and all AMD boards. Here’s the process:
- Four small bolts slip through the back plate and PCB.
- Four small plastic washers clip on the bolts to hold them in place.
- Apply some thermal paste to CPU.
- Attach the unmarked mounting brackets to the cooler’s base.
- If your case has a motherboard tray cut out, tighten the bolts to the brackets on the base without letting the cooler tilt.
You can also lay the case between two surfaces and sit the cooler on top flat. If you don’t have a cut out, lay the cooler upside down on a flat surface and then line up the motherboard from the top. Overall, this isn’t the easiest or most efficient mounting method or system. So we thought it would be best if we laid it out so that you knew what you’d be up against.
The mounting system is easiest on the LGA 2011 boards because it doesn’t require the back plate or board removal. You can install it with the following three steps…
- Four small dual threaded mini-bolts attach to the CPU socket corners with the wrench.
- Attach the unmarked brackets to the cooler base.
- Four small nuts hold the cooler in place using the wrench.
Ultimately, this four point mount is best for ensuring a reliable connection. It will work well for regular users no doubt. But speaking from system integrator experience, a cooler this size using this mounting system is still cause for concern especially during shipping given the way big boxes with systems are treated by UPS and Fedex. If you are a system builder or integrator shipping a system with this solution onboard, the Instapak method is recommended to prevent this cooler from tearing a hole in the motherboard.
Test System Setup
I assembled a tried and true X58 test system with the Core i7-980X to push the TDP limits of the Dark Rock Pro 2. Some of the coolers included in the scores had to use Arctic Silver 5 mainly because any bundled compound has long since been used up. There’s usually only enough for three or four installations. Also, I switched out the usual Antec power supply and replaced it with bequiet’s own Dark Power Pro 10 650 because it’s a very quiet PSU which helps eliminate it as a noise source.
- Processor: Intel Core i7-980X Gulftown
- Motherboard: ASUS Rampage III Black Edition
- Memory: Kingston HyperX 12GB 2000MHz DDR3 Triple Channel
- Graphics: Zotac Geforce GTX 680 AMP! Edition
- Storage: Intel SSD 520 Series 240GB
- Power: bequiet! Dark Power Pro 10 650
- Test Cooler 1: bequiet! Dark Rock Pro 2
- Test Cooler 2: NZXT HAVIK 140
- Test Cooler 3: Thermaltake Frio OCK
- Test Cooler 4: Noctua NH-D14
- Test Cooler 5: Thermalright Venomous X
Prime95 was used for heating up the CPU which of course heats up the surrounding VREG components as well. The test enclosure was left open to offset any additional component heat. It’s simple testing from here on out.
Thermal Performance
This time around, I’ve left out the overclocked idle temps since the ASUS Rampage III Black Edition was used in testing. It offers overclockers the option to force constant CPU Voltage or use the Offset Voltage which means it uses whatever it needs. This can make the idle temps look a little skewed.
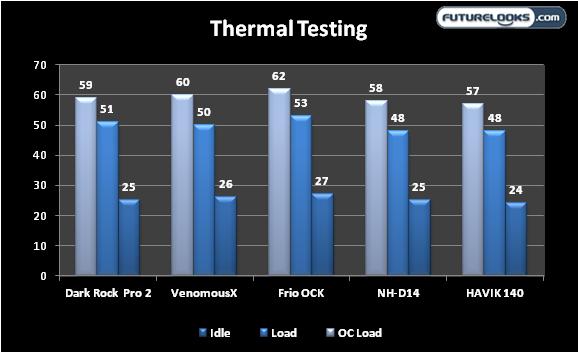
The Dark Rock Pro 2 actually performs respectably well among these big players. In my professional opinion, anything that can keep six cores under 55C at full load is a very good cooler. Now, it becomes a question of noise. That comes next.
Noise Levels
When evaluating fan noise, there are two variables to consider. One is the fan itself since things like blade shape and RPM create noise. The second is the CPU cooler itself in that the fins and their orientation can cause even more noise. There is such a thing as having too many radiator fins and other design obstructions.
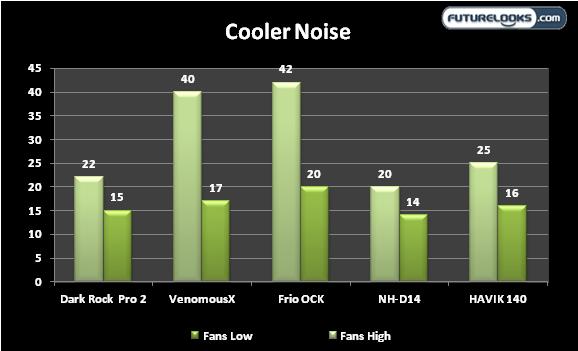
This evaluation adds a new angle to the Dark Rock Pro 2 image. The cooler manages to maintain low temperatures without generating a considerable amount of noise especially at max speed. The bequiet! is a pleasant experience on the ears at all times. Overall, I’d say the cooler is rather aerodynamic and matched well with the fans. This is one reason why many CPU cooler manufacturers make, or design their own fans.
Final Thoughts

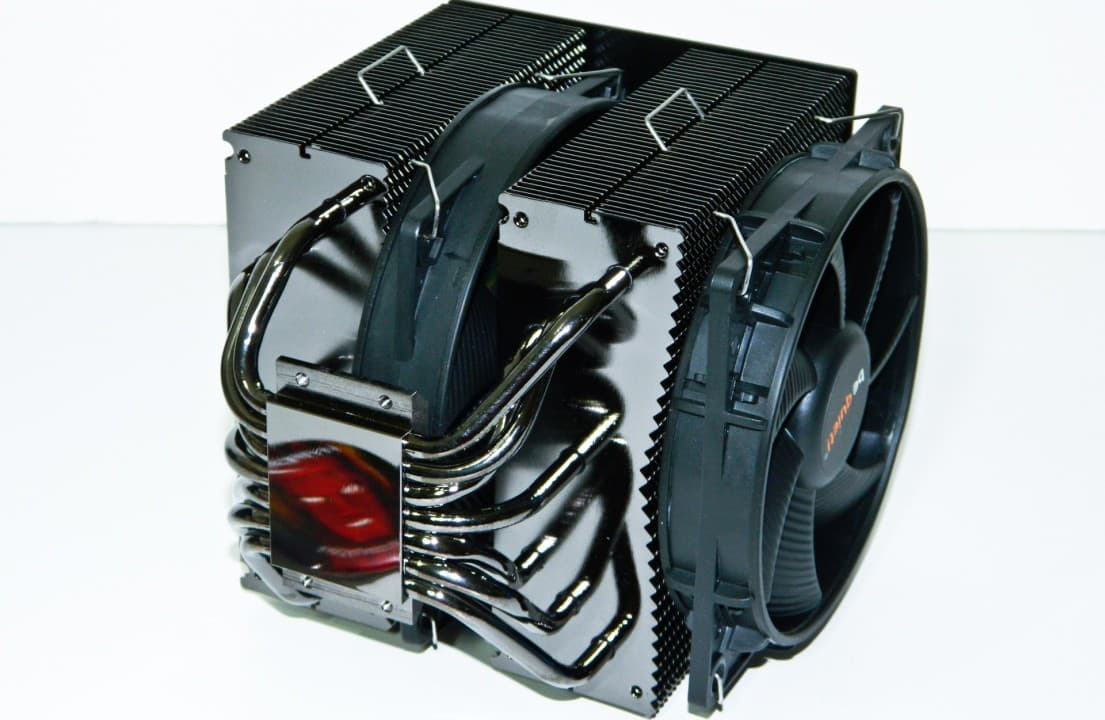
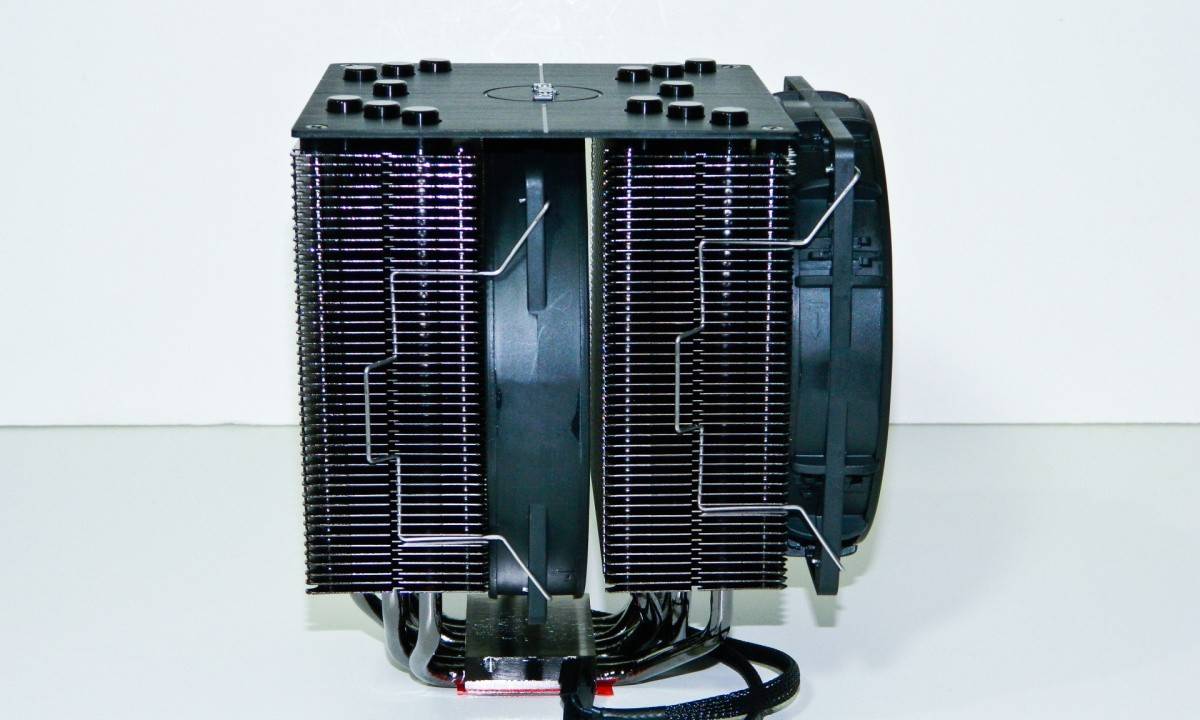
There is no arguing that bequiet! put a great deal of effort in to designing a very attractive, high performance CPU cooler. In fact, their entire CPU cooler line is actually very well designed and no doubt should perform relatively well given that the base designs are all similar. The Dark Rock Pro 2 was also designed for maximum cooling without creating a ruckus common to many high performance coolers. That means double radiators, double fans, and of course double the size. It’s just nice to see it also means doubling up on the polished “dark theme” and adding a much needed level of quality to the fit and finish that few coolers have.
As bequiet! prepares to offer the cooler here in North America, its only weakness may be the pricing. The Dark Rock Pro 2 will rival the cost of the top coolers like the Noctua NH-D14, but as we mentioned in the beginning, they want to have fit, finish and an appealing design that wins users over. On design alone, the bequiet! clearly bests the somewhat odd Noctua “beige/brown” motif. Plus, with nearly full assembly out of the box, it’ll give enthusiasts a much more refined user experience that is somewhat expected of anything coming from a German company.
If quiet, high performance cooling wrapped with a very attractive theme is what you’re looking for in a CPU cooler, keep your eye out for this bad boy launching soon. And start saving for it now.
Pros
- High quality materials
- Quiet operation
- Good cooling performance
- Very attractive design
Cons
- Current mounting system is tedious
- Premium design will command premium price
Overall Ratings: 8.5 / 10.0

Help Us Improve Our Reviews By Leaving a Comment Below!