Extreme Installation
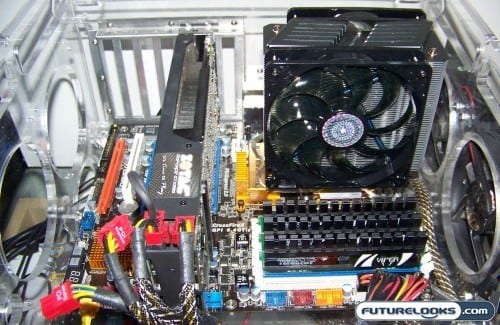
One thing worth mentioning is that there’s plenty of space around the CPU socket should you desire to install a monstrous CPU tower cooler. There’s even a little extra room between the socket and the memory (DIMM) slots which is where most of the issues occur (points angrily at the EVGA X58 Classified). To put this to the test, I installed a rather huge Coolermaster CPU Cooler which includes two 120mm fans. Yep! Lot’s of room!
Here are the test system’s magical components carefully chosen, as foretold in ancient Chinese writings:
- Intel Core i7 975 Extreme Edition [D0 Stepping] Processor
- Motherboard 1: ASRock X58 Extreme Motherboard (As reviewed)
- Motherboard 2: ECS Black Series X58B-A “Nehalem” Motherboard
- Patriot Memory Viper II 2000 MHz 6GB Triple Channel
- Zotac Geforce GTX295 Videocard
- Kingston SSDnow V-Series 128GB Solid State Hard Drive
- Kingwin 1000 Watt Mach-I Power Supply
Installing the latest drivers and BIOS went quite smoothly. With the updated BIOS file on a USB pen drive, the built-in BIOS utility makes the process super easy. Dare I say this is easier and safer than attempting anything from Windows since you never know if your OS is suddenly going to choke.
As for the BIOS itself, the overall layout is actually an all new experience compared to past versions. Some of the settings are quite easy to understand due to their better stated explanations. I particularly liked the detail at which all of the CPU, memory, and voltage settings offer the end user. Otherwise, only a couple supporting items like tying the IDE and 1394 Firewire together in to one setting seemed a little odd.
Overclocking and Tweaking

There’s two ways you can overclock your ASRock X58 Extreme. One way is to install and use the ASRock OC Tuner. It works fine for some small basic overclocking. But, as with all OC utlilities, they don’t always do as well as using the BIOS options.
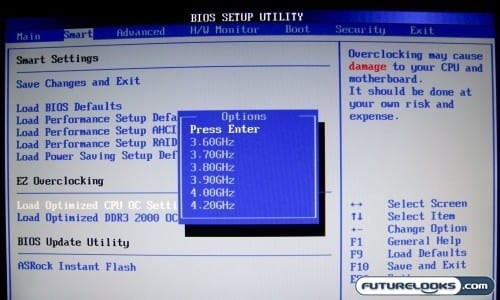
The automated overclocking settings in the BIOS offer choices ranging from 3.6 GHz to 4.2 GHz. Since this is an “extreme” motherboard, I passed all the other choices and went straight to 4.2 GHz. The system booted and proceeded straight in to Windows as though nothing changed at all, except the extra performance.
With more manual tweaking and lowering the Multiplier, the system was able to reach a 205 MHz CPU Bus Speed (Bclk). What this means is you should be able to reach a decent overclock with a Core i7 920 and 940. Pushing the CPU Bus any higher wasn’t quite smooth despite the system’s eagerness. It’s very possible that increasing the VTT and PLL voltages can allow something higher. It comes down to what you’re willing to risk.
One thing that is quite common when overclocking a motherboard is finding a maximum stable memory frequency. As you push the CPU past a certain point, the motherboard can’t balance the two extreme frequencies. In this case, the 2000 MHz memory had to be dropped to 1866 MHz which wasn’t the end of the world especially since the CAS Latency could be lowered from 8 to 7 offering some extra system performance.